In the ever-evolving world of technology, keeping your hardware running smoothly is paramount. Whether you’re a seasoned tech enthusiast or a digital novice, understanding how to install drivers is a fundamental skill. Drivers, often referred to as device drivers, are essentially software programs that act as translators between your operating system (like Windows or macOS) and your hardware components. Without the correct drivers, your devices – from your graphics card to your printer and even your Wi-Fi adapter – might not function at all, or they could perform poorly. This guide will walk you through the essential steps and considerations for installing and managing drivers, ensuring your digital ecosystem operates at its peak.
The Crucial Role of Drivers in Your Digital Ecosystem
Before we dive into the installation process, it’s vital to understand why drivers are so important. Think of your operating system as the brain of your computer and your hardware as the limbs and senses. The drivers are the nerves connecting the brain to these external components. They provide the necessary instructions for the operating system to communicate with, control, and utilize the full capabilities of each piece of hardware.
Why Incorrect or Outdated Drivers Cause Problems
The consequences of missing, corrupted, or outdated drivers can range from minor annoyances to significant system instability. You might encounter:
- Device Malfunctions: A new webcam might not be recognized, a printer might refuse to print, or your sound might cut out intermittently.
- Performance Degradation: Graphics drivers, in particular, can significantly impact gaming performance, video playback, and overall graphical rendering speed. Outdated drivers often lead to lag, stuttering, and lower frame rates.
- System Crashes and Blue Screens: In severe cases, incompatible or faulty drivers can lead to unexpected system shutdowns, often accompanied by the dreaded “Blue Screen of Death” (BSOD) on Windows.
- Security Vulnerabilities: Like any software, drivers can have security flaws. Keeping them updated can patch these vulnerabilities, protecting your system from potential exploits.
- Incompatibility Issues: New hardware often requires updated drivers to work correctly with your current operating system, especially after an OS update.
Therefore, maintaining your drivers is not just about performance; it’s also about the stability and security of your entire computing experience.
Navigating the Driver Installation Landscape
The process of installing drivers can vary depending on the type of hardware and your operating system. However, there are several common methods that cover the vast majority of scenarios. We’ll explore the most reliable and straightforward approaches.
H3: Automatic Driver Installation: The OS-Managed Approach
Modern operating systems are incredibly adept at managing hardware. When you connect a new device, or when you first install an operating system, Windows, macOS, and Linux often attempt to identify the hardware and install suitable drivers automatically.
How Windows Handles Automatic Driver Installation
Windows has a vast built-in library of drivers. For many common peripherals like USB mice, keyboards, and basic webcams, plugging them in is often all that’s required. Windows will detect the device, search its internal database, and install the necessary driver. You’ll usually see a notification in the system tray indicating that new hardware is being set up.
When does Windows Update provide drivers?
Windows Update isn’t just for operating system patches. It also serves as a distribution channel for hardware driver updates. Microsoft works with hardware manufacturers to certify drivers for compatibility with Windows. When these certified drivers become available, they can be delivered through Windows Update.
- How to Check for Windows Updates (Including Driver Updates):
- Go to Settings.
- Click on Update & Security (Windows 10) or Windows Update (Windows 11).
- Click Check for updates.
- Windows will scan for available OS updates and driver updates. If drivers are found, they will usually be listed under “Optional updates” or directly in the main update section.
- Click Download and install for any updates you wish to apply.
While automatic installation is convenient, it doesn’t always provide the latest or most feature-rich drivers. For specialized hardware like high-end graphics cards or advanced audio interfaces, manual installation from the manufacturer is often recommended for optimal performance.
macOS and Driver Management
macOS generally takes a more integrated approach. Hardware compatibility is a core tenet of Apple’s ecosystem, and most peripherals designed for Mac will work out-of-the-box with Apple’s own drivers. For devices that require specific software, it’s usually provided as an application rather than a separate driver package. Updates for this bundled software are typically handled through the App Store or via System Settings > General > Software Update.
H3: Manual Driver Installation: The Manufacturer-Controlled Method
For many components, especially those that require advanced configuration or offer specific performance enhancements (like graphics cards, network adapters, or printers), the best drivers are often found directly on the manufacturer’s website. This method gives you the most control and ensures you’re getting the latest stable release optimized for your specific hardware model.
Step-by-Step Manual Driver Installation
-
Identify Your Hardware: The first crucial step is to know exactly what hardware you need a driver for.
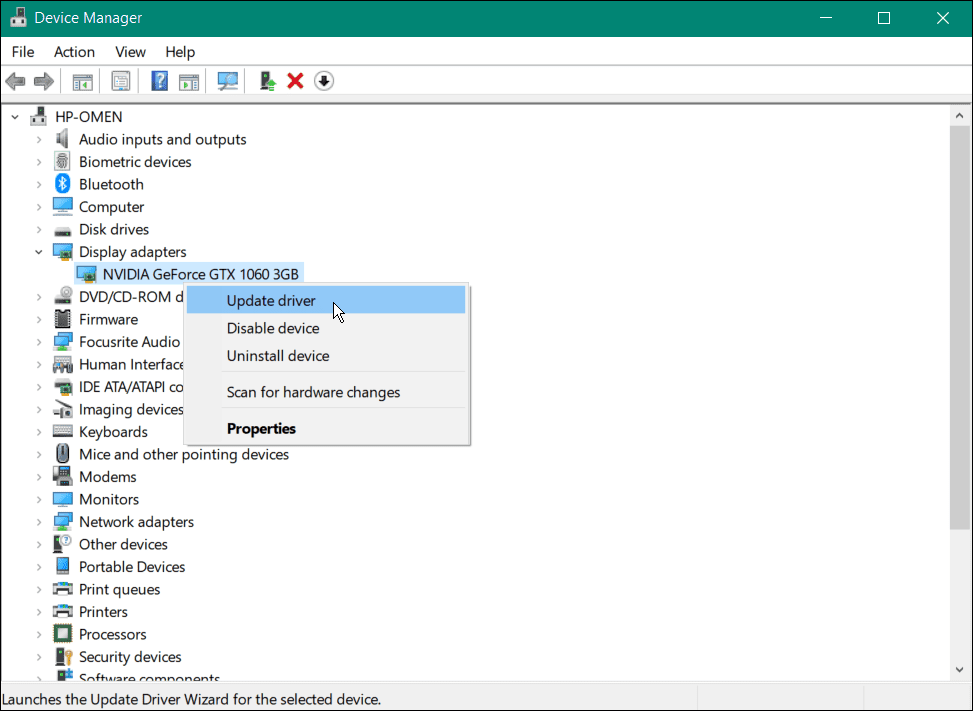
- For built-in components: You can usually find this information in Device Manager (Windows) by right-clicking the Start button and selecting “Device Manager.” Expand the relevant category (e.g., “Display adapters” for graphics cards, “Network adapters” for Wi-Fi/Ethernet). Right-click the device and select “Properties.” The “General” tab will show the device name and manufacturer.
- For external devices: Check the device itself, its packaging, or its manual. The model number and manufacturer will be clearly listed.
-
Locate the Manufacturer’s Support Website: Once you have the hardware details, visit the official website of the manufacturer (e.g., NVIDIA, AMD, Intel, HP, Epson). Look for a “Support,” “Downloads,” or “Drivers” section.

-
Search for Your Specific Model: On the support page, you’ll typically need to enter your product name, model number, or serial number. Some sites may also ask for your operating system version (e.g., Windows 11 64-bit). Be precise to ensure you download the correct driver.
-
Download the Driver Installer: Select the appropriate driver package for your operating system and hardware. It will usually be an executable file (.exe on Windows). Download this file to a convenient location, such as your Desktop or Downloads folder.
-
Run the Installer:
- Close other applications: Before running the driver installer, it’s a good practice to close any unnecessary programs to prevent conflicts.
- Execute the downloaded file: Double-click the downloaded .exe file.
- Follow the on-screen prompts: Most driver installers have a wizard-like interface. Read the instructions carefully and accept any license agreements. You might have options for “Express” or “Custom” installation. “Express” is usually fine for most users, while “Custom” allows you to select specific components if you know what you’re doing.
- Restart your computer: Many driver installations require a system restart to complete the process. This is crucial for the changes to take effect.
What to Do if the Installer Fails
- Re-download the driver: The download might have been corrupted.
- Verify your operating system: Ensure you downloaded the driver for the correct version and architecture (32-bit or 64-bit) of your OS.
- Run as administrator: Right-click the installer file and select “Run as administrator.”
- Check for OS updates: Sometimes, a pending OS update is required for a driver to install correctly.
H2: Advanced Driver Management and Troubleshooting
Beyond basic installation, managing your drivers effectively can prevent future issues and optimize your system’s performance. This includes updating drivers proactively and knowing how to troubleshoot when something goes wrong.
H3: Keeping Drivers Up-to-Date: Proactive Maintenance
Regularly updating your drivers is a cornerstone of good computer maintenance. While automatic updates can catch some driver revisions, a manual check on manufacturer websites is often the most reliable way to ensure you have the latest versions.
When should you update drivers?
- After a new hardware installation: Essential for initial setup.
- When experiencing performance issues: Especially with graphics, audio, or networking.
- After a major operating system update: OS updates can sometimes require new drivers for compatibility.
- When a new driver version is released: Manufacturers often release updates to improve performance, fix bugs, or add new features.
Driver Updater Software: Use with Caution
There are numerous third-party “driver updater” tools available, often promising to scan your system and automatically update all your drivers. While some of these tools can be helpful, many are unreliable, may install incorrect drivers, or even bundle malware.
- Recommendation: Stick to the automatic updates provided by your operating system (Windows Update) and manually download drivers directly from the hardware manufacturer’s website. If you choose to use a third-party tool, research it thoroughly, read reviews from trusted sources, and be prepared to uninstall it if it causes problems.
H3: Troubleshooting Common Driver Problems
Even with the best practices, driver issues can arise. Here’s how to tackle some common scenarios:
Undoing a Problematic Driver Installation
If a newly installed driver causes issues, the first step is often to roll back to the previous version.
- How to Roll Back a Driver in Windows:
- Open Device Manager.
- Locate the device with the problematic driver.
- Right-click the device and select Properties.
- Go to the Driver tab.
- Click Roll Back Driver. If this option is greyed out, it means there isn’t a previous driver to revert to, and you may need to uninstall and reinstall an older, known-good driver.
- Follow the prompts and restart your computer.
Uninstalling and Reinstalling Drivers
Sometimes, a complete reinstallation is necessary to fix a corrupted driver.
- How to Uninstall a Driver in Windows:
- Open Device Manager.
- Locate the device.
- Right-click the device and select Uninstall device.
- Crucially, if prompted, check the box that says “Delete the driver software for this device” (or similar wording). This ensures the problematic driver files are removed.
- Restart your computer. Windows will then attempt to reinstall the driver automatically, or you can manually install a fresh copy from the manufacturer.
Using the Built-in Troubleshooter (Windows)
Windows has built-in troubleshooters that can often diagnose and fix common hardware and driver problems.
- Access them via Settings > Update & Security > Troubleshoot (Windows 10) or Settings > System > Troubleshoot > Other troubleshooters (Windows 11).
By understanding these methods and approaching driver management with a proactive mindset, you can significantly enhance the stability, performance, and overall usability of your computer and its connected devices. Keeping your drivers in order is a key step to unlocking the full potential of your technology.
aViewFromTheCave is a participant in the Amazon Services LLC Associates Program, an affiliate advertising program designed to provide a means for sites to earn advertising fees by advertising and linking to Amazon.com. Amazon, the Amazon logo, AmazonSupply, and the AmazonSupply logo are trademarks of Amazon.com, Inc. or its affiliates. As an Amazon Associate we earn affiliate commissions from qualifying purchases.