In the rapidly evolving landscape of smart home technology, the Nest Thermostat has emerged as a cornerstone, offering not just temperature control but also significant energy savings and enhanced convenience. Its intuitive design and sophisticated learning capabilities have made it a popular choice for homeowners looking to upgrade their traditional thermostats. While the prospect of a DIY installation might seem daunting to some, the process is surprisingly straightforward, especially when broken down into manageable steps. This guide will walk you through everything you need to know to successfully install your Nest Thermostat, ensuring you can begin enjoying its benefits without the need for professional assistance.

The decision to install a smart thermostat like the Nest is often driven by a desire for efficiency and modernization. Beyond the immediate convenience of remote control via a smartphone app, Nest thermostats are designed to learn your habits and adjust your home’s temperature accordingly, leading to substantial reductions in energy consumption and, consequently, lower utility bills. This aligns perfectly with the growing emphasis on personal finance and sustainable living, making the Nest Thermostat a wise investment for both your wallet and the environment.
This comprehensive guide aims to demystify the installation process. We will cover the essential preparations, the step-by-step wiring and mounting procedures, and the crucial final setup steps to get your Nest Thermostat up and running. Whether you’re a seasoned DIYer or a complete novice, this tutorial is designed to equip you with the confidence and knowledge to tackle the installation yourself.
Before You Begin: Essential Preparations for Nest Thermostat Installation
Embarking on any DIY project, especially one involving your home’s electrical system, requires careful planning and preparation. The Nest Thermostat is no exception. Before you even think about touching your old thermostat or unpacking your new Nest, a few key steps will ensure a smooth and safe installation. This preparatory phase is critical and often overlooked, but it lays the foundation for a successful outcome.
Compatibility Check: Ensuring Your HVAC System Works with Nest
The most important initial step is to verify your home’s HVAC (Heating, Ventilation, and Air Conditioning) system is compatible with the Nest Thermostat. While Nest thermostats are designed to work with a wide range of systems, there are exceptions, particularly with older or more complex setups like high-voltage systems or proprietary communication protocols.
How to Check Compatibility:
- Visit the Nest Compatibility Checker: Google, the manufacturer of Nest products, provides an online tool specifically for this purpose. You can find it by searching for “Nest thermostat compatibility checker” on their website. This tool will guide you through a series of questions about your current HVAC system.
- Identify Your Current Wiring: The compatibility checker will likely ask you about the wires connected to your existing thermostat. Before you start, it’s advisable to remove the faceplate of your current thermostat (after turning off the power, of course!) and take a clear picture of the wiring terminals and the wires connected to them. Make note of the labels next to each terminal.
- Common System Types: Nest thermostats generally work well with most 24-volt forced-air, radiant, heat pump, and high-efficiency furnaces and air conditioners. Systems that might pose compatibility issues include those with a high-voltage system (often found in older homes for electric baseboard heating), proprietary communication wires, or certain multi-stage heating and cooling setups.
Why is this critical? Installing a Nest thermostat on an incompatible system can lead to malfunctioning of your HVAC system, damage to the thermostat itself, or even safety hazards. Spending a few minutes on this step can save you a lot of headaches and potential repair costs down the line.
Gathering Your Tools and Supplies
Once you’ve confirmed compatibility, it’s time to gather the necessary tools. Having everything you need readily available will streamline the installation process and prevent frustrating interruptions.
Essential Tools:
- Screwdriver Set: You’ll likely need a Phillips head screwdriver and possibly a small flathead screwdriver for removing the old thermostat’s faceplate and mounting bracket.
- Wire Strippers/Cutters: If any wires need to be trimmed or stripped, these will be essential.
- Pliers: Small needle-nose pliers can be helpful for maneuvering wires in tight spaces.
- Level: To ensure your Nest thermostat is mounted straight on the wall.
- Drill and Drill Bits (Optional): If you need to drill new holes for mounting the Nest baseplate, a drill will be necessary.
- Pencil: For marking drilling or mounting points on the wall.
- Wall Anchors and Screws: These are usually included with the Nest Thermostat, but it’s good to have them on hand.
- Smartphone or Tablet: For the Nest app and Wi-Fi setup.
- Your Nest Thermostat and Baseplate: Unpack everything and ensure all components are present.
Safety First:
- Turn Off Power: This is the most crucial step. Before you do anything else, locate your home’s circuit breaker box and turn off the power to your HVAC system. There will typically be a breaker labeled “Furnace,” “Air Handler,” “HVAC,” or similar. Do not skip this step. It is essential for your safety. Test by trying to turn on your old thermostat or system to confirm the power is indeed off.
- Read the Manual: While this guide provides a comprehensive overview, always refer to the specific instruction manual that came with your Nest Thermostat. It contains detailed information tailored to your particular model.
The Installation Process: From Old Thermostat to New Nest
With preparations complete and safety ensured, you’re ready to begin the physical installation. This involves carefully removing your old thermostat and connecting the wires to your new Nest.
Removing Your Old Thermostat
This is where you’ll get hands-on. The process typically involves two main steps: removing the faceplate and then detaching the wall plate with the wiring.
- Remove the Old Thermostat’s Faceplate: Most older thermostats have a snap-on or screw-on faceplate. Gently pull on the bottom or sides of the faceplate, or unscrew it if there are visible screws. Be careful not to force it, as you could damage the unit or surrounding paint.
- Photograph the Wiring: Once the faceplate is off, you’ll see the wires connected to terminals. This is your most important reference point. Take a clear, well-lit photograph of the wiring. Ensure you can clearly see which wire is connected to which terminal letter (e.g., R, G, Y, W, C). If there are any wires you can’t identify or that aren’t connected to anything, make a note of them.
- Label the Wires: Using small pieces of tape or the labels provided with your Nest Thermostat, label each wire according to the terminal it’s connected to. For example, if a wire is connected to the “R” terminal, label that wire “R.” This labeling is essential for connecting them correctly to the Nest.
- Disconnect the Wires: Carefully loosen the terminal screws and detach each labeled wire. Make sure the wires don’t fall back into the wall. You can gently wrap them around a pencil or use a bit of tape to secure them temporarily.
- Remove the Old Wall Plate: Unscrew the old thermostat’s wall plate from the wall. Once it’s loose, pull it away from the wall, ensuring the wires come with it.
Installing the Nest Baseplate and Connecting Wires
Now it’s time to install the Nest thermostat’s hardware.
-
Position the Nest Baseplate: Hold the Nest baseplate against the wall where your old thermostat was. Use the built-in level to ensure it’s straight. If the existing hole is too large or unsightly, you may need to use the included trim plate behind the Nest baseplate to cover it. Mark the screw holes with a pencil.
-
Drill Holes and Mount the Baseplate (if necessary): If you’re drilling new holes, use a drill with an appropriate drill bit. If you’re mounting into drywall, you’ll likely need to insert wall anchors for a secure fit. Screw the Nest baseplate firmly to the wall.
-
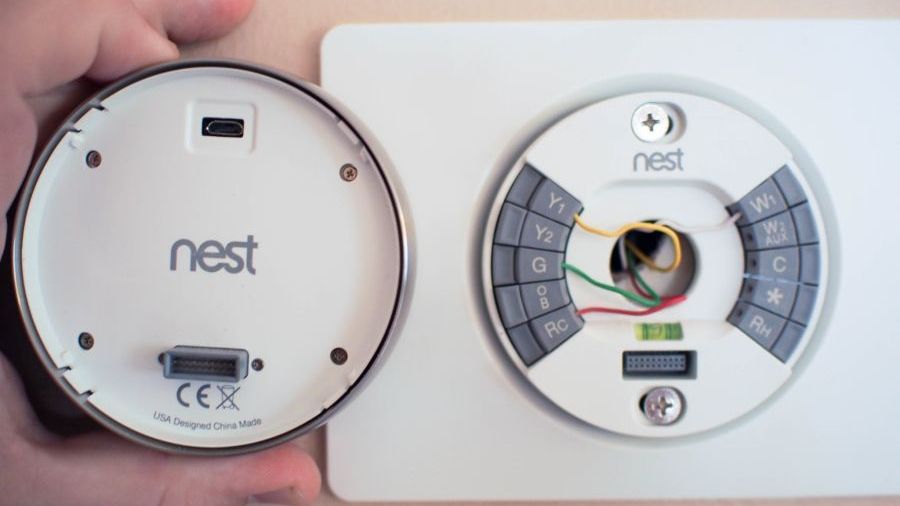
Connect the Wires to the Nest Baseplate: This is where your photograph and labels become invaluable. Refer to your photo and the labels on the wires. Insert each wire into the corresponding terminal on the Nest baseplate. The Nest uses a push-and-release connector system, so you’ll typically push down on a lever or button, insert the wire, and then release. Ensure the wire is securely seated.
- Common Wires:
- R (or Rh/Rc): Power wire. Most systems have one. If you have both Rh and Rc, Nest usually directs you to connect to Rc unless you have a specific setup.
- G: Fan wire.
- Y (or Y1): Cooling wire.
- W (or W1): Heating wire.
- C: Common wire. This wire provides continuous power to the thermostat. Many Nest thermostats (especially older models) require a C-wire for consistent power. If you don’t have a C-wire, you might need to use the Nest power connector (included with some models) or consult the Nest app for alternative solutions.
- Troubleshooting Wire Connections: Double-check that each wire is in the correct terminal and is securely connected. A loose wire is a common cause of installation issues.
- Common Wires:
-
Tuck Wires and Attach the Nest Display: Gently push any excess wire back into the wall opening. Then, align the Nest thermostat display with the baseplate and gently push it until it clicks into place.
Setting Up Your Nest Thermostat: Connecting to Wi-Fi and Personalizing Settings
With the hardware installed, the final phase is configuring the thermostat through its software and connecting it to your home’s Wi-Fi network. This is where you unlock the full potential of your smart thermostat.
Initial Power-Up and On-Screen Setup
Once the Nest display is attached, it should power on. The screen will guide you through the initial setup process.
- Language Selection: Choose your preferred language.
- Wi-Fi Connection: The Nest will scan for available Wi-Fi networks. Select your home network from the list and enter your Wi-Fi password. A stable internet connection is crucial for remote control and software updates.
- Location and Time Zone: Enter your home’s location to help Nest adjust for local weather patterns and set the correct time zone.
- HVAC System Configuration: The Nest will ask you to confirm the type of HVAC system you have. This information is based on the wiring you connected, but it’s good to confirm. It might ask about single-stage, multi-stage, heat pump, etc. Answer these questions accurately.
- Confirm Wire Setup: The Nest will often perform a quick check to ensure the wires are connected correctly based on the system type you’ve indicated. It will show you which terminals it detects are active.
Downloading the Nest App and Final Configuration
The true power of your Nest Thermostat is unleashed through the Nest app, available for iOS and Android devices.
- Download and Install the Nest App: Search for “Google Home” or “Nest” in your device’s app store and download the official application.
- Create or Log In to Your Google Account: You’ll need a Google account to use the Nest app. If you don’t have one, you can create one for free.
- Add Your Nest Thermostat: Within the Nest app, you’ll have an option to add a new device. Follow the on-screen prompts. This usually involves scanning a QR code displayed on the Nest Thermostat itself or entering a setup code.
- Personalize Settings: The app will guide you through setting up personalized schedules, defining your comfort preferences, and setting up energy-saving features like “Auto-Away” (which detects when no one is home and adjusts the temperature accordingly). You can also set up vacation modes, geofencing (adjusting temperature based on your phone’s location), and receive energy usage reports.
- Remote Access: Once set up, you can control your thermostat from anywhere in the world via the Nest app. Adjust the temperature, change modes, and monitor your energy usage all from your smartphone.
Testing Your Nest Thermostat
After setup, it’s essential to test all functions of your HVAC system to ensure everything is working correctly.
- Test Heating: Set the thermostat to a temperature higher than the current room temperature and ensure your heating system kicks on.
- Test Cooling: Set the thermostat to a temperature lower than the current room temperature and ensure your air conditioning system activates.
- Test Fan: Manually turn on the fan to ensure it’s circulating air.
If any of these tests fail, double-check your wiring connections against your initial photo and the Nest app’s troubleshooting guide.

Conclusion: Enjoying the Benefits of Your Smart Home Upgrade
Installing a Nest Thermostat is a rewarding DIY project that can lead to significant improvements in home comfort, energy efficiency, and convenience. By carefully following these steps, from ensuring compatibility and gathering tools to meticulously connecting wires and completing the app setup, you can successfully upgrade your home’s climate control system.
The Nest Thermostat is more than just a temperature regulator; it’s a smart device that integrates seamlessly into your digital life, offering insights into your energy consumption and contributing to a more sustainable lifestyle. This upgrade represents a smart investment in both your personal finance through potential energy savings and your overall quality of life. With your new Nest Thermostat installed and configured, you’re well on your way to enjoying a more comfortable, efficient, and connected home.
aViewFromTheCave is a participant in the Amazon Services LLC Associates Program, an affiliate advertising program designed to provide a means for sites to earn advertising fees by advertising and linking to Amazon.com. Amazon, the Amazon logo, AmazonSupply, and the AmazonSupply logo are trademarks of Amazon.com, Inc. or its affiliates. As an Amazon Associate we earn affiliate commissions from qualifying purchases.