In the intricate world of Windows operating systems, managing system components, updates, and drivers often feels like navigating a labyrinth. While Windows Update typically handles most installations seamlessly, there are critical instances where users, IT professionals, or system administrators need to take matters into their own hands. This is where the venerable .CAB file format comes into play. A .CAB file, short for “Cabinet” file, is a Microsoft-proprietary archive file format used for compressing and storing various types of data, most notably system files, device drivers, and crucial updates for Windows.
Understanding how to properly install .CAB files manually is not just a technical skill; it’s an essential capability for maintaining system stability, troubleshooting persistent issues, or deploying specific versions of software or drivers. This guide delves deep into the mechanisms behind .CAB files, outlines scenarios where manual intervention becomes indispensable, and provides step-by-step instructions on utilizing powerful command-line tools like DISM and PowerShell for effective installation. By mastering these techniques, you empower yourself with greater control over your Windows environment, ensuring optimal performance and security even when automated processes fall short.
Understanding .CAB Files: What Are They and Why They Matter
Before we dive into the “how-to,” it’s crucial to grasp the “what” and “why” behind .CAB files. These files are more than just simple archives; they are a fundamental component of Windows package management, often critical for the health and functionality of your operating system.
The Anatomy of a Cabinet File
A Cabinet (.CAB) file is a data compression and archiving format developed by Microsoft. It’s designed to bundle multiple files into a single, compressed package, making it efficient for distribution and installation. While similar in concept to other archive formats like .ZIP or .RAR, .CAB files hold a special place within the Windows ecosystem due to their specific integration with Microsoft’s installation and update mechanisms.
Key characteristics of .CAB files include:
- Compression: They employ various compression algorithms (such as LZX, Quantum, and ZIP) to reduce file size, which is beneficial for faster downloads and efficient storage.
- Integrity Checks:
.CABfiles often include checksums or digital signatures, allowing the operating system to verify the integrity of the contained files and ensure they haven’t been tampered with. This is a critical security feature, especially for system updates. - Metadata: They can store metadata about the files they contain, such as version numbers, dependency information, and installation instructions, which are vital for the Windows installer services to correctly deploy the package.
- Historical Significance: The
.CABformat has been a cornerstone of Windows software distribution since the early versions of the OS, remaining relevant even in modern iterations.
Common uses of .CAB files within Windows include:
- Windows Updates: Many Windows updates, especially cumulative updates and security patches, are distributed as
.CABfiles. - Device Drivers: Manufacturers often package device drivers into
.CABfiles, particularly for hardware that requires specific versions or has complex installation routines. - Optional Features: Certain optional Windows features, like specific language packs or legacy components, might be available as
.CABfiles for manual installation. - System Components: Critical system files and service packs are frequently delivered in this format.
Understanding that a .CAB file is a self-contained, often digitally signed, and compressed package designed for specific system-level installations helps demystify its role and underscores the importance of handling it correctly.
Scenarios Demanding Manual .CAB Installation
While Windows Update strives for automation, there are numerous legitimate and critical scenarios where manual .CAB file installation becomes not just an option, but a necessity. These situations often arise when automated processes fail, specific versions are required, or internet access is limited.
-
Offline Updates and Installations: In environments with limited or no internet connectivity, or for air-gapped systems, downloading
.CABfiles on an internet-connected machine and then transferring them for manual installation is the only way to apply updates or install features. This is crucial for maintaining security and functionality in isolated networks. -
Troubleshooting Windows Update Failures: When Windows Update gets stuck, repeatedly fails to install a specific update, or reports enigmatic error codes, manually installing the problematic update’s
.CABfile can often bypass the automated system’s glitches. This method allows users to pinpoint the failing component and force its installation. -
Installing Specific Driver Versions: Sometimes, a newer driver pushed by Windows Update might introduce instability or compatibility issues with specific hardware or software. In such cases, IT professionals might need to revert to or install an older, more stable
.CABdriver package directly from the manufacturer’s website to resolve conflicts. Conversely, a critical bug fix might be available as a.CABfile before it’s officially rolled out via Windows Update. -
Adding Optional Windows Features: Certain optional features, particularly in enterprise or specialized versions of Windows, might not be readily available through the graphical user interface. Their
.CABfiles can be sourced and installed manually to enable specific functionalities. -
System Recovery and Repair: During system recovery operations, or when Windows components are corrupted, manually installing known good
.CABfiles for those components can be a part of the repair process, helping to restore system integrity. -
Advanced System Management for IT Professionals: For IT departments managing large fleets of computers, manual
.CABinstallation provides granular control. It’s often integrated into deployment scripts for ensuring consistent system configurations across multiple machines, or for applying critical patches in a controlled manner outside of standard update cycles.
In each of these scenarios, the ability to manually install a .CAB file transforms from a niche trick into a vital tool for effective Windows management and troubleshooting.
Method 1: Installing .CAB Files Using DISM (Deployment Image Servicing and Management)
When it comes to robust Windows component management from the command line, DISM is the undisputed heavyweight. It’s the primary tool recommended by Microsoft for servicing Windows images and preparing them for deployment, but it’s equally powerful for managing the live operating system.
The Power of DISM: A System Administrator’s Friend
DISM is a command-line tool used to service a Windows image or prepare a Windows Preinstallation Environment (Windows PE) image. It can be used to service a Windows image (.wim) or a virtual hard disk (.vhd or .vhdx). For .CAB file installations, DISM interacts directly with the Windows Component Store, which is where all system components and updates are managed.
Why DISM is preferred for .CAB installation:
- System-Level Integration: DISM integrates the
.CABpackage directly into the Windows Component Store, ensuring that the system recognizes it as an officially installed update or feature. This is critical for system stability and future updates. - Dependency Resolution: While not fully automated, DISM can sometimes provide more informative feedback on dependency issues compared to simpler methods, aiding in troubleshooting.
- Robustness: Designed for enterprise environments, DISM operations are generally more robust and provide detailed logging, which is invaluable for diagnosing complex installation failures.
- Online and Offline Servicing: DISM can service both a running operating system (online) and a Windows installation image that is not currently booted (offline), offering flexibility for various scenarios.
When you need to ensure a .CAB file is properly integrated into the Windows operating system as a genuine package, especially for system updates or features, DISM is almost always the preferred and most reliable method.
Step-by-Step DISM Installation Guide
Installing a .CAB file using DISM is a straightforward process once you understand the command syntax. It requires administrator privileges.
Prerequisites:
- The
.CABfile you wish to install. - The exact path to the
.CABfile. - Administrator access to the computer.
Steps:
-
Open Command Prompt as Administrator:
- Click the Start button.
- Type
cmdin the search bar. - Right-click on “Command Prompt” in the search results.
- Select “Run as administrator.”
- Confirm the User Account Control (UAC) prompt if it appears.
-
Navigate (Optional but Recommended):
- If your
.CABfile is in a complex path, you might find it easier to copy it to a simple location likeC:tempor directly to the root of a drive. For example, if your file is atC:UsersYourNameDownloadsupdate.cab, you might copy it toC:tempupdate.cab.
- If your
-
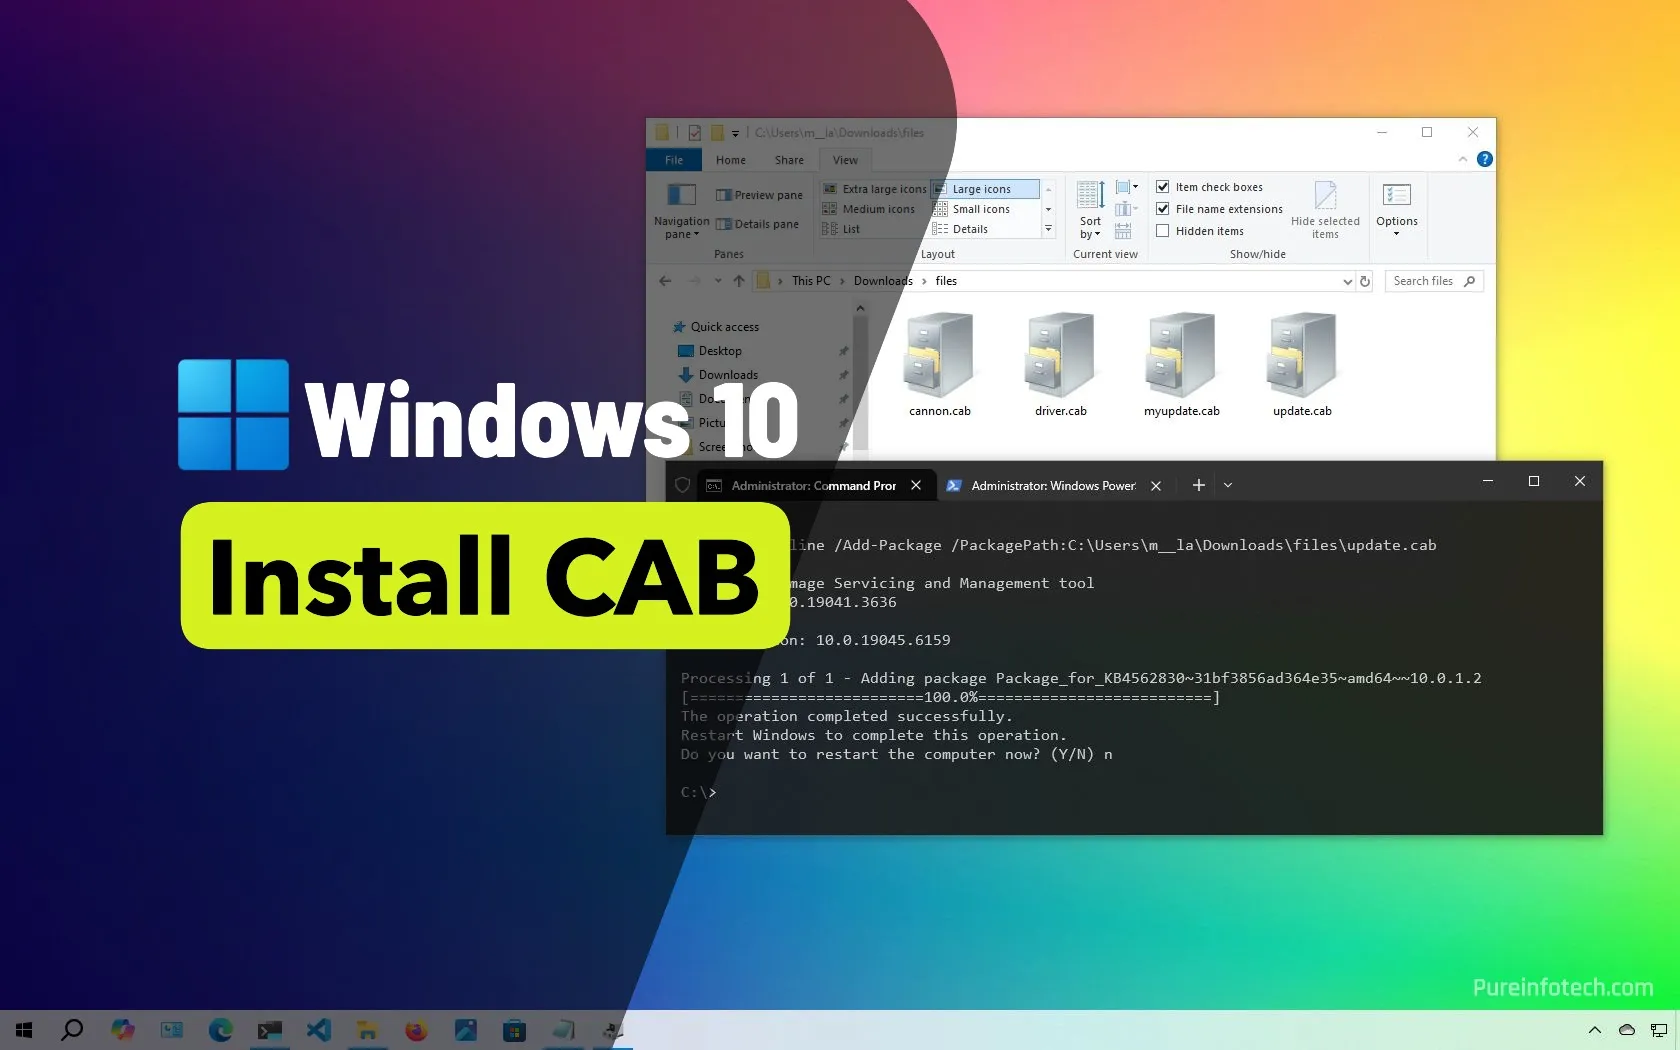
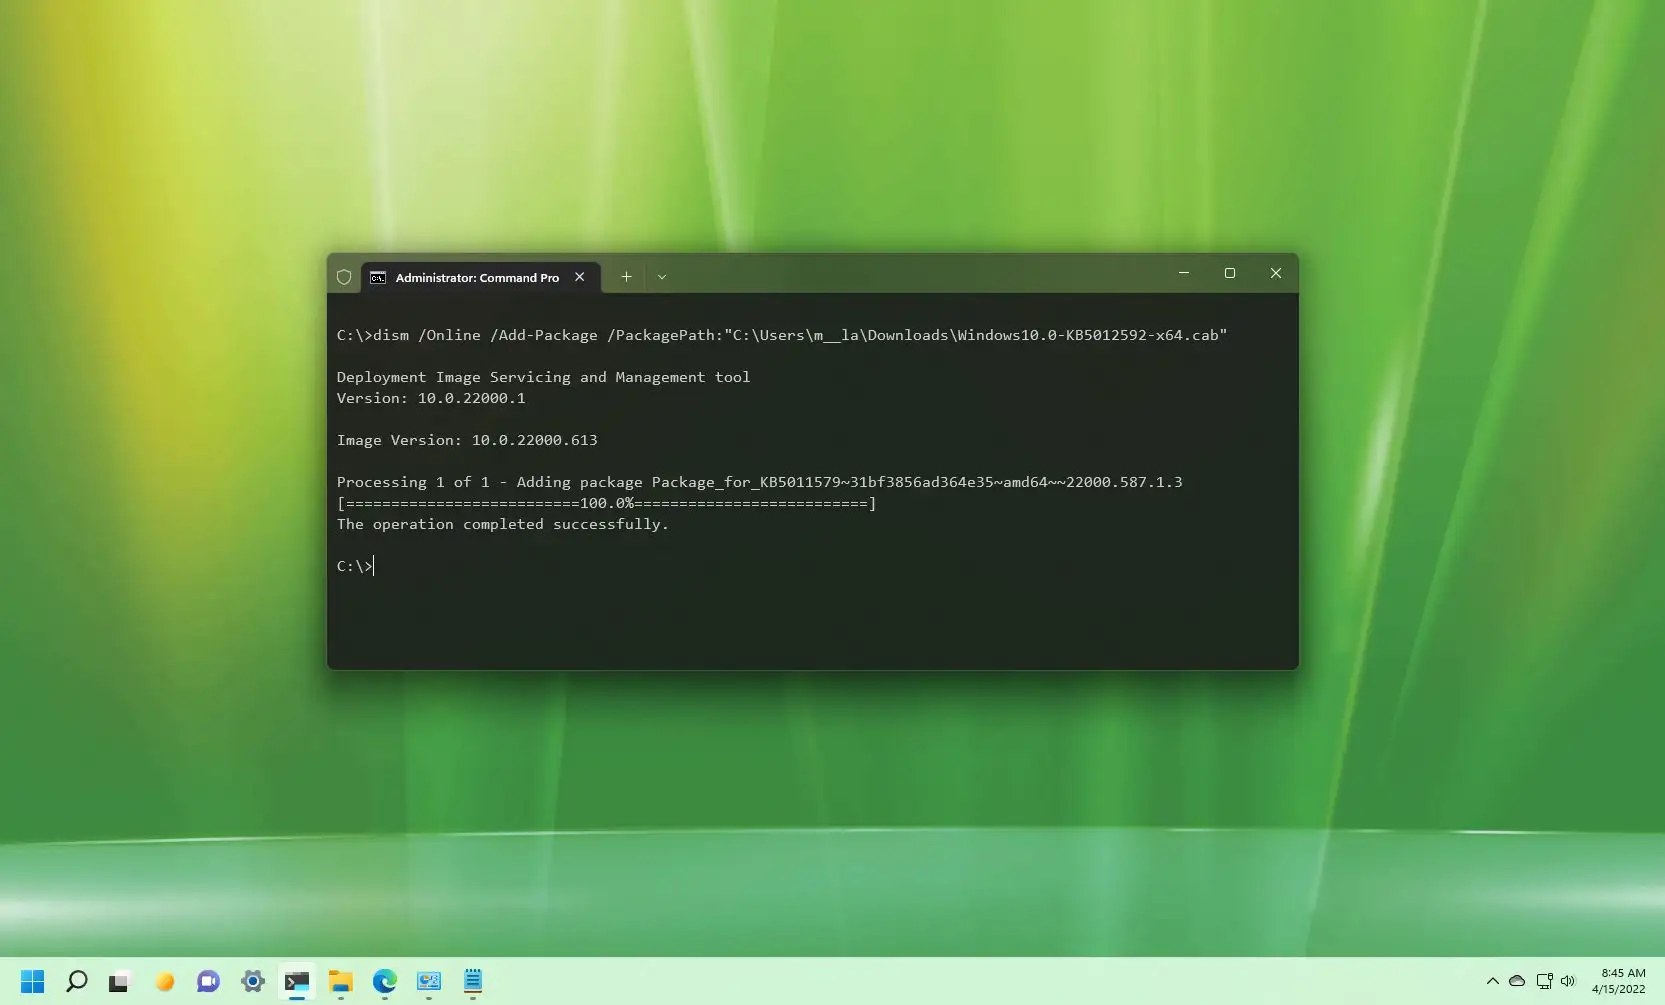
Execute the DISM Command:
- In the elevated Command Prompt window, type the following command and press Enter:
dism /online /add-package /packagepath:"C:pathtoyourfile.cab"- Explanation of parameters:
dism: Invokes the Deployment Image Servicing and Management tool./online: Specifies that the operation should be performed on the currently running operating system. If you were servicing an offline image, you would use/image:C:pathtoimage./add-package: Instructs DISM to add a package (your.CABfile) to the Windows image./packagepath:"C:pathtoyourfile.cab": Specifies the full path to the.CABfile you want to install. Important: Always enclose the path in double quotes if it contains spaces.
Example: If your file is named
KB12345678.caband is located inC:Updates, the command would be:dism /online /add-package /packagepath:"C:UpdatesKB12345678.cab" -
Monitor the Installation Process:
- DISM will display a progress bar. The installation might take several minutes, depending on the size of the
.CABfile and your system’s performance. - Upon successful completion, you will see a message indicating “The operation completed successfully.”
- DISM will display a progress bar. The installation might take several minutes, depending on the size of the
-
Restart Your System (If Prompted or Necessary):
- Some
.CABinstallations require a system restart to finalize the changes. If DISM prompts you to restart, do so immediately. Even if it doesn’t prompt, it’s often a good practice to restart after installing significant system updates.
- Some
Troubleshooting Common DISM Errors:
- Error 0x800f081f (The specified package is not a valid Windows package): This usually means the
.CABfile is corrupted, incomplete, or not intended for your specific version of Windows. Double-check the source and integrity of the file. - Error 0x80070002 (The system cannot find the file specified): The path to your
.CABfile is incorrect. Verify the filename and path, and ensure you’ve enclosed it in quotes if there are spaces. - Error 0x80070005 (Access is denied): You did not run Command Prompt as an administrator. Close and reopen Command Prompt with administrative privileges.
- Error 0x800f0906 (The source files could not be downloaded): This might occur if the
.CABfile has dependencies that DISM tries to download but fails. Ensure internet connectivity or provide the dependency.CABfiles locally.
By following these steps carefully, you can reliably install .CAB files and manage your Windows components with precision using DISM.
Method 2: Leveraging PowerShell for .CAB Package Management
For users and administrators comfortable with scripting and modern command-line interfaces, PowerShell offers an equally powerful, and sometimes more flexible, alternative to DISM for installing .CAB files. PowerShell builds upon the functionality of previous command shells and provides a rich environment for system administration.
PowerShell: Modern Command-Line Control
PowerShell is a cross-platform command-line shell and scripting language developed by Microsoft. It’s designed for automating and managing tasks across various operating systems and services. Unlike the traditional Command Prompt, PowerShell uses “cmdlets” (pronounced “command-lets”) – lightweight command-line tools designed for specific functions – which are generally more descriptive and object-oriented.
Why PowerShell is favored for automation and scripting:
- Object-Oriented: PowerShell cmdlets operate on objects rather than plain text, allowing for more precise data manipulation and chaining of commands.
- Rich Functionality: It provides extensive cmdlets for managing almost every aspect of Windows, from file systems and services to network configurations and user accounts.
- Scriptability: PowerShell scripts can automate complex sequences of tasks, making it a go-to tool for IT professionals for deployment, configuration, and monitoring.
- Unified Interface: It offers a consistent environment for managing both local and remote Windows systems, as well as cloud services like Azure.
For .CAB file installation, PowerShell provides a dedicated cmdlet that wraps the underlying DISM functionality, offering a potentially cleaner and more integrated experience, especially within scripts.
Installing .CAB Files via PowerShell Commands
The process for installing .CAB files via PowerShell is very similar to DISM but utilizes a more intuitive cmdlet.
Prerequisites:
- The
.CABfile you intend to install. - The exact path to the
.CABfile. - Administrator access to the computer.
Steps:
-
Open PowerShell as Administrator:
- Click the Start button.
- Type
powershellin the search bar. - Right-click on “Windows PowerShell” or “PowerShell” in the search results.
- Select “Run as administrator.”
- Confirm the User Account Control (UAC) prompt if it appears.
-
Execute the PowerShell Command:
- In the elevated PowerShell window, type the following command and press Enter:
Add-WindowsPackage -Online -PackagePath "C:pathtoyourfile.cab"- Explanation of parameters:
Add-WindowsPackage: This is the PowerShell cmdlet responsible for adding a.CABor.MSUpackage to a Windows image. It essentially performs the same action asdism /add-package.-Online: Similar to DISM, this parameter specifies that the operation should be performed on the currently running operating system.-PackagePath "C:pathtoyourfile.cab": Specifies the full path to the.CABfile you want to install. Again, use double quotes for paths containing spaces.
Example: If your file is
driver_update.caband is located inD:Drivers, the command would be:Add-WindowsPackage -Online -PackagePath "D:Driversdriver_update.cab" -
Monitor the Installation Process:
- PowerShell will display status updates and a progress bar. The installation might take a few moments.
- Upon successful completion, you should see output indicating the operation completed successfully, often followed by a prompt for reboot if necessary.
-
Restart Your System (If Prompted or Necessary):
- Just like with DISM, certain package installations require a system restart. If prompted by PowerShell or if you suspect it’s a critical update, restart your computer.
Comparison to DISM:
Functionally, Add-WindowsPackage in PowerShell often calls the same underlying DISM APIs. The primary differences are in syntax and environment. PowerShell’s cmdlets are designed for consistency, making it easier to learn if you’re already familiar with PowerShell, and providing richer output objects that can be easily processed in scripts. For a one-off installation, either DISM or PowerShell will achieve the same result. For automated deployments or complex scripting, PowerShell typically offers more versatility.
Troubleshooting Common PowerShell Errors:
Errors encountered with Add-WindowsPackage are usually similar to those of DISM, as they often stem from the same underlying issues (corrupted file, wrong path, permissions).
Add-WindowsPackage : The specified package is not applicable to this image.: The.CABfile is not compatible with your Windows version or architecture.Add-WindowsPackage : The path 'C:wrongpathfile.cab' was not found.: Verify the path and filename.Add-WindowsPackage : Access is denied.: Ensure PowerShell is running with administrator privileges.
Both DISM and PowerShell provide powerful, reliable ways to install .CAB files. Choose the tool that best fits your comfort level and the specific context of your task.
Best Practices and Critical Considerations for .CAB Installations
While manual .CAB installation offers a robust solution for various Windows management challenges, it also introduces responsibilities. Adhering to best practices is paramount to ensure system stability, security, and prevent unintended side effects.
Verifying File Integrity and Source Trustworthiness
This is arguably the most critical step before attempting any manual .CAB installation. Installing an untrusted or corrupted .CAB file can lead to severe system instability, security vulnerabilities, or even necessitate a full operating system reinstallation.
-
Source Trustworthiness:
- Official Microsoft Catalog: For Windows updates and drivers, the Microsoft Update Catalog is the most reliable source. You can search for specific KB numbers and download the corresponding
.CABfiles directly from Microsoft. - Official Vendor Websites: For device drivers, always download
.CABor other driver packages directly from the hardware manufacturer’s official support website. Avoid third-party driver download sites, as they can often bundle malware or provide outdated/incorrect drivers. - Reputable Internal Sources: In an enterprise setting, always use
.CABfiles provided by your organization’s IT department, which should have verified their integrity.
- Official Microsoft Catalog: For Windows updates and drivers, the Microsoft Update Catalog is the most reliable source. You can search for specific KB numbers and download the corresponding
-
File Integrity Verification:
- Digital Signatures: Most legitimate
.CABfiles from Microsoft or reputable vendors are digitally signed. Before installation, you can right-click the.CABfile, go to “Properties,” then “Digital Signatures” tab (if available). Verify that the signature is valid and comes from a trusted issuer (e.g., Microsoft Windows). - Checksum/Hash Verification: If the source provides a checksum (MD5, SHA1, SHA256) for the
.CABfile, always compare it with the checksum of your downloaded file. Tools like PowerShell’sGet-FileHashcmdlet can compute the hash:Get-FileHash -Algorithm SHA256 "C:pathtoyourfile.cab". Mismatched hashes indicate a corrupted or tampered file. - Antivirus Scan: Always run a comprehensive antivirus scan on any downloaded
.CABfile before proceeding with installation.
- Digital Signatures: Most legitimate
Never install a .CAB file if you are unsure of its origin or if its integrity cannot be verified. The risk of compromising your system far outweighs the potential benefits.
Essential Pre-Installation Steps
Before executing any DISM or PowerShell command, take these preparatory measures to safeguard your system:
-
Create a System Restore Point: This is your safety net. A system restore point allows you to revert your system to a previous working state if the
.CABinstallation causes unexpected issues.- Type “create a restore point” in the Windows search bar.
- Click “Create…” and follow the prompts to create a new restore point.
-
Backup Important Data: While a restore point helps with system files, it’s always wise to back up your personal documents, photos, and critical work files to an external drive or cloud service. This ensures data protection regardless of any system-level problems.
-
Ensure Administrator Privileges: As repeatedly mentioned, both DISM and PowerShell require elevated privileges to modify system components. Always run Command Prompt or PowerShell as an administrator.
-
Temporarily Disable Antivirus (with Caution): In rare cases, an active antivirus program might interfere with the installation process, especially if the
.CABfile contains system-critical components. If you encounter persistent errors that point to file access issues, consider temporarily disabling your antivirus only after you have thoroughly verified the.CABfile’s trustworthiness and integrity. Remember to re-enable it immediately after the installation. -
Close Unnecessary Applications: To minimize potential conflicts and ensure sufficient system resources, close any non-essential applications before starting the installation.
Post-Installation Verification and System Management
Once the .CAB file has been installed, a few final steps help confirm its successful integration and ensure long-term system health.
-
System Restart: Many
.CABinstallations, particularly those involving updates or drivers, require a system restart to fully apply the changes. If not prompted, a restart is often a good practice to ensure all components are properly loaded. -
Check for Functionality: If the
.CABfile was intended to fix a specific issue or enable a new feature, test that functionality immediately after the restart. For driver updates, verify the driver version in Device Manager. For Windows updates, check the update history in Settings. -
Review Event Logs: The Windows Event Log can provide valuable insights into the installation process, noting any errors or warnings that might not have been visible in the command-line output.
- Type “Event Viewer” in the Windows search bar and open it.
- Navigate to “Windows Logs” -> “Setup” or “System” to look for entries related to the installation.
-
Monitor System Stability: For the next few days, pay attention to your system’s performance. Watch for unexpected crashes, freezes, or unusual behavior that might indicate a conflict with the newly installed
.CABpackage. If issues arise, the system restore point you created earlier will be invaluable. -
Re-enable Antivirus: If you temporarily disabled your antivirus, ensure it is re-enabled and fully functional immediately after confirming the installation.
By diligently following these best practices, you can confidently navigate the complexities of manual .CAB file installations, minimizing risks and ensuring a stable, secure, and well-managed Windows environment. This advanced skill is a testament to the granular control that tech enthusiasts and professionals can exert over their operating systems, bridging gaps where automated solutions might fall short and contributing significantly to digital security and productivity.

Conclusion
The ability to manually install .CAB files stands as a testament to the depth of control available within the Windows operating system, offering a critical pathway for system administrators, IT professionals, and advanced users to manage their computing environments with precision. While often overshadowed by the convenience of automated updates, understanding the “how-to” of .CAB package installation using tools like DISM and PowerShell empowers you to troubleshoot elusive problems, deploy specific software versions, and maintain system integrity in challenging scenarios.
We’ve explored the fundamental nature of .CAB files, their critical role in Windows packaging, and the diverse situations where manual intervention becomes indispensable. From mitigating Windows Update failures and deploying offline patches to installing precise driver versions and customizing system features, the command line offers a robust and reliable solution. By meticulously following the step-by-step guides for both DISM and PowerShell, you gain proficiency in two of the most powerful system management tools available in Windows.
Beyond the technical commands, the emphasis on best practices—such as verifying file integrity, safeguarding your system with restore points, and conducting thorough post-installation checks—cannot be overstated. These precautions are your first line of defense against potential issues, ensuring that the power of manual installation is wielded responsibly and securely.
In an ever-evolving digital landscape, where technology trends shift rapidly and digital security is paramount, possessing such detailed technical knowledge contributes significantly to your overall tech literacy. It transforms you from a passive consumer of technology into an active manager, capable of optimizing, securing, and maintaining your systems to the highest standards. Mastering .CAB installation is not just about a single file type; it’s about embracing a proactive approach to technology management that enhances productivity, ensures stability, and fortifies your digital environment against unforeseen challenges.