
Despite the advent of Windows 11, Windows 10 remains a powerhouse in the operating system landscape, powering millions of personal computers and business workstations worldwide. Its familiarity, robust feature set, and extensive software compatibility make it a preferred choice for many users, whether they’re setting up a new machine, refreshing an older one, or troubleshooting persistent software issues with a clean install. Understanding how to properly install Windows 10 is a fundamental skill for any tech-savvy individual, offering not only practical benefits in terms of system performance and security but also contributing to a more efficient and reliable digital experience—a cornerstone of both personal and professional “digital brand” integrity.

This comprehensive guide will walk you through every step of the Windows 10 installation process, from initial preparations to post-installation optimization. We’ll delve into the technical requirements, strategic considerations, and even touch upon the financial prudence of a self-managed, proper installation. By the end, you’ll be equipped with the knowledge to confidently install Windows 10, ensuring a smooth, secure, and productive computing environment that aligns with your tech needs and safeguards your digital investment.
Preparing for a Seamless Windows 10 Installation
A successful Windows 10 installation isn’t just about clicking “next” repeatedly; it begins long before you even boot from an installation drive. Thoughtful preparation can save you hours of frustration, prevent data loss, and ensure your new system runs optimally. This preparatory phase is where technology meets financial prudence and personal branding, as safeguarding your data and ensuring genuine software are paramount.
Essential Pre-Installation Checks and Requirements
Before embarking on the installation journey, it’s crucial to confirm your system’s readiness and gather all necessary resources.
System Compatibility: Meeting the Minimum Specs
First, ensure your hardware meets Windows 10’s minimum system requirements. While Windows 10 is quite forgiving, aiming for these specs (or better) is essential for a smooth experience and avoiding performance bottlenecks that could impact your productivity and overall user satisfaction. The basic requirements are:
- Processor: 1 GHz or faster, compatible with PAE, NX, and SSE2
- RAM: 1 GB for 32-bit or 2 GB for 64-bit
- Hard Disk Space: 16 GB for 32-bit OS or 32 GB for 64-bit OS
- Graphics Card: DirectX 9 or later with WDDM 1.0 driver
- Display: 800 x 600 resolution
For optimal performance and a better “brand experience” (i.e., less frustration, more efficiency), consider a solid-state drive (SSD) for your operating system, at least 8GB of RAM, and a multi-core processor. These components contribute significantly to a snappier, more responsive system, directly translating into time saved and higher productivity—a valuable return on investment.
Securing Your Digital Assets: The Critical Importance of Backups
This cannot be stressed enough: Back up all your important data before proceeding. A clean installation will wipe the designated drive, meaning any files, photos, documents, or applications on it will be irrevocably lost. This step is not just good practice; it’s a vital safeguard against potentially catastrophic data loss, which can have significant financial and personal branding implications. Imagine losing critical client proposals, years of personal photos, or financial records – the cost of recovery (if even possible) or the impact on your reputation can be immense.
Use an external hard drive, cloud storage services (like OneDrive, Google Drive, Dropbox), or a network-attached storage (NAS) device. Verify your backups are complete and accessible before moving forward. This diligence protects your “money” (by preventing costly data recovery or business interruptions) and your “brand” (by ensuring continuity and reliability of your digital work).
Obtaining Your Windows 10 License: The Foundation of a Genuine Experience
To activate Windows 10, you’ll need a legitimate product key or a digital license linked to your Microsoft account. There are several ways to acquire one:
- Retail Purchase: Buy a full version of Windows 10 from Microsoft or an authorized reseller.
- OEM License: If your PC came pre-installed with Windows 10, the license is typically embedded in the hardware or linked to your Microsoft account.
- Free Upgrade: While the free upgrade offer from Windows 7/8/8.1 technically ended years ago, many eligible devices can still upgrade and activate using their existing digital license.
- Transferring a License: If you’re moving Windows 10 from an old PC to a new one, you might be able to transfer a retail license, provided it’s not an OEM version.
Using a genuine license is crucial not only for full functionality and access to updates but also for security and maintaining your digital integrity. Pirated software carries significant risks, including malware, lack of security updates, and potential legal issues, all of which can severely compromise your “digital security brand” and lead to substantial financial losses.
Gathering Your Digital Toolkit: Drivers and Internet Access
While Windows 10 does an excellent job of installing generic drivers, it’s a good idea to download essential drivers specific to your hardware (especially network adapters, chipset, and graphics card) from your PC manufacturer’s website before you start the installation. Store them on a separate USB drive. This ensures you can get online immediately after installation, allowing for Windows Updates and any additional driver downloads. An active internet connection is also vital during the installation process for various configuration steps and activation.
Crafting Your Installation Media
Once preparations are complete, the next step is to create the bootable media that will initiate the Windows 10 installation.
Leveraging the Windows Media Creation Tool
The easiest and most reliable way to create Windows 10 installation media is by using Microsoft’s official Media Creation Tool. Download it from Microsoft’s website on an existing Windows PC. This tool ensures you get the latest stable version of Windows 10 and handles the complex process of making the media bootable.
Choosing Your Medium: USB Flash Drive vs. DVD
- USB Flash Drive (Recommended): Most modern PCs boot quickly from USB drives. You’ll need a USB drive with at least 8 GB of storage space. This method is faster and more convenient than DVDs.
- DVD: If your PC has an optical drive and you prefer DVDs, you can choose this option with the Media Creation Tool, but it’s generally slower and less common today.
The tool will guide you through selecting the correct Windows 10 edition (Home/Pro), language, and architecture (32-bit or 64-bit). Ensure these match your system’s capabilities and license.
The Step-by-Step Guide to Installing Windows 10
With your preparations complete and installation media ready, it’s time to begin the actual installation. This process is highly technical, but following these steps carefully will ensure a smooth transition to your new Windows 10 environment.
Initiating the Installation Process
Booting from Your Installation Media: Navigating BIOS/UEFI
Insert your USB drive or DVD into your computer. You’ll need to instruct your computer to boot from this media instead of your existing operating system (if any).
- Restart your PC.
- Access the Boot Menu or BIOS/UEFI Settings: As your PC starts, repeatedly press the designated key (common keys include F2, F10, F12, Del, or Esc). The specific key varies by manufacturer (e.g., Dell, HP, Lenovo, ASUS).
- Change Boot Order: In the BIOS/UEFI settings, navigate to the “Boot” or “Boot Order” tab. Prioritize your USB drive or DVD drive to be the first boot device. For modern systems, you might see “UEFI USB Device” or similar. Save changes and exit.
- Boot from Media: Your PC should now boot from the installation media. You might see a “Press any key to boot from CD or DVD…” message – follow it.
Understanding UEFI (Unified Extensible Firmware Interface) versus traditional BIOS is a small but important tech detail. UEFI offers faster boot times, supports larger hard drives, and provides enhanced security features like Secure Boot. Most modern systems use UEFI, and the Media Creation Tool usually prepares media for both.
Initial Setup: Language, Time, and Keyboard Configuration
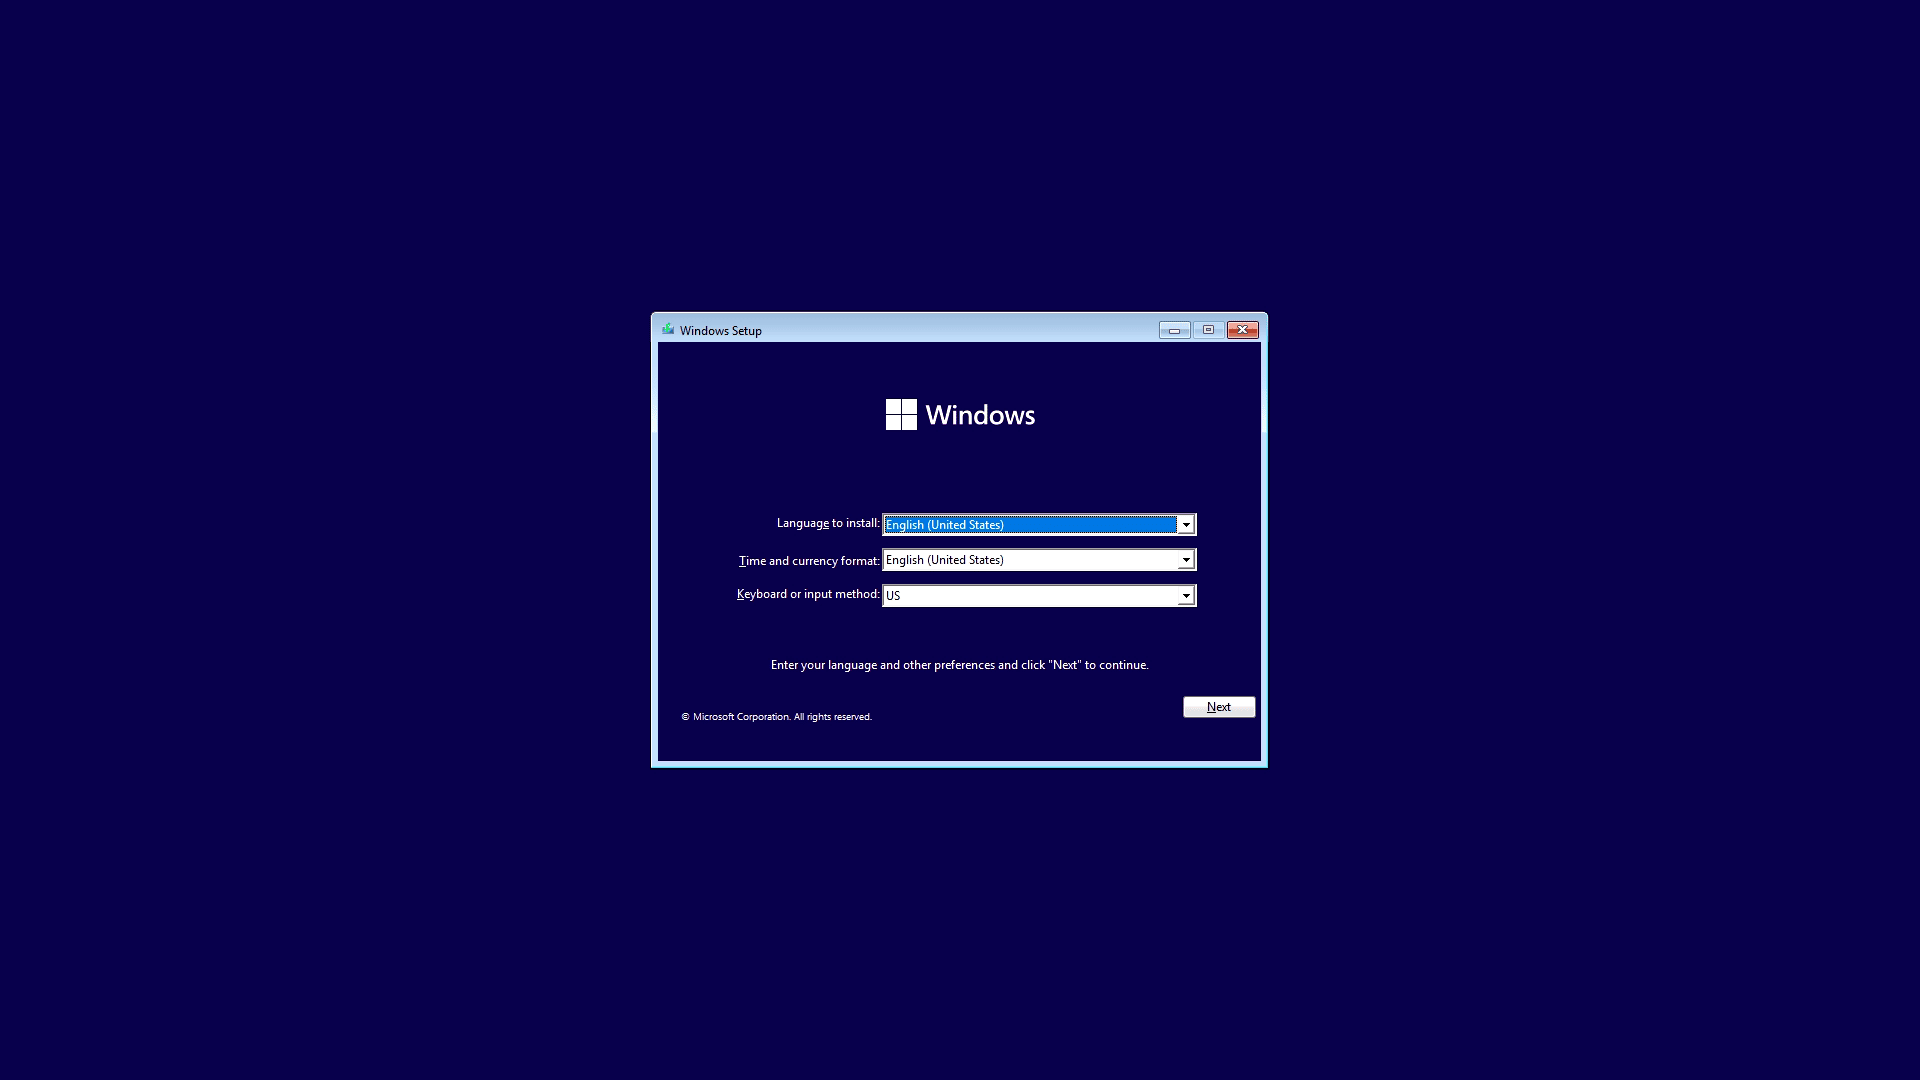
Once the Windows 10 setup loads, you’ll be greeted by the initial configuration screen:
- Language to install: Choose your preferred language.
- Time and currency format: Select your region.
- Keyboard or input method: Choose your keyboard layout.
- Click “Next,” then “Install now.”
Configuring Your Installation
This section involves critical decisions about your product key, installation type, and how your hard drive will be used.
Entering Your Product Key: Activating Your Windows Experience
You will be prompted to enter your product key.
- If you have one, enter it now.
- If you’re reinstalling Windows 10 on a PC that previously had an activated digital license, you can click “I don’t have a product key.” Windows will usually activate automatically once connected to the internet. This seamless re-activation reinforces the value proposition of legitimate software and contributes to a hassle-free user experience, preserving your “digital brand.”
Choosing Installation Type: Upgrade vs. Custom (Clean Install)
This is a crucial decision:
- Upgrade: Keeps your files, settings, and applications. This option is typically used when moving from an older Windows version (like Windows 7/8.1) without losing data. However, for most re-installations, this option might be grayed out if booting from media.
- Custom: Install Windows only (advanced): This performs a clean installation, which is generally recommended for optimal performance, especially if you’re trying to resolve persistent system issues, remove malware, or starting fresh on new hardware. A clean install provides the best foundation for a robust system, maximizing your return on hardware investment and improving productivity.
For this guide, we’ll focus on the Custom (clean install) option, as it’s the most common scenario for addressing “how do I install Windows 10” from scratch.
Partitioning Your Drive: Optimizing Storage for Performance
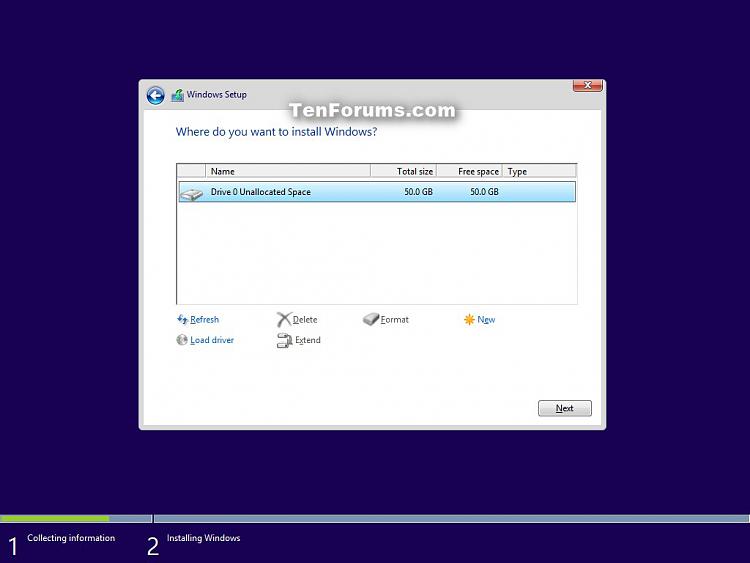
Next, you’ll see a screen listing your hard drives and their partitions. This is where you decide where Windows 10 will reside.
- Identify the Target Drive: Carefully select the drive where you want to install Windows. If you have multiple drives, ensure you pick the correct one to avoid erasing data from others.
- Delete Existing Partitions (for a truly clean install): To start fresh, select each partition on the target drive (e.g., “Drive 0 Partition 1,” “Drive 0 Partition 2”) and click “Delete.” This will turn the entire drive into “Unallocated Space.”
- Create New Partition: Select the “Unallocated Space” and click “New.” You can choose to use the entire space for Windows or create smaller partitions for specific purposes (e.g., one for the OS and another for data). For most users, using the entire space is fine. Windows will automatically create necessary system partitions (e.g., Recovery, System).
- Format (Optional but Recommended): Once the new partition is created, select it and click “Format” to ensure it’s clean and ready.
- Select Partition for Installation: Choose the newly created and formatted primary partition, then click “Next.”
This meticulous management of drive space is a critical technical step that impacts future system performance and data management, demonstrating a proactive approach to your digital environment.
The Core Installation: Copying Files and System Reboots
Windows will now begin copying files and installing features. Your computer will restart several times during this process. Do not remove the installation media until the process is fully complete and you reach the out-of-box experience (OOBE) setup. Removing it too early could corrupt the installation. This phase is largely automated, requiring no user intervention.
Personalizing Your New Windows Environment
After the core installation, you’ll go through the Out-Of-Box Experience (OOBE), where you personalize your Windows 10 setup.
Setting Up Your User Account: The Gateway to Your OS
- Region and Keyboard Layout: Confirm your region and keyboard layout.
- Connect to a Network: Connect to your Wi-Fi or Ethernet. This is vital for updates and digital license activation.
- Sign in with Microsoft Account (Recommended): Using a Microsoft account links your settings, OneDrive, and digital license, offering a more integrated and seamless experience across devices. If you prefer, you can choose “Offline account” (formerly “Limited experience”) but will miss out on some cloud-syncing benefits.
- Create PIN: For faster and more secure login, create a PIN.
Privacy Settings and Cortana: Tailoring Your Digital Footprint
Windows 10 offers numerous privacy settings. Carefully review each option (Location, Diagnostics, Advertising ID, etc.) and choose what you’re comfortable with. This is an important aspect of managing your “personal brand” and digital security. Similarly, decide if you want to enable Cortana as your digital assistant. You can always adjust these settings later in the Windows Settings app.
Post-Installation Essentials: Optimizing Your Windows 10 Experience
A fresh Windows 10 installation is just the beginning. To truly leverage its capabilities, ensure security, and maintain peak performance, several post-installation steps are crucial. These steps enhance the “tech” aspect, protect your “money” by preventing issues, and contribute to a professional “brand” image through a reliable computing platform.
Ensuring Security and Performance
Windows Updates: The Cornerstone of a Secure System
Immediately after installation, connect to the internet and run Windows Update.
- Go to
Settings > Update & Security > Windows Update. - Click “Check for updates.”
- Download and install all available updates, including cumulative updates, security patches, and feature updates. You may need to restart your PC multiple times and check for updates again until no more are found.
Keeping Windows up-to-date is paramount for security. Updates patch vulnerabilities that could be exploited by malware, protecting your data and financial well-being. They also bring performance improvements and new features, ensuring your system remains robust and efficient. Neglecting updates is a common oversight that can lead to costly security breaches and system instability.
Driver Installation: Unlocking Full Hardware Potential
While Windows Update often provides many drivers, it’s advisable to check for specific drivers from your hardware manufacturer’s website, especially for:
- Graphics Card: Install the latest drivers from NVIDIA, AMD, or Intel for optimal visual performance and gaming.
- Chipset: Essential for motherboard functionality and communication between components.
- Network Adapter: If you had to install a generic one, replace it with the manufacturer’s version for best performance.
- Peripherals: Any specialized devices like printers, scanners, or external sound cards might require their own drivers.
Proper drivers ensure all your hardware components communicate effectively with Windows, maximizing performance and preventing compatibility issues. This attention to detail extends the lifespan of your hardware and optimizes your investment.
Essential Software and Antivirus: Building Your Digital Workspace
Once your system is updated and drivers are installed, begin installing your essential applications:
- Web Browser: Chrome, Firefox, Edge, etc.
- Productivity Suite: Microsoft Office, LibreOffice, Google Workspace apps.
- Communication Tools: Zoom, Slack, Microsoft Teams.
- Antivirus/Antimalware: While Windows Defender provides robust protection, many users opt for third-party solutions for additional features or perceived enhanced security. Investing in reliable security software is a small cost that provides immense “money” protection against cyber threats.
- Backup Software: Re-establish your backup routines.
Prioritize software that aligns with your daily tasks and professional needs. A well-organized and equipped digital workspace is a direct contributor to productivity and reflects positively on your personal or corporate “brand.”
Troubleshooting Common Installation Hiccups
Even with meticulous preparation, issues can sometimes arise during or after a Windows 10 installation. Knowing how to troubleshoot common problems can save you time, stress, and potentially the cost of professional repair. This section focuses on the “tech” aspects of problem-solving and the “money” saved by self-resolution.
Addressing Persistent Issues
Boot Failures and Loopbacks
- Problem: The PC fails to boot from the installation media or gets stuck in a restart loop during installation.
- Solution:
- Check Boot Order: Re-enter BIOS/UEFI and confirm the boot order prioritizes your installation media.
- Recreate Media: The installation media might be corrupted. Try recreating the USB drive using the Media Creation Tool on a different USB stick or computer.
- Hardware Issues: Faulty RAM or hard drive can cause boot issues. Run hardware diagnostics if possible.
Driver Conflicts and Device Recognition Problems
- Problem: After installation, certain hardware (e.g., Wi-Fi, graphics) isn’t working, or device manager shows exclamation marks.
- Solution:
- Install Manufacturer Drivers: As mentioned, download and install the latest drivers directly from the manufacturer’s website for your specific model.
- Windows Update: Ensure all Windows Updates are installed, as they often include driver updates.
- Device Manager: In Device Manager, right-click on the problematic device and choose “Update driver” or “Uninstall device” and then restart.
Activation Woes and Digital Licenses
- Problem: Windows 10 isn’t activating, or you get an activation error.
- Solution:
- Connect to Internet: Ensure your PC is connected to the internet. Digital licenses activate automatically when online.
- Enter Product Key: Go to
Settings > Update & Security > Activationand try entering your product key manually. - Troubleshooter: Use the “Troubleshoot” option in the Activation settings, especially if you’ve recently changed hardware.
- Microsoft Account: Ensure the correct Microsoft account is linked if your license is tied to it.
Addressing these issues promptly not only restores functionality but also prevents minor annoyances from escalating into major productivity blockers, thereby safeguarding your “money” (time is money) and maintaining a smooth “tech” workflow.
Conclusion: The Value of a Well-Installed Windows 10 System
Successfully installing Windows 10 is more than just a technical task; it’s an investment in your digital future. A properly installed and configured operating system forms the bedrock of a productive, secure, and reliable computing experience. By following the meticulous steps outlined in this guide – from strategic pre-installation backups to crucial post-installation updates and driver management – you’re not just setting up an OS; you’re building a robust digital environment.
This proactive approach directly impacts your “money” by minimizing downtime, preventing costly data loss, and extending the life of your hardware. It reinforces your “brand” by ensuring a professional, efficient, and secure digital presence, whether for personal use or business operations. Moreover, the enhanced understanding gained through this process elevates your “tech” literacy, empowering you to manage your systems with greater confidence and competence.
Windows 10, despite its age, remains a formidable platform, offering stability and a vast ecosystem of software and services. A clean, optimized installation unlocks its full potential, providing a seamless user experience that is both efficient and secure. Embrace the power of a well-maintained system, and you’ll find that the answer to “How do I install Windows 10?” is not just a series of technical steps, but a pathway to a more reliable and rewarding digital life.
aViewFromTheCave is a participant in the Amazon Services LLC Associates Program, an affiliate advertising program designed to provide a means for sites to earn advertising fees by advertising and linking to Amazon.com. Amazon, the Amazon logo, AmazonSupply, and the AmazonSupply logo are trademarks of Amazon.com, Inc. or its affiliates. As an Amazon Associate we earn affiliate commissions from qualifying purchases.