
In the fast-paced digital world, a well-maintained computer is not just a convenience; it’s a necessity. For Mac users, the sleek design and intuitive macOS often mask a common issue: the accumulation of unused applications and their associated junk files. Over time, these digital remnants can hog valuable storage, slow down performance, and even introduce security vulnerabilities. This comprehensive guide will walk you through various methods to effectively remove installed programs from your Mac, ensuring a cleaner, faster, and more secure system. From basic drag-and-drop techniques to in-depth manual cleanups and the efficiency of third-party tools, we’ll equip you with the knowledge to reclaim your digital space and optimize your Mac’s performance, aligning with best practices for Tech efficiency, enhancing your Brand presence through seamless operation, and even saving you Money by extending hardware lifespan and boosting productivity.
The Imperative of Digital Decluttering: Why Clean Up Your Mac?
Before diving into the “how,” let’s understand the “why.” Deleting applications might seem straightforward, but merely dragging an icon to the Trash often leaves behind a trail of hidden files—preferences, caches, application support data, and more. These lingering files can become problematic for several reasons:
- Performance Degradation: A cluttered system means your Mac has to work harder. Unnecessary background processes, bloated application support files, and a fragmented drive can lead to slower boot times, sluggish application launches, and overall reduced responsiveness. For professionals relying on their Macs for demanding tasks, this can be a significant productivity bottleneck.
- Storage Space Conservation: Modern applications, especially creative suites and games, can consume gigabytes of storage. Even small utility apps leave behind residual data. Reclaiming this space is crucial, especially for Macs with limited SSD storage, allowing you to store more important documents, media, or new applications without resorting to costly external drives or cloud storage subscriptions.
- Enhanced Security: Outdated or unused applications, particularly those not from the App Store, can become security risks. If they are no longer updated by developers, they may contain vulnerabilities that malicious software could exploit. Regularly purging such programs reduces your attack surface and keeps your system safer from malware and data breaches.
- Digital Hygiene and Brand Image: A well-organized, responsive machine reflects professionalism. For individuals engaged in personal branding or corporate identity, a smoothly running Mac contributes to a polished image, whether you’re presenting to clients, collaborating with colleagues, or simply managing your digital assets. A cluttered system can appear unprofessional and signal a lack of attention to detail.
Understanding these benefits underscores the importance of a systematic approach to Mac program removal. Let’s explore the methods.
The Essentials: Standard Methods for Uninstalling Mac Apps
For many users, the primary methods of deleting applications involve familiar macOS functionalities. While these are a good starting point, it’s important to understand their limitations.
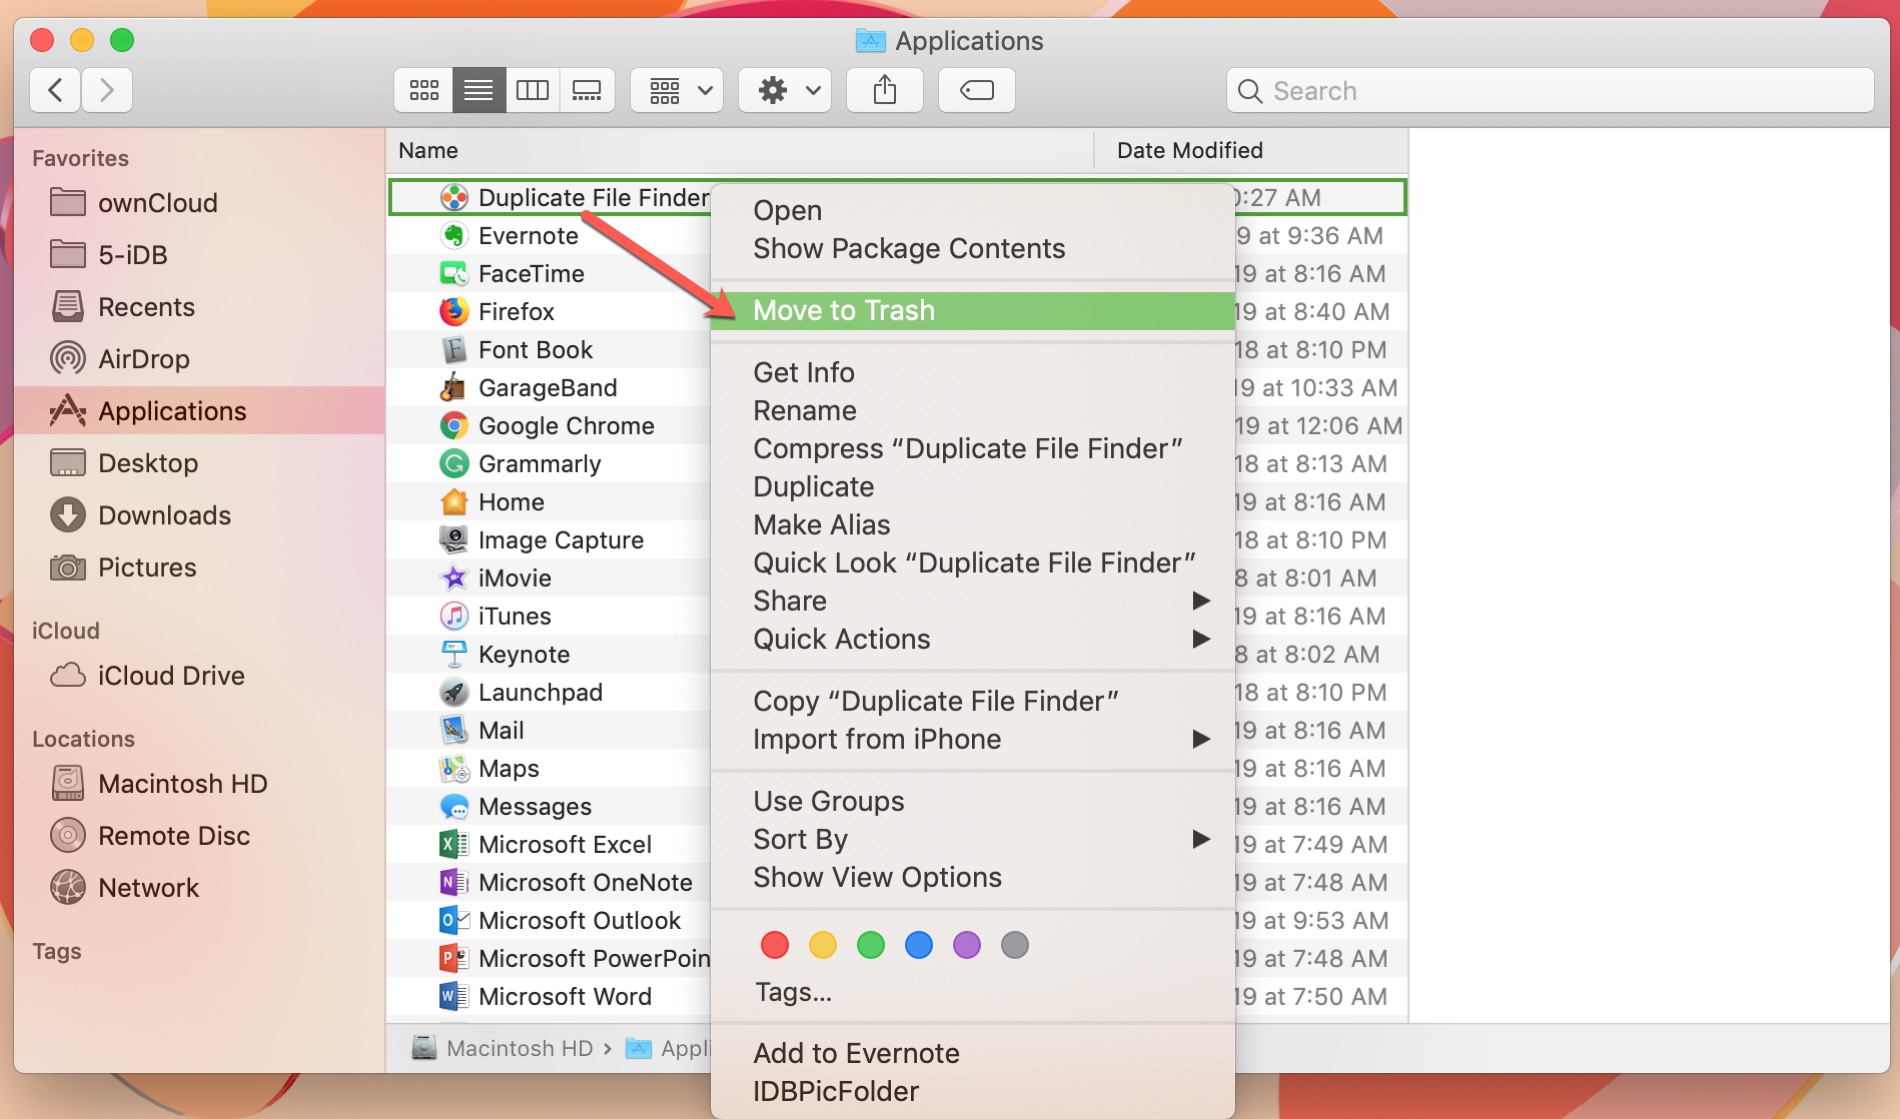
Method 1: Dragging to the Trash from the Applications Folder
This is the most common and intuitive method for uninstalling applications on a Mac, particularly for those not installed via the App Store.
How it works:
- Open Finder: Click on the Finder icon in your Dock.
- Navigate to Applications: In the Finder sidebar, click on “Applications.”
- Locate the App: Find the application you wish to remove.
- Drag to Trash: Click and drag the application icon directly to the Trash icon in your Dock.
- Empty Trash: Right-click (or Control-click) on the Trash icon and select “Empty Trash.” Confirm the action if prompted.
When to use it: This method is effective for basic removal of many applications, especially those that come as a single .app file. It works well for applications that don’t deeply integrate with the system or require complex installation procedures.
Limitations: While simple, this method often leaves behind associated files (preferences, caches, support files, etc.) scattered across your system. These files are typically stored in the hidden Library folder and won’t be deleted by merely trashing the application icon. Over time, these leftovers can accumulate, contributing to system clutter and potential performance issues.
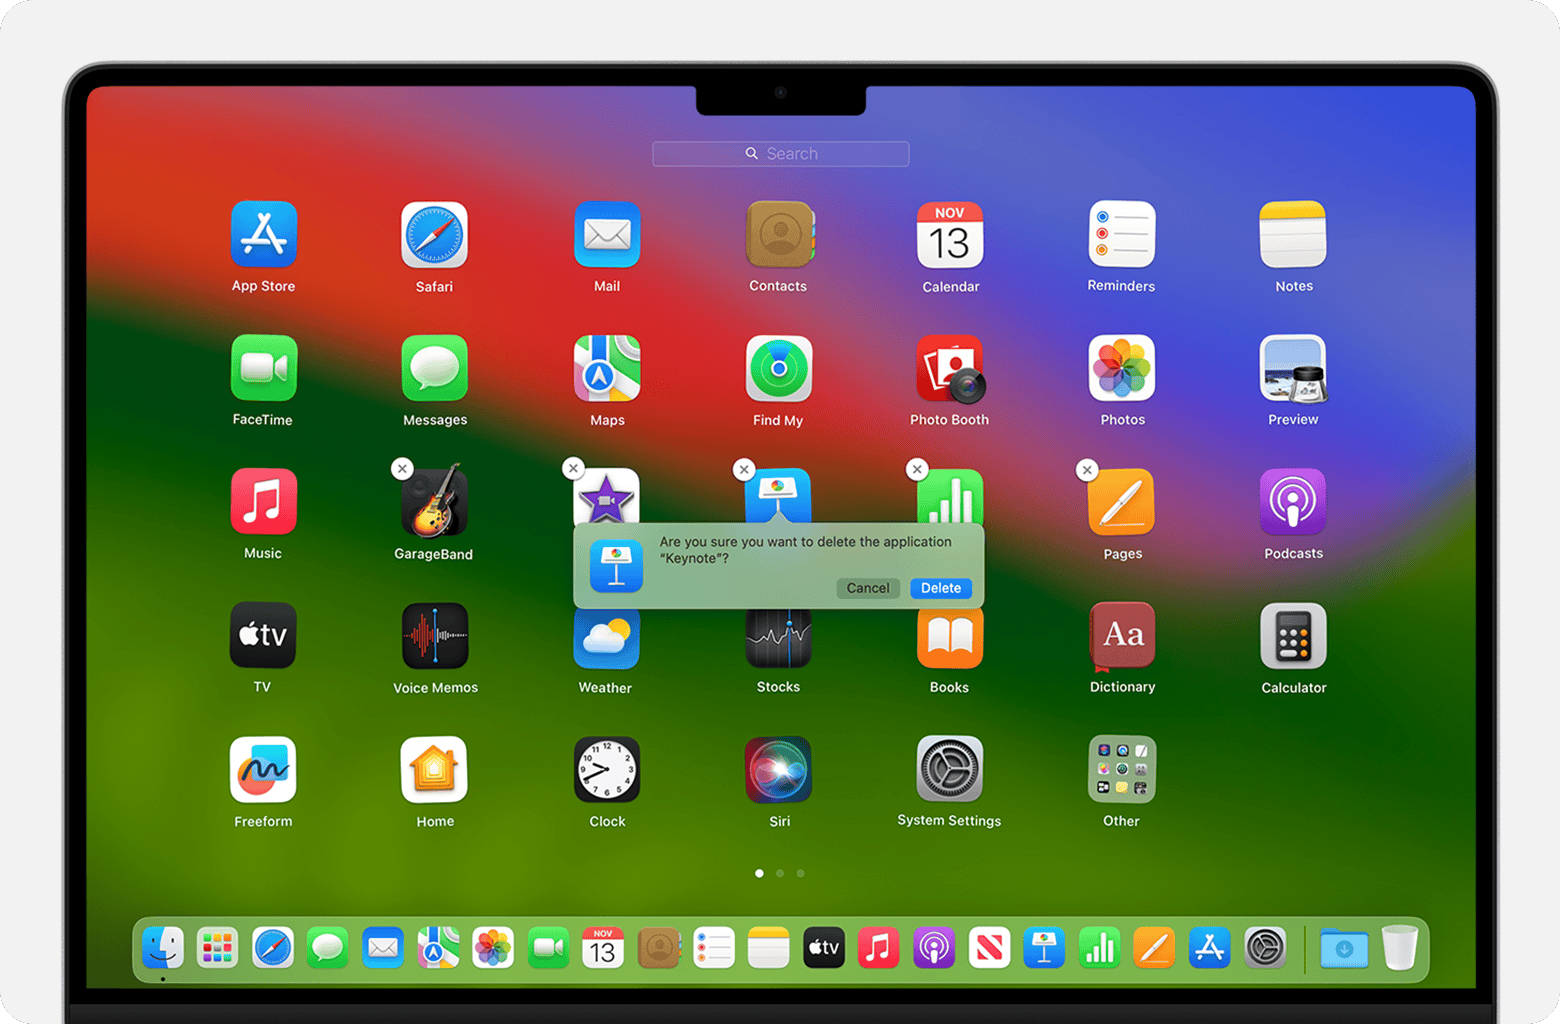
Method 2: Uninstalling via Launchpad
Launchpad provides an iOS-like interface for managing your applications, particularly those downloaded from the Mac App Store.
How it works:
- Open Launchpad: Click the Launchpad icon in your Dock (it looks like a rocket ship) or pinch with four fingers on your trackpad.
- Find the App: Locate the application you want to delete. You might need to swipe through pages.
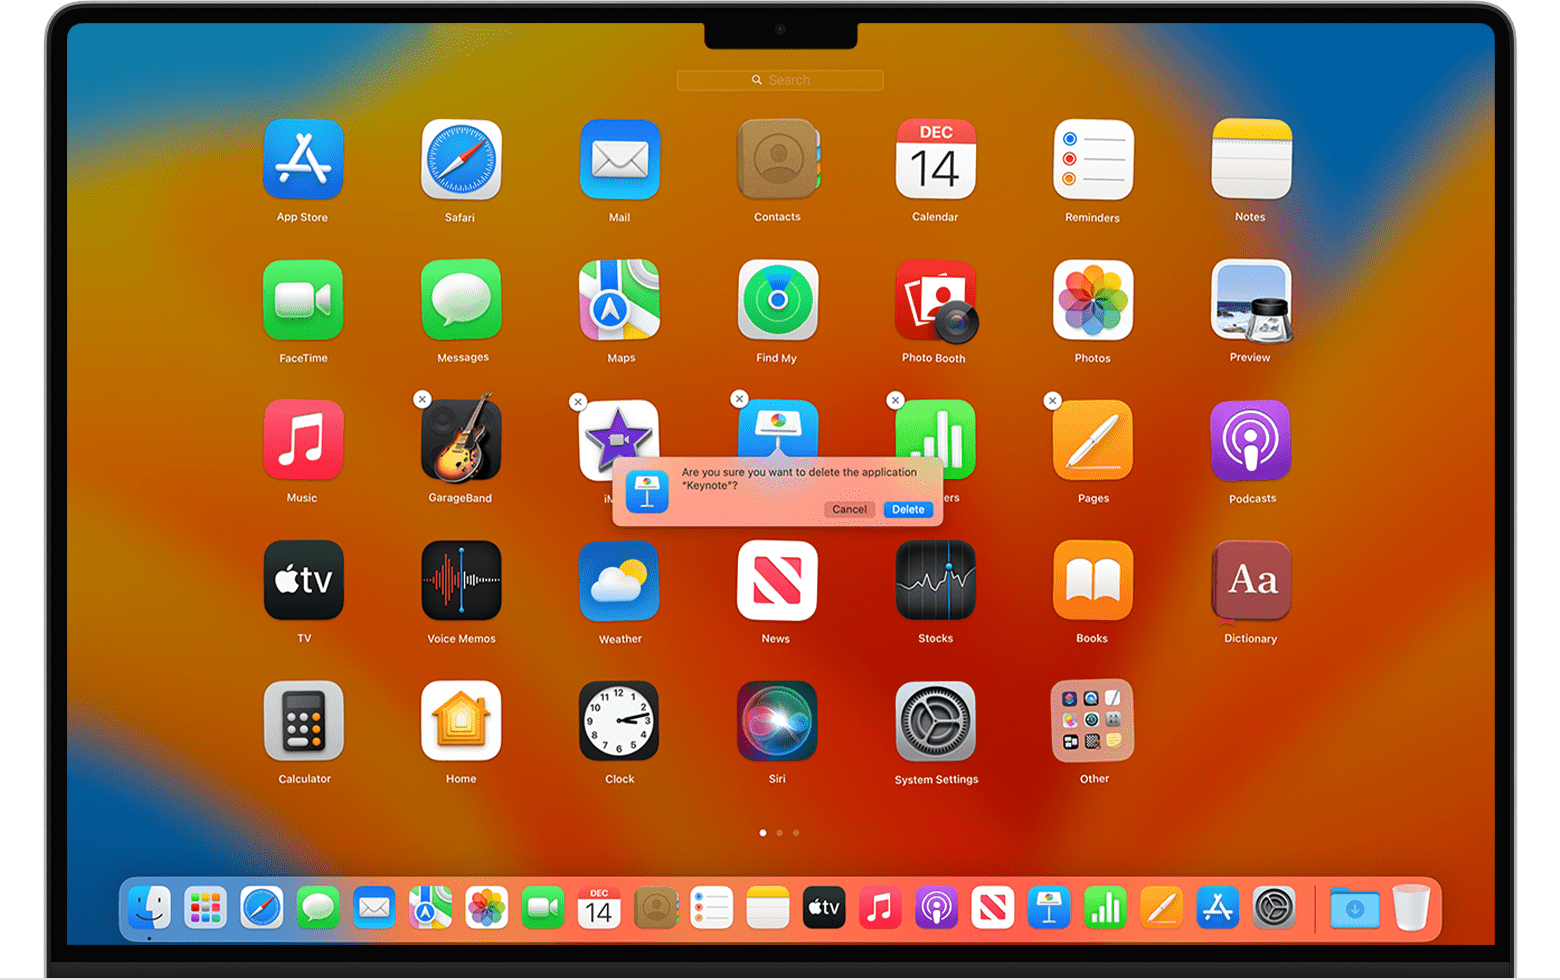
- Activate Jiggle Mode: Click and hold an application icon until all icons begin to jiggle.
- Delete the App: An “X” will appear in the top-left corner of apps that can be uninstalled this way. Click the “X” next to the desired app, then click “Delete” to confirm.
When to use it: This method is primarily designed for applications downloaded directly from the Mac App Store. App Store apps are generally sandboxed, meaning their files are more contained, and Launchpad’s uninstall process is usually more thorough for them than dragging non-App Store apps to the Trash.
Limitations: The “X” only appears on App Store applications or sometimes on third-party applications installed using an installer that registered with Launchpad. Many applications, especially those downloaded directly from a developer’s website, will not have an “X” here and cannot be removed via Launchpad.
Method 3: Utilizing the App’s Native Uninstaller
Some developers provide a dedicated uninstaller program for their software, especially for complex applications or suites that install multiple components across your system.
How it works:
- Check the Applications Folder: Sometimes, the uninstaller is located within the application’s folder itself (e.g.,
Applications/AppName/Uninstall AppName). - Check the Disk Image/Installer Package: If you still have the original
.dmgfile or installer package, mount it or open it. The uninstaller might be included there alongside the main application installer. - Look in System Preferences: For some applications (especially drivers or utility software), an uninstaller or removal option might be found in System Preferences (now System Settings in macOS Ventura and later).
- Developer’s Website: As a last resort, visit the developer’s official website. They often provide specific uninstallation instructions or a downloadable uninstaller tool.
When to use it: Always prioritize using a native uninstaller if one is available. These tools are designed by the developers to remove all components of their software cleanly and efficiently, ensuring no remnants are left behind. This is the most thorough method for complex software.
The Deeper Dive: Manual Uninstallation and Beyond
For applications that don’t have a native uninstaller or when you want to ensure a truly clean removal after using Method 1, you’ll need to delve into manual file deletion. This process is more involved but guarantees a thorough cleanup.
The Manual Cleanup: Deleting Residual Files
The key to a truly clean uninstallation lies in deleting the “leftover” files stored in various hidden folders. These typically reside in your user’s Library folder.
Types of Residual Files to Look For:
- Application Support Files: Stored in
~/Library/Application Support/and/Library/Application Support/. These can include data, settings, and other files crucial for the app’s operation. - Caches: Located in
~/Library/Caches/and/Library/Caches/. Caches are temporary files designed to speed up app loading, but old cache files can become corrupt or simply take up space. - Preferences Files: Found in
~/Library/Preferences/and/Library/Preferences/. These.plistfiles store your app-specific settings. - Containers: In
~/Library/Containers/for sandboxed applications, especially App Store apps. - Plugins and Extensions: Some apps install plugins in folders like
~/Library/Internet Plug-Ins/,~/Library/Audio/Plug-Ins/, or~/Library/Mail/Bundles/. - Launch Agents/Daemons: In
~/Library/LaunchAgents/and/Library/LaunchAgents/,/Library/LaunchDaemons/. These files tell macOS to launch certain helper processes when your computer starts or a user logs in.
Identifying and Accessing Hidden Library Files
The Library folder in your user directory (~/Library/) is hidden by default to prevent accidental deletion of critical system files.
Steps for Manual Deletion:
- Delete the Application First: Ensure you’ve already dragged the application icon from the
Applicationsfolder to the Trash and emptied it. - Access the User Library Folder:
- Open Finder.
- Click “Go” in the menu bar at the top of your screen.
- Hold down the
Optionkey (Alt) on your keyboard. “Library” will appear in the dropdown menu. Click on it.
- Search for Related Files: Once in the
Libraryfolder, you’ll need to navigate through its subfolders (Application Support,Caches,Preferences,Containers,LaunchAgents).- Inside each of these folders, look for folders or files named after the application you uninstalled, the developer, or keywords related to the app. For example, if you removed “MyApp,” look for “MyApp,” “My App Inc.,” or similar variations.
- Be cautious: Only delete files and folders that you are absolutely certain belong to the application you are removing. Deleting system-critical files can lead to macOS instability. If unsure, err on the side of caution or use a third-party uninstaller.
- Drag to Trash: Drag any identified residual files and folders to the Trash.
- Empty Trash: Once you’re done searching and deleting, empty the Trash again.
- Repeat for System-Wide Library (Optional, for advanced users): Some applications install files in the system-wide
/Library/folder (accessible directly from the Finder sidebar by clicking “Macintosh HD” or “Macintosh HD > Library”). Exercise extreme caution here, as deleting files from this location can affect all users on your Mac or the entire operating system. Only proceed if you are very confident in what you are deleting.
This manual process requires diligence and a good understanding of file systems but offers the most control over what is removed. For those less comfortable navigating hidden system folders, third-party tools offer a safer and more efficient alternative.
Streamlining the Process: Third-Party Uninstallers
Given the complexity and potential risks of manual file hunting, many Mac users opt for dedicated uninstaller applications. These tools are designed to automate the process, ensuring a thorough cleanup without requiring you to manually browse hidden folders.
Why Consider a Dedicated Uninstaller?
- Thoroughness: Third-party uninstallers are built to scan your entire system for all files associated with a given application—including caches, preferences, support files, plugins, and even hidden launch agents—and present them for deletion. This significantly reduces the likelihood of leaving behind digital clutter.
- Efficiency and Time-Saving: Instead of manually searching through various directories, a dedicated uninstaller can perform a comprehensive scan and removal in a matter of seconds or minutes. This is a huge boon for productivity.
- Safety: Good uninstaller tools clearly identify which files belong to an app, minimizing the risk of accidentally deleting essential system files. They often provide a review screen where you can see exactly what will be deleted before confirming the action.
- Ease of Use: Most dedicated uninstallers feature intuitive interfaces, making the uninstallation process simple even for novice users.
Popular Third-Party Options and What to Look For
While I won’t name specific products as a general rule, here’s what to look for in a reputable third-party uninstaller:
- Comprehensive Scanning: It should scan beyond the main application file, delving into
~/Libraryand/Libraryfolders to find all associated components. - Selective Deletion: The tool should show you a list of all found files and allow you to select or deselect specific items for deletion, giving you control.
- Intuitive User Interface: Easy to navigate and understand, even for less tech-savvy users.
- Safety Features: Look for features like a “Smart Clean” or “Safe Clean” option that avoids deleting essential system files, and perhaps even a “Revert” or “Undo” option in case of accidental deletion.
- Additional Features: Many comprehensive cleaning suites that include an uninstaller also offer other optimization tools like duplicate file finders, large file scanners, startup item managers, and malware removers. These can add significant value to your overall Mac maintenance strategy.
- Reputation and Reviews: Always choose software from well-known developers with positive user reviews and a good track record for reliability and security.
Using a reliable third-party uninstaller can transform a tedious chore into a quick and easy maintenance task, freeing up your time and mental energy for more productive pursuits.
Best Practices for a Lean, Mean Mac Machine
Beyond just removing applications, cultivating good digital habits is key to maintaining a high-performing Mac. This impacts not only your system’s health but also your professional workflow and digital security posture.
Regular Digital Housekeeping
Think of your Mac like your physical workspace. A little regular tidying goes a long way to prevent overwhelming clutter.
- Schedule Check-ups: Set a reminder (monthly or quarterly) to review your installed applications. Uninstall anything you haven’t used in a while or no longer need.
- Review Downloads Folder: This folder is often a dumping ground for installers, documents, and random files. Periodically sort through it, deleting unnecessary items or moving important ones to organized folders.
- Empty Trash Regularly: Don’t let items sit in the Trash indefinitely; empty it to free up space.
- Manage Browser Extensions: Browser extensions can consume resources and sometimes pose security risks. Remove any you don’t actively use.
Understanding What to Keep and What to Ditch
Making informed decisions about your software inventory is crucial.
- Usage vs. Necessity: Just because an app is installed doesn’t mean you use it. Be honest about an app’s actual utility. If you use an online alternative or haven’t opened an app in months, it’s likely a candidate for removal.
- System Impact: Some apps are notoriously resource-intensive. If an app frequently causes your Mac to slow down or consumes excessive CPU/memory, consider if its benefits outweigh its performance cost.
- Security Updates: If a developer stops supporting an application, it becomes a security liability. Prioritize updated, actively maintained software.
The Brand & Money Connection: Productivity, Security, and Value
Maintaining a clean and efficient Mac isnatespecially crucial when considering the broader aspects of Brand and Money.
- Professional Brand Image: A fast, responsive computer contributes to an image of competence and efficiency. When you’re sharing your screen during a video call, giving a presentation, or simply demonstrating a product, a smoothly running system avoids awkward delays, crashes, or visible clutter, reinforcing a professional brand identity. It shows attention to detail and respect for your own time and the time of others.
- Boosted Productivity (Money Saved): Time is money. A sluggish Mac due to bloatware translates directly into lost productivity. Waiting for apps to load, enduring system freezes, or constantly dealing with “spinning beach balls” eats into your valuable working hours. By ensuring your Mac runs optimally, you maximize your output, streamline your workflow, and ultimately make the most of your investment in both your hardware and your time. This efficiency can directly impact your bottom line, whether you’re a freelancer, a small business owner, or an employee.
- Enhanced Digital Security (Money Protected): Outdated or unused software can be a gateway for malware, putting your sensitive data—financial records, client information, personal identifiers—at risk. A data breach can have devastating financial consequences, from identity theft to reputational damage that impacts your earning potential. Regular software removal, coupled with other security practices, strengthens your digital defenses, protecting your financial assets and personal information.
- Extended Hardware Lifespan (Money Saved): By reducing the load on your Mac’s CPU, RAM, and storage, you minimize wear and tear on its components. A well-maintained system that isn’t constantly maxing out its resources tends to last longer, delaying the need for costly upgrades or replacements. This intelligent management of your digital assets translates into tangible financial savings over time.
- Smart Software Investment: Understanding what software you truly need and effectively managing its lifecycle on your Mac helps you make smarter purchasing decisions. You avoid buying apps you won’t use or subscribing to services that are redundant, ensuring every dollar spent on software provides genuine value.
In conclusion, managing the programs on your Mac isn’t just about deleting files; it’s about optimizing your entire digital ecosystem. By adopting these methods and best practices, you can ensure your Mac remains a powerful, efficient, and secure tool that supports your productivity, upholds your professional image, and protects your financial well-being. Regular digital decluttering is a small effort with significant long-term rewards, transforming your Mac into a truly lean, mean machine.
aViewFromTheCave is a participant in the Amazon Services LLC Associates Program, an affiliate advertising program designed to provide a means for sites to earn advertising fees by advertising and linking to Amazon.com. Amazon, the Amazon logo, AmazonSupply, and the AmazonSupply logo are trademarks of Amazon.com, Inc. or its affiliates. As an Amazon Associate we earn affiliate commissions from qualifying purchases.