In an increasingly unpredictable world, safeguarding your assets, especially your vehicle, has become paramount. A dash cam is no longer just a fancy gadget; it’s an indispensable tool for modern drivers, offering peace of mind, digital security, and potentially significant financial protection. Whether you’re a daily commuter, a rideshare driver, or simply someone who values an extra layer of security, understanding how to properly install a dash cam is the first step towards unlocking its full potential. This comprehensive guide will walk you through the entire process, from selecting the right device to seamlessly integrating it into your vehicle, all while emphasizing the technological advantages, brand considerations, and economic benefits of a well-executed installation.

Why a Dash Cam is an Essential Gadget for Modern Drivers
The automotive landscape is constantly evolving, bringing with it new technologies and, unfortunately, new risks. Dash cameras have emerged as a crucial countermeasure, providing an unbiased eye on the road and beyond. Investing in a dash cam is not merely about adding another accessory to your car; it’s about investing in your safety, security, and financial well-being.
Unpacking the Benefits: Beyond Just Accidents
The primary reason most drivers consider a dash cam is for accident evidence. In the event of a collision, footage from your dash cam can be invaluable, providing clear, irrefutable proof of fault to insurance companies and legal authorities. This can significantly speed up claims processing, prevent fraudulent claims against you, and save you from protracted legal battles and higher premiums. But the utility of a dash cam extends far beyond collision documentation. It acts as a silent witness against road rage incidents, vandalism, and even attempted theft when equipped with parking mode. For those involved in ridesharing or commercial driving, it adds an extra layer of accountability and protection, documenting interactions and routes. The peace of mind that comes from knowing you have an objective record of events is, for many, priceless.
The Tech Advantage: Smart Features and Digital Security
Modern dash cams are sophisticated pieces of technology, far removed from the basic recording devices of yesteryear. Today’s models boast high-definition video quality, often 1080p, 1440p, or even 4K, ensuring every detail, from license plates to facial features, is captured with clarity. Integrated GPS tracking logs your speed and location, providing contextual data that can be crucial in an incident. Wi-Fi and Bluetooth connectivity allow for seamless transfer of footage to your smartphone or cloud storage, making it easy to review, edit, and share clips. Many dash cams incorporate G-sensors, which automatically detect impacts and lock the relevant footage, preventing it from being overwritten. Advanced parking surveillance modes, often powered by hardwiring kits, continuously monitor your vehicle even when it’s parked and turned off, recording any bumps or suspicious activity. These technological advancements transform a simple camera into a comprehensive digital security system for your vehicle, offering protection around the clock.
Choosing the Right Dash Cam: Features, Types, and Value for Money
Before you even think about installation, selecting the appropriate dash cam is critical. The market is flooded with options, and understanding the differences can make all the difference in functionality, reliability, and ultimately, your satisfaction. This decision should balance your specific needs with your budget, ensuring you get the most value for your investment.
Decoding Dash Cam Types: Front-Facing, Dual-Channel, and Multi-Channel Systems
Dash cams come in several configurations, each designed for different levels of coverage:
- Front-Facing (Single-Channel): These are the most common and typically the most affordable. They record only what’s happening in front of your vehicle. Ideal for basic accident proof and straightforward road monitoring.
- Dual-Channel (Front and Rear): Offering comprehensive coverage, these systems include a main front camera and a smaller secondary camera for the rear windshield. This setup is excellent for capturing rear-end collisions, tailgaters, and what happens behind your vehicle in parking situations. Many also integrate the rear camera into the front unit with an interior view.
- Multi-Channel (Front, Rear, and Interior): Often preferred by rideshare drivers or those seeking maximum coverage, these systems add a third camera to monitor the vehicle’s interior. This can be crucial for documenting passenger interactions, protecting against false accusations, or simply monitoring children and pets.
Your choice should align with your driving habits, the level of security you desire, and potential risks you want to mitigate.
Key Features to Look For: Resolution, GPS, Wi-Fi, Parking Mode, G-Sensor
Beyond the number of channels, several technical features define a dash cam’s performance and utility:
- Video Resolution: Aim for at least 1080p Full HD. Higher resolutions like 1440p (2K) or 2160p (4K) offer superior detail, which can be critical for reading license plates or identifying faces.
- Frame Rate: A higher frame rate (30fps or 60fps) provides smoother video and better motion capture, especially important at higher speeds.
- Loop Recording: Essential for continuous recording, this feature automatically overwrites the oldest footage when the memory card is full.
- G-Sensor (Accelerometer): Detects sudden impacts or rapid deceleration/acceleration, automatically locking the current footage to prevent it from being overwritten.
- Parking Mode: A critical security feature that allows the dash cam to record while the vehicle is parked. This can be event-triggered (G-sensor, motion detection) or continuous time-lapse recording. Requires a hardwire kit for constant power.
- GPS: Records speed and location data, embedding it into the video metadata. This provides valuable context for incidents.
- Wi-Fi/Bluetooth Connectivity: Enables wireless connection to your smartphone for easy viewing, downloading, and sharing of footage via an app. This is a huge convenience feature.
- Capacitor vs. Battery: Capacitors are generally preferred as they are more durable in extreme temperatures and have a longer lifespan than lithium-ion batteries, which can degrade over time.
- Storage (SD Card Support): Check the maximum supported SD card size and consider purchasing a high-endurance memory card designed for continuous writing.
Budgeting for Your Brand: Balancing Cost and Quality
Dash cams range widely in price, from budget-friendly options under $50 to premium systems exceeding $400. While it might be tempting to opt for the cheapest model, remember that a dash cam is a security investment. Reputable brands often offer better build quality, more reliable software, superior image sensors, and better customer support. Look for brands known for their consistent performance and positive user reviews. Consider the total cost of ownership, including a high-endurance SD card and potentially a professional installation if you’re not comfortable with the DIY approach. A slightly higher upfront investment in a quality device can save you significant hassle and money in the long run, proving its worth when it matters most.
Preparing for Installation: Gathering Tools and Planning Your Setup
Once you’ve chosen your ideal dash cam, the next phase is preparation. A well-planned installation not only ensures a clean, professional look but also guarantees optimal performance and longevity of your device. Rushing this stage can lead to frustration, exposed wires, and even reduced functionality.
Essential Tools and Supplies for a Smooth DIY Install
While many dash cams come with basic mounting accessories, a few additional tools will make your installation much smoother and cleaner:
- Pry Tool Kit (Plastic Trim Removal Tools): Absolutely essential for safely prying open trim panels and tucking cables without damaging your car’s interior. Metal tools can scratch or mar surfaces.
- Microfiber Cloth and Glass Cleaner: To ensure a clean surface for mounting the dash cam and adhesive, especially for suction cups or 3M tape.
- Cable Clips/Zip Ties (Optional): For securing any loose wiring, although a good installation aims to hide as much as possible.
- Alcohol Wipes: For thoroughly cleaning the mounting surface before applying adhesive mounts.
- Measuring Tape: To help with precise placement and cable routing.
- Test Light/Multimeter (for Hardwiring): If you plan to hardwire your dash cam, these tools are crucial for identifying appropriate fuse slots for constant and accessory power.
- Fuse Tap Kit (for Hardwiring): Allows you to safely tap into your car’s fuse box without cutting any wires. Ensure you have the correct fuse type (ATO, mini, low-profile mini, micro2) for your vehicle.
Strategic Placement: Optimizing View and Minimizing Obstruction
The placement of your dash cam is critical for its effectiveness. The goal is to capture the widest possible view of the road ahead (and behind, if applicable) without obstructing your own vision or interfering with the car’s safety features like airbags.
- Front Camera:
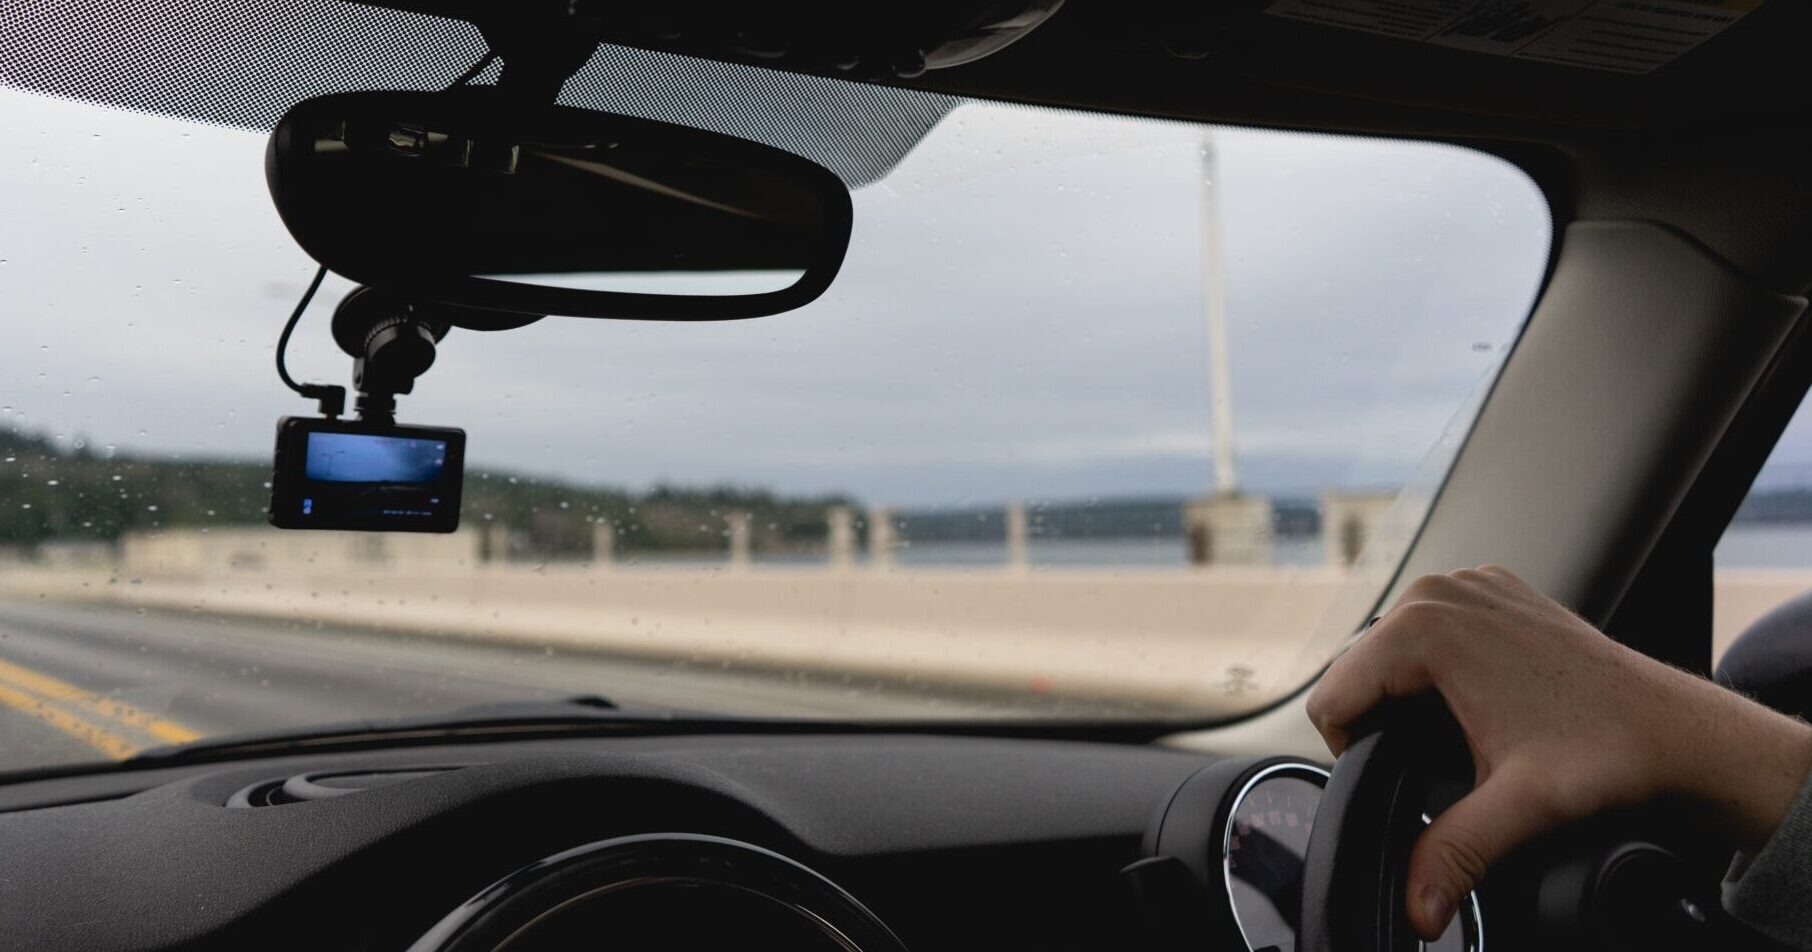
- High and Central: Typically, the best spot is just behind the rearview mirror, as high on the windshield as possible without blocking the camera’s view of the road or the driver’s view. This position keeps the camera out of your direct line of sight.
- Avoid Obstructions: Ensure the camera lens is clear of any window tint, wipers, or black dot matrices on the windshield that might interfere with image quality.
- Airbag Clearance: Make sure the camera and its wires do not interfere with the deployment path of any airbags, especially side curtain airbags along the A-pillar.
- Rear Camera:
- Mount centrally at the top of the rear windshield for an unobstructed view. Again, be mindful of any defroster lines or tints that could affect clarity.
- Some dual-channel systems have a rear camera designed to mount on the interior of the rear windshield, while others are exterior-mounted for commercial vehicles.
Before permanently mounting, temporarily hold the camera in place and check the live view (if available) on its screen or via the app to confirm optimal positioning.
Powering Your Device: Understanding Your Options (12V Socket, Hardwiring, OBD)
How you power your dash cam significantly impacts its functionality, especially for features like parking mode.
- 12V Cigarette Lighter Socket:
- Pros: Easiest and quickest installation. Simply plug and play.
- Cons: Only provides power when the vehicle is on (or the socket is always-on, which is rare). This means no parking mode. It also occupies your 12V socket, which might be needed for other devices. Wires are often visible.
- Hardwiring Kit:
- Pros: Provides power directly from the car’s fuse box, enabling parking mode (constant power) and accessory power (only when the car is on). This is the most professional and discreet option, hiding all wires.
- Cons: Requires more technical knowledge and tools (fuse taps, multimeter). Incorrect installation can potentially drain your battery if the hardwire kit doesn’t have a low-voltage cutoff.
- OBD-II Power Adapter:
- Pros: A good middle-ground option. Plugs directly into your car’s OBD-II port. Some adapters offer both constant and switched power and can support parking mode. Easier than hardwiring.
- Cons: Occupies the OBD-II port, which might be needed for diagnostics. Wires are still visible unless carefully routed. Some adapters might not have battery drain protection.
For maximum security and a clean look, hardwiring is generally recommended. If you’re uncomfortable with electrical work, consider a professional installation or an OBD-II adapter as a compromise.
Step-by-Step Dash Cam Installation: From Mounting to Cable Management
With your preparation complete, it’s time to bring your dash cam to life. This section details the practical steps to install your device, focusing on a clean and secure setup.
Secure Mounting: Attaching Your Camera Firmly
Most dash cams use either a suction cup mount or an adhesive (3M VHB tape) mount.
- Clean the Surface: Thoroughly clean the chosen mounting area on your windshield with glass cleaner and then an alcohol wipe. Let it dry completely. A clean, grease-free surface is vital for a strong bond.
- Attach the Mount to the Camera: Connect the mount to your dash cam as per the manufacturer’s instructions.
- Position the Camera: Carefully align the camera in your pre-determined optimal position.
- Secure the Mount:
- Adhesive Mount: Peel off the protective backing from the adhesive. Press the mount firmly against the windshield for at least 30-60 seconds. Apply consistent pressure to ensure maximum adhesion. Allow the adhesive to cure for a recommended period (usually 24 hours) before driving, if possible.
- Suction Cup Mount: Press the suction cup firmly against the glass and then engage the lever or twist mechanism to create a strong vacuum seal.
Professional Cable Routing: Hiding Wires for a Clean Look
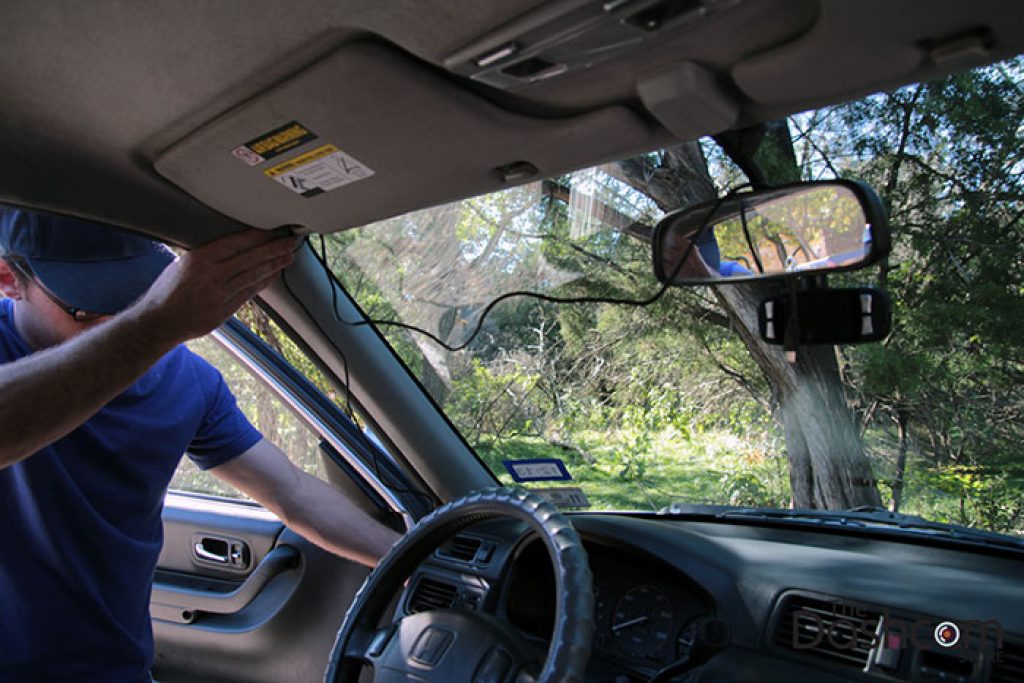
This is where your pry tools come in handy. The goal is to hide the power cable as much as possible, making the installation look factory-integrated and preventing wires from dangling and obstructing your view.
- Initial Routing (from Camera to Headliner): Starting from the mounted dash cam, carefully tuck the power cable into the gap between the headliner (car ceiling) and the windshield trim. Use your pry tool to gently push the cable in.
- Down the A-Pillar: Route the cable along the headliner towards the passenger-side A-pillar (the pillar between the windshield and the front passenger door). Continue tucking the cable along the edge of the A-pillar trim. In most cars, you can gently pull back the A-pillar trim and route the cable behind it. Be extremely cautious not to interfere with any airbag components that might be located within the A-pillar. If you’re unsure, route the cable under the A-pillar trim instead of behind it.
- Across the Dashboard (Optional) or Along the Door Seal: Once the cable reaches the bottom of the A-pillar, you have a couple of options:
- Along the door seal: Tuck the cable into the gap along the rubber door seal, working your way down to the footwell. This is often the easiest and safest method.
- Under the dashboard: Route the cable underneath the glove compartment or dashboard trim towards the center console or fuse box.
- Rear Camera Cable (for Dual/Multi-Channel Systems): If installing a rear camera, repeat a similar process. Route the cable from the front unit, along the headliner, down a side pillar (usually the passenger side B-pillar), and then along the roofline or C-pillar to the rear windshield. Tuck the cable into the trim panels as you go. This can be more challenging and may require removing more trim pieces.
Powering Up: Connecting Your Dash Cam for Operation
Based on your chosen power method:
- 12V Cigarette Lighter Socket:
- Plug the dash cam’s power adapter into the 12V socket.
- Route any excess cable into the console or under the seats to keep it tidy.
- Start your car to confirm the dash cam powers on.
- Hardwiring Kit (More Involved):
- Locate Your Fuse Box: Refer to your car’s owner’s manual to find the fuse box location (often in the footwell, under the dashboard, or in the engine bay).
- Identify Fuse Slots: Using your test light or multimeter, find:
- An ACC (Accessory) fuse that provides power only when the car is on (e.g., radio, cigarette lighter).
- A BAT (Constant) fuse that provides power even when the car is off (e.g., hazard lights, door locks) – only if you need parking mode.
- Install Fuse Taps: Insert the appropriate fuse tap into the chosen fuse slots. Each fuse tap has two slots: one for the original fuse and one for a new fuse for the dash cam (usually a 2A or 3A fuse).
- Connect Wires: Connect the red (ACC) wire from the hardwire kit to the ACC fuse tap, and the yellow (BAT) wire (if applicable) to the constant fuse tap.
- Ground the Wire: Connect the black (ground) wire from the hardwire kit to a metal bolt or screw on the car’s chassis, ensuring good electrical contact.
- Connect to Dash Cam: Plug the hardwire kit’s output cable into your dash cam.
- Test: Start your car to ensure the dash cam powers on and off correctly. If you have parking mode, turn off the car and confirm the dash cam transitions to parking mode.
- OBD-II Power Adapter:
- Locate your car’s OBD-II port (usually under the dashboard near the steering column).
- Plug the OBD-II adapter into the port.
- Route the cable from the adapter to your dash cam, tucking it away neatly.
- Start your car to confirm power.
Advanced Power Solutions: The Hardwire Kit and Parking Mode Integration
For optimal security and a truly integrated setup, a hardwire kit is indispensable, especially if you want parking mode functionality. This feature allows your dash cam to continue monitoring your vehicle even after you’ve turned off the engine, protecting against hit-and-runs in parking lots, vandalism, or theft attempts. A well-designed hardwire kit will have a low-voltage cutoff feature, which automatically shuts off power to the dash cam if your car battery’s voltage drops below a certain threshold, preventing your battery from draining completely. This intelligent power management transforms your dash cam into a 24/7 surveillance system, offering round-the-clock digital security and potentially saving you from significant financial headaches.
Post-Installation Checks and Maximizing Your Dash Cam’s Potential
Congratulations, your dash cam is installed! But the job isn’t quite finished. A few final checks and optimizations will ensure your device is working flawlessly and providing the maximum benefit.
Testing and Fine-Tuning: Ensuring Optimal Performance
- Power On/Off Cycles: Start and turn off your car several times to verify the dash cam powers on and off correctly with the ignition. If hardwired, check that it transitions into and out of parking mode as expected.
- Live View and Angle Adjustment: If your dash cam has a screen or a companion app, check the live view. Fine-tune the camera’s angle to ensure it captures the road properly without too much sky or hood. Make sure the front camera captures all lanes of traffic and that the rear camera provides a clear view of the area behind your car.
- Date and Time Stamp: Verify that the date and time are correctly set. This is crucial for valid evidence. Many modern dash cams sync with GPS or your phone for automatic time setting.
- Memory Card Check: Ensure the SD card is properly inserted and recognized by the camera. Perform a test recording to confirm footage is being saved. Format the SD card within the dash cam settings if prompted or recommended.
Software and Settings: Customizing Your Dash Cam Experience
Modern dash cams offer a plethora of settings that can be customized to your preferences.
- Video Quality: Confirm your desired resolution and frame rate are selected.
- Loop Recording: Ensure it’s enabled and set to a comfortable duration (e.g., 1, 3, or 5 minutes per clip).
- G-Sensor Sensitivity: Adjust the sensitivity to avoid false positives from minor bumps or overly aggressive braking, but sensitive enough to capture real impacts.
- Parking Mode Settings: If enabled, customize its settings (e.g., motion detection sensitivity, time-lapse interval, low-voltage cutoff threshold).
- GPS/Wi-Fi: Ensure these features are enabled if you intend to use them. Download the companion app to your smartphone and connect to the dash cam for easy access to settings and footage.
- Voice Prompts/Beeps: Adjust the volume or disable any annoying notifications.
Maintenance and Best Practices: Longevity and Reliability
To ensure your dash cam remains a reliable guardian for years to come:
- Regular SD Card Formatting: High-endurance SD cards are built for continuous writing, but regular formatting (monthly or bi-monthly) helps maintain their performance and prevent data corruption. Always format the card using the dash cam itself.
- Firmware Updates: Periodically check the manufacturer’s website for firmware updates. These can introduce new features, improve performance, or fix bugs.
- Clean the Lens: Just like your windshield, keep the dash cam lens clean for clear footage. Use a microfiber cloth.
- Temperature Management: In extreme heat, consider removing the dash cam when parked for extended periods, especially if it uses a battery (capacitors handle heat better).
- Review Footage Periodically: It’s good practice to review some footage occasionally to ensure the camera is recording correctly and the quality is as expected.
By following these steps, you’ve not only installed a dash cam but also integrated a powerful piece of technology into your daily drive. This smart investment offers invaluable peace of mind, bolstering your vehicle’s digital security and potentially safeguarding your finances against unforeseen circumstances. With a properly installed and maintained dash cam, you’re better prepared for whatever the road throws your way.
aViewFromTheCave is a participant in the Amazon Services LLC Associates Program, an affiliate advertising program designed to provide a means for sites to earn advertising fees by advertising and linking to Amazon.com. Amazon, the Amazon logo, AmazonSupply, and the AmazonSupply logo are trademarks of Amazon.com, Inc. or its affiliates. As an Amazon Associate we earn affiliate commissions from qualifying purchases.