In the ever-evolving landscape of technology, keeping your computing hardware up-to-date is paramount for optimal performance, stability, and security. Among the various components that require attention, the BIOS (Basic Input/Output System) holds a foundational role. For users of Gigabyte motherboards, understanding how to properly update this critical firmware is not just a technical task but a crucial step in maintaining a robust and future-proof system. This guide will walk you through the process, ensuring you can confidently enhance your Gigabyte system.
Understanding Your BIOS: The Foundation of Your PC’s Performance
Before diving into the “how-to,” it’s essential to grasp what the BIOS is and why its updates matter. The BIOS, or increasingly its modern successor UEFI (Unified Extensible Firmware Interface), is the first software your computer runs when you power it on. It’s a small piece of firmware stored on a chip on your motherboard, responsible for initializing and testing your hardware components (CPU, RAM, storage, graphics card, etc.) before handing control over to your operating system. Think of it as the ultimate gatekeeper and initial conductor of your system’s orchestra.

Why a BIOS Update Matters for Your Gigabyte System
Updating your BIOS isn’t a task to be taken lightly, but it offers significant benefits, especially for a brand like Gigabyte that constantly innovates its hardware. These updates can unlock new capabilities, enhance stability, and even patch critical security vulnerabilities. Here’s a detailed look at why you might consider it:
- Expanded Hardware Compatibility: Perhaps the most common reason for a BIOS update is to enable support for newer hardware. This often includes compatibility with the latest generation of CPUs, allowing you to upgrade your processor without needing a new motherboard. Gigabyte frequently releases BIOS updates for their chipsets to support new CPU microcodes or upcoming memory modules.
- Bug Fixes and Stability Improvements: Like any software, BIOS can have bugs. Updates often contain crucial fixes that resolve system instability, strange boot behaviors, or compatibility issues with specific peripherals. A more stable BIOS means a more reliable computing experience, preventing crashes and data loss.
- Performance Enhancements: Sometimes, a BIOS update can unlock subtle performance gains. This might include optimized memory timings, improved power management features, or better handling of boost clocks for your CPU. While not always dramatic, these optimizations can contribute to a snappier, more efficient system.
- Support for New Technologies: As technology progresses, so does the BIOS. Updates can add support for emerging standards like faster NVMe SSDs, new USB specifications, or enhanced security features like Trusted Platform Module (TPM) 2.0, which is essential for operating systems like Windows 11.
- Security Patches: Firmware vulnerabilities can be just as dangerous as software vulnerabilities. BIOS updates often include security patches that protect your system from sophisticated low-level attacks, bolstering your digital security posture.
- Extending Your PC’s Lifespan and Value: By keeping your Gigabyte motherboard’s BIOS updated, you’re essentially future-proofing your investment. Support for newer components and improved stability means you can potentially use your existing motherboard for longer, avoiding the cost of a full system overhaul. This aligns well with smart money management, as it defers larger expenses and maximizes the utility of your current tech.
The Inherent Risks: Proceeding with Caution
While the benefits are compelling, it’s crucial to acknowledge the risks involved. A BIOS update is not a routine software installation. Interrupting the process (e.g., due to a power outage), using the wrong BIOS file, or experiencing a system crash during the update can lead to a “bricked” motherboard – rendering it unusable. Therefore, this is an operation that demands careful preparation and strict adherence to instructions. The adage “if it ain’t broke, don’t fix it” often applies; only update if there’s a specific problem to solve or a feature you genuinely need.
Essential Preparation: Setting the Stage for a Successful Update
A successful BIOS update begins long before you click “start.” Thorough preparation is the cornerstone of avoiding potential pitfalls. Here’s a step-by-step guide to ensure you’re ready:
1. Identify Your Exact Gigabyte Motherboard Model
This is the single most critical step. Downloading and attempting to flash the wrong BIOS file can irrevocably damage your motherboard. You need to know the precise model name and revision number.
- Physical Inspection: The most reliable method is to physically open your PC case and look at the motherboard. The model name (e.g., Z690 AORUS ELITE AX DDR4) and often the revision number (e.g., Rev. 1.0) are printed clearly near the PCIe slots, CPU socket, or RAM slots.
- Software Utilities: If opening your case isn’t feasible, you can use software. Utilities like CPU-Z, Speccy, or HWiNFO64 can provide detailed information about your motherboard model and current BIOS version. Windows’ System Information tool (
msinfo32) also lists basic motherboard details. - Command Prompt: Open Command Prompt as administrator and type:
wmic baseboard get product,manufacturer,version,serialnumber.
Once identified, write down the full model name and revision number.
2. Download the Correct BIOS File from Gigabyte’s Official Website
Never download BIOS files from unofficial sources. Gigabyte’s support portal is your only trusted resource.
- Navigate to Gigabyte Support: Go to
www.gigabyte.com/support. - Search for Your Motherboard: Use the search bar or the navigation menu to find your specific motherboard model and revision.
- Locate the BIOS Section: On your motherboard’s support page, find the “BIOS” or “Firmware” section.
- Review BIOS Versions: You’ll see a list of available BIOS versions.
- Read Release Notes: Crucially, read the release notes for each version. This will tell you what improvements, bug fixes, or new hardware support each update provides. Don’t always jump to the absolute latest if an intermediate version addresses your specific need. Sometimes, a specific version might be required before jumping to the latest.
- Download: Download the desired BIOS file. It will typically be a compressed archive (ZIP or RAR).
- Unzip the File: Extract the contents of the downloaded archive to a convenient location. Inside, you’ll usually find the BIOS image file (often with a
.F#extension, e.g.,Z690AORUS.F8), a flash utility, and sometimes a README. It’s the BIOS image file you’ll need.
3. Prepare a USB Flash Drive
A USB flash drive is the most common and recommended medium for updating Gigabyte BIOS using Q-Flash.
- Small Capacity Preferred: Use a small capacity USB drive (2GB-16GB is ideal). Older BIOS utilities sometimes have issues with very large drives.
- Format to FAT32: This is critical. Many older BIOS utilities only recognize FAT32 formatted drives.
- Insert the USB drive.
- Open “This PC” or “My Computer.”
- Right-click on the USB drive and select “Format.”
- Under “File system,” select “FAT32.”
- Uncheck “Quick Format” for a thorough check (optional but recommended if you suspect issues), then click “Start.” Warning: This will erase all data on the USB drive.
- Copy the BIOS File: Copy only the unzipped BIOS image file (e.g.,
Z690AORUS.F8) to the root directory of the newly formatted USB drive. Do not put it in a folder.
4. Ensure a Stable Power Supply
Power loss during a BIOS update is catastrophic.
- UPS (Uninterruptible Power Supply): If you have one, connect your PC to a UPS. This provides a buffer against power outages and fluctuations.
- Direct Wall Outlet: Plug your PC directly into a wall outlet, avoiding power strips with surge protectors if they are old or unreliable.
- Avoid Storms: Do not perform a BIOS update during a thunderstorm or when there’s a risk of power fluctuations.
5. Backup Important Data (Optional, but Recommended)
While a BIOS update typically doesn’t affect your operating system or data, taking a full system backup to an external drive is always a wise precaution before any low-level system modification. This provides peace of mind in the unlikely event of unforeseen issues.
Methods for Updating Your Gigabyte BIOS: Q-Flash, @BIOS, and Q-Flash Plus
Gigabyte offers several methods for updating your BIOS. For most users, Q-Flash is the safest and recommended method. @BIOS is a Windows-based utility and carries higher risk due to the instability of the operating system environment. Q-Flash Plus is a special feature on select high-end motherboards for flashing without CPU/RAM/GPU.
Method 1: Q-Flash (Recommended for Stability and Safety)
Q-Flash is Gigabyte’s built-in BIOS flashing utility, accessible directly from the BIOS environment. It’s safer because it operates outside the Windows OS, reducing interference from background processes.
- Restart Your PC and Enter BIOS: Restart your computer. As soon as it begins to boot, repeatedly press the
DELkey (orDelete) on your keyboard. This will take you into the Gigabyte BIOS setup utility. - Access Q-Flash:
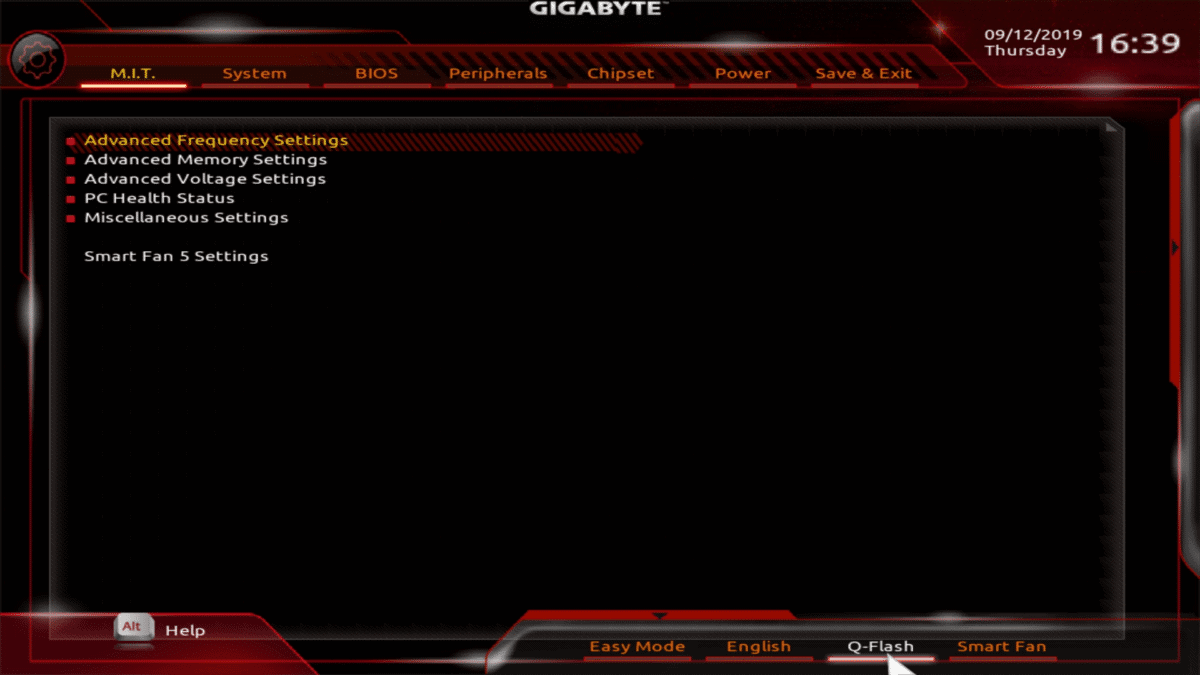
- In the classic (blue/grey) BIOS interface, you might see “Q-Flash” listed directly, or you can often press the
F8key to launch it. - In the modern (UEFI, graphical) BIOS interface, Q-Flash is usually found under the “M.I.T.” (Motherboard Intelligent Tweaker) tab or sometimes a dedicated “Q-Flash” button on the main screen (often by pressing
F8).
- In the classic (blue/grey) BIOS interface, you might see “Q-Flash” listed directly, or you can often press the
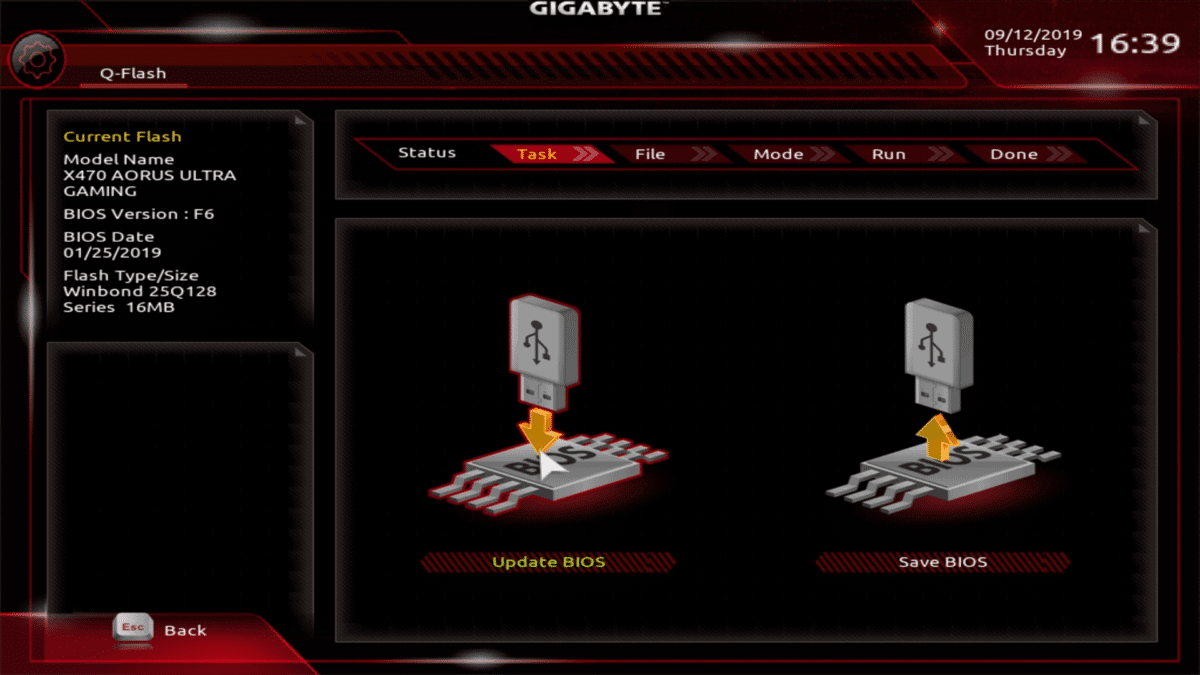
- Insert USB Drive: With the Q-Flash utility open, insert your prepared USB flash drive containing the BIOS file into a USB 2.0 port (USB 3.0 ports sometimes have compatibility issues, though less common with newer boards).
- Select “Update BIOS From Drive”: Navigate through the Q-Flash menu and select the option to “Update BIOS From Drive” or similar.
- Select the BIOS File: The utility will scan your USB drive. Select your formatted USB drive, then locate and select the BIOS image file (e.g.,
Z690AORUS.F8). - Verify Information: Q-Flash will display information about the current BIOS version and the version you are about to flash. Double-check that the model name and target BIOS version match your motherboard and the downloaded file.
- Initiate Flash: Confirm you want to proceed. The flashing process will begin.
- DO NOT INTERRUPT: This is the most critical stage. Do not turn off your computer, press any buttons, or disconnect power. Let the process complete entirely. It may take several minutes.
- Progress Indicator: The utility will usually show a progress bar.
- Automatic Restart: Once the flash is complete, your computer will automatically restart.
- Load Optimized Defaults: As the computer restarts and before it boots into Windows, press
DELagain to enter the BIOS.- Navigate to the “Save & Exit” section.
- Select “Load Optimized Defaults” (or “Load Default Settings”). This clears any old, potentially incompatible settings from the previous BIOS version.
- Select “Save & Exit Setup.”
- Reconfigure Settings (If Necessary): If you had custom BIOS settings (e.g., XMP/DOCP for RAM, boot order, fan curves, RAID configuration), you will need to re-enter the BIOS after the optimized defaults are loaded and reconfigure them.
Method 2: @BIOS Utility (Windows-Based – Use with Caution)
Gigabyte’s @BIOS utility allows you to update the BIOS from within Windows. While convenient, it’s generally considered less safe due to the complexities of the Windows environment. Only use this method if Q-Flash is not an option or if you understand the increased risks.
- Download and Install @BIOS: Go to your motherboard’s support page on Gigabyte’s website, download the latest version of the @BIOS utility, and install it on your Windows system.
- Run @BIOS: Launch the @BIOS utility.
- Choose Update Method:
- Update BIOS from File: This is the safer option. Select it and navigate to the unzipped BIOS image file you downloaded earlier.
- Update BIOS from Server: This option downloads and flashes directly from Gigabyte’s servers. It’s convenient but relies on a stable internet connection and Gigabyte’s server availability.
- Follow Prompts: The utility will guide you through the process, prompting you to confirm the update.
- DO NOT INTERRUPT: Again, once the flash starts, do not touch your computer until it restarts. Any interference or system crash can corrupt the BIOS.
- Automatic Restart: Your computer will restart after a successful flash.
- Load Optimized Defaults: Similar to Q-Flash, enter the BIOS (
DELkey), load “Optimized Defaults,” and “Save & Exit.” Reconfigure any custom settings.
Method 3: Q-Flash Plus (For Select Motherboards – CPU/RAM/GPU Not Required)
Q-Flash Plus is a powerful feature found on many modern Gigabyte motherboards (typically mid-to-high end). It allows you to update the BIOS even without a CPU, RAM, or graphics card installed – useful for flashing a new CPU’s compatibility BIOS.
- Check Motherboard Support: Verify if your specific Gigabyte motherboard model supports Q-Flash Plus. This information is usually found on the product page or in the motherboard manual. Look for a dedicated “Q-Flash Plus” button and USB port on the rear I/O panel.
- Prepare USB Drive: Format a USB drive to FAT32.
- Rename BIOS File (Crucial!): This is the most critical step for Q-Flash Plus. You must rename the downloaded BIOS image file to a specific name as per your motherboard’s manual. This name is usually something like
GIGABYTE.binorgigabyte.bin. Refer to your specific manual for the exact required filename. Copy this renamed file to the root of the USB drive. - Connect Power, Insert USB: With your PC powered off (but connected to the PSU), insert the USB drive into the designated “Q-Flash Plus” USB port on the motherboard’s rear I/O panel.
- Press Q-Flash Plus Button: Press the dedicated “Q-Flash Plus” button (often next to the USB port).
- Wait for LED Indicator: An LED indicator (usually near the button or inside the board) will start blinking, signifying the update is in progress.
- DO NOT INTERRUPT: Let the process complete. It can take several minutes.
- Completion: The LED will stop blinking when the update is finished.
- Power Off and Proceed: Once the LED stops, power off the system, remove the USB drive, and then proceed to install your CPU, RAM, etc., if you haven’t already. When you first boot, the new BIOS version will be active.
Post-Update Checks and Troubleshooting Common Issues
After successfully flashing your Gigabyte BIOS, a few steps are recommended to ensure everything is in order.
Post-Update Checks:
- Verify BIOS Version: Enter the BIOS (
DELkey) and check the system information section to confirm that the new BIOS version is correctly displayed. - System Stability: Boot into Windows and use your PC as normal. Pay attention to any unusual behavior, crashes, or performance degradation.
- Driver Reinstallation (Rare): In rare cases, especially with very old motherboards, you might need to reinstall chipset drivers or other specific drivers if you encounter issues. This is highly uncommon with modern boards and BIOS updates.
Troubleshooting Common Issues:
- PC Won’t Boot / Black Screen:
- Clear CMOS: This is your first line of defense. Power off your PC, unplug it, remove the CMOS battery (a small coin-cell battery on the motherboard) for 5-10 minutes, or short the “CMOS Clear” pins (refer to your motherboard manual for their location). Reinstall the battery and try booting again. This resets the BIOS to its factory defaults.
- Check Components: Ensure all components (RAM, GPU, cables) are properly seated.
- System Instability / Crashes:
- Load Optimized Defaults: If you didn’t do this after the update, do it now. Sometimes old settings conflict with new BIOS.
- Check RAM (XMP/DOCP): If you enabled XMP/DOCP profiles for your RAM, try disabling them and see if stability improves. Some BIOS versions might require slight adjustments to memory timings.
- Check CPU Overclock: If you have an overclock, reset it to default and test stability.
- Boot Loop:
- Check Boot Order: Enter BIOS and ensure your primary boot drive (usually your OS SSD/HDD) is set as the first boot device.
- BIOS Downgrade (Caution!): Some Gigabyte boards allow you to downgrade the BIOS using Q-Flash. However, this is generally not recommended unless explicitly advised by Gigabyte support, as it can sometimes lead to instability or compatibility issues. Always check if a downgrade is safe and necessary.
When to Seek Professional Help:
If you’ve tried basic troubleshooting steps and your PC remains unresponsive or exhibits severe issues, it’s best to contact Gigabyte technical support or a professional PC repair service. Attempting advanced fixes without expertise can worsen the situation.
Conclusion: Empowering Your Tech Journey with a Smart Update Strategy
Updating your Gigabyte motherboard’s BIOS is a powerful way to enhance its capabilities, improve stability, and extend its useful life. It’s a prime example of how understanding core technology components can directly impact your system’s performance and longevity. While the process demands careful attention to detail and a healthy respect for the risks involved, following this comprehensive guide ensures you’re equipped to navigate it successfully.
By meticulously identifying your hardware, downloading the correct files, preparing your tools, and utilizing the robust Q-Flash utility, you can confidently unlock the full potential of your Gigabyte system. This proactive approach to system maintenance not only keeps your tech at its peak but also contributes to smart financial decisions by maximizing your existing hardware investment, reinforcing the synergy between tech savviness and responsible resource management. Embrace the power of an optimized system and enjoy a more stable, efficient, and future-ready computing experience.
aViewFromTheCave is a participant in the Amazon Services LLC Associates Program, an affiliate advertising program designed to provide a means for sites to earn advertising fees by advertising and linking to Amazon.com. Amazon, the Amazon logo, AmazonSupply, and the AmazonSupply logo are trademarks of Amazon.com, Inc. or its affiliates. As an Amazon Associate we earn affiliate commissions from qualifying purchases.