In an increasingly visual digital landscape, the quality of your images can make or break your message, your brand, and even your bottom line. From captivating marketing campaigns to crisp product photography and stunning personal portfolios, high-resolution visuals are no longer a luxury but a necessity. Enter ReUpscale, a powerful, AI-driven tool designed to breathe new life into your images by intelligently enhancing their resolution without sacrificing detail.
This comprehensive guide will walk you through every step of installing ReUpscale, ensuring you can leverage its capabilities to elevate your digital content. Whether you’re a content creator, a small business owner, a developer, or simply someone looking to improve their personal photo collection, mastering ReUpscale installation is your first step towards unlocking a new realm of visual fidelity. We’ll delve into its importance, prepare your system, guide you through the installation process, and even help you troubleshoot common hurdles, ensuring a smooth journey into the world of AI-powered image upscaling.
Understanding ReUpscale and Its Impact
Before we dive into the technicalities of installation, let’s take a moment to understand what ReUpscale is, why it’s gaining traction, and how it can profoundly impact various aspects of your digital life, particularly in the realms of Tech, Brand, and even Money.
What is ReUpscale?
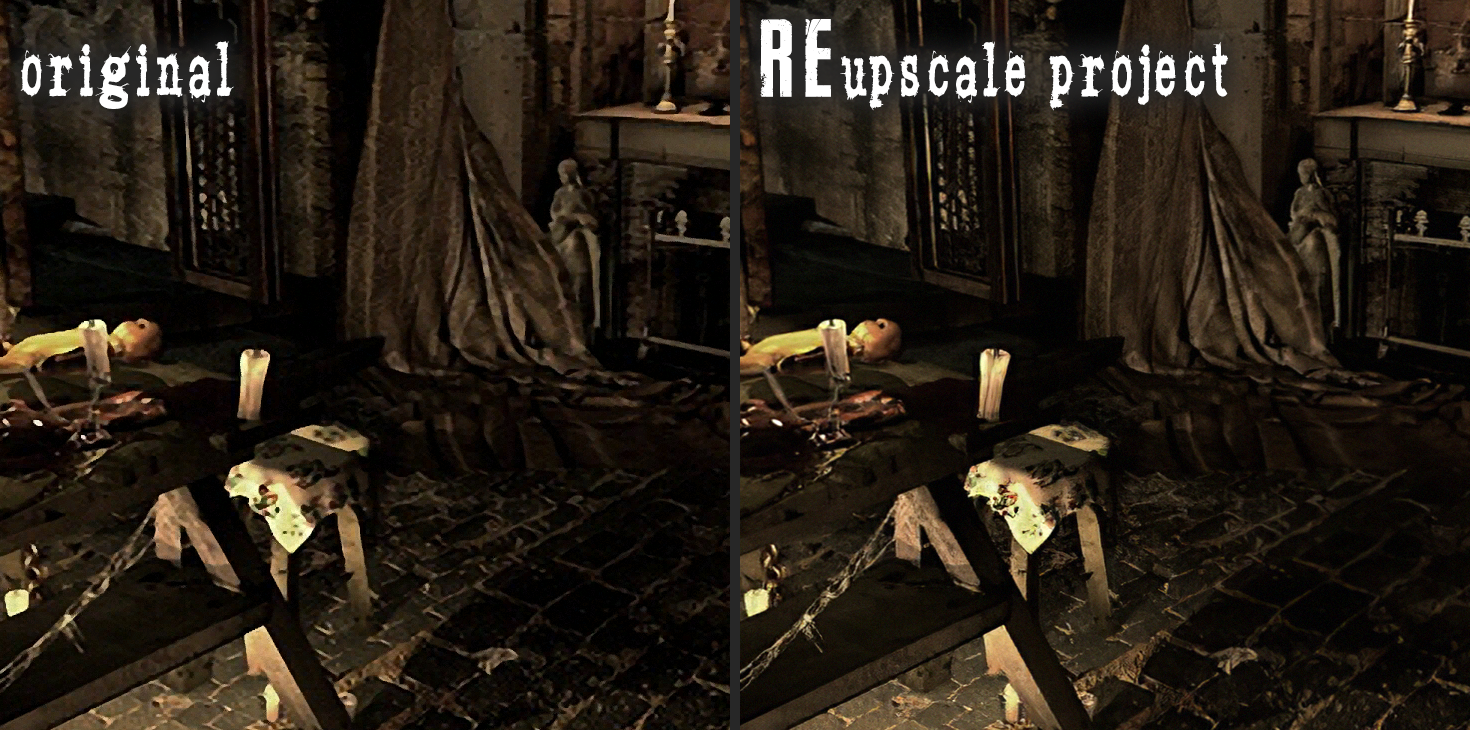
ReUpscale is an advanced software solution that utilizes sophisticated artificial intelligence and machine learning algorithms to enlarge images while simultaneously improving their quality. Unlike traditional upscaling methods that often result in pixelation, blurriness, or a loss of fine details, ReUpscale intelligently “guesses” the missing pixels, reconstructing images with incredible clarity and sharpness. It can transform low-resolution images into high-resolution masterpieces, making them suitable for larger displays, print, or simply a more professional online presence.
At its core, ReUpscale is built upon cutting-edge neural networks that have been trained on vast datasets of images. This training allows it to identify patterns, textures, and edges, enabling it to add detail rather than just stretching existing pixels. For anyone invested in the quality of their visual output, ReUpscale represents a significant leap forward in image processing technology, aligning perfectly with the latest “Tech trends” and “AI Tools.”
Why ReUpscale Matters for Creatives and Businesses
The implications of a tool like ReUpscale extend far beyond mere image enlargement. For “Creatives” and “Businesses,” its utility touches upon vital areas such as “Brand Strategy,” “Marketing,” and even “Productivity.”
- Brand Strategy and Corporate Identity: A strong brand relies heavily on consistent, high-quality visual representation. Outdated, low-resolution logos, product images, or marketing collateral can severely undermine a brand’s credibility. ReUpscale empowers businesses to refresh their visual assets without the often prohibitive cost and time of professional reshoots or redesigns. By improving the clarity and resolution of existing imagery, companies can ensure their “Corporate Identity” shines through every touchpoint, from social media profiles to print advertisements. This directly contributes to a stronger, more professional “Brand” perception.
- Marketing and Design: In the competitive world of digital marketing, captivating visuals are key to grabbing attention and driving engagement. ReUpscale allows marketers to repurpose older images, adapt visuals for different platforms (e.g., small web images to large banners), and enhance stock photos to meet specific campaign requirements. Designers can integrate ReUpscale into their workflow to rescue suboptimal assets, providing greater flexibility and reducing production time. This translates to more effective “Marketing” campaigns and higher-quality “Design” output, improving conversion rates and overall campaign ROI, which ultimately ties back to “Money.”
- Productivity and Efficiency: Imagine having a treasure trove of older, low-resolution photographs that you can now transform into usable, high-quality assets. ReUpscale saves countless hours that might otherwise be spent searching for new images, commissioning photography, or attempting manual pixel-by-pixel corrections. For professionals and enthusiasts alike, it streamlines the content creation process, allowing for greater “Productivity” and faster iteration. This efficiency can lead to significant cost savings, directly impacting “Business Finance” by reducing operational expenses.
Key Features and Benefits
The core strength of ReUpscale lies in its advanced algorithms, but its practical benefits are equally compelling:
- Superior Image Quality: The primary benefit is undeniably the ability to produce sharp, detailed, and visually appealing images from lower-resolution inputs, far surpassing traditional scaling methods.
- Versatility: Capable of handling various image types, from photographs to illustrations, making it a valuable tool across different industries.
- Cost-Effectiveness: Reduces the need for expensive re-photography or redesigns, offering a powerful tool for extending the lifespan and utility of existing visual assets.
- Ease of Integration: Designed to be accessible, ReUpscale can often be integrated into existing digital workflows, enhancing “Productivity” without a steep learning curve.
- Future-Proofing: By leveraging AI, ReUpscale stays ahead of the curve in image processing, aligning with ongoing “Technology Trends” and ensuring users benefit from the latest advancements.
Preparing for Installation: Prerequisites and System Requirements
Before you can unleash the power of ReUpscale, it’s crucial to ensure your system meets the necessary requirements and has all the foundational software installed. This preparatory phase is essential for a smooth installation and optimal performance, preventing many common “Troubleshooting” headaches down the line.
Essential Software Dependencies
ReUpscale, like many AI-driven tools, often relies on a set of core software components to function correctly. The exact dependencies can vary slightly depending on the specific version or flavor of ReUpscale you intend to install, but typically they include:
- Python: The majority of AI/ML tools, including ReUpscale, are developed using Python due to its extensive libraries and active community. You’ll need a recent version of Python (e.g., 3.8 or newer). It’s highly recommended to use a virtual environment (like
venvorconda) to isolate ReUpscale’s dependencies from your system’s global Python packages, preventing conflicts and maintaining a clean development environment. This is a best practice for “Digital Security” and “Productivity” in development. - Deep Learning Frameworks: ReUpscale will likely leverage popular deep learning frameworks. Common choices include:
- PyTorch: A widely used open-source machine learning library developed by Facebook AI Research.
- TensorFlow: Google’s powerful open-source library for machine learning and artificial intelligence.
You will typically need to install one of these (or both, depending on the specific models ReUpscale uses) along with their necessary dependencies.
- Other Python Libraries: Beyond the core frameworks, ReUpscale will depend on various other Python packages for image manipulation (e.g.,
Pillow,OpenCV), numerical operations (NumPy), and utility functions. These are usually specified in arequirements.txtfile and are installed automatically when usingpip. - Git (Optional, but Recommended): If you plan to install ReUpscale directly from its source code repository (e.g., GitHub), you’ll need Git installed on your system to clone the repository. Git is an indispensable tool for developers and those wanting to stay on the cutting edge of “Software” development.
Hardware Recommendations
While ReUpscale can often run on standard CPUs, its true potential is unleashed when leveraging powerful graphics processing units (GPUs). The computational demands of AI inference, especially for high-resolution image processing, can be immense.
- CPU: A modern multi-core CPU (Intel i5/Ryzen 5 or equivalent, or better) is generally sufficient for managing the application logic and smaller upscaling tasks.
- GPU (Highly Recommended): This is where ReUpscale truly shines. An NVIDIA GPU with CUDA support is strongly recommended for significantly faster processing times.
- Entry-Level: NVIDIA GTX 1660 or RTX 2060 with at least 6GB VRAM.
- Recommended: NVIDIA RTX 3060, 3070, 3080, 4070, 4080 with 8GB VRAM or more.
- Professional/High-Volume: NVIDIA RTX 3090, 4090, or professional-grade GPUs like NVIDIA A-series cards with 12GB+ VRAM for handling very large images or batch processing.
The more VRAM (Video RAM) your GPU has, the larger the images you can process without running into memory issues, and the faster the processing will be. This reflects the increasing reliance on specialized hardware for advanced “AI Tools.”
- RAM: At least 8GB of system RAM is a good starting point, but 16GB or 32GB is recommended, especially if you’re working with large image files or running multiple applications simultaneously.
- Storage: A Solid State Drive (SSD) is highly recommended for faster loading times of the software, AI models, and image files. Ensure you have ample free space for the ReUpscale installation, its models (which can be several gigabytes), and your processed images.
Operating System Compatibility
ReUpscale, being a Python-based application, typically offers broad cross-platform compatibility:
- Windows: Most versions of Windows (10 and 11) are fully supported. You’ll need to install Python and configure your environment variables correctly.
- macOS: macOS users can also install ReUpscale, though GPU acceleration might be limited depending on the specific hardware (M1/M2/M3 Macs have their own optimized frameworks, while older Intel Macs might struggle with NVIDIA CUDA).
- Linux: Various Linux distributions (Ubuntu, Fedora, Debian, etc.) are excellent environments for running AI/ML applications, often providing the most straightforward setup for GPU acceleration with CUDA.
Before proceeding, take a moment to confirm that your system meets these prerequisites. This attention to detail will save you considerable time and frustration during the installation phase.
Step-by-Step Installation Guide
With your system prepared, it’s time to install ReUpscale. We’ll cover the most common installation methods, focusing on clarity and ease of execution. Remember, specific commands might vary slightly depending on the exact ReUpscale project you’re using (e.g., a library vs. a standalone application), but the underlying principles remain consistent.
Method 1: Installing via Pip (Python Package Manager)
If ReUpscale is distributed as a Python package, pip is the simplest way to install it.
- Open your Terminal/Command Prompt:
- Windows: Search for “cmd” or “PowerShell” and run it.
- macOS/Linux: Open your preferred terminal application.
- Create a Virtual Environment (Highly Recommended):
This isolates ReUpscale’s dependencies.
bash

python -m venv reupscale_env
- Activate the Virtual Environment:
- Windows:
bash

.reupscale_envScriptsactivate
- macOS/Linux:
bash

source reupscale_env/bin/activate
You’ll notice(reupscale_env)prepending your command prompt, indicating the environment is active.
- Windows:
- Install ReUpscale and its Dependencies:
Assuming ReUpscale is available on PyPI (Python Package Index), you can install it like any other Python package.
bash

pip install reupscale
If ReUpscale requires a specific deep learning framework for GPU support (e.g., PyTorch with CUDA), you might need to install that first, following instructions from PyTorch’s website. For example:
bash

pip install torch torchvision torchaudio --index-url https://download.pytorch.org/whl/cu118 # For CUDA 11.8

pip install reupscale
This command will download and install ReUpscale along with all its specified dependencies.
Method 2: Manual Installation from Source (Git Clone)
Sometimes, ReUpscale might be a project hosted on GitHub, requiring you to clone the repository and install it manually. This is common for cutting-edge projects or those still under active development.
- Install Git (if you haven’t already): Refer to Git’s official website for installation instructions.
- Open your Terminal/Command Prompt.
- Navigate to your desired installation directory:
bash

cd C:UsersYourUserDocumentsProjects # Windows example

cd ~/Projects # macOS/Linux example
- Clone the ReUpscale Repository: Replace
[repository_url]with the actual GitHub URL for ReUpscale.
bash

git clone [repository_url]
This will create a new directory (e.g.,reupscale) containing the source code. - Navigate into the ReUpscale Directory:
bash

cd reupscale
- Create and Activate a Virtual Environment (as described in Method 1).
- Install Dependencies: Most source projects include a
requirements.txtfile listing all necessary Python packages.
bash

pip install -r requirements.txt
Again, if specific GPU-enabled frameworks are needed, install them before this step, as described in Method 1. - Install ReUpscale (if it’s designed as an installable package): Some projects have a
setup.pyfile or similar.
bash

pip install .
Or, if it’s meant to be run directly, this step might not be necessary. Consult the project’sREADME.mdfile for specific instructions.
Setting Up Your Environment (Post-Installation)
After installation, a few additional steps might be necessary for optimal functionality, especially concerning AI models and environment variables.
- Download AI Models: Many AI upscaling tools require specific pre-trained models to be downloaded. These models are often large files (hundreds of MBs to several GBs) and are not included in the initial package to keep the install size small. Check the ReUpscale documentation for instructions on where to download and place these models. They might need to be in a specific folder within the ReUpscale directory or a designated cache location.
- Environment Variables (if applicable): Some tools might benefit from or require specific environment variables to be set, such as paths to CUDA installations, model directories, or custom configurations. Consult ReUpscale’s documentation for any such requirements.
- GPU Drivers: Ensure your NVIDIA GPU drivers are up-to-date. This is critical for optimal performance and compatibility with CUDA.
Verifying the Installation
To confirm ReUpscale is correctly installed and ready for use, you can usually perform a simple test:
- Ensure your virtual environment is active.
- Try running a basic command. Most tools have a help command or version check:
bash

reupscale --help
or
bash

python -m reupscale --version
If you see output detailing commands, options, or a version number, your installation is likely successful. If you encounter errors, proceed to the troubleshooting section.
Your First Upscale: Basic Usage and Configuration
With ReUpscale successfully installed, it’s time to put it to work. This section will guide you through a basic upscaling task and introduce you to some common configuration options, helping you quickly integrate this powerful “AI Tool” into your workflow for improved “Productivity.”
Running ReUpscale from the Command Line
Most AI upscaling tools like ReUpscale are primarily command-line interfaces (CLIs). This provides immense power and flexibility for scripting and automation.
Let’s assume a hypothetical basic command structure for ReUpscale:
- Prepare your input image: Place a low-resolution image you wish to upscale in an accessible directory (e.g.,
input.jpg). - Open your Terminal/Command Prompt (with the virtual environment activated).
- Navigate to the directory containing your input image, or provide the full path to the image.
- Execute the upscaling command:
bash

reupscale --input C:pathtoyourimageinput.jpg --output C:pathtoyouroutputoutput_upscaled.png --scale 4 --model 'default_model'
Let’s break down this hypothetical command:reupscale: The command to invoke the ReUpscale application.--input C:pathtoyourimageinput.jpg: Specifies the path to your original, low-resolution image.--output C:pathtoyouroutputoutput_upscaled.png: Defines the output path and filename for the upscaled image. It’s often a good practice to use a lossless format like PNG for the output to preserve quality, especially if you plan further editing.--scale 4: Indicates the desired upscale factor (e.g., 2 for double the resolution, 4 for quadruple).--model 'default_model': Specifies which AI model to use for upscaling. ReUpscale might offer different models optimized for different types of images (photos, illustrations, text) or for different performance/quality trade-offs.
After running the command, ReUpscale will process the image, and upon completion, your high-resolution output file (output_upscaled.png in this example) will be saved in the specified directory. The processing time will vary significantly based on your image size, upscale factor, selected model, and crucially, whether you’re using a CPU or a powerful GPU.
Exploring Configuration Options
ReUpscale is likely to offer a variety of configuration options that allow you to fine-tune the upscaling process to suit your specific needs. Understanding these parameters can significantly enhance the quality of your results and your overall “Productivity.”
- Upscale Factor (
--scale): As seen above, this determines how much larger your output image will be. Common factors are 2x, 3x, 4x, or even higher. Experiment to find the sweet spot for your images and intended use. - AI Model Selection (
--model): Many AI upscalers come with multiple pre-trained models.- General-purpose models: Good for a wide range of photos.
- Detail-oriented models: Might emphasize fine textures but could sometimes introduce artifacts.
- Anime/Illustration models: Specifically trained for non-photographic content.
- Fast models: Optimized for speed over ultimate quality.
Refer to ReUpscale’s documentation to understand the characteristics of each available model and choose the one best suited for your input imagery.
- Output Format and Quality (
--format,--quality): You can often specify the output file format (PNG, JPG, WebP, etc.) and, for lossy formats like JPEG, adjust the compression quality. For professional use, sticking with lossless formats like PNG or TIFF for intermediate files is advisable. - Batch Processing (
--batch_input,--batch_output): For users needing to process multiple images, ReUpscale may support batch processing. Instead of individual input/output files, you might specify input and output directories, and ReUpscale will process all images within the input directory. This is a massive “Productivity” booster for large projects. - Tiling/Chunking (
--tile_size): For extremely large images that might exceed your GPU’s VRAM, some tools offer a “tiling” option. This processes the image in smaller chunks, or “tiles,” stitching them back together at the end. While slightly slower, it allows you to upscale much larger images than your VRAM would typically permit. - GPU vs. CPU (
--device cudaor--device cpu): Explicitly tell ReUpscale whether to use your GPU (CUDA) or CPU for processing, especially useful for debugging or when your GPU is busy.
To discover all available options, always consult the ReUpscale documentation or run the help command: reupscale --help.
Integrating ReUpscale into Your Workflow
The command-line nature of ReUpscale makes it highly adaptable to various workflows and “Digital Security” best practices, enhancing overall “Productivity.”
- Scripting: For repetitive tasks, you can write simple shell scripts (Bash, Batch, PowerShell) to automate the upscaling of entire folders or sequences of images.
- Automation Tools: Integrate ReUpscale commands into broader automation workflows using tools like Zapier, Make (formerly Integromat), or even custom Python scripts that monitor folders for new images and trigger upscaling.
- Creative Software Pipelines: While ReUpscale might not have a direct plugin for every photo editor, you can use it as a pre- or post-processing step. Upscale an old photo before importing it into Photoshop for retouching, or use it to prepare images for web or print output.
- Web Services/APIs: For advanced users or developers, it’s often possible to wrap ReUpscale functionality into a custom web service or API, enabling on-demand upscaling for web applications or mobile apps. This highlights how “AI Tools” can be built into broader “Apps” and “Gadgets” ecosystems.
By understanding and leveraging these options, ReUpscale transforms from a simple utility into a powerful asset, significantly improving the quality and efficiency of your visual content creation.
Troubleshooting Common Installation Issues
Even with careful preparation, encountering issues during software installation is not uncommon, especially with sophisticated “AI Tools” like ReUpscale. This section addresses some of the most frequent problems and provides solutions, helping you minimize downtime and maintain “Productivity.”
Dependency Conflicts
One of the most common pitfalls in Python environments is managing dependencies.
- Problem: You get
ModuleNotFoundError,ImportError, or similar messages indicating a required package is missing or incompatible. - Solution:
- Virtual Environments: Always use a virtual environment. If you didn’t, create one now, activate it, and reinstall ReUpscale and its dependencies within it. This prevents conflicts with other Python projects on your system.
- Check
requirements.txt: Ensure all packages listed in the project’srequirements.txt(if applicable) are installed. If you installed manually, you might have missed some. - Version Mismatches: Sometimes, an installed package version is too new or too old for ReUpscale. Check the project’s documentation for specific version requirements for Python, PyTorch/TensorFlow, and other key libraries. You might need to use
pip install package_name==X.Y.Zto specify a compatible version. pip install --upgrade pip: Ensure yourpipis up-to-date, as older versions can sometimes have issues resolving dependencies.
GPU/CUDA Errors
When leveraging GPU acceleration, errors related to CUDA or your graphics card are common.
- Problem: Errors like
CUDA out of memory,No NVIDIA driver found,RuntimeError: CUDA error: invalid device function, or slow performance despite having a GPU. - Solution:
- NVIDIA Drivers: Ensure your NVIDIA graphics drivers are up-to-date. Download the latest drivers directly from the NVIDIA website, matching your GPU model.
- CUDA Toolkit: Verify that you have the correct version of the CUDA Toolkit installed that is compatible with your PyTorch/TensorFlow version. Check the PyTorch/TensorFlow installation guides for exact CUDA version compatibility. Uninstall and reinstall if necessary.
- cuDNN: Ensure cuDNN is correctly installed and configured. It’s an NVIDIA library that accelerates deep learning frameworks.
- VRAM Usage:
CUDA out of memoryusually means your GPU doesn’t have enough VRAM for the current image size and model.- Try processing smaller images.
- Reduce the upscale factor.
- Look for a
--tile_sizeor--batch_sizeoption in ReUpscale to process images in smaller chunks or fewer images at a time. - Close other applications that might be consuming GPU memory.
- GPU Selection: If you have multiple GPUs, ensure ReUpscale is trying to use the correct one. Some tools allow specifying the device ID (e.g.,
CUDA_VISIBLE_DEVICES=0 reupscale ...). - PyTorch/TensorFlow GPU Version: Make sure you installed the PyTorch or TensorFlow package specifically compiled for CUDA, not the CPU-only version. For example,
pip install torch torchvision torchaudio --index-url https://download.pytorch.org/whl/cu118for PyTorch with CUDA 11.8.
Path and Environment Variable Problems
Incorrectly configured system paths or environment variables can prevent applications from finding necessary files or executables.
- Problem: Commands like
reupscaleare not found, or certain libraries cannot be located. - Solution:
- Virtual Environment Activation: Double-check that your virtual environment is active. If it’s not, the
reupscalecommand (which lives in the virtual environment’s scripts directory) won’t be in your system’s PATH. - Python Path: Ensure your system’s PATH variable correctly points to your Python installation (or rather, the virtual environment’s Python).
- CUDA Paths: For GPU acceleration, CUDA environment variables (like
CUDA_HOMEorPATHincluding CUDAbindirectories) need to be correctly set, especially on Linux. Refer to NVIDIA’s CUDA installation guide for details. - Model Paths: If ReUpscale can’t find its AI models, ensure they are downloaded and placed in the exact directory specified by the documentation. You might need to set an environment variable or command-line argument to point to the model directory.
- Virtual Environment Activation: Double-check that your virtual environment is active. If it’s not, the
Seeking Community Support
If you’ve exhausted these common solutions, don’t despair. The open-source and AI communities are typically very supportive.
- ReUpscale’s Documentation/GitHub Issues: The first place to look for specific troubleshooting tips is the official documentation, README, or the “Issues” section on ReUpscale’s GitHub repository. Others may have already reported and solved your exact problem.
- Developer Forums/Community Channels: Many AI tools have dedicated forums, Discord servers, or community channels where you can ask for help.
- Stack Overflow: A vast resource for programming and technical questions. Search for your specific error message or a description of your problem.
By systematically approaching these issues, you can usually resolve installation hurdles and get ReUpscale running smoothly, ensuring that your journey into advanced image upscaling remains productive and rewarding.
Conclusion
The journey to high-quality visual content is continually evolving, and tools like ReUpscale represent a significant leap forward in making professional-grade image enhancement accessible. By following this comprehensive installation guide, you’ve taken the crucial first step in harnessing the power of artificial intelligence to transform your low-resolution images into stunning, high-fidelity visuals.
We’ve covered everything from understanding ReUpscale’s profound impact on “Brand Strategy,” “Marketing,” and “Productivity” to preparing your system with the right “Tech” dependencies, navigating the step-by-step installation process, and even tackling common troubleshooting scenarios. Whether you’re a seasoned developer, a budding content creator, or a business aiming to polish its “Corporate Identity,” ReUpscale offers a robust solution for ensuring your visuals always stand out.
As “AI Tools” continue to advance, integrating them into your workflow becomes paramount for staying competitive and efficient. ReUpscale is more than just an installer; it’s an investment in the visual integrity of your work, a tool that saves “Money” by extending the life of existing assets, and a catalyst for greater “Productivity.” Now that you have ReUpscale up and running, we encourage you to experiment, explore its various models and configurations, and unleash its full potential. The future of visual content is crisp, clear, and powered by AI, and you are now equipped to be a part of it.
aViewFromTheCave is a participant in the Amazon Services LLC Associates Program, an affiliate advertising program designed to provide a means for sites to earn advertising fees by advertising and linking to Amazon.com. Amazon, the Amazon logo, AmazonSupply, and the AmazonSupply logo are trademarks of Amazon.com, Inc. or its affiliates. As an Amazon Associate we earn affiliate commissions from qualifying purchases.