
In the vast and ever-evolving landscape of technology, Java stands as a towering pillar, powering a colossal array of applications from enterprise-level systems and mobile apps to big data solutions and web services. Its celebrated platform independence, robust security features, and extensive ecosystem have cemented its position as one of the most widely used programming languages globally. Whether you’re an aspiring developer about to embark on your coding journey, a seasoned professional setting up a new development environment, or simply a user needing to run Java-based applications, understanding how to properly install Java is a fundamental step.
This guide will walk you through the entire process, demystifying the different Java components, outlining the installation steps for popular operating systems, and providing crucial tips for verification and troubleshooting. By the end of this article, you’ll have a fully functional Java environment, ready to support your development projects or power your favorite Java applications.
Understanding Java: JDK vs. JRE and When You Need It
Before diving into the installation process, it’s essential to grasp the core components of Java and their distinct roles. This foundational knowledge will help you choose the correct package for your specific needs, preventing unnecessary installations and potential configuration headaches.
What is Java? The Platform and Its Pervasiveness
At its heart, Java is a high-level, class-based, object-oriented programming language designed for maximum portability. “Write once, run anywhere” (WORA) is its enduring motto, achieved through the Java Virtual Machine (JVM), which allows Java bytecode to execute on any device that has a JVM. This remarkable adaptability has led to Java’s pervasive use in diverse areas such as:
- Enterprise Applications: Many large-scale business applications rely on Java, thanks to its scalability and robustness.
- Android Development: The Android operating system is built on Java, making it the primary language for developing native Android apps.
- Web Applications: Frameworks like Spring and Jakarta EE (formerly Java EE) are popular for building powerful web backends.
- Big Data: Technologies like Apache Hadoop and Apache Spark, critical for processing massive datasets, are written in Java (or Scala, which runs on the JVM).
- Scientific Applications: Java’s performance and stability make it suitable for complex scientific computing.
This wide adoption underscores why understanding Java, and how to install it, remains a crucial skill in the tech world.
Java Runtime Environment (JRE): For Running Java Applications
The JRE is what end-users typically need. It’s a bundle of software that enables your computer to run Java applications. It includes the Java Virtual Machine (JVM), which interprets Java bytecode and executes it, along with essential core libraries and other supporting files. If your primary goal is simply to run a Java-based application, such as a desktop program, a web applet (though less common now), or certain system tools, the JRE is sufficient. It does not contain the development tools required to write and compile Java code. Think of it as the “player” for Java programs.
Java Development Kit (JDK): For Developing Java Applications
The JDK is a superset of the JRE and is specifically designed for Java developers. It contains everything found in the JRE, plus a suite of development tools necessary for writing, compiling, debugging, and packaging Java applications. Key components of the JDK include:
javac(Java Compiler): Translates Java source code (.javafiles) into Java bytecode (.classfiles).java(Java Launcher): Executes the compiled bytecode.javadoc(Documentation Generator): Creates API documentation from source code comments.jdb(Java Debugger): Helps developers find and fix errors in their code.jar(Archiver Tool): Packages Java classes and associated metadata into a single.jarfile.
If you plan to write, compile, and develop Java applications, the JDK is what you need. Most developers will always install the JDK, as it provides both the runtime and development capabilities.
Why is Java Still Relevant in Today’s Tech Landscape?
Despite the emergence of many new programming languages, Java continues to thrive. Its relevance is continually reinforced by its massive community, extensive libraries, robust performance, and strong corporate backing. Oracle’s continuous updates, along with the growth of OpenJDK, ensure that Java remains modern, secure, and performant. Its mature ecosystem provides stability for enterprise systems, while its adaptability ensures it integrates well with newer technologies like cloud computing, microservices, and AI. For any professional navigating the tech industry, having Java proficiency, and the ability to manage its environment, is a valuable asset.
Preparing for Java Installation: Key Considerations
Before you download and run an installer, a few preliminary steps and considerations can streamline the process and prevent common pitfalls. Taking a moment to prepare will ensure a smooth installation and a correctly configured Java environment.
Checking for Existing Java Installations
It’s a good practice to check if Java is already installed on your system and, if so, which version. This helps avoid conflicts or ensures you’re installing the desired version without interference from older ones.
On Windows:
Open Command Prompt (CMD) and type:
java -version
javac -version (if checking for JDK)
On macOS/Linux:
Open Terminal and type:
java -version
javac -version (if checking for JDK)
If you see version information, Java is installed. If you get a “command not found” error, Java is likely not installed or not correctly configured in your system’s PATH. If you have multiple versions and want to clean up, you might need to manually uninstall older versions through your operating system’s control panel (Windows) or package manager (Linux), or manage them with tools like sdkman (Linux/macOS).
Choosing the Right Java Version: Oracle JDK vs. OpenJDK
Historically, Oracle JDK was the dominant choice. However, with changes in Oracle’s licensing model, OpenJDK has gained significant traction and is now the preferred choice for many developers and organizations, especially for production environments due to its open-source nature and free distribution.
- Oracle JDK: The official, commercial distribution from Oracle. While free for development and personal use, commercial use often requires a subscription.
- OpenJDK: The open-source reference implementation of Java. Several vendors provide builds of OpenJDK, including Adoptium (formerly AdoptOpenJDK), Amazon Corretto, Azul Zulu, and Red Hat. These are generally free for all uses.
Which to choose?
For most users and developers, especially those starting out or working on open-source projects, OpenJDK (specifically a build from Adoptium or Amazon Corretto) is highly recommended. It offers the same core functionality as Oracle JDK without licensing concerns.
Long-Term Support (LTS) Versions:
Java releases new versions every six months. However, not all versions receive long-term support. LTS versions are recommended for stability and extended maintenance. Key LTS versions include Java 8, Java 11, Java 17, and Java 21. For new projects, Java 17 or Java 21 are excellent choices, offering modern features and extended support.
System Requirements
Java is remarkably lightweight in terms of basic system requirements, but the demands grow with the complexity of the applications you develop or run.
Generally, you’ll need:
- Operating System: Windows 7 or later (64-bit recommended), macOS 10.11 (El Capitan) or later, various Linux distributions.
- Processor: Any modern x86-64 processor. ARM processors are also supported for newer Java versions.
- RAM: Minimum 2GB (4GB+ recommended for development).
- Disk Space: 200MB – 1GB, depending on the version and additional components.
Always check the specific system requirements for the particular Java version you intend to install on the vendor’s website (e.g., Adoptium, Oracle).
Step-by-Step Installation Guides by Operating System
The installation process varies slightly depending on your operating system. Below are detailed instructions for Windows, macOS, and Linux, covering the most common methods.
Installing Java on Windows
Installing Java on Windows typically involves downloading an executable installer and then configuring environment variables.
-
Download the JDK/JRE:
- Go to the official download page for your chosen distribution. For OpenJDK, a popular choice is Adoptium (adoptium.net). Navigate to the “Temurin” downloads.
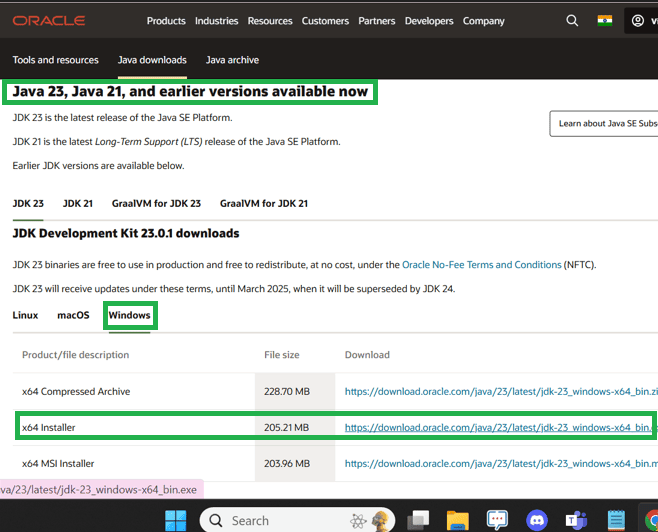
- Select the latest LTS version (e.g., Java 17 or Java 21), choose “Windows,” “x64,” and download the
msiinstaller. - For Oracle JDK, visit oracle.com/java/technologies/downloads and select the Windows x64 Installer.
-
Run the Installer:
- Locate the downloaded
.msifile and double-click it. - Follow the on-screen instructions in the installer wizard.
- You can typically accept the default installation path (e.g.,
C:Program FilesJavajdk-17). - The installer usually offers to set environment variables automatically for newer versions. If it does, great! If not, you’ll do it manually in the next step.
- Locate the downloaded
-
Set Environment Variables (if not set automatically):
- Set
JAVA_HOME:- Search for “Environment Variables” in the Windows search bar and select “Edit the system environment variables.”
- Click “Environment Variables…”
- Under “System variables,” click “New…”
- For “Variable name,” enter
JAVA_HOME. - For “Variable value,” enter the path to your JDK installation directory (e.g.,
C:Program FilesJavajdk-17). Click “OK.”
- Add to
Path:- Under “System variables,” find the
Pathvariable and click “Edit…” - Click “New” and add
%JAVA_HOME%bin. - Ensure this entry is at the top of the list to prioritize your installed Java version. Click “OK” on all open dialogs.
- Under “System variables,” find the
- Set
-
Verify Installation:
- Open a new Command Prompt window (important, as existing ones won’t have updated environment variables).
- Type
java -versionand press Enter. You should see the version you just installed. - Type
javac -versionand press Enter. You should see the compiler version (which should matchjava -version). - Type
echo %JAVA_HOME%to confirmJAVA_HOMEis set correctly.
Installing Java on macOS
Installing Java on macOS is similar to Windows, often involving a .dmg installer or using a package manager like Homebrew.
-
Download the JDK/JRE:
- Go to Adoptium (adoptium.net) or Oracle JDK downloads.
- Select the macOS platform and the
pkginstaller (x64 for Intel Macs, aarch64 for Apple Silicon Macs).
-
Run the Installer:
- Locate the downloaded
.pkgfile and double-click it. - Follow the on-screen prompts of the installer wizard.
- The installer will typically place the JDK in
/Library/Java/JavaVirtualMachines/. - Unlike Windows, macOS often handles the
PATHvariable automatically for Java installations, making manual configuration less common.
- Locate the downloaded
-
Verify Installation:
- Open a new Terminal window.
- Type
java -versionand press Enter. - Type
javac -versionand press Enter.

- Using Homebrew (Recommended for Developers):
- If you don’t have Homebrew, install it:
/bin/bash -c "$(curl -fsSL https://raw.githubusercontent.com/Homebrew/install/HEAD/install.sh)" - Install a specific OpenJDK version (e.g., Temurin 17):
brew install --cask temurin@17 - Homebrew manages symlinks and often updates your PATH automatically. You might need to set
JAVA_HOMEmanually:export JAVA_HOME=$(/usr/libexec/java_home)(add this to your~/.bash_profileor~/.zshrc).
- If you don’t have Homebrew, install it:
Installing Java on Linux
Linux offers several methods for installing Java: using a package manager (recommended), or manual installation from a tar.gz archive.
Using Package Manager (Recommended)
This is the easiest and most robust method as it handles updates and dependencies automatically.
For Debian/Ubuntu-based systems (e.g., Ubuntu, Mint):
- Update Package List:
sudo apt update - Install OpenJDK:
- To install the latest default JRE:
sudo apt install default-jre - To install the latest default JDK:
sudo apt install default-jdk - To install a specific version (e.g., OpenJDK 17):
sudo apt install openjdk-17-jreorsudo apt install openjdk-17-jdk
- To install the latest default JRE:
- Verify Installation:
java -versionandjavac -version
For RHEL/Fedora-based systems (e.g., CentOS, Fedora, RHEL):
- Update Packages:
sudo dnf update(orsudo yum updatefor older systems) - Install OpenJDK:
- To install the latest default JRE:
sudo dnf install java-latest-openjdk-jre - To install the latest default JDK:
sudo dnf install java-latest-openjdk - To install a specific version (e.g., OpenJDK 17):
sudo dnf install java-17-openjdkorsudo dnf install java-17-openjdk-devel
- To install the latest default JRE:
- Verify Installation:
java -versionandjavac -version
Manual Installation from Tar.gz (Universal Method)
This method gives you full control but requires manual PATH and JAVA_HOME configuration.
-
Download Tar.gz:
- Go to Adoptium or Oracle JDK downloads.
- Select “Linux,” “x64,” and download the
tar.gzarchive.
-
Extract the Archive:
- Create a directory for Java installations (e.g.,
~/javaor/usr/local/java). sudo mkdir -p /usr/local/javasudo tar -xzf jdk-<version>-linux-x64.tar.gz -C /usr/local/java- This will create a directory like
/usr/local/java/jdk-<version>.
- Create a directory for Java installations (e.g.,
-
Set Environment Variables:
- Open your shell’s configuration file (e.g.,
~/.bashrc,~/.zshrc, or/etc/profilefor system-wide). - Add the following lines (replace
<version>with your JDK folder name):
bash

export JAVA_HOME=/usr/local/java/jdk-<version>

export PATH=$JAVA_HOME/bin:$PATH
- Save the file and apply changes:
source ~/.bashrc(or your respective file).
- Open your shell’s configuration file (e.g.,
-
Verify Installation:
- Open a new Terminal.
- Type
java -version,javac -version, andecho $JAVA_HOME.
Verifying Your Java Installation and Troubleshooting Common Issues
A successful installation isn’t just about running the installer; it’s about confirming that Java is correctly recognized and functional within your system. Knowing how to verify and troubleshoot can save considerable time.
How to Verify Java Installation
As mentioned in the OS-specific sections, the primary method for verification is using the command line:
- Check Java Runtime: Open your terminal/command prompt and type
java -version. This should output the version of the Java Runtime Environment (JRE) being used. - Check Java Compiler: If you installed the JDK, type
javac -version. This confirms that the Java Development Kit (JDK) compiler is accessible. - Check
JAVA_HOME(for JDK): Typeecho $JAVA_HOME(Linux/macOS) orecho %JAVA_HOME%(Windows). This should display the path to your JDK installation directory.
If any of these commands fail or show an unexpected version, it indicates a configuration issue.
Common Installation Problems and Solutions
Even with careful steps, you might encounter issues. Here are some common problems and their fixes:
-
“java: command not found” or “javac: command not found”:
- Cause: The
PATHenvironment variable is not correctly set or doesn’t include the Javabindirectory. - Solution: Double-check your
PATHvariable (refer to OS-specific steps above). Ensure%JAVA_HOME%bin(Windows) or$JAVA_HOME/bin(Linux/macOS) is included and prioritized. Remember to open a new terminal/command prompt after making changes.
- Cause: The
-
Incorrect Java Version Reported:
- Cause: Multiple Java versions are installed, and your system is picking up an older or unintended one from a different
PATHentry. - Solution: Review your
PATHvariable. Ensure the desired Javabindirectory is listed first or that old Java paths are removed. On Linux, usesudo update-alternatives --config java(andjavac) to select the preferred version.
- Cause: Multiple Java versions are installed, and your system is picking up an older or unintended one from a different
-
JAVA_HOMENot Set:- Cause: The
JAVA_HOMEenvironment variable, crucial for many build tools (like Maven, Gradle) and IDEs, is missing or incorrect. - Solution: Manually set
JAVA_HOMEto the root directory of your JDK installation (e.g.,C:Program FilesJavajdk-17on Windows,/usr/local/java/jdk-17on Linux).
- Cause: The
-
Permissions Issues (Linux):
- Cause: When manually installing Java, the extracted directory or its contents might not have correct execution permissions.
- Solution: Ensure the Java
bindirectory and its executables have appropriate permissions:chmod -R 755 /usr/local/java/jdk-<version>(adjust path as needed).
-
Installer Errors:
- Cause: Corrupted download, insufficient disk space, or conflicting software.
- Solution: Re-download the installer, check disk space, temporarily disable antivirus software if it’s interfering, or try installing an LTS version if you’re on a cutting-edge release that might have teething issues.
Updating and Managing Java Versions
In a dynamic development environment, you might need to switch between Java versions for different projects or update to the latest LTS release.
- Linux
update-alternatives: On Debian/Ubuntu,sudo update-alternatives --config javaandsudo update-alternatives --config javacprovide a convenient way to select the default Java binary from installed versions. - SDKMAN! (Linux/macOS): For developers,
sdkman.iois an invaluable tool for managing multiple SDKs, including various Java versions. It allows you to install and switch between different JDKs (e.g.,sdk install java 17.0.9-temthensdk use java 17.0.9-tem) with ease, making version management robust and efficient. - Manual
JAVA_HOMEchange: You can always manually update yourJAVA_HOMEandPATHenvironment variables to point to a different installed JDK.
Regularly updating your Java environment to the latest security patches and LTS versions is a crucial aspect of digital security and maintaining a productive development setup.
Maximizing Your Java Environment for Productivity and Security
Beyond just installing Java, optimizing your environment involves integrating it with development tools and adhering to best practices for security and performance. This holistic approach ensures you get the most out of your Java setup.
Integrating Java with Popular IDEs
For serious Java development, an Integrated Development Environment (IDE) is indispensable. IDEs like IntelliJ IDEA, Eclipse, and Visual Studio Code provide robust features for coding, debugging, and building Java applications.
- IntelliJ IDEA: Highly recommended for its powerful features, intelligent code assistance, and excellent support for modern Java frameworks. After installation, go to
File -> Project Structure -> SDKsto add your installed JDK. - Eclipse: A long-standing, open-source IDE, especially popular for enterprise Java. During installation or via
Window -> Preferences -> Java -> Installed JREs, you can specify your JDK. - Visual Studio Code: While a lightweight editor, VS Code can be transformed into a powerful Java IDE with extensions like the “Extension Pack for Java” by Microsoft. It often auto-detects installed JDKs, but you can configure it in settings.json (
java.home).
Ensure your chosen IDE points to the correct JDK installation to avoid compilation or runtime errors.
Best Practices for Java Security
Digital security is paramount, and your Java installation plays a role.
- Keep Java Up-to-Date: Always use the latest available patch release for your chosen Java version (e.g., Java 17.0.9 instead of 17.0.0). These updates contain critical security fixes.
- Use LTS Versions: Long-Term Support (LTS) versions receive security updates for several years, making them safer for production environments.
- Download from Trusted Sources: Only download JDKs from official vendors (Oracle, Adoptium, Amazon, etc.) to prevent malware.
- Regularly Review Applications: Be mindful of which Java applications you run and their source. Outdated or untrusted applications can pose security risks.
Keeping Your Java Up-to-Date
Java evolves, and staying current not only offers new language features and performance improvements but also ensures you benefit from the latest security patches.
- Automatic Updates: On Windows and macOS, some Oracle JRE installations used to have an auto-update feature. With modern JDK distributions (especially OpenJDK builds), you’ll typically need to manually download and install new patch versions or use package managers/tools like
sdkmanto update. - Scheduled Checks: For critical systems, schedule regular checks (e.g., monthly) for new patch releases for your specific Java version.
- Dependency Management Tools: In development, tools like Maven or Gradle can help manage project dependencies, but they don’t update your core JDK installation. That remains a system-level task.

Conclusion
Installing Java is a foundational step for anyone working with this versatile and powerful language. By understanding the distinction between JDK and JRE, carefully choosing your Java distribution and version, and following the clear, operating-system-specific instructions outlined in this guide, you can establish a robust and functional Java environment.
Remember to verify your installation, troubleshoot any issues promptly, and adopt best practices for managing and updating your Java setup. With Java correctly installed and configured, you’re well-equipped to develop innovative applications, run critical software, and contribute to the vibrant world of technology. Happy coding!
aViewFromTheCave is a participant in the Amazon Services LLC Associates Program, an affiliate advertising program designed to provide a means for sites to earn advertising fees by advertising and linking to Amazon.com. Amazon, the Amazon logo, AmazonSupply, and the AmazonSupply logo are trademarks of Amazon.com, Inc. or its affiliates. As an Amazon Associate we earn affiliate commissions from qualifying purchases.