Minecraft, at its core, is a game of limitless creativity, but for many enthusiasts, the vanilla experience is just the beginning. The true vastness of what Minecraft can offer often lies within its vibrant modding community. This is where Minecraft Forge comes into play – an essential API (Application Programming Interface) that acts as a bridge, enabling thousands of user-created modifications (mods) to run seamlessly within your game. From new biomes and creatures to complex machinery and magic systems, Forge unlocks a universe of possibilities, transforming your gameplay and elevating your digital adventures.

In the realm of Tech, understanding how to integrate tools like Forge is paramount for anyone looking to optimize their software experience, delve into game development intricacies, or simply enhance their digital entertainment. This tutorial is designed not just to guide you through the technical steps of installation but also to contextualize Forge within broader themes of digital security, productivity, and community engagement. Whether you’re a seasoned modder or a curious newcomer, mastering Forge installation is a fundamental skill that paves the way for countless hours of enriched gameplay and opens doors to understanding how software ecosystems evolve and thrive.
Beyond the immediate technical utility, the ability to install and manage mods also touches upon aspects of Brand and Money. The modding community itself is a testament to decentralized innovation, where individual developers and teams build powerful extensions, often garnering significant reputation and followers. For content creators, modded Minecraft offers fresh content streams, building a personal brand through unique gameplay experiences. And for the shrewd observer, understanding how these digital ecosystems function can even hint at pathways for online income and side hustles, from creating popular modpacks to streaming highly engaging modded series.
This comprehensive guide will walk you through every step of installing Forge, ensuring a smooth and successful setup. We’ll cover everything from preliminary checks and downloading the right version to verifying your installation and integrating your first mods. Prepare to embark on a journey that will forever change the way you play Minecraft.
Preparing for Your Forge Installation: Essential Pre-Checks and System Readiness
Before diving into the actual installation process, a few crucial preparatory steps are necessary. These steps ensure compatibility, prevent common errors, and safeguard your existing game data, aligning with best practices in Digital Security and Software Management – key components of our Tech focus. Neglecting these initial checks can lead to frustration, corrupted files, or a less-than-optimal modding experience.
Ensuring Java Compatibility and Installation
Minecraft Forge, like Minecraft itself, relies heavily on Java to function. It’s imperative that you have the correct version of Java installed on your system. Different Minecraft versions and corresponding Forge versions might require specific Java environments. Generally, modern Minecraft versions (1.17+) require Java 17 or higher, while older versions (1.16.5 and below) typically run on Java 8.
To check your Java version, open your command prompt (Windows) or terminal (macOS/Linux) and type java -version. If Java is not installed, or if the version is outdated, you’ll need to download and install the appropriate Java Development Kit (JDK) from Oracle or OpenJDK. Always download directly from the official source to ensure authenticity and security. This step is a foundational element of software compatibility, a concept frequently explored in Tech Tutorials. A robust Java installation is the bedrock upon which your modded Minecraft experience will be built, ensuring system stability and performance when running resource-intensive mods.
Backing Up Your Minecraft World and Game Files
This is perhaps the most critical preparatory step, one that cannot be overstated. Modding, by its nature, involves altering game files and introducing new code. While Forge itself is generally stable, conflicts between mods or incorrect installations can occasionally lead to corrupted saves or game files. To prevent the heartbreaking loss of your meticulously built worlds and progress, a comprehensive backup is essential.
Navigate to your Minecraft installation directory (%appdata%.minecraft on Windows, ~/Library/Application Support/minecraft on macOS). Copy the entire .minecraft folder to a safe location on your hard drive or an external storage device. This ensures that you have a pristine, unmodded version of your game to revert to should anything go wrong. From a Digital Security perspective, regular backups are a cornerstone strategy, not just for gaming but for all critical data. This practice saves time, reduces stress, and reinforces the principle of data redundancy – a valuable lesson for personal finance (Money) as well, protecting your digital assets. This simple act of foresight epitomizes good data management, allowing you to experiment with mods without fear of irreversible damage to your digital creations.
Choosing the Right Forge Version for Your Minecraft Client
Minecraft undergoes frequent updates, and each major update often necessitates a new version of Forge. It’s crucial to select the Forge version that precisely matches your desired Minecraft client version. For example, if you plan to play Minecraft 1.19.2 with mods, you must download Forge for 1.19.2. Attempting to use a Forge version incompatible with your Minecraft client will result in startup failures.
Visit the official Forge website (files.minecraftforge.net) to browse available versions. On the download page, you’ll typically see two main options: “Recommended” and “Latest.” For most users, the “Recommended” build is the safest choice, as it has undergone more testing and is generally more stable. The “Latest” build might contain newer features or bug fixes but could also introduce new instabilities. Carefully select your desired Minecraft version from the left-hand sidebar, and then choose the Recommended installer. This decision-making process, balancing stability against cutting-edge features, is a common dilemma in Software Management and Tech Adoption. Understanding how different versions interact helps users navigate complex software ecosystems more effectively, a skill that can be applied to managing other apps and tools.
The Step-by-Step Forge Installation Guide: From Download to Launch
With your preparations complete, you’re ready to proceed with the core installation. This section details the precise steps required to get Forge up and running, transforming your vanilla Minecraft into a mod-ready powerhouse. Each step is critical and should be followed carefully to ensure a successful setup.
Downloading the Minecraft Forge Installer
Once you’ve identified the correct Forge version (e.g., 1.19.2 Recommended), click on the “Installer” link next to it on the official Forge website. You’ll be redirected to an AdFocus page. This page will display an advertisement for a few seconds. Crucially, do not click on any ads. Look for a “Skip” button, usually located in the top-right corner of the browser window. Click “Skip” to bypass the advertisement and begin the download of the Forge installer .jar file.
It’s common for web browsers to flag .jar files as potentially harmful because they are executable programs. Rest assured, if downloaded from the official Forge website, the file is safe. You might need to manually confirm that you want to keep the file. This experience highlights an important aspect of Digital Security awareness – understanding legitimate warnings versus false positives, and recognizing trusted sources. Always prioritize official download portals to minimize risks of malware or unwanted software, a practice essential for maintaining the integrity of your digital environment.
Running the Forge Installer Application
After the .jar file has finished downloading, locate it in your downloads folder. To run the installer, simply double-click the .jar file. Your system should automatically open it with Java. If it doesn’t, you might need to right-click the file, select “Open with,” and then choose “Java Platform SE binary.”
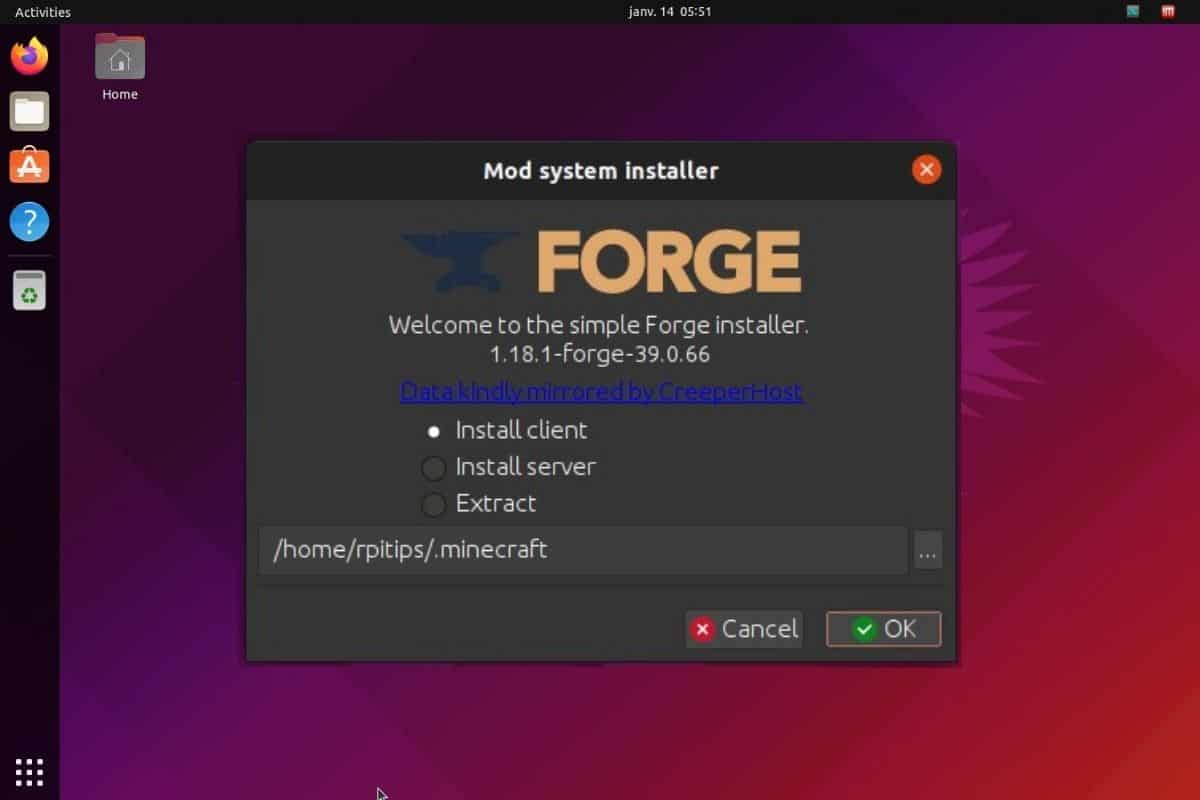
The Forge installer window will appear, presenting you with a few options. The default and most common option is “Install client,” which is what you need to integrate Forge into your main Minecraft game. Ensure that the installation directory points to your correct .minecraft folder. Unless you’ve custom-configured your Minecraft installation, the default path should be correct. Click “OK” to begin the installation.
The installer will then download necessary files and integrate Forge into your Minecraft launcher. A progress bar will indicate the status. Once complete, you’ll receive a message confirming that Forge has successfully installed the client profile. This process is a testament to the sophistication of modern Software Tools and installers, which automate complex configurations, abstracting away the underlying technical details for the user. Successful installation here is a productivity gain, allowing you to move quickly to the fun part of modding.
Verifying the Forge Installation and Launching Modded Minecraft
With the installer complete, it’s time to verify that Forge has been correctly integrated. Open your official Minecraft Launcher. In the bottom-left corner of the launcher window, next to the “Play” button, you should see a dropdown menu. Click on this menu, and you should now find a new profile named “forge” (or “Minecraft Forge” followed by your version number).
Select this “forge” profile. Now, click the “Play” button. The launcher might download some additional files specific to the Forge profile on its first launch. Once the game starts, you’ll know Forge is successfully installed if you see a new “Mods” button on the main menu screen of Minecraft, typically in the bottom-right corner. Furthermore, the Minecraft title screen often displays “Forge” and its version number.
If you encounter any issues during this verification, such as the game crashing or the Forge profile not appearing, it often indicates a Java compatibility issue, an incorrect Forge version, or a corrupted download. In such cases, carefully retrace your steps from the beginning, focusing on Java installation and matching Forge versions. This initial successful launch signifies not just a technical achievement but also a gateway to building out a unique “Brand” for your gameplay experience, allowing you to tailor Minecraft to your exact preferences, something that streamers and content creators often leverage to stand out.

Integrating Mods with Forge: Expanding Your Minecraft Universe
The installation of Forge is merely the first step; its true power lies in its ability to run a multitude of user-created modifications. This section guides you through the process of finding, installing, and managing these mods, allowing you to fully customize your Minecraft experience.
Finding Compatible and Reliable Mods
The internet is teeming with Minecraft mods, but not all are created equal. When searching for mods, prioritize reputable websites such as CurseForge.com, which is the largest and most trusted repository for Minecraft mods. On CurseForge, you can easily filter mods by Minecraft version, ensuring compatibility with your installed Forge client.
When browsing, pay attention to the mod’s popularity, download count, and user reviews. A high download count and positive feedback are good indicators of a well-maintained and stable mod. Always download mods from their official pages on these trusted platforms. Avoid obscure websites or direct downloads from forums that don’t link back to a main repository, as these can pose Digital Security risks, potentially containing malicious software. This careful selection process is akin to curating a high-quality software suite, a critical skill in modern Tech environments where app vetting is crucial for system health and productivity.
Adding Mods to Your Game: The mods Folder
Once you’ve downloaded your desired mods (they will typically be .jar files), the process of adding them to your game is straightforward. Navigate back to your .minecraft folder. Inside this folder, you should now see a new folder named mods. If this folder doesn’t exist, simply create it (ensure the name is exactly mods in lowercase).
Drag and drop all the downloaded .jar mod files directly into this mods folder. Do not extract the .jar files; Forge reads them as they are. Once the mods are in the folder, launch your Minecraft game using the Forge profile in the launcher, just as you did when verifying the installation.
Upon loading, go to the “Mods” button on the main menu. You should now see a list of all the mods you’ve installed. If a mod doesn’t appear, or if the game crashes during startup, it likely indicates a mod incompatibility (e.g., incorrect Minecraft version, conflicting mods, or a corrupted mod file). Troubleshooting these issues is a common aspect of Software Management and problem-solving in a Tech context, requiring systematic testing and identification of the root cause. Successfully managing your mod collection significantly enhances your game, transforming it into a personalized experience that reflects your unique “Brand” of gameplay.
Troubleshooting Common Mod Issues and Conflicts
Even with careful planning, modding can sometimes lead to issues. Common problems include game crashes on startup, in-game performance drops, or specific features not working.
- Game Crashes (Crash Reports): If your game crashes, look for a crash report. These are usually found in the
crash-reportsfolder within your.minecraftdirectory. These reports often contain valuable information about the mod causing the issue. Tools like pastebin.com can be used to share these reports with online communities for help. - Mod Incompatibility: Some mods simply don’t play well together. If your game crashes immediately after adding multiple mods, try adding them one by one to identify the culprit. Remove any problematic mods or search for known conflicts online.
- Performance Issues: A large number of mods, especially resource-intensive ones, can significantly impact game performance. Consider optimizing your Java arguments, allocating more RAM to Minecraft (through the launcher’s Forge profile settings), or installing performance-enhancing mods like OptiFine (ensure compatibility with your Forge version and other mods).
Addressing these issues effectively not only restores your gameplay but also sharpens your Tech troubleshooting skills, a highly valued trait in any IT or software-related field. This systematic approach to problem-solving can save you considerable time and frustration, an indirect “Money” benefit by increasing your productivity and enjoyment, allowing you to focus on the game itself rather than technical hurdles.
Advanced Tips and Maintaining Your Modded Environment
Beyond the basic installation, maintaining a stable and enjoyable modded Minecraft experience requires ongoing attention to updates, performance, and community engagement. This section offers advanced tips to help you get the most out of Forge.
Resolving More Complex Installation and Runtime Errors
While the basic troubleshooting covers common issues, some errors can be more persistent. For intricate problems:
- Forge Forum & Community Support: The official Forge forums and communities like r/feedthebeast on Reddit are invaluable resources. When seeking help, provide detailed information: your Minecraft version, Forge version, a list of installed mods, and the full crash report (using Pastebin). The collective knowledge of these communities can often pinpoint obscure issues that might not be immediately obvious.
- Clean Reinstallation: If you’re facing persistent, unresolvable issues, a complete clean reinstallation of Minecraft, Java, and Forge might be necessary. This involves deleting your
.minecraftfolder (after backing up your worlds!), reinstalling Java, then Minecraft, and finally Forge, followed by adding mods incrementally. This approach ensures no corrupted files from previous attempts are interfering. A “fresh start” is a powerful troubleshooting technique in Tech, often simplifying complex problems by eliminating unknown variables. - Log Files: Beyond crash reports, Minecraft generates various log files (e.g.,
latest.login thelogsfolder). These can provide insights into what’s happening internally just before a crash or error, offering more clues for advanced diagnostics. Understanding and interpreting these logs is a skill that translates well into professional Software Development and IT support roles.
Performance Optimization for a Seamless Modded Experience
Modded Minecraft can be significantly more demanding than the vanilla game. To ensure smooth gameplay:
- Allocate More RAM: In your Minecraft Launcher, go to the “Installations” tab, hover over your Forge profile, click the three dots, and then “Edit.” Under “More Options,” you’ll find “JVM Arguments.” Modify the
-Xmxvalue (e.g.,-Xmx4Gfor 4 gigabytes of RAM). For heavy modpacks, 6-8GB is often recommended, provided your system has enough physical RAM. Be cautious not to allocate too much, as your operating system needs RAM too. - Install OptiFine (Carefully): OptiFine is a popular mod that drastically improves Minecraft’s performance and adds graphical options. However, it can sometimes conflict with other mods or specific Forge versions. Always download the OptiFine version compatible with your Minecraft and Forge version. Test it carefully after installation.
- Review Mod Lists: Some mods are simply very resource-intensive. If performance is a consistent issue, consider which mods are truly essential and if any can be replaced with lighter alternatives or removed entirely. Regular review and optimization are key to maintaining a high-performing system, a principle applicable across all Tech tools and apps for maximizing Productivity.
- Monitor System Resources: Use task manager (Windows) or activity monitor (macOS) to keep an eye on CPU, GPU, and RAM usage while playing modded Minecraft. This helps identify bottlenecks and informs decisions about hardware upgrades or further optimization.
Keeping Forge and Mods Updated: Best Practices
The modding community is constantly evolving. Staying updated is important for bug fixes, new features, and security patches.
- Forge Updates: When a new Minecraft version is released, Forge will eventually update to support it. Be prepared for a new installation process for each major game update. For minor Forge updates (within the same Minecraft version), you can often download the new installer and run “Install client” again; it will update your existing Forge profile.
- Mod Updates: Regularly check the mod pages on CurseForge for updates to your installed mods. Newer versions often fix bugs, improve performance, or add content. Always back up your world before updating a mod, especially major ones, as updates can sometimes introduce breaking changes.
- Version Control and Planning: For heavy mod users or modpack creators, consider using tools like MultiMC or GDLauncher. These launchers simplify the management of multiple Minecraft instances, each with its own Forge and mod setup, allowing for easy switching and testing. This level of organization is crucial for managing complex Software Environments, saving time, and preventing conflicts, indirectly contributing to “Money” by increasing efficiency for content creators or developers.
- Community Engagement: Staying active in modding communities helps you learn about new mods, upcoming updates, and best practices. Sharing your experiences and helping others also builds your reputation within the community, reinforcing your “Brand” as a knowledgeable and helpful member.
Conclusion: Empowering Your Minecraft Journey Through Forge
Installing Minecraft Forge is more than just a technical procedure; it’s an initiation into a boundless world of creativity, innovation, and community. By following this comprehensive guide, you’ve not only mastered a crucial Tech skill but also opened the door to countless hours of enhanced digital entertainment. From intricate automation systems to breathtaking new landscapes, the possibilities are limited only by the availability of mods and your imagination.
The journey through Forge installation touches upon critical aspects relevant to a broader understanding of the digital landscape. We’ve emphasized Digital Security through essential backups, highlighted Software Management practices by selecting compatible versions and troubleshooting errors, and showcased the dynamic nature of Technology Trends as mods continuously push the boundaries of what a game can be. This hands-on experience with modifying a popular piece of software provides valuable insights into how digital ecosystems are built, maintained, and evolved by passionate communities.
Furthermore, integrating mods extends beyond personal enjoyment. For those interested in Brand building, a unique modded Minecraft experience can be a powerful content generator for streaming, YouTube channels, or even educational tutorials, carving out a distinct niche in the vast online landscape. And in the realm of Money, understanding modding can spark ideas for online income – from developing your own popular mods or modpacks to creating engaging content around them, attracting an audience, and potentially monetizing that attention. The efficiency gained from a well-optimized and modded game, free from frustrating technical hurdles, translates into more productive time for creative endeavors or pure enjoyment.
Congratulations on successfully installing Forge! Now, go forth and explore the incredible universe that the modding community has painstakingly crafted. Embrace the process of discovery, experiment with new mods, and contribute to the vibrant ecosystem that makes Minecraft an enduring phenomenon. Your Minecraft journey just got a whole lot more exciting, and your understanding of the underlying tech has deepened, preparing you for more complex digital challenges and opportunities ahead.
aViewFromTheCave is a participant in the Amazon Services LLC Associates Program, an affiliate advertising program designed to provide a means for sites to earn advertising fees by advertising and linking to Amazon.com. Amazon, the Amazon logo, AmazonSupply, and the AmazonSupply logo are trademarks of Amazon.com, Inc. or its affiliates. As an Amazon Associate we earn affiliate commissions from qualifying purchases.