
In the dynamic world of web development, Node.js has emerged as a cornerstone technology, transforming how developers build scalable and high-performance applications. If you’re looking to dive into server-side JavaScript, create powerful APIs, or develop real-time applications, installing Node.js is your essential first step. This guide will walk you through various installation methods, ensuring you get Node.js and its package manager (npm) up and running on your system, whether you’re a seasoned developer or just starting your journey into the vast realm of modern tech.
Node.js, an open-source, cross-platform JavaScript runtime environment, allows developers to execute JavaScript code outside of a web browser. Its event-driven, non-blocking I/O model makes it incredibly efficient for building data-intensive, real-time applications. For anyone focused on enhancing productivity, mastering cutting-edge software, or even venturing into online income generation through development, Node.js is an indispensable tool.
Why Node.js Matters: A Developer’s Perspective
Node.js is more than just a runtime; it’s an ecosystem that has fundamentally reshaped the landscape of backend development. Its primary appeal lies in its ability to use JavaScript for both front-end and back-end development, creating a unified language environment that streamlines development workflows and reduces context switching. This “full-stack JavaScript” capability is a game-changer for individual developers and teams alike, significantly boosting productivity and accelerating project delivery.
From a technological standpoint, Node.js is incredibly versatile. It powers everything from simple command-line tools and sophisticated web servers to complex microservices architectures and real-time chat applications. Giants like Netflix, PayPal, and LinkedIn leverage Node.js for its speed, scalability, and ability to handle concurrent connections efficiently. For businesses, this translates to faster application response times, better user experiences, and ultimately, a more robust digital presence – a critical component of modern brand strategy.
Furthermore, the Node.js ecosystem, primarily driven by npm (Node Package Manager), boasts an unparalleled repository of open-source libraries and tools. This vast collection allows developers to integrate functionalities ranging from database drivers and authentication modules to testing frameworks and build tools with remarkable ease. This rich resource pool not only saves development time but also fosters innovation, empowering developers to build sophisticated applications without reinventing the wheel. For those eyeing online income or side hustles through freelance development, proficiency in Node.js opens doors to a wide array of high-demand projects, from building custom APIs to developing e-commerce platforms. Understanding how to install and manage Node.js is thus not just a technical step, but a strategic move towards professional growth and technological empowerment.
Preparing for Installation: Essential Considerations
Before diving into the installation process, it’s wise to consider a few factors that will help you choose the best method and ensure a smooth setup. Different operating systems have preferred methods, and your development needs might dictate whether you opt for a simple standalone installation or a more flexible version management system.
Understanding Node.js Versions
Node.js follows a Long Term Support (LTS) release cycle, which is crucial for stability and maintenance. LTS versions are recommended for most users and production environments as they receive active support and bug fixes for an extended period. Current versions, while featuring the latest advancements, might be less stable and are often preferred by developers experimenting with new features. For most users, especially beginners, an LTS version is the safest bet.
Choosing Your Installation Method
There are generally three primary ways to install Node.js, each with its own advantages:
- Official Installer: This is the most straightforward method, especially for Windows and macOS users. You download an executable file directly from the official Node.js website and run it like any other application. It’s simple, but managing multiple Node.js versions can be cumbersome.
- Package Managers: For those comfortable with the command line, package managers (like Homebrew for macOS, Chocolatey for Windows, or
aptandyumfor Linux) offer a convenient way to install and update Node.js. They handle dependencies and updates efficiently, integrating well with your system’s package management. - Node Version Manager (NVM): This is often considered the most flexible and recommended method for developers who work on multiple projects that might require different Node.js versions. NVM allows you to install, manage, and switch between various Node.js versions seamlessly on the same machine. This is particularly valuable for productivity and ensuring compatibility across diverse projects.
Consider your comfort level with the command line, your operating system, and whether you anticipate needing to switch between Node.js versions frequently when deciding which method to use.
Method 1: Installing Node.js Using the Official Installer
The official installer provides the simplest path to getting Node.js and npm running, particularly for users who prefer a graphical interface. This method is ideal for beginners or those who primarily work with a single version of Node.js.
Windows Installation
-
Download the Installer:
- Navigate to the official Node.js website: https://nodejs.org/
- You will see two main download options: the “LTS” (Long Term Support) version and the “Current” version. For most users, especially if you’re just starting or working on production applications, choose the LTS version as it’s more stable.
- Click on the Windows Installer (.msi) link corresponding to your system architecture (64-bit or 32-bit, though 64-bit is most common now).
-
Run the Installer:
- Once the
.msifile is downloaded, double-click it to launch the Node.js Setup Wizard. - Click “Next” on the welcome screen.
- Accept the end-user license agreement and click “Next”.
- Choose the destination folder for the installation. The default location is usually fine. Click “Next”.
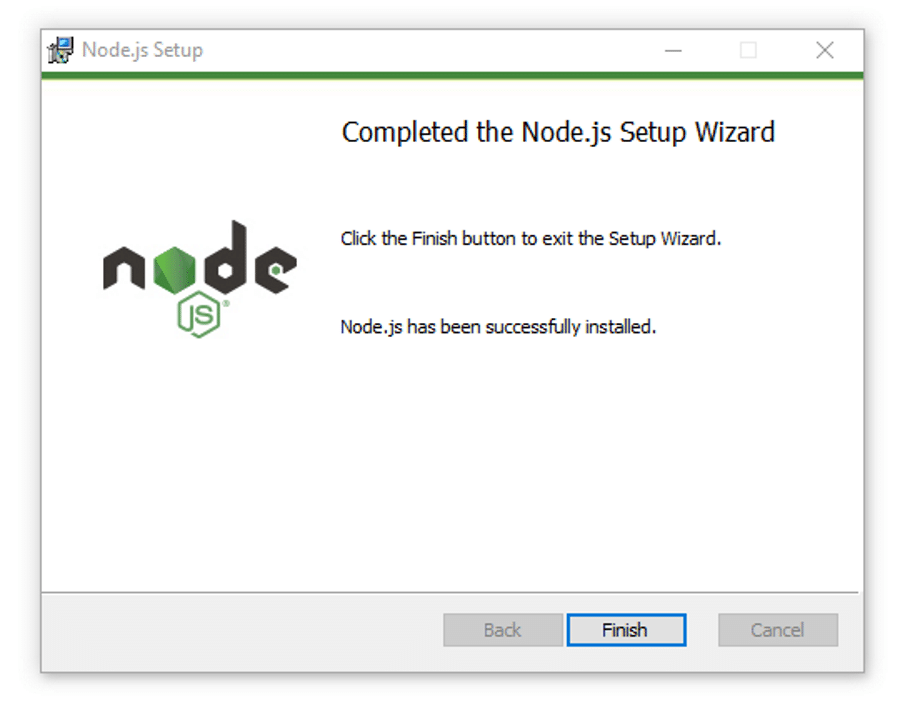
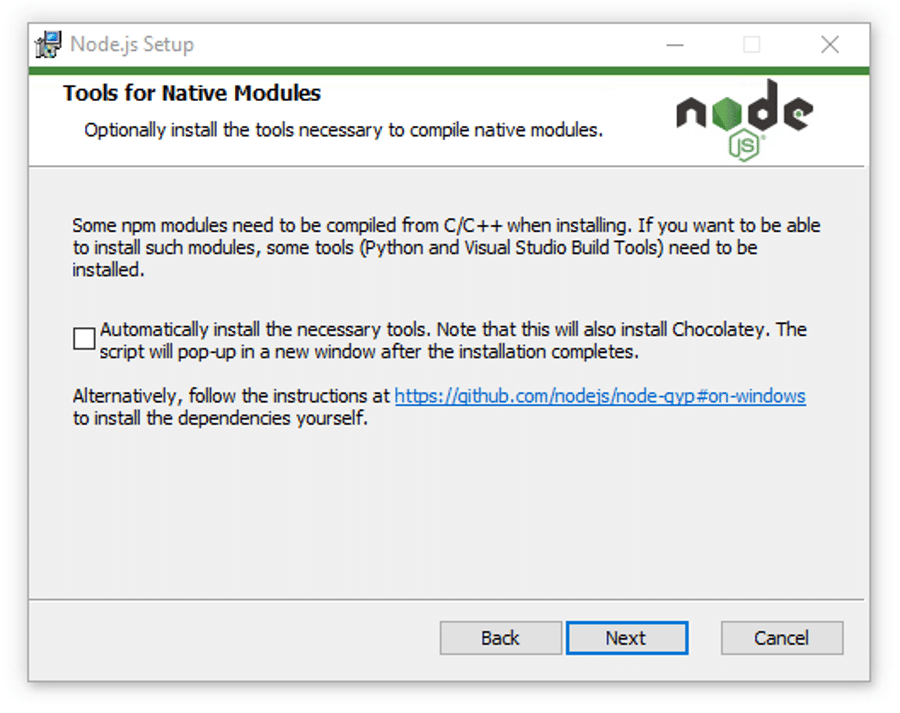
- On the “Custom Setup” screen, ensure that “Node.js runtime,” “npm package manager,” and “Add to PATH” are selected. The “Tools for Native Modules” option (which includes Python and Visual Studio Build Tools) is optional but recommended if you plan to compile native add-ons. Click “Next”.
- Click “Install” to begin the installation process.
- If prompted by User Account Control (UAC), click “Yes” to allow the installer to make changes to your system.
- Once the installation is complete, click “Finish.”
- Once the
macOS Installation
-
Download the Installer:
- Go to the official Node.js website: https://nodejs.org/
- As with Windows, select the LTS version for stability.
- Click on the macOS Installer (.pkg) link.
-
Run the Installer:
- Locate the downloaded
.pkgfile and double-click it to start the Node.js installer. - Click “Continue” on the welcome screen.
- Read the software license agreement and click “Continue,” then “Agree” to proceed.
- Choose the installation location. The default is typically
/usr/local/bin, which is suitable. Click “Continue.” - Click “Install” to begin.
- You will be prompted to enter your macOS user password to authorize the installation.
- Once the installation is complete, you will see a confirmation message. Click “Close.”
- Locate the downloaded
After completing the installation via the official installer on either Windows or macOS, Node.js and npm will be added to your system’s PATH, making them accessible from any command-line interface.
Method 2: Leveraging Package Managers for Streamlined Installation
Package managers offer a more convenient and often preferred way for developers to install and manage software. They handle dependencies, updates, and uninstallation efficiently, making them an excellent choice if you’re comfortable with the command line and want a clean system.
macOS with Homebrew
Homebrew is the de facto package manager for macOS, simplifying the installation of various software.
-
Install Homebrew (if not already installed):
- Open your Terminal application (Applications > Utilities > Terminal).
- Paste the following command and press Enter:
bash

/bin/bash -c "$(curl -fsSL https://raw.githubusercontent.com/Homebrew/install/HEAD/install.sh)"
- Follow the on-screen prompts, which may include entering your macOS password.
- Once Homebrew is installed, run
brew doctorto ensure everything is set up correctly.
-
Install Node.js:
- With Homebrew installed, you can now install Node.js (which includes npm) with a simple command:
bash

brew install node
- Homebrew will download and install the latest stable version of Node.js.
- With Homebrew installed, you can now install Node.js (which includes npm) with a simple command:
Windows with Chocolatey
Chocolatey is a popular package manager for Windows, bringing a Linux-like package management experience to the platform.
-
Install Chocolatey (if not already installed):
- Open PowerShell as an Administrator. To do this, search for “PowerShell” in the Start Menu, right-click “Windows PowerShell,” and select “Run as administrator.”
- Ensure that
Get-ExecutionPolicyis notRestricted. If it is, run:
powershell

Set-ExecutionPolicy AllSigned
or
powershell

Set-ExecutionPolicy Bypass -Scope Process
- Paste the following command into PowerShell and press Enter:
powershell

Set-ExecutionPolicy Bypass -Scope Process -Force; [System.Net.ServicePointManager]::SecurityProtocol = [System.Net.ServicePointManager]::SecurityProtocol -bor 3072; iex ((New-Object System.Net.WebClient).DownloadString('https://community.chocolatey.org/install.ps1'))
- After installation, close and reopen PowerShell (as Administrator) to ensure Chocolatey is in your PATH.
-
Install Node.js:
- In the Administrator PowerShell window, run:
powershell

choco install nodejs-lts
- This command will install the latest LTS version of Node.js and npm. If you prefer the current version, use
choco install nodejs.
- In the Administrator PowerShell window, run:
Linux with apt (Debian/Ubuntu)
For Debian-based distributions like Ubuntu, apt is the standard package manager.
-
Update Package List:
- Open a terminal and update your local package index:
bash

sudo apt update
- Open a terminal and update your local package index:
-
Install Node.js (using NodeSource PPA for the latest versions):
- While you can install Node.js directly from the default
aptrepositories (sudo apt install nodejs), these versions are often outdated. For the latest LTS or current versions, it’s recommended to use the NodeSource PPA (Personal Package Archive). - First, install
curlif you don’t have it:
bash

sudo apt install curl
- Then, add the NodeSource PPA. For the latest LTS version (e.g., Node.js 20):
bash

curl -fsSL https://deb.nodesource.com/setup_20.x | sudo -E bash -
(Replace20.xwith the desired LTS version, e.g.,18.x,20.x, or22.xfor the latest current version). - After running the above command, install Node.js and npm:
bash

sudo apt install nodejs
- This command will install both Node.js and npm.
- While you can install Node.js directly from the default
Method 3: The Power of Node Version Manager (NVM) for Flexibility

For developers who manage multiple projects, each potentially requiring a different Node.js version, Node Version Manager (NVM) is an invaluable tool. NVM allows you to install, use, and switch between various Node.js versions effortlessly, preventing version conflicts and boosting your overall development efficiency. This is a must-have for professional productivity in a diverse tech environment.
Installing NVM
NVM installation varies slightly depending on your operating system.
macOS and Linux
-
Install NVM:
- Open your terminal.
- You can install NVM using
curlorwget. It’s generally recommended to fetch the latest install script from the official NVM GitHub repository. - Using
curl:
bash

curl -o- https://raw.githubusercontent.com/nvm-sh/nvm/v0.39.7/install.sh | bash
(Note: Replacev0.39.7with the latest stable version number found on the NVM GitHub page if a newer one exists) - Using
wget:
bash

wget -qO- https://raw.githubusercontent.com/nvm-sh/nvm/v0.39.7/install.sh | bash
- The script clones the NVM repository to
~/.nvmand adds the necessary lines to your shell’s profile file (e.g.,.bashrc,.zshrc, or.profile) to load NVM. - Crucial Step: After installation, close your terminal and reopen it, or run
source ~/.bashrc(orsource ~/.zshrc, etc., depending on your shell) for NVM to be loaded into your current session.
-
Verify NVM Installation:
- Type
nvm --versionin your terminal. If it outputs a version number, NVM is successfully installed.
- Type
Windows (using nvm-windows)
For Windows, the official NVM for Unix-like systems doesn’t work directly. Instead, nvm-windows is the popular alternative.
-
Download nvm-windows Installer:
- Go to the official
nvm-windowsGitHub repository releases page: https://github.com/coreybutler/nvm-windows/releases - Download the
nvm-setup.zipfile from the latest release.
- Go to the official
-
Run the Installer:
- Extract the
nvm-setup.zipfile. - Run the
nvm-setup.exeinstaller. - Follow the prompts, accepting the license agreement and choosing the installation paths for NVM and Node.js. It’s best to use the default paths.
- Click “Install” and then “Finish.”
- Extract the
-
Verify nvm-windows Installation:
- Open a new Command Prompt or PowerShell window (ensure it’s not running as Administrator initially, unless you encounter issues).
- Type
nvm versionand press Enter. If it displays a version number,nvm-windowsis correctly installed.
Using NVM to Install Node.js
Once NVM is installed, managing Node.js versions becomes incredibly simple.
-
List Available Node.js Versions:
- To see all available Node.js versions you can install:
bash

nvm ls-remote
- This command will display a long list of all published Node.js versions, including LTS and current releases.
- To see all available Node.js versions you can install:
-
Install a Specific Node.js Version:
- To install the latest LTS version:
bash

nvm install --lts
- To install a specific LTS version (e.g., Node.js 20):
bash

nvm install 20
- To install the latest current version:
bash

nvm install node
- You can install multiple versions this way (e.g.,
nvm install 18,nvm install 16).
- To install the latest LTS version:
-
List Installed Node.js Versions:
- To see which Node.js versions you currently have installed:
bash

nvm ls
- The output will show your installed versions and indicate which one is currently active.
- To see which Node.js versions you currently have installed:
-
Switch Between Node.js Versions:
- To use a specific installed version:
bash

nvm use 20
(Replace20with the desired version number). - This command changes the active Node.js version for your current terminal session.
- To set a default Node.js version that NVM will use every time you open a new terminal:
bash

nvm alias default 20
- To use a specific installed version:
-
Uninstall a Node.js Version:
- If you no longer need a particular version:
bash

nvm uninstall 16
- If you no longer need a particular version:
NVM’s power lies in its flexibility, making it an indispensable tool for any serious Node.js developer. It ensures that your development environment is always perfectly aligned with the requirements of your various projects, thereby enhancing your productivity and mitigating version-related headaches.
Verifying Your Node.js and npm Installation
Regardless of the method you used, it’s crucial to verify that Node.js and npm (Node Package Manager) were installed correctly and are accessible from your command line.
-
Open your terminal or command prompt.
-
Check Node.js Version:
- Type the following command and press Enter:
bash

node -v
- You should see the installed Node.js version number (e.g.,
v20.10.0).
- Type the following command and press Enter:
-
Check npm Version:
- Type the following command and press Enter:
bash

npm -v
- You should see the installed npm version number (e.g.,
10.2.3).
- Type the following command and press Enter:
If both commands return version numbers, congratulations! Node.js and npm are successfully installed and ready for use. If you encounter errors, proceed to the troubleshooting section.
Troubleshooting Common Installation Issues
Even with detailed guides, installation issues can arise. Here are some common problems and their solutions:
‘node’ or ‘npm’ command not found
- Cause: Node.js or npm might not be in your system’s PATH environment variable, or the installation was incomplete.
- Solution (Official Installer):
- Windows: During installation, ensure “Add to PATH” was selected. If not, you might need to manually add the Node.js installation directory (e.g.,
C:Program Filesnodejs) to your system’s PATH. Restart your command prompt or terminal after making changes. - macOS/Linux: Re-run the installer or ensure NVM is sourced correctly (if using NVM, close and reopen your terminal or
source ~/.bashrc).
- Windows: During installation, ensure “Add to PATH” was selected. If not, you might need to manually add the Node.js installation directory (e.g.,
- Solution (NVM):
- Ensure NVM itself is correctly installed and sourced in your shell’s configuration file (e.g.,
.bashrc,.zshrc). Runnvm use [version]to activate a specific Node.js version in your current session, ornvm alias default [version]to set a default. - Close and reopen your terminal after NVM installation.
- Ensure NVM itself is correctly installed and sourced in your shell’s configuration file (e.g.,
Permissions Errors (EACCES) when installing global packages with npm
- Cause: By default, npm tries to install global packages into a system directory that requires root (administrator) privileges, which is a security risk and causes errors for regular users.
- Solution (Recommended): Configure npm to install global packages in a user-specific directory. This is the safest and most recommended approach.
- Follow npm’s official guide to fix permissions, which involves setting a new directory for global packages: https://docs.npmjs.com/resolving-eacces-permissions-errors-when-installing-packages-globally
- A common approach involves creating a
.npm-globaldirectory in your home folder and configuring npm to use it.
- Solution (Less Recommended, Use with Caution): Install global packages using
sudo(Linux/macOS) or an Administrator PowerShell/Command Prompt (Windows).sudo npm install -g <package-name>- This works but is generally discouraged due to security implications and potential conflicts.
Installation Fails or Hangs
- Cause: Network issues, corrupted download files, or conflicts with existing software.
- Solution:
- Check internet connection: Ensure stable connectivity.
- Re-download installer: The downloaded file might be corrupted. Try downloading again.
- Clear cache (npm): If issues arise during
npm install, trynpm cache clean --force. - Disable antivirus/firewall (temporarily): Occasionally, security software can interfere with installations. Remember to re-enable it afterward.
Already have Node.js and want to switch to NVM
- Cause: You previously installed Node.js using an installer or package manager, and now want the flexibility of NVM.
- Solution:
- Uninstall existing Node.js: First, uninstall your current Node.js installation. For Windows, use “Add or remove programs.” For macOS, use Homebrew (
brew uninstall node) or manually remove the/usr/local/bin/nodeand/usr/local/lib/node_modulesdirectories. For Linux, use your package manager (sudo apt remove nodejs). - Install NVM: Follow the NVM installation steps mentioned in Method 3.
- Install Node.js via NVM: Use
nvm install --ltsornvm install [version]to get your desired Node.js versions.
- Uninstall existing Node.js: First, uninstall your current Node.js installation. For Windows, use “Add or remove programs.” For macOS, use Homebrew (
By addressing these common issues, you should be able to resolve most installation problems and get your Node.js environment fully functional.
Conclusion: Your Journey into Modern Web Development Begins
Successfully installing Node.js is a pivotal step in your journey as a developer, opening up a world of possibilities for building robust, scalable, and efficient web applications. Whether you chose the simplicity of the official installer, the elegance of a package manager, or the unparalleled flexibility of NVM, you now have the foundational tools to leverage server-side JavaScript.
Node.js is not just a technology; it’s a gateway to enhancing your productivity, expanding your skill set, and tapping into high-demand areas of software development. As you begin to explore its vast ecosystem, remember that the power of Node.js extends beyond mere coding – it’s about building innovative solutions that drive technological progress, support evolving brand strategies, and ultimately, create new avenues for professional growth and online income.
With Node.js and npm at your fingertips, you are now equipped to dive into countless projects, from building powerful APIs and real-time applications to contributing to the thriving open-source community. Keep experimenting, keep learning, and keep building – the future of web development awaits!
aViewFromTheCave is a participant in the Amazon Services LLC Associates Program, an affiliate advertising program designed to provide a means for sites to earn advertising fees by advertising and linking to Amazon.com. Amazon, the Amazon logo, AmazonSupply, and the AmazonSupply logo are trademarks of Amazon.com, Inc. or its affiliates. As an Amazon Associate we earn affiliate commissions from qualifying purchases.