
In the dynamic world of Linux desktop environments, innovation is a constant. Users are continually seeking interfaces that marry aesthetic appeal with robust functionality, and the Cutefish Desktop Environment stands out as a noteworthy contender in this arena. Designed with a clear focus on beauty, simplicity, and user-friendliness, Cutefish offers a refreshing take on the traditional Linux experience, drawing inspiration from macOS to deliver a sleek and intuitive workspace. For Ubuntu users eager to explore new horizons beyond GNOME, KDE Plasma, or XFCE, Cutefish presents an opportunity to transform their daily computing experience into something truly elegant and efficient.
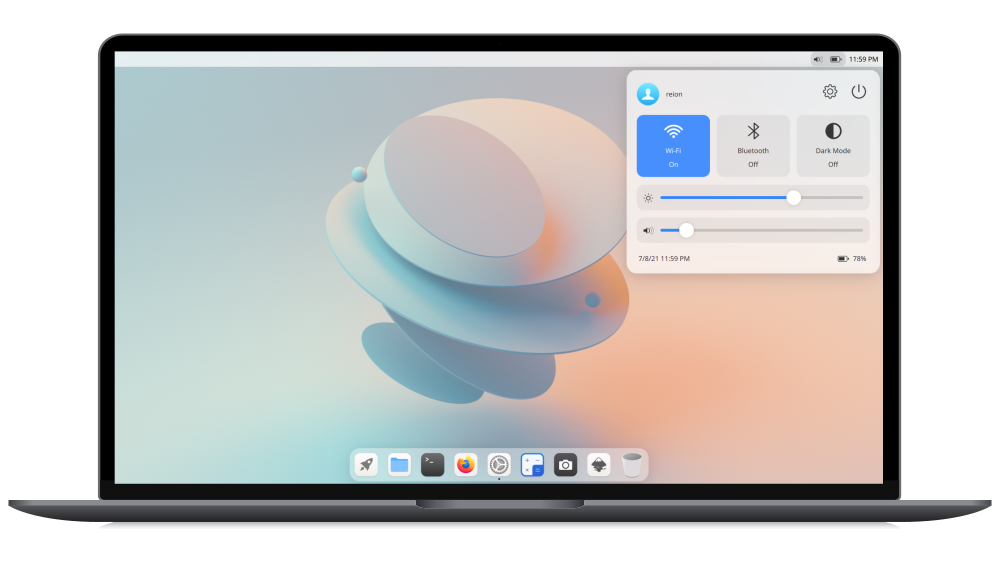
This in-depth guide is tailored for tech enthusiasts, productivity seekers, and anyone looking to infuse a modern, polished aesthetic into their Ubuntu system. We will walk you through the entire process of installing the Cutefish Desktop Environment, from initial system preparation to logging into your new, beautiful desktop. We’ll also delve into what makes Cutefish special, why it might be the perfect fit for your workflow, and how to maintain or even remove it if your needs change. By understanding not just how to install it, but why it’s gaining traction, you’ll be well-equipped to make an informed decision and optimize your digital workspace.
Understanding Cutefish: Design Philosophy and Appeal
Cutefish is more than just another desktop environment; it’s a statement. Born from the desire to create a beautiful, simple, and practical operating system, the Cutefish team developed their desktop environment with a distinct vision. At its core, Cutefish leverages the powerful Qt framework, renowned for its capability to create visually rich and performant cross-platform applications. This foundation allows Cutefish to deliver a smooth, responsive, and visually cohesive experience that feels both modern and refined.
The immediate appeal of Cutefish lies in its design. It embraces a minimalist aesthetic, characterized by clean lines, subtle animations, and an uncluttered interface. Users often note its resemblance to macOS, particularly in its global menu bar, dock, and system settings panel. This familiar layout can be particularly welcoming for those transitioning from Apple’s ecosystem or users who appreciate a streamlined, less distracting workspace. For individuals who value strong “Brand” identity and a cohesive user experience, Cutefish’s thoughtful design aligns perfectly, presenting a professional and polished front that can enhance personal productivity and overall digital well-being.
Beyond aesthetics, Cutefish is engineered for practicality. It aims to provide a focused environment where applications launch quickly and system resources are managed efficiently. Key features include:
- A Centralized Settings Panel: All system configurations are neatly organized in a single, intuitive interface, making it easy to manage everything from display settings to user accounts.
- A Global Search Function: Quickly find applications, files, and system settings, streamlining workflow and saving valuable time.
- An Elegant Dock: Provides quick access to frequently used applications, mirroring the functionality found in other modern operating systems.
- Consistent Application Integration: While still in active development, the goal is for native Cutefish applications (like its file manager, terminal, and calculator) to seamlessly integrate with the desktop’s overall theme and design language, contributing to a unified “brand experience” for the user.
For tech-savvy individuals and professionals whose work demands focus and efficiency, Cutefish offers a compelling alternative. It’s not just about how your desktop looks, but how it empowers you to work smarter and more effectively. In an era where digital distraction is rife, a thoughtfully designed, minimalist environment can be a significant asset for boosting “Productivity,” a core theme for any tech-focused professional or business looking to maximize “Money” through efficient output.
Preparing Your Ubuntu System for Cutefish Installation
Before embarking on the journey to transform your Ubuntu desktop, a few preparatory steps are essential. These actions ensure a smooth installation process, minimize potential conflicts, and safeguard your existing data. Think of this as laying a strong foundation for your new digital workspace.
System Requirements and Backup Best Practices
While Cutefish is designed to be relatively lightweight, a stable and adequately resourced Ubuntu system is crucial. We recommend:
- Ubuntu Version: Ideally, Ubuntu 20.04 LTS (Focal Fossa) or a newer release. While it might work on older versions, newer releases generally offer better compatibility with modern software and dependencies.
- Hardware: A modern dual-core processor, 4GB of RAM (8GB recommended for comfortable multitasking), and at least 20GB of free disk space will provide a satisfactory experience. Cutefish, being Qt-based, generally performs well, but a little extra headroom always helps.
- Internet Connection: An active and stable internet connection is vital for downloading packages from Ubuntu’s repositories and the Cutefish PPA.
- Sudo Privileges: You will need administrator rights to install software and modify system settings. Ensure your user account has
sudoprivileges.
Crucially, always back up your data before undertaking significant system changes like installing a new desktop environment. While the process is generally safe, unforeseen issues can occur. Consider backing up your home directory (/home/your_username), important documents, photos, and any custom configurations. Tools like Deja Dup (GNOME Backups), rsync, or even cloud storage services can facilitate this. This isn’t just a technical recommendation; it’s a fundamental aspect of “Digital Security” and good practice for managing your “Tech” assets, ensuring peace of mind and preventing potential loss of valuable work, which ultimately safeguards your “Money” in terms of time and effort invested.
Updating Your System: A Critical First Step
Maintaining an up-to-date system is paramount for stability, security, and compatibility. Outdated packages can lead to dependency conflicts during installation or expose your system to known vulnerabilities. Therefore, the very first command you should execute is to update your package lists and upgrade existing packages.
Open your terminal (you can usually find it by searching for “Terminal” in your applications menu or by pressing Ctrl+Alt+T) and enter the following commands:
sudo apt update
sudo apt upgrade -y
sudo apt update: This command refreshes your local package index. It fetches the latest information about available packages from all configured repositories (including Ubuntu’s official repositories and any PPAs you’ve added). This ensures that your system knows about the newest versions of software.sudo apt upgrade -y: This command then upgrades all installed packages to their latest versions, based on the refreshed package index. The-yflag automatically confirms any prompts, allowing the upgrade to proceed without requiring manual input.
Allow these commands to complete fully. Depending on how recently you’ve updated your system, this process could take a few minutes. This proactive step not only prepares your system for Cutefish but also contributes to the overall health and security of your Ubuntu installation, aligning with best practices in “Digital Security” and maintaining optimal “Tech” performance.
The Step-by-Step Installation Process for Cutefish
With your system updated and prepared, you are now ready to install the Cutefish Desktop Environment. Since Cutefish is a relatively new project and not yet part of Ubuntu’s default repositories, we will use a Personal Package Archive (PPA) to get the necessary software. PPAs are a common way for developers to distribute software directly to Ubuntu users.
Adding the Cutefish Personal Package Archive (PPA)
To install Cutefish, you first need to tell your system where to find its packages. This is done by adding the official Cutefish PPA.
In your terminal, execute the following command:
sudo add-apt-repository ppa:cutefishos/cutefish
sudo add-apt-repository: This command is used to add new repositories to your system’saptsources.ppa:cutefishos/cutefish: This specifies the particular PPA maintained by the Cutefish OS team.
After adding the PPA, you must update your package list again so that apt is aware of the new packages available from this repository.
sudo apt update
This second sudo apt update is crucial. Without it, your system won’t know that the Cutefish packages are now available for installation. Understanding the role of PPAs is a key piece of “Software” knowledge for any serious Linux user, allowing access to a wider range of applications and newer versions than those in the official repositories. While generally safe, users should always exercise caution when adding PPAs, ensuring they come from trusted sources, a core tenet of “Digital Security.”
Installing the Cutefish Desktop Environment Package
With the PPA configured and your package lists updated, you can now proceed with the main installation. This command will download and install all the necessary components for the Cutefish desktop.
sudo apt install cutefish-desktop-environment
sudo apt install: This is the standard command for installing packages on Debian-based systems like Ubuntu.cutefish-desktop-environment: This is the meta-package that includes all the core components of the Cutefish desktop, along with its essential dependencies.
During the installation process, you might be prompted to choose a display manager. A display manager is responsible for handling login screens and starting your desktop environment. Common choices include gdm3 (the default for Ubuntu with GNOME) and lightdm.

- If you are presented with this option, you can typically stick with
gdm3if you intend to switch between Cutefish and your existing GNOME environment. - If you prefer a lighter, more minimalist login screen,
lightdmis also a valid choice.
Make your selection using the arrow keys and press Enter. The installation will then continue. This step can take a significant amount of time, depending on your internet speed and system performance, as many packages need to be downloaded and installed.
Rebooting Your System to Apply Changes
Once the installation completes, the new desktop environment components are on your system, but they aren’t active yet. To fully integrate Cutefish and make it available at the login screen, you must reboot your system.
sudo reboot
Save any open work before executing this command, as it will immediately restart your computer. This ensures that all new services and configurations are loaded correctly, setting the stage for your first interaction with the Cutefish desktop.
Experiencing Cutefish: Logging In and Initial Exploration
After your system reboots, you will be greeted by the login screen. This is where you’ll make the crucial selection to launch the Cutefish Desktop Environment.
Selecting Cutefish at the Login Screen
At the login screen (whether it’s gdm3, lightdm, or another display manager):
- Locate the Desktop Environment Selector: This is usually a small gear icon, a dropdown menu, or a similar indicator. Its exact position can vary but is often found in one of the corners of the screen (e.g., bottom-right or top-right).
- Click and Select “Cutefish”: A list of available desktop environments will appear. Find “Cutefish” (or “Cutefish Desktop Environment”) and click on it to select it.
- Enter Your Password and Log In: Once “Cutefish” is selected, enter your user password as usual and press Enter or click the “Sign In” button.
Congratulations! You should now be logging into the elegant Cutefish Desktop Environment. Take a moment to appreciate the clean interface, the well-placed dock, and the overall polished feel. This initial interaction highlights the “Brand” experience Cutefish aims to deliver – a sense of modern efficiency and aesthetic pleasure.
Exploring and Customizing Your New Environment
Upon your first login, spend some time exploring the default layout and features:
- The Dock: Located at the bottom of the screen, it provides quick access to essential applications. You can usually add or remove applications by dragging them to or from the dock.
- The Global Menu Bar: At the top, similar to macOS, this bar typically houses application menus, system indicators (Wi-Fi, battery, volume), and the clock.
- Settings Panel: Look for the gear icon in the dock or search for “Settings” to open the centralized control panel. Here, you can customize:
- Appearance: Change themes, wallpapers, icon sets, and cursor styles to truly personalize your workspace.
- Desktop Behavior: Adjust hot corners, multi-tasking settings, and notifications.
- Networking, Sound, Power: Manage your hardware and system resources.
Customization is a powerful aspect of any Linux desktop, and Cutefish provides the tools to make your workspace truly your own. For those who see their digital environment as an extension of their “Personal Branding,” tailoring themes and layouts can significantly enhance workflow and reflect individual style. Experiment with different settings to find what boosts your “Productivity” and makes your daily interaction with the “Tech” more enjoyable and efficient.
Maintaining and Managing Your Cutefish Installation
Installing Cutefish is just the beginning. To ensure a smooth and stable experience, it’s important to understand how to maintain your new desktop environment and what to do if you ever decide to switch back or remove it.
Keeping Cutefish Updated
Just like any other software on your Ubuntu system, Cutefish will receive updates that include bug fixes, performance improvements, and new features. To ensure you always have the latest version, regularly run the update commands:
sudo apt update
sudo apt upgrade -y
This will fetch the newest packages from the Cutefish PPA and apply them to your system. Consistent updates are crucial for “Digital Security” and optimal “Software” performance, ensuring you benefit from the latest innovations and protections.
Troubleshooting Common Issues
While the installation process is generally straightforward, minor issues can occasionally arise:
- PPA Not Found Error: Double-check the PPA address for typos. Ensure your internet connection is active.
- Broken Dependencies: If
aptreports broken packages, trysudo apt install -forsudo dpkg --configure -ato fix dependency issues, then retry the installation. - Graphics Issues: If you experience screen tearing or graphical glitches, ensure your graphics drivers are up to date. For NVIDIA users, installing proprietary drivers is often necessary via “Software & Updates” -> “Additional Drivers.” This highlights the importance of hardware-software synergy in “Tech.”
- Unable to Log In: If you can’t log into Cutefish, try logging into your previous desktop environment (e.g., Ubuntu/GNOME) to troubleshoot. Sometimes a corrupted user configuration can prevent login.
For more specific issues, consulting the Cutefish community forums or related Ubuntu support channels can be beneficial. Leveraging community knowledge is a powerful aspect of the open-source “Tech” ecosystem.
Uninstalling Cutefish (Optional)
Should you decide that Cutefish isn’t the right fit for your needs, or if you wish to return to your previous desktop environment, removing it is a simple process.
Open your terminal and execute the following commands:
sudo apt autoremove --purge cutefish-desktop-environment
sudo add-apt-repository --remove ppa:cutefishos/cutefish
sudo apt update
sudo apt autoremove --purge cutefish-desktop-environment: This command removes the Cutefish desktop environment package and its configuration files. The--purgeflag ensures that configuration files are also deleted, not just the binaries.sudo add-apt-repository --remove ppa:cutefishos/cutefish: This command removes the Cutefish PPA from your system’s sources, preventing future updates from that repository.sudo apt update: After removing the PPA, update your package lists to reflect the change.
After running these commands, remember to sudo reboot your system. At the login screen, you can then select your original desktop environment (e.g., “Ubuntu” or “GNOME”) to return to your familiar workspace. This flexibility underscores the power of Linux, allowing users to freely experiment with different “Software” solutions without permanent commitment.

Conclusion: Embracing Innovation for Enhanced Productivity
The Cutefish Desktop Environment offers a compelling vision for a modern Linux desktop: beautiful, intuitive, and efficient. By following this comprehensive guide, you’ve not only learned the technical steps to install it on your Ubuntu system but also gained insight into its design philosophy and potential benefits for your workflow.
In an increasingly digital world, optimizing your “Tech” environment is not merely a matter of personal preference; it’s an investment in your “Productivity” and, by extension, your professional and financial success. A well-designed, clutter-free workspace like Cutefish can reduce cognitive load, enhance focus, and make your daily computing tasks more enjoyable. Whether you’re a developer, a designer, a writer, or simply someone who appreciates a clean aesthetic, Cutefish provides a robust platform to elevate your digital experience.
As Cutefish continues to evolve, it represents the vibrant spirit of innovation within the open-source community. Its commitment to a polished user experience and robust performance aligns with the principles of creating strong “Brand” identities, even for personal computing. We encourage you to explore its features, customize it to your heart’s content, and discover how this elegant desktop environment can empower you to achieve more in your daily tasks. Embrace the future of the Linux desktop – embrace Cutefish.
aViewFromTheCave is a participant in the Amazon Services LLC Associates Program, an affiliate advertising program designed to provide a means for sites to earn advertising fees by advertising and linking to Amazon.com. Amazon, the Amazon logo, AmazonSupply, and the AmazonSupply logo are trademarks of Amazon.com, Inc. or its affiliates. As an Amazon Associate we earn affiliate commissions from qualifying purchases.