Windows 11 represents a significant evolution in Microsoft’s operating system lineage, offering a refined user interface, enhanced productivity features, and improved security. For many users, performing a clean installation is the preferred method to experience Windows 11, ensuring optimal performance, resolving underlying system issues, and starting fresh without legacy clutter. Installing Windows 11 from a USB drive is not only the most common and convenient method but also provides the flexibility to install the OS on multiple machines or troubleshoot existing systems.
This comprehensive tutorial will guide you through every step of the process, from preparing your hardware and creating a bootable USB drive to navigating the installation wizard and performing crucial post-installation tasks. Whether you’re upgrading from an older version of Windows, building a new PC, or simply looking to refresh your current setup, this guide will empower you to install Windows 11 confidently and efficiently.
Preparing for Your Windows 11 Installation Journey
Before you embark on the installation process, meticulous preparation is key. This initial phase involves ensuring your system meets the necessary requirements, safeguarding your data, and readying the tools you’ll need. Skipping these steps can lead to frustrating delays or, worse, data loss.
Understanding Windows 11 System Requirements
Windows 11 introduced stricter hardware requirements compared to its predecessors, primarily aimed at enhancing security and performance. Before proceeding, it’s crucial to verify that your PC is compatible.
- Processor (CPU): 1 Gigahertz (GHz) or faster with two or more cores on a compatible 64-bit processor or System on a Chip (SoC). Most CPUs released in the last few years should qualify.
- RAM: 4 Gigabytes (GB) or greater. While 4GB is the minimum, 8GB or more is highly recommended for a smooth experience.
- Storage: 64 GB or greater available storage. An SSD (Solid State Drive) is strongly recommended over an HDD (Hard Disk Drive) for significantly faster performance.
- System Firmware: UEFI, Secure Boot capable. UEFI (Unified Extensible Firmware Interface) is a modern replacement for the traditional BIOS, and Secure Boot is a security feature that helps prevent malicious software from loading when the PC starts.
- TPM (Trusted Platform Module): Version 2.0. This is perhaps the most significant new requirement, a security chip that provides hardware-level protection. Most modern motherboards have TPM 2.0, though it might need to be enabled in your UEFI/BIOS settings.
- Graphics Card: Compatible with DirectX 12 or later with WDDM 2.0 driver.
- Display: High definition (720p) display that is greater than 9” diagonally, 8 bits per color channel.
- Internet Connection and Microsoft Account: Required for initial setup and subsequent updates, especially for Windows 11 Home edition.
You can check your PC’s compatibility using Microsoft’s PC Health Check app or by manually checking your system’s specifications and BIOS/UEFI settings for TPM and Secure Boot.
Essential Pre-Installation Steps
A clean installation of Windows 11 will erase all data on the target drive. Therefore, backing up your valuable files is non-negotiable.
- Backup Your Data: This is paramount. Copy all important documents, photos, videos, music, and any other personal files from your primary drive (usually C:) to an external hard drive, cloud storage (OneDrive, Google Drive, Dropbox), or another computer. Do not proceed without a complete backup.
- Gather Essential Drivers: While Windows 11 has good driver support, it’s wise to download the latest drivers for your motherboard (chipset, LAN/Wi-Fi, audio), graphics card, and any specialized peripherals from your manufacturer’s website. Save them to a separate USB drive or an external hard drive. This ensures you can get online and use all hardware components immediately after installation.
- Deactivate Software (If Applicable): Some software, especially creative suites or specialized applications, might require deactivation before an OS reinstallation to transfer licenses. Check the specific software’s licensing policy.
- Ensure Stable Power: For desktop PCs, ensure a stable power supply. For laptops, make sure it’s fully charged and plugged into a power outlet throughout the entire process to prevent unexpected shutdowns.
- Disable Overclocking: If you have overclocked your CPU or RAM, temporarily revert to default settings in your BIOS/UEFI during installation to avoid stability issues.
Acquiring and Preparing Your USB Drive
The USB drive will be the medium from which you install Windows 11.
- USB Drive Size: You’ll need a USB flash drive with at least 8 GB of storage space. For future compatibility or if you anticipate needing additional diagnostic tools on the same drive, a 16GB or 32GB drive is a good choice.
- Formatting the USB Drive: The Media Creation Tool typically handles the formatting, but it’s good practice to ensure your USB drive is empty or contains no critical data, as the process will erase everything on it. The tool will usually format it to FAT32, which is compatible with both UEFI and BIOS systems.
Creating Your Windows 11 Bootable USB Drive
With your preparations complete, the next crucial step is to create the bootable USB drive. Microsoft provides a straightforward tool for this purpose.
Using the Official Microsoft Media Creation Tool
This is the recommended and simplest method for creating a Windows 11 installation USB.
- Download the Tool: Navigate to the official Microsoft Windows 11 download page on your web browser. Under the “Create Windows 11 Installation Media” section, click the “Download Now” button to get the “Media Creation Tool.”
- Run the Tool: Once downloaded, double-click the
MediaCreationToolW11.exefile. You may need to grant administrator permissions. - Accept Terms: Read and accept the license terms.
- Language and Edition: The tool will typically default to recommended options based on your current PC. If you want to change these (e.g., install a different language or edition), uncheck the “Use the recommended options for this PC” box and make your selections. For most users, the defaults are fine. Click “Next.”
- Choose Media Type: Select “USB flash drive” as the media type you want to use. Click “Next.”
- Select USB Drive: The tool will list detected USB drives. Carefully select the correct USB drive from the list. Ensure you select the right one, as all data on it will be erased. Click “Next.”
- Download and Create: The tool will now download the Windows 11 installation files and write them to your USB drive. This process can take a significant amount of time depending on your internet speed and the USB drive’s write speed. Do not unplug the USB drive or shut down your computer during this step.
- Finish: Once completed, the tool will indicate that your USB flash drive is ready. Click “Finish.” You now have a bootable Windows 11 installation USB drive.
Alternative Methods (For Advanced Users)
While the Media Creation Tool is recommended, advanced users might prefer other methods:
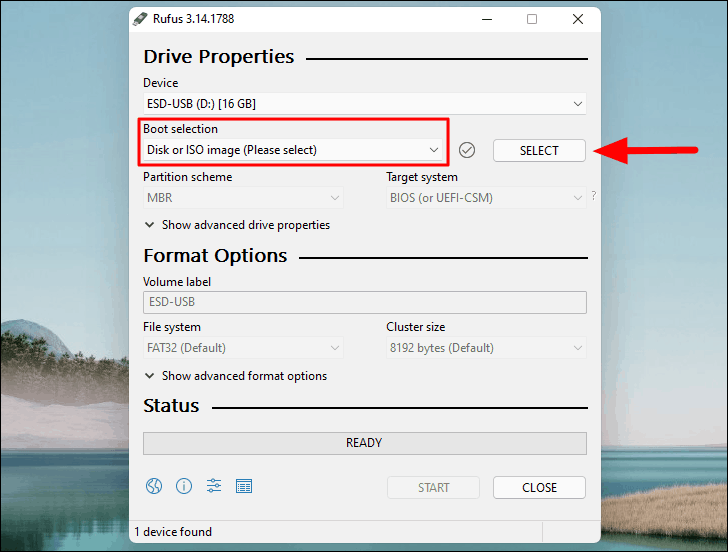
- Using Rufus with an ISO: If you’ve already downloaded a Windows 11 ISO file (also available from Microsoft’s download page), a third-party tool like Rufus can be used to create a bootable USB. Rufus offers more control over partition schemes (MBR for BIOS, GPT for UEFI) and can bypass some system requirements for older hardware, though this is not officially supported by Microsoft and may lead to stability issues.
- Command Prompt (Diskpart): For those comfortable with command-line tools,
diskpartcan be used to manually format the USB drive and copy files. This method is more complex and prone to errors if not executed precisely. For the vast majority of users, the Media Creation Tool is sufficient and safer.
Booting from the USB Drive and Initiating Installation
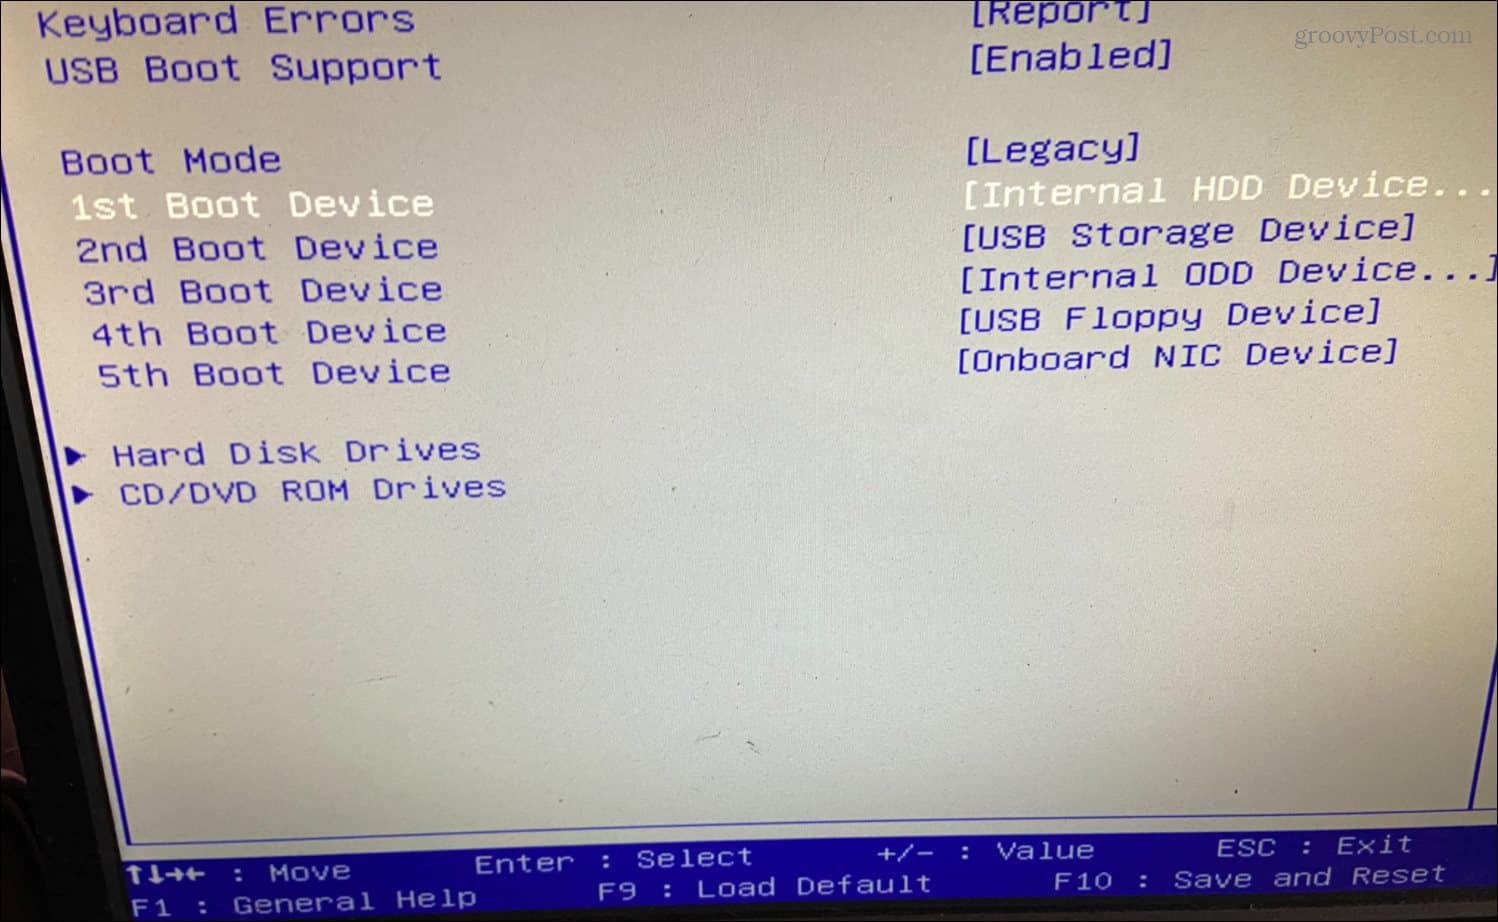
With your bootable USB ready, the next step is to instruct your computer to start from it rather than its internal hard drive. This is done through your PC’s BIOS (Basic Input/Output System) or, more commonly on modern machines, UEFI (Unified Extensible Firmware Interface) settings.
Accessing Your PC’s BIOS/UEFI Settings
The method to access BIOS/UEFI varies by manufacturer, but common keys are:
- Dell: F2 or F12
- HP: F10 or Esc
- Lenovo: F1, F2, Fn+F2, or Enter then F1
- Acer: F2 or Del
- Asus: Del or F2
- MSI: Del
- Microsoft Surface: Press and hold the Volume Up button while pressing the Power button.
- Custom Builds: Usually Del or F2, depending on the motherboard manufacturer.
To access these settings, you typically need to repeatedly press the corresponding key immediately after powering on your computer. If you miss the window, simply restart and try again.
Configuring Boot Order for USB
Once in the BIOS/UEFI utility:

- Navigate to Boot Options: Look for a section labeled “Boot,” “Boot Options,” “Boot Priority,” or similar. The interface will likely be text-based with keyboard navigation or a graphical interface with mouse support.
- Set USB as Primary Boot Device: You’ll see a list of bootable devices (your hard drive, DVD drive if present, and your USB drive). You need to move your USB drive to the top of the boot order. It might appear as “USB-HDD,” “USB Flash Drive,” or by its brand name.
- Enable Secure Boot and TPM (If Disabled): If you previously disabled Secure Boot or TPM 2.0, now is the time to re-enable them, usually found under “Security” or “Boot” settings.
- Save and Exit: Find the option to “Save Changes and Exit” (often F10). Confirm your decision to restart the computer.
Your computer will now attempt to boot from the USB drive. You might see a “Press any key to boot from USB…” message. If so, press a key quickly.
The Windows 11 Setup Wizard Begins
After booting from the USB drive, the Windows 11 setup wizard will load.
- Language, Time, and Keyboard: The first screen will ask you to select your language, time and currency format, and keyboard or input method. Make your selections and click “Next.”
- Install Now: Click the “Install now” button to proceed.
Navigating the Windows 11 Installation Process
This phase involves making critical decisions about licensing, partition management, and where Windows 11 will reside on your storage device.
Entering Your Product Key (or Skipping for Later)
- Enter Product Key: If you have a Windows 11 product key, enter it here.
- Skip for Later: If you don’t have one, or if you’re reinstalling Windows 11 on a machine that was previously activated (digital license), you can click “I don’t have a product key.” Windows will activate automatically once it connects to the internet after installation. Click “Next.”
- Select Operating System (If Applicable): If your product key is for multiple editions (e.g., Home or Pro), you might be prompted to select which edition you want to install. Choose the one corresponding to your license.
- Accept License Terms: Read the Microsoft Software License Terms and check the “I accept the license terms” box. Click “Next.”
Choosing Installation Type: Upgrade vs. Custom (Clean Install)
You’ll be presented with two installation types:
- Upgrade: Install Windows and keep files, settings, and applications: This option is for upgrading an existing Windows installation without losing your data. This guide focuses on a clean installation, so we will not choose this.
- Custom: Install Windows only (advanced): This is the option for a clean installation, which means all existing data on the chosen drive or partition will be erased. Select this option.
Partitioning Your Hard Drive
This is a critical step where you manage your storage. Proceed with caution, as incorrect actions can lead to data loss.
- Identify the Target Drive: You’ll see a list of drives and partitions. Identify the drive where you want to install Windows 11. It’s often labeled “Drive 0” if it’s your primary drive. Be extremely careful to select the correct drive, especially if you have multiple drives.
- Delete Existing Partitions: For a truly clean installation, you should delete all partitions associated with the target drive. Select each partition (e.g., Drive 0 Partition 1, Drive 0 Partition 2, etc.) and click “Delete.” Confirm when prompted. This will consolidate the entire space into “Unallocated Space.”
- Warning: Deleting partitions will permanently erase all data on them. Ensure your backup is complete.
- Create New Partition: Once the drive shows as “Unallocated Space,” select it and click “New.” The setup wizard will typically suggest the maximum available size. You can adjust this if you wish to create multiple partitions (e.g., one for Windows, one for data), but for most users, using the full space is fine. Click “Apply” and then “OK” when prompted that Windows might create additional partitions for system files (like recovery and EFI partitions).
- Select Primary Partition: Windows will create several small system partitions and a larger “Primary” partition. Select the largest “Primary” partition (this is where Windows will be installed) and click “Next.”
Copying Windows Files and Initial Reboots
The installation process will now begin:
- Copying Files: Windows will start copying files from the USB drive to your chosen hard drive.
- Installing Features and Updates: It will then install features, drivers, and any available updates.
- Reboots: Your computer will restart multiple times during this phase. It’s crucial to remove the USB drive after the first restart, or at least ensure your BIOS/UEFI is set to boot from the hard drive first. If you don’t remove the USB, the PC might try to boot from it again and restart the installation process.
Post-Installation: Finalizing Your Windows 11 Experience
After the installation files are copied and the system reboots, you’ll be guided through the final setup steps to configure your personal settings.
Initial Setup and User Account Creation
- Region and Keyboard Layout: Select your country/region and confirm your keyboard layout. You can add a second keyboard layout if needed.
- Name Your Device (Optional): You can name your PC now or skip this step.
- Microsoft Account vs. Local Account:
- Microsoft Account: This is the default and recommended option for Windows 11 Home and Pro. Sign in with your existing Microsoft account (Outlook, Hotmail, Live, Xbox) or create a new one. This links your PC to cloud services, synchronization, and easy access to the Microsoft Store.
- Local Account (Workaround for Home, Direct for Pro): For Windows 11 Home, you typically need an internet connection and a Microsoft account for initial setup. If you want a local account, you may need to temporarily disconnect from the internet during this step, or for Pro versions, select “Sign-in options” and then “Offline account” or “Domain join instead” if available.
- Create a PIN: For faster sign-in, you’ll be prompted to create a PIN.
- Privacy Settings: Review and choose your privacy settings (location, diagnostic data, tailored experiences, etc.). Customize these to your preference.
- Customize Your Experience (Optional): You might be asked to select how you plan to use your device (e.g., Gaming, Creativity, School). This helps Windows suggest relevant apps and services.
- OneDrive Setup: You’ll be asked if you want to back up your files to OneDrive. Choose your preference.
After these steps, Windows 11 will finalize its setup, which might take a few more minutes, and then present you with your new desktop.
Installing Essential Drivers
While Windows 11 has a robust driver library, it’s always best to install the latest drivers directly from your hardware manufacturers.
- Network Driver First: If your Ethernet or Wi-Fi isn’t working, install the network driver you downloaded earlier. This will allow you to get online.
- Chipset Driver: Install the latest chipset drivers from your motherboard manufacturer’s website. This is crucial for overall system stability and performance.
- Graphics Card Driver: Download and install the latest drivers for your NVIDIA, AMD, or Intel graphics card. This ensures optimal display performance and enables advanced graphical features.
- Audio and Other Drivers: Install drivers for audio, any specialized peripherals, and ensure all devices are recognized in Device Manager.
Running Windows Update and Security Checks
- Windows Update: Once online, immediately go to
Settings > Windows Updateand click “Check for updates.” Install all pending updates to ensure your system is patched with the latest security fixes and performance improvements. You might need to restart your PC multiple times. - Microsoft Defender: Verify that Microsoft Defender Antivirus is running and up-to-date. Consider running a quick scan.
- Install Antivirus (Optional): If you prefer a third-party antivirus solution, install it now.
Restoring Your Data and Personalizing Your Desktop
- Restore Backup: Copy your backed-up files from your external storage back to your new Windows 11 installation.
- Install Applications: Reinstall all your essential software: web browser (Chrome, Firefox, Edge), productivity suites (Microsoft Office, LibreOffice), creative tools, games, etc.
- Personalize: Go to
Settings > Personalizationto set your desktop background, theme, colors, and other visual preferences. Arrange your desktop icons and pin frequently used apps to the Start Menu or Taskbar.
Congratulations! You have successfully installed Windows 11 from a USB drive and prepared your system for an optimal computing experience. By following these detailed steps, you’ve laid a strong foundation for a fast, secure, and stable operating system. Enjoy exploring the new features and improved interface of Windows 11!
aViewFromTheCave is a participant in the Amazon Services LLC Associates Program, an affiliate advertising program designed to provide a means for sites to earn advertising fees by advertising and linking to Amazon.com. Amazon, the Amazon logo, AmazonSupply, and the AmazonSupply logo are trademarks of Amazon.com, Inc. or its affiliates. As an Amazon Associate we earn affiliate commissions from qualifying purchases.