
In an increasingly digital world, the choice of operating system is more than just a preference; it’s a strategic decision that impacts productivity, security, and even your financial bottom line. While Windows and macOS dominate the commercial landscape, a powerful, free, and open-source contender has steadily risen in prominence: Ubuntu. Far from being a niche option for tech enthusiasts, Ubuntu has evolved into a user-friendly, robust, and highly secure platform suitable for a wide range of users – from students and developers to businesses and individuals seeking a cost-effective yet powerful computing experience.
This comprehensive guide will walk you through the entire process of installing Ubuntu, demystifying what might seem like a daunting task and transforming it into an empowering journey. We’ll not only cover the technical steps but also explore why Ubuntu is an excellent choice, aligning with themes of technological empowerment, digital security, and smart financial management inherent in today’s tech landscape. Whether you’re looking to revitalize an older PC, explore new software ecosystems, enhance your digital security, or simply save money on licensing fees, installing Ubuntu opens up a world of possibilities, blending cutting-edge technology with a vibrant community-driven ethos.
Preparing for Your Ubuntu Installation: The Foundation for a Seamless Transition
Before diving into the actual installation, a thorough preparation phase is crucial. This step ensures that your hardware is ready, your data is safe, and you have all the necessary components to make the installation smooth and hassle-free. Neglecting these preliminary steps can lead to lost data or frustrating setbacks, so paying close attention here will save you considerable time and potential headaches later on. This preparation isn’t just about technical readiness; it’s about smart digital security and responsible data management, which are cornerstones of any savvy tech user’s approach.
System Requirements and Essential Backups
First and foremost, let’s address the foundational technical requirements for running Ubuntu. While Ubuntu is renowned for its efficiency, especially compared to more resource-hungry proprietary operating systems, understanding the minimum specifications for a smooth experience is vital. For Ubuntu Desktop, the recommended system requirements include a 2 GHz dual-core processor, 4 GB of RAM, and 25 GB of free hard-drive space. Of course, more powerful hardware will provide an even snappier experience, especially if you plan to run demanding applications or engage in intensive multitasking. However, one of Ubuntu’s key advantages, a benefit often overlooked in the “Money” category, is its ability to breathe new life into older, seemingly obsolete hardware, thereby extending the lifespan of your gadgets and deferring costly upgrades.
Beyond hardware, the single most critical step before beginning any operating system installation is to back up all your important data. This cannot be stressed enough. Whether you’re installing Ubuntu alongside an existing OS like Windows or completely replacing it, there’s always a minuscule risk of data loss. Think of it as your digital safety net. Utilize external hard drives, cloud storage services (like Google Drive, Dropbox, or Nextcloud for a self-hosted open-source alternative), or network-attached storage (NAS) to secure your documents, photos, videos, and any other files you can’t afford to lose. This proactive approach to data security is not just a best practice; it’s a fundamental aspect of digital security and personal productivity, ensuring that your valuable intellectual property and memories remain safe. For those managing business finances or client data, this step is paramount for operational continuity and data integrity.
Creating Your Bootable Ubuntu Media
Once your data is safely backed up and you’ve confirmed your system meets the requirements, the next step is to obtain the Ubuntu installation media. This typically involves downloading the Ubuntu ISO image and then “burning” it onto a USB drive, transforming it into a bootable device. Always download the official ISO image directly from the Ubuntu website to ensure you’re getting a legitimate, untampered version. This is crucial for both security and upholding the brand integrity of Ubuntu. Several versions are available, including the Long Term Support (LTS) releases, which are recommended for most users due to their five years of security and maintenance updates, offering stability and reliability.
For creating the bootable USB drive, several free and user-friendly tools are available:
- Rufus (Windows): A popular, fast, and feature-rich utility for creating bootable USB drives from ISOs. It’s straightforward to use and highly effective.
- Etcher (Windows, macOS, Linux): A visually appealing and incredibly simple tool that makes creating bootable USB drives almost foolproof. Its cross-platform compatibility makes it a versatile choice.
- dd (Linux/macOS command line): For the more technically inclined, the
ddcommand in Linux or macOS offers a powerful and direct way to write the ISO image to a USB drive. While it requires command-line familiarity, it’s a fundamental skill for advanced users.
After creating your bootable USB, you’ll need to configure your computer’s BIOS or UEFI settings to boot from it. This usually involves restarting your computer and pressing a specific key (commonly F2, F10, F12, DEL, or ESC) immediately after powering on to enter the firmware settings. Within the BIOS/UEFI menu, navigate to the “Boot Order” or “Boot Priority” section and set your USB drive as the primary boot device. You might also need to disable “Secure Boot” or enable “Legacy Boot” if you encounter issues, especially on newer Windows machines, though Ubuntu’s compatibility with Secure Boot has improved significantly. This step is a critical gateway to installing any new operating system and familiarizing yourself with your system’s firmware settings is a valuable tech skill.
Step-by-Step Ubuntu Installation Process
With your preparations complete, you’re ready to embark on the core process of installing Ubuntu. This section will guide you through each screen and decision point, ensuring you understand the implications of your choices. From the initial boot to the final user setup, we’ll navigate the Ubuntu installer together, turning what might seem complex into a series of manageable steps.
Initiating the Installation and Basic Setup
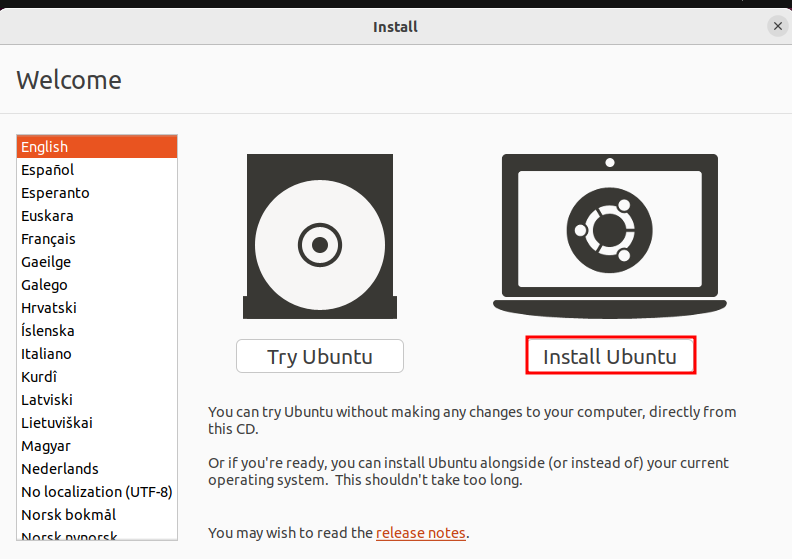
Restart your computer with the bootable Ubuntu USB drive inserted. Your system should now boot directly from the USB, presenting you with the Ubuntu startup screen. You’ll typically see two main options: “Try Ubuntu” and “Install Ubuntu.”
- Try Ubuntu: This option allows you to run Ubuntu directly from the USB drive without installing it on your hard drive. It’s an excellent way to test drive the operating system, check hardware compatibility (e.g., Wi-Fi, graphics, sound), and get a feel for the interface before committing to a full installation. All changes made in this live session will be lost upon reboot.
- Install Ubuntu: This is the option you’ll choose to proceed with the permanent installation.
Select “Install Ubuntu.” The installer will then guide you through a series of initial setup screens. First, you’ll be prompted to select your language. Choose your preferred language for the installer and the installed system. Next, you’ll select your keyboard layout. The installer often tries to detect this automatically, but you can manually choose it and even test it to ensure it’s correct.
The subsequent screen asks about your internet connection. While not strictly necessary at this stage, connecting to the internet is highly recommended. This allows the installer to download updates and third-party software (like multimedia codecs and proprietary drivers) during the installation process, saving you time later. It’s an example of Ubuntu’s focus on user convenience and ensuring you have a fully functional system right out of the gate, contributing to your immediate productivity.
Finally, you’ll see options for “Updates and other software.”
- Normal installation: This includes a web browser, utilities, office software, games, and media players – a comprehensive package for most users.
- Minimal installation: This option provides only basic utilities and a web browser, which is useful if you prefer to build your software suite from scratch or have limited disk space.
- Download updates while installing Ubuntu: Always check this box if you’re connected to the internet. It ensures your system is up-to-date from the moment it’s installed, enhancing digital security.
- Install third-party software for graphics and Wi-Fi hardware and additional media formats: This is crucial for optimal hardware performance and multimedia playback. Check this box, especially if you have NVIDIA or AMD graphics cards, or certain Wi-Fi adapters. This ensures compatibility and boosts your system’s capabilities, an important tech consideration.
Navigating Disk Partitioning Options

This is arguably the most critical step of the installation, as it determines how Ubuntu will be stored on your hard drive. Proceed with caution and ensure you understand each option.
- Erase disk and install Ubuntu: This is the simplest option and is recommended if you are installing Ubuntu on a new computer, dedicating the entire disk to Ubuntu, or don’t have any important data on the disk (because you’ve backed it up, of course!). This option will wipe everything on the selected disk and install Ubuntu.
- Install Ubuntu alongside [Another Operating System]: If you have Windows or another OS already installed, the installer might detect it and offer this option. This creates a dual-boot setup, allowing you to choose between Ubuntu and your other OS at startup. The installer will typically shrink your existing OS partition to make space for Ubuntu. This is a popular choice for users who want to experiment with Ubuntu without fully abandoning their current environment.
- Something else: This option is for advanced users who want to manually create, resize, or delete partitions. It gives you full control over your disk layout. This is essential for:
- Customizing partition sizes: For example, creating separate partitions for your root directory (
/), home directory (/home), and swap space. A separate/homepartition is beneficial as it keeps your personal files isolated from the operating system, making it easier to reinstall Ubuntu without losing your data. - Specific drive setups: Like RAID configurations, encrypting partitions, or managing multiple hard drives.
- Avoiding unintended data loss: If you have multiple drives and want to ensure Ubuntu is installed on a specific one, this option allows precise selection.
- Customizing partition sizes: For example, creating separate partitions for your root directory (
When using “Something else,” you’ll need to create at least a root partition (/) formatted as ext4. A swap partition (typically 2-4GB, or equal to RAM for hibernation) is also recommended, especially if you have less than 8GB of RAM. A separate /home partition is a good practice for data longevity.
For users with Solid State Drives (SSDs), Ubuntu is optimized to work well, and the default settings generally handle SSDs efficiently. Consider having enough free space, as SSDs perform better when not completely full. The correct partitioning strategy is a key part of system optimization and contributes to the longevity and performance of your tech assets.
User Setup and Finalizing the Installation
After configuring your disk, the installer will prompt you for a few more details:
- Where are you?: Select your geographical location on the map. This sets your time zone, which is important for scheduling, email, and general digital organization – a small but significant aspect of productivity.
- Who are you?: This is where you create your user account.
- Your name: Enter your full name.
- Your computer’s name: This is the hostname that will identify your computer on a network. A descriptive name is useful, especially if you manage multiple devices.
- Pick a username: This is the name you’ll use to log in. Keep it simple and lowercase.
- Choose a password: This is critical for digital security. Choose a strong, unique password (a mix of uppercase, lowercase, numbers, and symbols) and do not reuse passwords.
- Confirm your password: Re-enter your password.
- Require my password to log in: Recommended for security.
- Log in automatically: Only choose this on personal computers where security is not a primary concern, as it bypasses the login screen.
With these details entered, the installer will present a summary of your choices. Review everything carefully, especially the disk partitioning section, to ensure you’re happy with the configuration. Once satisfied, click “Install Now.” A final confirmation dialog will appear, detailing the changes that will be made to your disk. Click “Continue” to proceed.
The installation process will now begin. This typically takes 15-30 minutes, depending on your system’s speed and internet connection. During this time, a slideshow will introduce you to Ubuntu’s features, applications, and philosophy. Once the installation is complete, you’ll see a prompt to “Restart Now.” Remove the USB drive when prompted, and your computer will reboot into your newly installed Ubuntu system. Congratulations, you’ve successfully installed Ubuntu!
Post-Installation: Optimizing Your New Ubuntu System
Installing Ubuntu is just the first step. To truly unlock its potential and tailor it to your needs, a few post-installation tasks are essential. These steps will ensure your system is fully updated, all hardware is optimally configured, and you have the necessary software to maximize your productivity and secure your digital life. This phase transforms your generic Ubuntu installation into a personalized, high-performance workstation, ready for any tech endeavor.
Initial Updates and Driver Installation
The very first thing you should do after booting into your new Ubuntu desktop is to update your software repositories and packages. Even if you selected “Download updates while installing,” new updates might have been released in the interim. Open the “Software Updater” application or, for a more robust approach, open a terminal (Ctrl+Alt+T) and run the following commands:
sudo apt update
sudo apt upgrade
sudo apt update refreshes the list of available packages, while sudo apt upgrade downloads and installs the newer versions of installed packages. This ensures your system benefits from the latest security patches, bug fixes, and performance improvements, which are crucial for maintaining digital security and system stability.
Next, focus on driver installation. While Ubuntu generally offers excellent out-of-the-box hardware support, some proprietary hardware, particularly graphics cards (NVIDIA, AMD) and certain Wi-Fi adapters, might require specific drivers for optimal performance or full functionality.
- Navigate to “Software & Updates” (you can search for it in the Activities overview).
- Go to the “Additional Drivers” tab.
- Ubuntu will search for proprietary drivers available for your hardware. If any are found, you’ll see a list of recommended or optional drivers. Select the recommended proprietary driver and click “Apply Changes.”
- You might need to restart your system for the changes to take effect. Installing the correct drivers can significantly enhance your experience, especially for gaming, video editing, or external display setups, thereby boosting your tech capabilities.

Essential Software and Customization for Productivity
With your system updated and drivers in place, it’s time to equip your Ubuntu workstation with the applications you need for daily use and to customize it to fit your workflow. This is where Ubuntu truly shines, offering a vast ecosystem of free and open-source software that can replace virtually any proprietary application, providing significant cost savings.
- Web Browsers: Firefox is pre-installed and is an excellent, privacy-focused browser. However, you can easily install others like Google Chrome (for better integration with Google services) or Brave (known for its privacy features and ad-blocking) from the Ubuntu Software Center or by downloading their
.debpackages from their official websites. - Office Suites: LibreOffice comes pre-installed and is a robust, feature-rich alternative to Microsoft Office, handling documents, spreadsheets, and presentations with ease. For those seeking Microsoft Office compatibility, OnlyOffice or WPS Office are also strong contenders available for Linux. These tools are indispensable for productivity, whether for personal use, academic work, or managing business finances.
- Media Players: VLC Media Player is a highly recommended, versatile media player that can handle almost any audio or video format. It’s available through the Ubuntu Software Center.
- Communication Apps: Many popular communication platforms like Discord, Slack, Zoom, and Microsoft Teams offer native Linux clients or excellent web-based versions, ensuring you stay connected.
- Development Tools: For developers, Ubuntu is a haven. Install VS Code, Sublime Text, Git, Docker, and various programming language runtimes (Python, Node.js, Java) with simple commands or through the Software Center. This makes Ubuntu an ideal platform for side hustles in coding, web development, or any tech-related project.
- Digital Security Tools: Explore tools like KeepassXC for password management, or GnuPG for encryption, enhancing your personal and corporate digital security posture.
Beyond essential applications, personalizing your desktop environment can significantly improve your user experience and productivity. Ubuntu defaults to the GNOME desktop, which is highly customizable:
- GNOME Tweaks: Install this tool (
sudo apt install gnome-tweaks) to access advanced settings for themes, fonts, extensions, and window management. - Themes and Icons: Change the look and feel of your desktop to match your personal branding or simply for aesthetic pleasure.
- Extensions: GNOME Shell Extensions can add new functionalities, such as weather widgets, system monitors, or enhanced application launchers.
- Dock Customization: Adjust the size, position, and auto-hide behavior of the Ubuntu dock to suit your workflow.
By taking the time to explore and customize, you transform Ubuntu into a powerful, efficient, and enjoyable computing environment. The ability to tailor your OS to your precise needs, coupled with its open-source nature and cost-free access, positions Ubuntu as a savvy choice for anyone looking to maximize their tech investment and enhance their digital productivity without breaking the bank.
In conclusion, installing Ubuntu is more than just loading new software onto your computer; it’s an embrace of an entire philosophy centered on freedom, security, and community. From revitalizing old hardware and saving on software costs to providing a robust platform for development and secure daily computing, Ubuntu offers compelling advantages that resonate across the realms of tech innovation, personal branding, and astute financial management. By following this guide, you’ve not only gained a powerful new operating system but also opened the door to a world of open-source possibilities, empowering you with greater control over your digital life. Explore, customize, and enjoy the power of Ubuntu!
aViewFromTheCave is a participant in the Amazon Services LLC Associates Program, an affiliate advertising program designed to provide a means for sites to earn advertising fees by advertising and linking to Amazon.com. Amazon, the Amazon logo, AmazonSupply, and the AmazonSupply logo are trademarks of Amazon.com, Inc. or its affiliates. As an Amazon Associate we earn affiliate commissions from qualifying purchases.