In today’s rapidly evolving digital landscape, Python stands out as a cornerstone programming language, fueling innovation across a myriad of domains. From the intricate algorithms of artificial intelligence and machine learning to the robust backends of web applications, data analysis, and automation scripts, Python’s versatility and readability have made it indispensable for developers, data scientists, and tech enthusiasts alike. For Mac users, getting Python up and running is a foundational step towards unlocking these powerful capabilities, enhancing productivity, and even charting new career paths in a tech-driven world.
This comprehensive guide is designed to walk you through the various methods of installing Python on your macOS system, ensuring you choose the approach best suited for your specific needs, whether you’re a beginner just starting your coding journey or an experienced developer looking for optimal environment management. We’ll explore the nuances of system Python, delve into recommended installation strategies, cover essential post-installation practices, and provide tips for troubleshooting common issues. By the end of this article, you’ll have a robust Python setup, ready to tackle any project and empower your technological aspirations.
Understanding Python on macOS: System vs. Installed Versions
Before diving into the installation process, it’s crucial to understand how Python is typically structured on a macOS system. This distinction is vital for maintaining system stability and ensuring your development environment functions optimally.
The macOS System Python
Historically, macOS has come pre-installed with its own version of Python, primarily Python 2, and more recently, some versions of macOS include an older Python 3. This “system Python” is not intended for general development use. Instead, it’s a utility for Apple’s internal scripts and system processes.
The key reasons why relying on the system Python for your development projects is discouraged include:
- Outdated Versions: The system Python is often an older, sometimes significantly outdated, version. This means you won’t have access to the latest features, performance improvements, and security updates found in modern Python releases. Many contemporary libraries and frameworks require newer Python versions to function correctly.
- System Dependency: Modifying or updating the system Python can inadvertently break macOS functionalities that rely on it. This can lead to system instability and unexpected errors, creating more problems than it solves.
- Lack of Isolation: Using the system Python directly for your projects means all your dependencies are installed globally, potentially leading to conflicts between different projects that require varying versions of the same library.
Why Install a New Version?
Given the limitations of the system Python, installing a separate, isolated version for your development work is the universally recommended best practice. This approach offers several compelling advantages:
- Access to Latest Features: You can install the most current stable release of Python 3, giving you access to the latest language features, performance enhancements, and standard library modules.
- Isolation and Control: A new installation allows you to manage your Python environment independently of the operating system. This is crucial for maintaining project-specific dependencies without interfering with other projects or the macOS system itself.
- Better Package Management: Modern Python installations come with
pip, the standard package installer, which makes adding, updating, and removing third-party libraries simple and efficient. - Enhanced Productivity: A clean, well-managed Python environment reduces the likelihood of dependency conflicts and system issues, allowing you to focus on coding and innovation rather than troubleshooting infrastructure.
Choosing Your Installation Method: Options for Every User
There are several effective ways to install Python on your Mac, each with its own benefits and target audience. We’ll explore the most popular methods, guiding you to select the one that best fits your workflow and technical comfort level.
Method 1: Installing Python via Homebrew (Recommended for Developers)
Homebrew is a free and open-source package manager for macOS that simplifies the installation of software. It’s highly popular among developers for its ease of use, robust features, and ability to manage dependencies efficiently. If you’re comfortable with the command line, Homebrew is arguably the most elegant and recommended way to install and manage Python.
Prerequisites:
-
Xcode Command Line Tools: Before installing Homebrew, you need to ensure the Xcode Command Line Tools are installed. Open your Terminal (Applications > Utilities > Terminal) and run:
xcode-select --installFollow the prompts to complete the installation.
-
Install Homebrew: If you don’t already have Homebrew, install it by pasting the following command into your Terminal:
bash

/bin/bash -c "$(curl -fsSL https://raw.githubusercontent.com/Homebrew/install/HEAD/install.sh)"
The script will guide you through the process, which might include entering your administrator password. Once installed, follow any post-installation instructions Homebrew provides, such as adding it to your PATH.
Step-by-Step Homebrew Python Installation:
- Update Homebrew (Optional but Recommended): Always start by updating Homebrew to ensure you have the latest formulas:
bash

brew update
- Install Python: To install the latest stable version of Python 3, simply run:
bash

brew install python
Homebrew will download and compile Python, along with any necessary dependencies. This process might take a few minutes. - Verify Installation: After the installation completes, verify that Python is correctly installed by checking its version:
bash

python3 --version

pip3 --version
You should see output similar toPython 3.x.xandpip x.x.x from .... Homebrew typically symlinkspython3to the newly installed version.
Advantages of Homebrew:
- Easy Updates: Keep Python and other software up-to-date with
brew upgrade. - Dependency Management: Homebrew handles dependencies automatically.
- Clean Uninstallation: Remove Python easily with
brew uninstall python. - Developer-Friendly: Integrates well into a developer’s workflow for managing a wide array of tools.
Method 2: Using the Official Python Installer (Good for Beginners)
The official Python website provides a direct installer that is straightforward and ideal for users who prefer a graphical interface over the command line. This method installs Python directly into your /Applications directory, typically.
Step-by-Step Official Installer Installation:
- Download the Installer:
- Go to the official Python website: python.org/downloads/macos/
- Locate the latest stable Python 3 release (e.g., “macOS 64-bit universal2 installer”). The “universal2” installer supports both Intel and Apple Silicon Macs.
- Click on the download link to get the
.pkgfile.
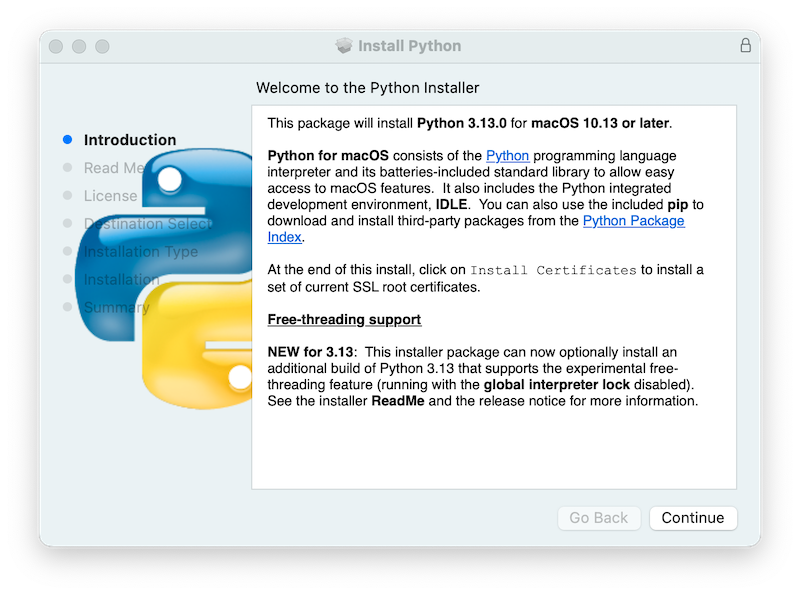
- Run the Installer:
- Once the download is complete, open the
.pkgfile. - The macOS installer wizard will appear. Click “Continue” through the introduction, read and accept the license agreement, and choose the installation location (usually the default is fine).
- Click “Install” and enter your macOS password when prompted.
- The installer will then proceed to install Python.
- Once the download is complete, open the
- Verify Installation:
- After the installation finishes, open your Terminal.
- Verify the Python and Pip versions:
bash

python3 --version

pip3 --version
- The official installer usually handles PATH configuration for you, but it’s good to confirm. If you run into issues where
python3isn’t found, you may need to manually add/Library/Frameworks/Python.framework/Versions/3.x/bin(where3.xis your version) to your shell’s PATH environment variable (e.g., in~/.zshrcor~/.bash_profile).
Advantages of Official Installer:
- User-Friendly: Simple graphical interface makes it accessible for beginners.
- Direct from Source: Ensures you get the official, unmodified Python distribution.
- Well-Documented: Supported by comprehensive documentation on python.org.
Method 3: Anaconda (For Data Science and Machine Learning)
Anaconda is a widely popular distribution for data science, machine learning, and scientific computing. It comes pre-packaged with Python and hundreds of essential libraries like NumPy, Pandas, SciPy, Scikit-learn, and Jupyter Notebook. It also includes the conda package and environment manager, which is even more powerful than pip for managing complex scientific computing environments.
Step-by-Step Anaconda Installation:
- Download the Anaconda Installer:
- Go to the Anaconda Distribution website: anaconda.com/products/individual
- Scroll down to the macOS installers and download the graphical installer (e.g., “64-bit Graphical Installer”). Choose the version appropriate for your Mac’s processor (Intel or Apple Silicon).
- Run the Installer:
- Open the downloaded
.pkgfile. - Follow the on-screen instructions, clicking “Continue” and “Agree” where necessary. You’ll be prompted to choose an installation location (the default is usually fine).
- Click “Install” and enter your macOS password.
- Towards the end, Anaconda may ask if you want to install Visual Studio Code (optional).
- Open the downloaded
- Verify Installation:
- After installation, close and reopen your Terminal. Anaconda typically modifies your shell configuration (e.g.,
~/.zshrcor~/.bash_profile) to add itsbindirectory to your PATH. - You should see
(base)prefixed to your command line prompt, indicating the base Anaconda environment is active. - Verify Python and Conda:
bash

python --version

conda --version
You can also open the Anaconda Navigator application from your Applications folder for a graphical interface to manage environments and applications.
- After installation, close and reopen your Terminal. Anaconda typically modifies your shell configuration (e.g.,
Advantages of Anaconda:
- Batteries Included: Comes with a vast collection of pre-installed data science libraries, saving significant setup time.
- Powerful Environment Management:
condaallows you to create and manage isolated environments with different Python versions and packages very effectively. - Cross-Platform: Consistent experience across macOS, Windows, and Linux.
Method 4: Pyenv (For Managing Multiple Python Versions)
While Homebrew and the official installer typically install a single version of Python, and Anaconda manages environments well, pyenv is a specialized tool for developers who frequently need to switch between multiple distinct Python versions for different projects (e.g., Python 3.8, 3.9, 3.10). It allows you to install and manage several Python versions and set a global, directory-specific, or shell-specific version. This is an advanced option and typically not necessary for most beginners, but it offers unparalleled flexibility for seasoned developers. It’s often installed via Homebrew itself.
Essential Post-Installation Steps for a Seamless Workflow
Installing Python is just the first step. To truly harness its power and maintain a clean, efficient development environment, a few crucial post-installation practices are essential.
Setting Up Virtual Environments: The Best Practice
Virtual environments are isolated Python environments that allow you to manage dependencies for different projects independently. This is arguably the most important best practice for Python development, preventing “dependency hell” where conflicting library versions between projects cause issues.
Why Use Virtual Environments?
- Project Isolation: Each project can have its own set of libraries and Python version, without affecting other projects or the global Python installation.
- Dependency Management: Easily manage specific versions of libraries required for a project.
- Clean Deployment: Simplifies deployment by clearly defining project dependencies.
- Avoid Global Pollution: Keeps your global Python installation clean and free from project-specific clutter.
How to Create and Activate a Virtual Environment (venv Module):
Python 3 comes with the venv module built-in, making virtual environment creation straightforward.
-
Navigate to Your Project Directory:
cd ~/Documents/MyPythonProject(If you don’t have a project directory yet, create one:
mkdir MyPythonProject && cd MyPythonProject) -
Create a Virtual Environment:
python3 -m venv .venvThis command creates a new directory named
.venv(a common convention) inside your project folder. This directory will contain a copy of the Python interpreter andpip, isolated from your system’s Python. -
Activate the Virtual Environment:
source .venv/bin/activateAfter activation, your command prompt will typically show
(.venv)or(your_env_name)before your regular prompt, indicating that you are now working within the virtual environment. Any packages you install withpipwill now be installed into this specific environment. -
Deactivate the Virtual Environment:
When you’re done working on a project, you can deactivate the environment:
bash

deactivate
Your prompt will return to normal, and your shell will no longer be using the virtual environment’s Python and packages.
Updating and Managing Python Packages with Pip
pip is the standard package installer for Python. It allows you to install and manage third-party libraries and modules that aren’t part of the Python standard library. When working inside a virtual environment, pip manages packages specifically for that environment.
Basic pip Commands:
- Update
pip(within an active virtual environment or globally if necessary):
bash

python3 -m pip install --upgrade pip
- Install a package (e.g.,
requestsfor making HTTP requests):
bash

pip install requests
- Install a specific version of a package:
bash

pip install requests==2.28.1
- List installed packages:
bash

pip list
- Uninstall a package:
bash

pip uninstall requests
- Generate a
requirements.txtfile (lists all installed packages and their versions for reproducibility):
bash

pip freeze > requirements.txt
- Install packages from a
requirements.txtfile:
bash

pip install -r requirements.txt
Mastering pip and virtual environments will dramatically improve your Python development experience, boosting your productivity and ensuring project stability.
Troubleshooting Common Installation Issues
Even with clear instructions, you might encounter minor hurdles during Python installation or setup. Here are some common issues and their solutions.
PATH Environment Variable Problems
The PATH environment variable tells your shell where to look for executable programs. If your shell can’t find python3 or pip3 after installation, it’s often a PATH issue.
- Symptoms: Commands like
python3orpip3result incommand not found. - Check your PATH:
bash

echo $PATH
Look for the directory where your new Python installation’s executables reside (e.g.,/usr/local/binfor Homebrew, or/Library/Frameworks/Python.framework/Versions/3.x/binfor the official installer). - Solution: You might need to manually add the Python executable’s directory to your
PATHin your shell configuration file.- For Zsh (default in modern macOS): Edit
~/.zshrc - For Bash: Edit
~/.bash_profileor~/.profile
Add a line like this (adjusting the path for your specific installation):
bash

export PATH="/usr/local/opt/python/libexec/bin:$PATH"  # For Homebrew Python

# OR

export PATH="/Library/Frameworks/Python.framework/Versions/3.x/bin:$PATH" # For official installer
After editing, save the file and then apply changes by sourcing the file or reopening your Terminal:
bash

source ~/.zshrc # or source ~/.bash_profile
- For Zsh (default in modern macOS): Edit
Dealing with Multiple Python Versions
It’s common to have multiple Python versions on your system (e.g., system Python, Homebrew Python, Anaconda Python).
- Symptoms: Running
python3activates an unexpected version. - Check which Python is being used:
bash

which python3
This command will show the full path to thepython3executable that your shell is currently resolving. - Solution:
- Prioritize PATH: Ensure the desired Python installation’s
bindirectory appears earlier in yourPATHenvironment variable than other Python installations. - Use Aliases (temporarily): You can create temporary aliases in your shell for specific versions, e.g.,
alias python3_homebrew='/usr/local/bin/python3'. - Use
pyenv: For robust management of multiple versions, consider installingpyenv(as mentioned earlier), which is specifically designed for this purpose. - Always use
python3andpip3: Avoid justpythonorpipas these often default to older Python 2 or system versions. Explicitly usingpython3andpip3is generally safer.
- Prioritize PATH: Ensure the desired Python installation’s
Permissions Errors
Sometimes, pip install commands might fail with permission denied errors, especially if you try to install packages globally outside a virtual environment.
- Symptoms:
Permission deniederrors when trying to install packages. - Solution:
- Use Virtual Environments (Recommended): The best way to avoid permission issues is to always work within an activated virtual environment. Packages installed here go into your user-owned project directory, requiring no special permissions.
- Avoid
sudo pip install: Whilesudo pip installmight seem like a quick fix, it can lead to global package installations that interfere with system stability and create security risks. Only usesudoif you are absolutely certain you need to modify system-wide Python packages, and even then, proceed with extreme caution. - Check directory ownership: If you consistently face permission issues even in virtual environments, ensure your user owns the project directory and its contents (
chown -R $USER:$GROUP /path/to/your/project).
By following these troubleshooting tips, you can effectively resolve common installation and environment management issues, keeping your Python development workflow smooth and efficient.
Conclusion
Installing Python on your Mac is the gateway to a world of innovation, enabling you to build cutting-edge applications, analyze complex data, delve into artificial intelligence, and automate countless tasks. By carefully choosing your installation method – whether it’s the developer-friendly Homebrew, the beginner-proof official installer, or the data science powerhouse Anaconda – you’re laying a solid foundation for your coding journey.
Remember, the true power of Python development on macOS comes from embracing best practices: always use virtual environments to isolate your projects, and leverage pip effectively for package management. These habits will not only boost your productivity but also ensure the stability and longevity of your development setup.
Equipped with this comprehensive guide, you are now ready to embark on your Python adventure. Start coding, experimenting, and bringing your ideas to life. The skills you cultivate will not only enhance your technological prowess but also open doors to new career opportunities, allowing you to innovate, solve problems, and contribute meaningfully in today’s digital economy. Explore our other tech tutorials to continue expanding your knowledge and mastering the tools of the future. Happy coding!
aViewFromTheCave is a participant in the Amazon Services LLC Associates Program, an affiliate advertising program designed to provide a means for sites to earn advertising fees by advertising and linking to Amazon.com. Amazon, the Amazon logo, AmazonSupply, and the AmazonSupply logo are trademarks of Amazon.com, Inc. or its affiliates. As an Amazon Associate we earn affiliate commissions from qualifying purchases.