The arrival of Starlink, SpaceX’s ambitious Low Earth Orbit (LEO) satellite constellation, has fundamentally redefined the landscape of global telecommunications. Unlike traditional geostationary satellites that orbit the Earth at approximately 35,000 kilometers, Starlink satellites operate at a mere 550 kilometers. This technical shift drastically reduces latency, making satellite internet a viable option for high-bandwidth activities like gaming, 4K streaming, and real-time video conferencing. However, the sophistication of the technology requires a precise and methodical installation process to ensure peak performance. This guide provides a deep dive into the technical workflow required to deploy a Starlink system, from initial site survey to advanced network configuration.

1. Preparing for Deployment: The Pre-Installation Phase
Before unboxing the hardware, the most critical step in the Starlink installation process is the site survey. Because Starlink relies on a phased-array antenna to track moving satellites across the sky, maintaining a “Clear View of the Sky” is not merely a recommendation—it is a technical requirement for stable connectivity.
Downloading the Starlink App
The Starlink mobile application (available on iOS and Android) serves as the primary interface for both installation and ongoing management. Before you even touch the hardware, you must install the app. It uses your smartphone’s camera, compass, and accelerometer to scan the sky and identify potential obstructions. In the tech world, this is a sophisticated application of Augmented Reality (AR) used to map out the “field of regard” required by the dish.
Conducting the Obstruction Survey
Once the app is installed, use the “Check for Obstructions” tool. You will need to stand in the exact spot where you intend to install the dish. As you rotate your phone to scan the horizon, the app identifies trees, chimneys, or power lines that could interrupt the signal. Even a single branch can cause a “micro-dropout,” which might not affect a Netflix stream (due to buffering) but will immediately disconnect a Zoom call or a gaming session. Aim for 0% obstructions for the most professional-grade installation.
Selecting the Ideal Mounting Location
The Starlink dish (often referred to as “Dishy McFlatface”) is designed to operate in various environments, but the mount must be structurally sound. While the kit includes a basic four-legged base for ground-level use, permanent installations usually require specialized hardware. You must decide between a roof mount, a pole mount, or a wall-facing “long wall” mount. From a technical perspective, the goal is to minimize cable length while maximizing the elevation of the dish to clear the local “clutter” (surrounding objects).
2. Setting Up the Hardware: From Unboxing to Physical Alignment
The Starlink kit is a masterclass in minimalist hardware engineering. Depending on whether you have the Standard Actuated (Gen 2) or the High-Performance Kit, the components may vary slightly, but the core logic remains the same: the dish is the modem, the antenna, and the GPS unit all in one.
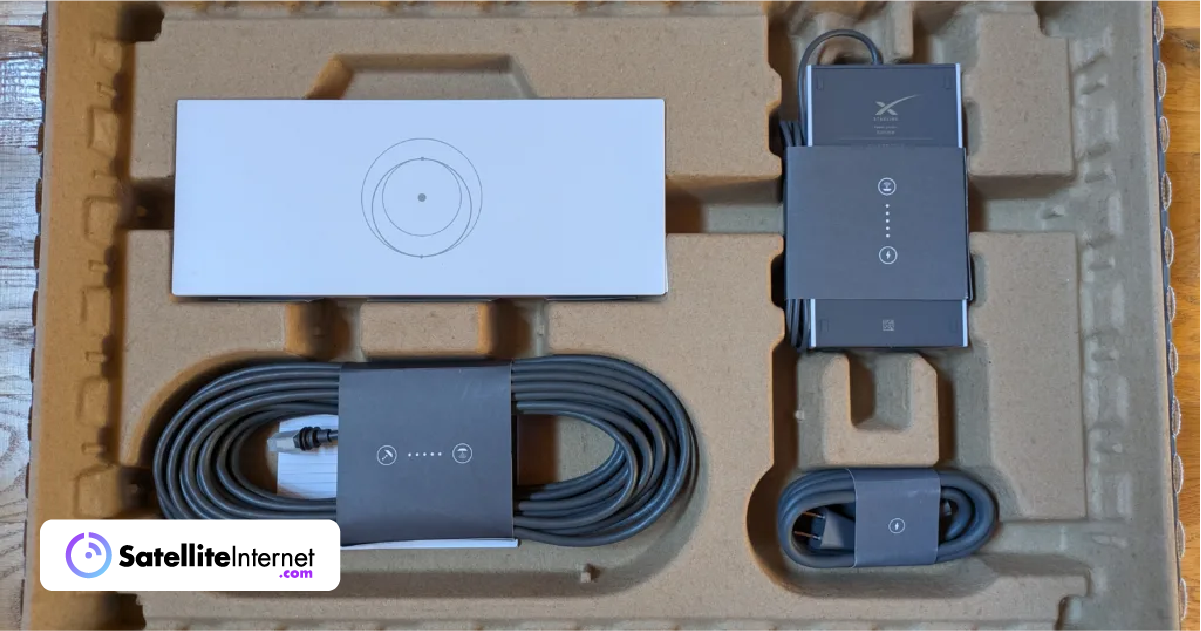
Unpacking the Starlink Kit
Inside the box, you will find the Starlink dish, a pre-connected proprietary cable (usually 50 or 75 feet), a Wi-Fi router, and a power cable. It is essential to handle the dish with care; the face of the antenna is a sensitive phased-array surface. Avoid placing it face-down on abrasive surfaces. The Gen 2 dishes feature motors that automatically tilt the dish to the optimal orientation, while newer Gen 3 models are stationary and require manual orientation assisted by the app’s software.
Assembling the Dish and Stand
Slide the dish mast into the provided base until you hear a click. Ensure the connection is secure, as high winds can create significant torque on the dish surface. If you are using a custom mount, ensure it is plumb (perfectly vertical). While the dish can compensate for some degree of tilt through its internal motors or software, a level base ensures the full range of motion is available for satellite tracking.
Routing the Proprietary Starlink Cable
The cable used by Starlink is a specialized Power-over-Ethernet (PoE) variant. One of the most common technical failures in DIY installations occurs during cable routing. The connectors are proprietary and relatively fragile. When feeding the cable through walls, use a 3/4 inch (19mm) hole to allow the connector to pass through without force. Avoid sharp 90-degree bends, as these can cause “kinking” in the internal copper shielding, leading to packet loss or power delivery issues.
3. Network Configuration and Software Integration
Once the physical hardware is in place, the focus shifts to the digital environment. Starlink’s ecosystem is designed to be user-friendly, but for the tech enthusiast or IT professional, there are several layers of configuration to consider.
Powering Up and Initial Handshake
Connect the dish cable to the router, and then plug the router into a power outlet. The system will take several minutes to initialize. During this “handshake” phase, the dish will move to a horizontal position to scan the sky, locate the Starlink constellation via GPS, and download the latest firmware. Do not power cycle the device during this time, even if it appears to be inactive.
Configuring the Wi-Fi Network
Once the router is powered on, a new open Wi-Fi network named “STINKY” or “STARLINK” will appear in your device’s settings. Connect to it, and the Starlink app will prompt you to set a unique SSID (Network Name) and a WPA2 or WPA3 password. From a digital security standpoint, it is highly recommended to use a complex passphrase, as satellite connections are often targets for unauthorized “leeching” in rural areas where options are limited.
Advanced Settings: Bypass Mode and Ethernet Integration
For users with existing high-end home networks (using Ubiquiti, ASUS, or TP-Link mesh systems), the standard Starlink router may feel restrictive. In the app settings, you can enable “Bypass Mode.” This disables the Starlink router’s Wi-Fi functionality and hands off the public IP address directly to your own third-party router. Note that for Gen 2 hardware, this requires the purchase of the “Starlink Ethernet Adapter,” a crucial accessory for anyone looking to hardwire their workstation or server.
4. Maximizing Network Throughput and Performance Optimization
An “installed” Starlink system is not necessarily an “optimized” one. To reach the advertised speeds of 100-200 Mbps, you must look at the fine-grained data provided by the app’s telemetry.
Understanding Latency and Satellite Handoffs
Starlink operates by constantly switching your connection from one satellite to the next as they fly overhead. Each “handoff” occurs every few minutes. Within the app, you can view the “Statistics” tab to monitor for “Latency Spikes” or “No Signal Received” events. If you see frequent outages of 0.1 seconds, these are often handoff issues that can be mitigated by ensuring the dish has an even wider field of view than initially thought.
Dealing with Obstructions and Signal Degradation
After 12 to 24 hours of operation, the Starlink app will generate an “Obstruction Map.” This is a 360-degree technical readout showing exactly where the signal is being blocked. If red dots appear on the map, you may need to relocate the dish or increase its height. In the world of RF (Radio Frequency) engineering, even “transparent” obstacles like glass or thin plastic can attenuate the signal, so a direct line of sight to the vacuum of space is paramount.
Managing Updates and System Maintenance
SpaceX frequently pushes “Over-the-Air” (OTA) updates to both the dish and the router. These updates often improve satellite tracking algorithms and thermal management. You can schedule these updates to occur at 3:00 AM via the app settings to ensure your workday is not interrupted. Additionally, for users in cold climates, the “Snow Melt” feature can be set to Automatic, which increases the power consumption of the dish to generate heat and prevent ice buildup on the antenna face.
5. Troubleshooting and Long-Term Reliability
The final stage of a professional installation is ensuring the system can withstand the elements and maintain uptime. Satellite tech is notoriously sensitive to environmental changes, and Starlink is no exception.
Common Error Codes and Connectivity Issues
The Starlink app provides a “Debug Data” section that is invaluable for troubleshooting. Technical errors like “Motors Stuck” (often caused by physical interference) or “Poor Cable Connection” (indicating a seating issue with the proprietary plug) can be diagnosed here. If the app shows “Searching,” but the sky is clear, a “Soft Reboot” via the app often recalibrates the phased-array sensors and restores the link.

Weather Resistance and Extreme Environment Operation
Starlink is rated IP54, meaning it is weather-resistant but not waterproof. Ensure all external cable connections are shielded from direct water ingress. For those living in areas with extreme heat, the dish features an internal thermal shutdown mechanism. Proper airflow around the mount is essential to prevent the hardware from throttling speeds during peak summer months. By following these technical protocols, you ensure that your Starlink installation is not just functional, but a high-performance gateway to the future of global internet.
aViewFromTheCave is a participant in the Amazon Services LLC Associates Program, an affiliate advertising program designed to provide a means for sites to earn advertising fees by advertising and linking to Amazon.com. Amazon, the Amazon logo, AmazonSupply, and the AmazonSupply logo are trademarks of Amazon.com, Inc. or its affiliates. As an Amazon Associate we earn affiliate commissions from qualifying purchases.