In the modern computing landscape, hardware and software must communicate with surgical precision to ensure system stability and performance. This communication is facilitated by drivers—small but critical pieces of software that act as the bridge between the operating system (OS) and the physical components of a computer. While many drivers are automatically updated via Windows Update or macOS software management, there are numerous scenarios where manual installation via a USB drive is the only viable solution. Whether you are performing a clean OS installation, troubleshooting a machine with no internet connectivity, or deploying specialized industrial hardware, knowing how to install drivers from a USB drive is an essential skill for any IT professional or tech enthusiast.
This guide provides a deep dive into the technical nuances of manual driver installation, ensuring your hardware operates at peak efficiency without compromising system integrity.
Preparing the Foundation: Sourcing and Organizing Drivers
Before initiating the installation process, the preparation of the USB drive and the acquisition of the correct files are paramount. Using the wrong driver can lead to the dreaded Blue Screen of Death (BSOD) or hardware malfunction.
Identifying Your Hardware Specifications
The first step in any manual driver update is identifying the exact hardware model and version. You can use the “System Information” tool or the “Device Manager” in Windows to find the manufacturer and model. For more obscure hardware, navigating to the “Details” tab in the device properties and selecting “Hardware Ids” provides a vendor (VEN) and device (DEV) code. These codes can be cross-referenced online to find the exact driver package needed.
Downloading from Official OEM Channels
Always prioritize Original Equipment Manufacturer (OEM) websites, such as those from Dell, HP, ASUS, or Lenovo, or the component manufacturer’s site (e.g., Intel, NVIDIA, AMD). Download the “Offline” or “Standalone” installer. These are typically provided in two formats: executable files (.exe or .msi) or compressed archives containing raw driver files (.zip or .rar).
Formatting the USB Drive for Compatibility
For driver installation, a standard FAT32 or NTFS formatted USB drive is sufficient. However, if you are working within a BIOS/UEFI environment before the OS has even loaded (such as during a Windows installation routine), ensuring the drive is formatted to FAT32 is often necessary for the motherboard to recognize the file structure. Organise your drivers into clearly labeled folders (e.g., /Network, /Chipset, /Graphics) to streamline the process.
Executing the Installation via Device Manager
The most robust method for installing drivers, especially when dealing with raw files rather than automated installers, is through the Windows Device Manager. This method gives the user granular control and allows for the installation of specific versions of a driver.
Accessing and Navigating the Device Manager
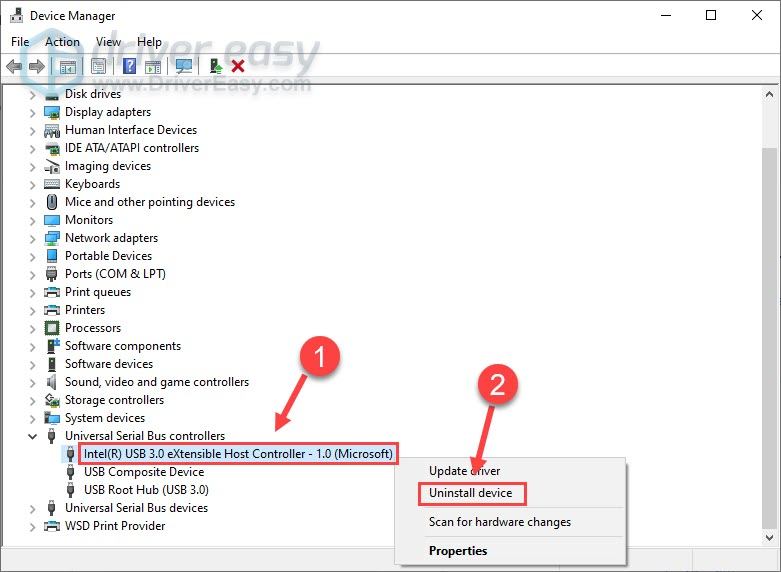
To begin, insert your USB drive into the target computer. Open the Device Manager by right-clicking the Start button and selecting it from the menu, or by typing devmgmt.msc in the Run dialog (Win + R). Look for any devices with a yellow exclamation mark, which indicates a missing or malfunctioning driver, or locate the specific component you wish to update.
The “Browse My Computer” Method
Right-click the target hardware and select “Update driver.” You will be presented with two choices; select “Browse my computer for drivers.” Instead of letting Windows search the entire PC, click “Browse” and point the directory specifically to the folder on your USB drive where the drivers are stored. Ensure the “Include subfolders” checkbox is marked, allowing the OS to scan all sub-directories for the appropriate .inf (Information) file.
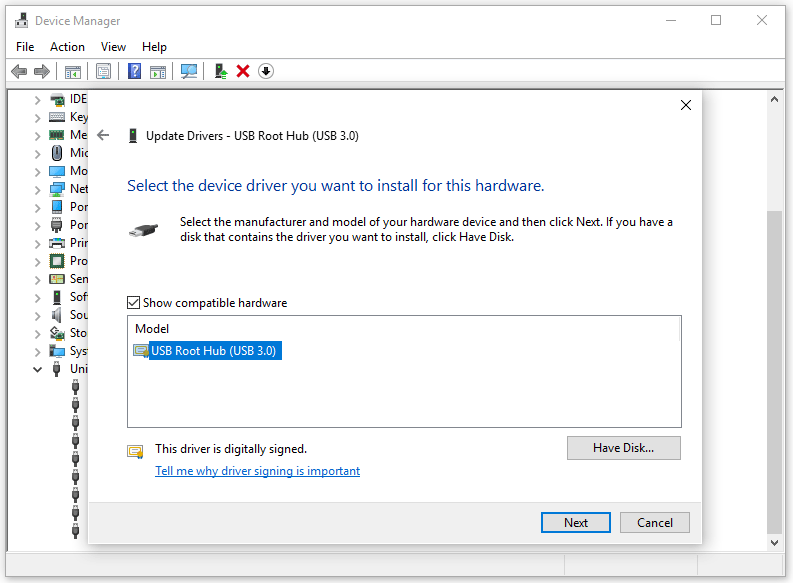
Utilizing the “Have Disk” Option for Legacy Hardware
In some instances, Windows may claim that the “best driver is already installed” even if you know the version on your USB is newer or more appropriate. To override this, select “Let me pick from a list of available drivers on my computer,” then click “Have Disk.” This forces the OS to look directly at the USB drive’s files, bypassing the internal database and allowing you to manually select the specific driver model from the provided list.
Handling Executable Installers and Driver Packages

Many modern hardware components, such as high-end graphics cards or complex peripherals, come with proprietary software suites. In these cases, the installation process differs from the manual INF selection.
Running Standalone Executables
If your USB drive contains an .exe or .msi file, the process is straightforward. However, for maximum stability, right-click the file and select “Run as administrator.” This ensures the installer has the necessary permissions to modify system registries and move files into the System32 directory.
Extracting Compressed Files
Often, manufacturers provide a “Self-Extracting” archive. When you run this from your USB, it may default to extracting files to a temporary folder on the C: drive. It is a best practice to redirect this extraction back to the USB or a dedicated “Temp” folder on the desktop so you can keep track of the files. Once extracted, you can either run the Setup.exe within the new folder or use the Device Manager method described in the previous section to point to the extracted content.
Command-Line Installations for Batch Deployment
For IT administrators managing multiple machines, drivers can often be installed via the Command Prompt or PowerShell. Using the PnPUtil tool (Plug and Play Utility), you can add drivers to the system store directly from the USB. A command like pnputil /add-driver D:Drivers*.inf /subdirs /install can automate the injection of an entire folder of drivers into the OS in a single step.
Troubleshooting and Overcoming Installation Barriers
Even with the correct files, the installation process can encounter hurdles. Understanding how to bypass these roadblocks is essential for a successful setup.
Bypassing Digital Signature Enforcement
Windows 10 and 11 require all drivers to be digitally signed by a verified authority. If you are installing a driver for older or niche hardware, Windows may block the installation. To resolve this, you may need to restart your computer in “Disable Driver Signature Enforcement” mode. This is found under the Advanced Startup options. Note that this should only be done if you absolutely trust the source of the driver, as unsigned drivers can pose a security risk.
Resolving Version Mismatch and Compatibility Issues
If a driver refuses to install, it may be intended for a different version of the OS (e.g., a Windows 7 driver on Windows 11). You can attempt to run the installer in “Compatibility Mode” by right-clicking the executable, selecting “Properties,” and choosing an older operating system from the Compatibility tab. If using the Device Manager method, ensure that you have downloaded the correct architecture (x64 for 64-bit systems or x86 for 32-bit systems).
Checking for Resource Conflicts
In rare cases, a newly installed driver may conflict with an existing one. If the system becomes unstable after an installation from your USB, use the “Roll Back Driver” feature in Device Manager. This returns the hardware to its previous working state by utilizing the cached version of the old driver.
Best Practices for Digital Security and System Stability
Installing drivers involves granting deep access to the core of your operating system. Therefore, security and stability should always be at the forefront of your workflow.
Verifying Driver Integrity
Malicious actors sometimes distribute “driver update tools” that contain malware. Only use files sourced directly from the manufacturer. Before installing, you can verify the file’s hash (MD5 or SHA-256) if the manufacturer provides it on their download page. This ensures the file hasn’t been tampered with or corrupted during the download to the USB drive.
Creating a System Restore Point
Before initiating any major driver changes from a USB drive, it is a professional best practice to create a System Restore Point. In the event of a catastrophic failure or a system hang, you can revert the OS to its state prior to the driver installation, saving hours of potential recovery work.
Maintaining a Portable Driver Library
For technicians, maintaining a “Master USB” with a library of common network (LAN/Wi-Fi) and chipset drivers is highly recommended. Since many modern systems cannot access the internet without these specific drivers, having them readily available on a USB drive is the ultimate “fail-safe” for system deployment and recovery.
By following these structured methodologies—from careful sourcing and Device Manager navigation to troubleshooting signed drivers—you ensure that your hardware is supported by the most stable and efficient software available. Manual driver installation remains a cornerstone of professional IT maintenance, providing a level of control that automated systems simply cannot replicate.
aViewFromTheCave is a participant in the Amazon Services LLC Associates Program, an affiliate advertising program designed to provide a means for sites to earn advertising fees by advertising and linking to Amazon.com. Amazon, the Amazon logo, AmazonSupply, and the AmazonSupply logo are trademarks of Amazon.com, Inc. or its affiliates. As an Amazon Associate we earn affiliate commissions from qualifying purchases.