Building a personal computer from scratch is an incredibly rewarding experience, offering a deep understanding of the technology that powers our digital lives. At the heart of every PC lies the Central Processing Unit (CPU), often dubbed the “brain” of the computer. Its proper installation is arguably the most critical step in the entire PC assembly process. A correctly installed CPU ensures optimal performance, system stability, and longevity, while an incorrect installation can lead to bent pins, damaged components, or a non-functional system.
This guide is designed to demystify the CPU installation process, transforming what might seem like a daunting task into a straightforward, manageable series of steps. Whether you’re a first-time builder or looking for a refresher, we’ll walk you through everything from preparation and component handling to the precise placement of the CPU and the installation of its crucial cooling solution. By following these instructions carefully, you’ll gain the confidence and knowledge to successfully install your CPU and take the first major leap toward bringing your custom-built machine to life.
Why CPU Installation Matters: The Brains of Your PC
The CPU is the fundamental component responsible for executing instructions, performing calculations, and managing the flow of data across your computer. From loading your operating system to running complex applications and rendering graphics in demanding games, the CPU is constantly at work, processing billions of instructions per second. Its proper installation is not just about physically placing it into a slot; it’s about ensuring electrical contact, thermal efficiency, and overall system integrity.
An improperly installed CPU can manifest in several critical issues. The most immediate and severe concern is physical damage to the CPU or the motherboard socket, often due to bent pins on the CPU (for older Intel LGA or AMD PGA sockets) or the socket itself (modern Intel LGA, AMD AM4/AM5). Such damage can render the components unusable and void warranties, leading to costly replacements. Beyond physical damage, poor thermal contact due due to incorrect installation or inadequate thermal paste application can cause the CPU to overheat. This leads to thermal throttling (where the CPU reduces its performance to prevent damage), system instability, crashes, and significantly shorten the lifespan of the chip. Ultimately, mastering CPU installation is a foundational skill that protects your investment and lays the groundwork for a high-performing, reliable PC.
Essential Preparations Before You Begin
Before you even think about touching your precious new CPU or motherboard, a meticulous preparation phase is crucial. This not only streamlines the installation process but also significantly reduces the risk of errors or damage. Think of it as setting the stage for a successful operation.
Gathering Your Tools and Components
Having all your components and tools at hand before you start is paramount. This prevents frantic searching mid-task and ensures you can maintain focus. Here’s a checklist of what you’ll need:
- CPU (Central Processing Unit): The star of the show, in its original packaging.
- Motherboard: The foundation of your PC, also in its original packaging.
- CPU Cooler: This could be an air cooler, an All-in-One (AIO) liquid cooler, or a custom liquid cooling solution. Many CPUs come with a “stock” cooler, which is generally sufficient for basic use but might not be ideal for demanding tasks or overclocking. Ensure it comes with all necessary mounting hardware.
- Thermal Paste: Often pre-applied to stock coolers or provided with aftermarket coolers. If not, you’ll need a separate tube of high-quality thermal compound.
- Phillips Head Screwdriver: A good quality magnetic screwdriver (usually PH2 size) is indispensable for installing the cooler and securing the motherboard.
- Anti-static Wrist Strap (Recommended): To prevent electrostatic discharge (ESD) which can damage sensitive components. Alternatively, frequently touch a grounded metal object (like a bare metal part of your PC case) to discharge any static electricity.
- Motherboard and CPU Cooler Manuals: These contain crucial, component-specific instructions, diagrams, and troubleshooting tips. Do not underestimate their value.
- Clean, Flat Workspace: A well-lit, clutter-free area where you can comfortably work.
- Cleaning Alcohol (Isopropyl Alcohol 90%+): If you need to clean off old thermal paste or correct a mistake.
- Lint-free Cloth or Coffee Filters: For applying alcohol and wiping surfaces.
Ensuring Compatibility: The Golden Rule
Compatibility is the cornerstone of any PC build. A CPU will only work with a motherboard that features the correct socket type. This is non-negotiable.
- CPU Socket Type: Modern CPUs from Intel and AMD use different socket designs. For instance, Intel CPUs currently use LGA (Land Grid Array) sockets (e.g., LGA1700 for 12th, 13th, 14th Gen Intel Core processors), where the pins are on the motherboard. AMD CPUs typically use PGA (Pin Grid Array) for older generations (e.g., AM3+, FM2+) where pins are on the CPU, and more recently, LGA for their higher-end desktop chips (e.g., AM5 for Ryzen 7000 series) and some workstation chips, or PGA for their mainstream chips (e.g., AM4 for Ryzen 1000-5000 series). Double-check your CPU’s model number and the motherboard’s specifications to ensure they match (e.g., an Intel LGA1700 CPU requires an LGA1700 motherboard).
- Chipset Compatibility: Beyond the physical socket, the motherboard’s chipset must support your CPU. While an LGA1700 CPU physically fits an LGA1700 motherboard, certain CPU generations might only be supported by specific chipsets (e.g., Z690, B660, H610 for Intel 12th/13th Gen, but a BIOS update might be needed for a 13th Gen on an older 12th Gen board). Always check the motherboard manufacturer’s CPU support list.
- TDP (Thermal Design Power): Ensure your chosen CPU cooler has enough cooling capacity to handle your CPU’s TDP, especially if you plan on overclocking or have a high-end chip.
- RAM Compatibility: While not directly related to CPU installation, ensure your motherboard and CPU support the speed and type of RAM you plan to use.
Workspace Setup and Safety Precautions
A well-prepared workspace contributes significantly to a smooth build.
- Clean and Clear: Remove any clutter from your desk or table. Make sure it’s a stable, non-conductive surface (wood or plastic is ideal, avoid metal).
- Good Lighting: Adequate light helps you see small components and alignment markers clearly.
- Anti-static Measures: This is critical. Electrostatic discharge (ESD) can fry sensitive electronic components without you even feeling a shock.
- Wear an anti-static wrist strap, clipping it to a grounded metal object (like a bare metal part of your PC case or a metal pipe).
- Avoid working on carpeted floors.
- Handle components by their edges as much as possible, minimizing contact with pins or circuitry.
Step-by-Step Guide to CPU Installation
With preparations complete, it’s time to install the CPU. Precision and patience are key here.
Unboxing and Handling with Care
- Motherboard First: Carefully remove the motherboard from its anti-static bag and place it on a non-conductive, flat surface (like its own cardboard box or a clean wooden table). This is often easiest to do outside the PC case for CPU and cooler installation.
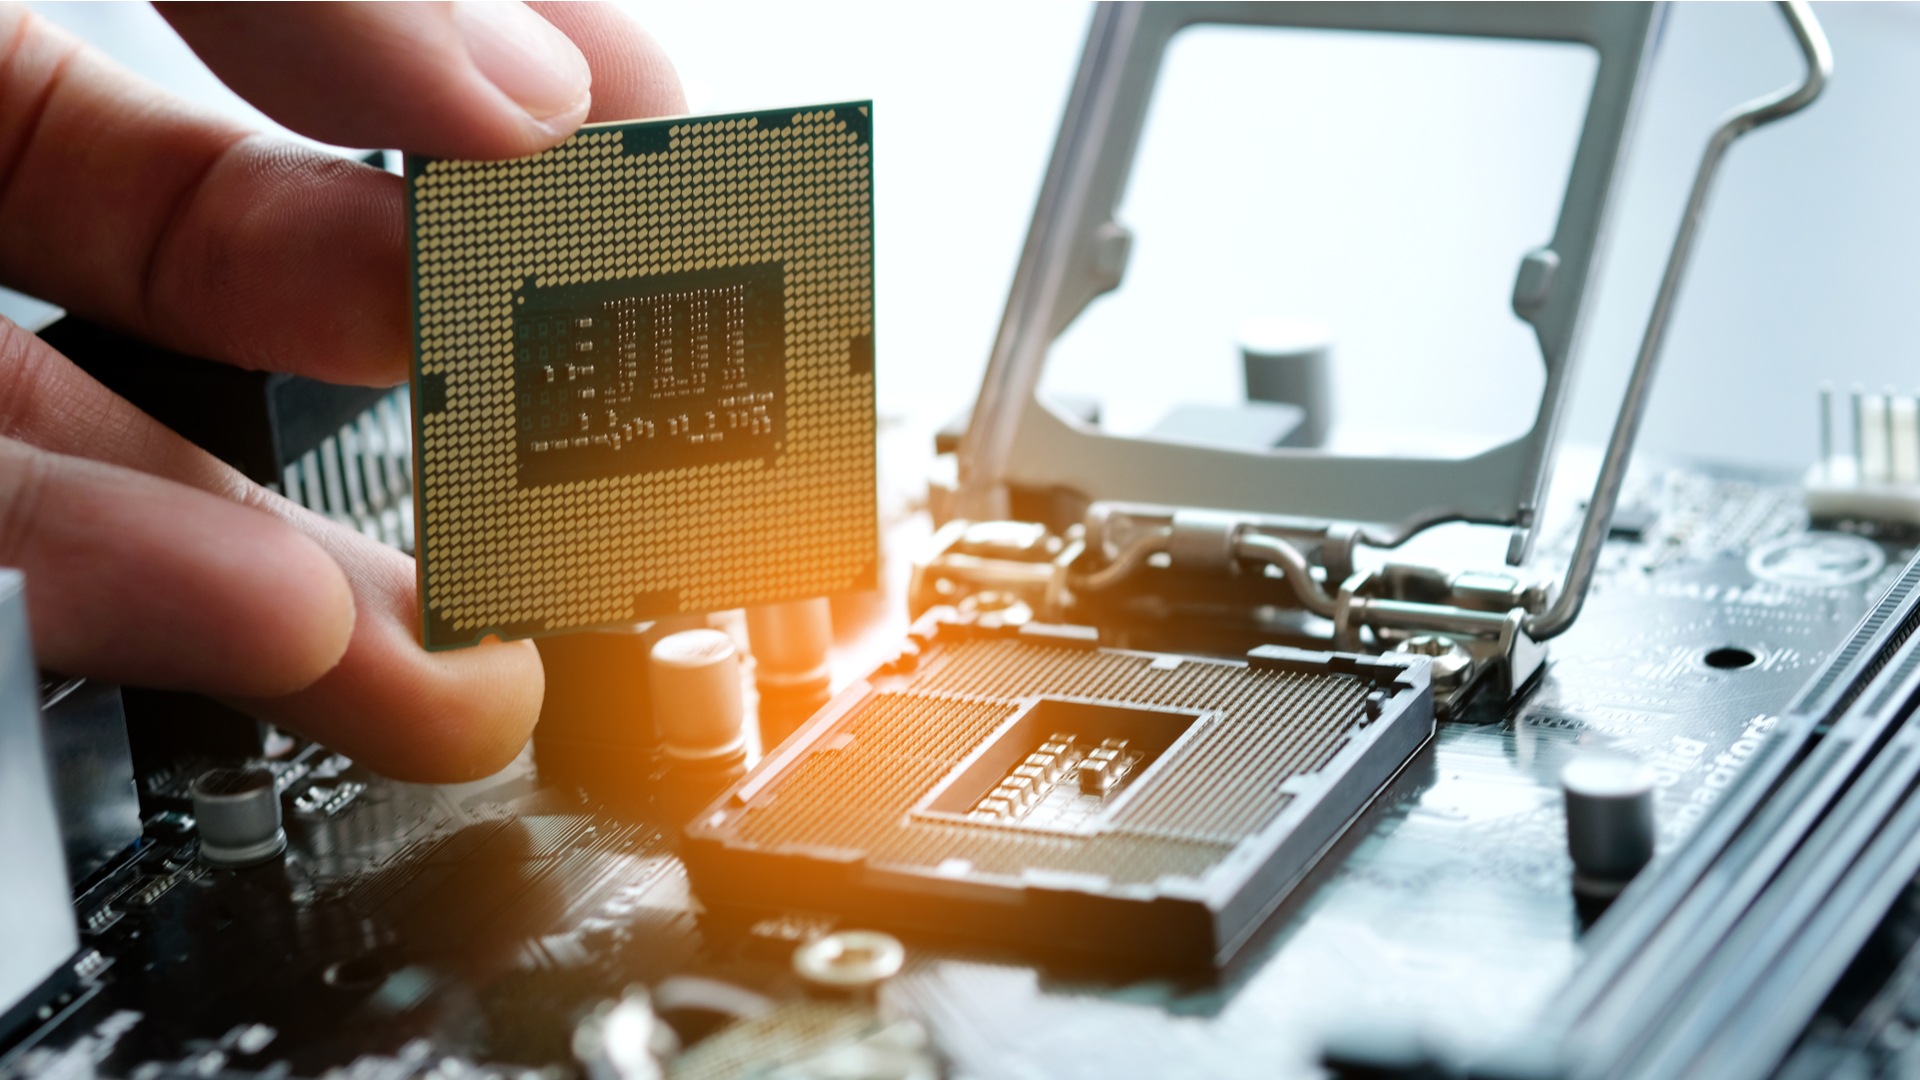
- CPU Next: Open the CPU packaging. Handle the CPU only by its edges. Avoid touching the gold contacts on the bottom (for PGA CPUs) or the top integrated heat spreader (IHS) if possible, but never touch the delicate pins on PGA CPUs or the contact pads on LGA CPUs.
Preparing the CPU Socket
Locate the CPU socket on your motherboard. It’s usually a large, square area in the center of the board.
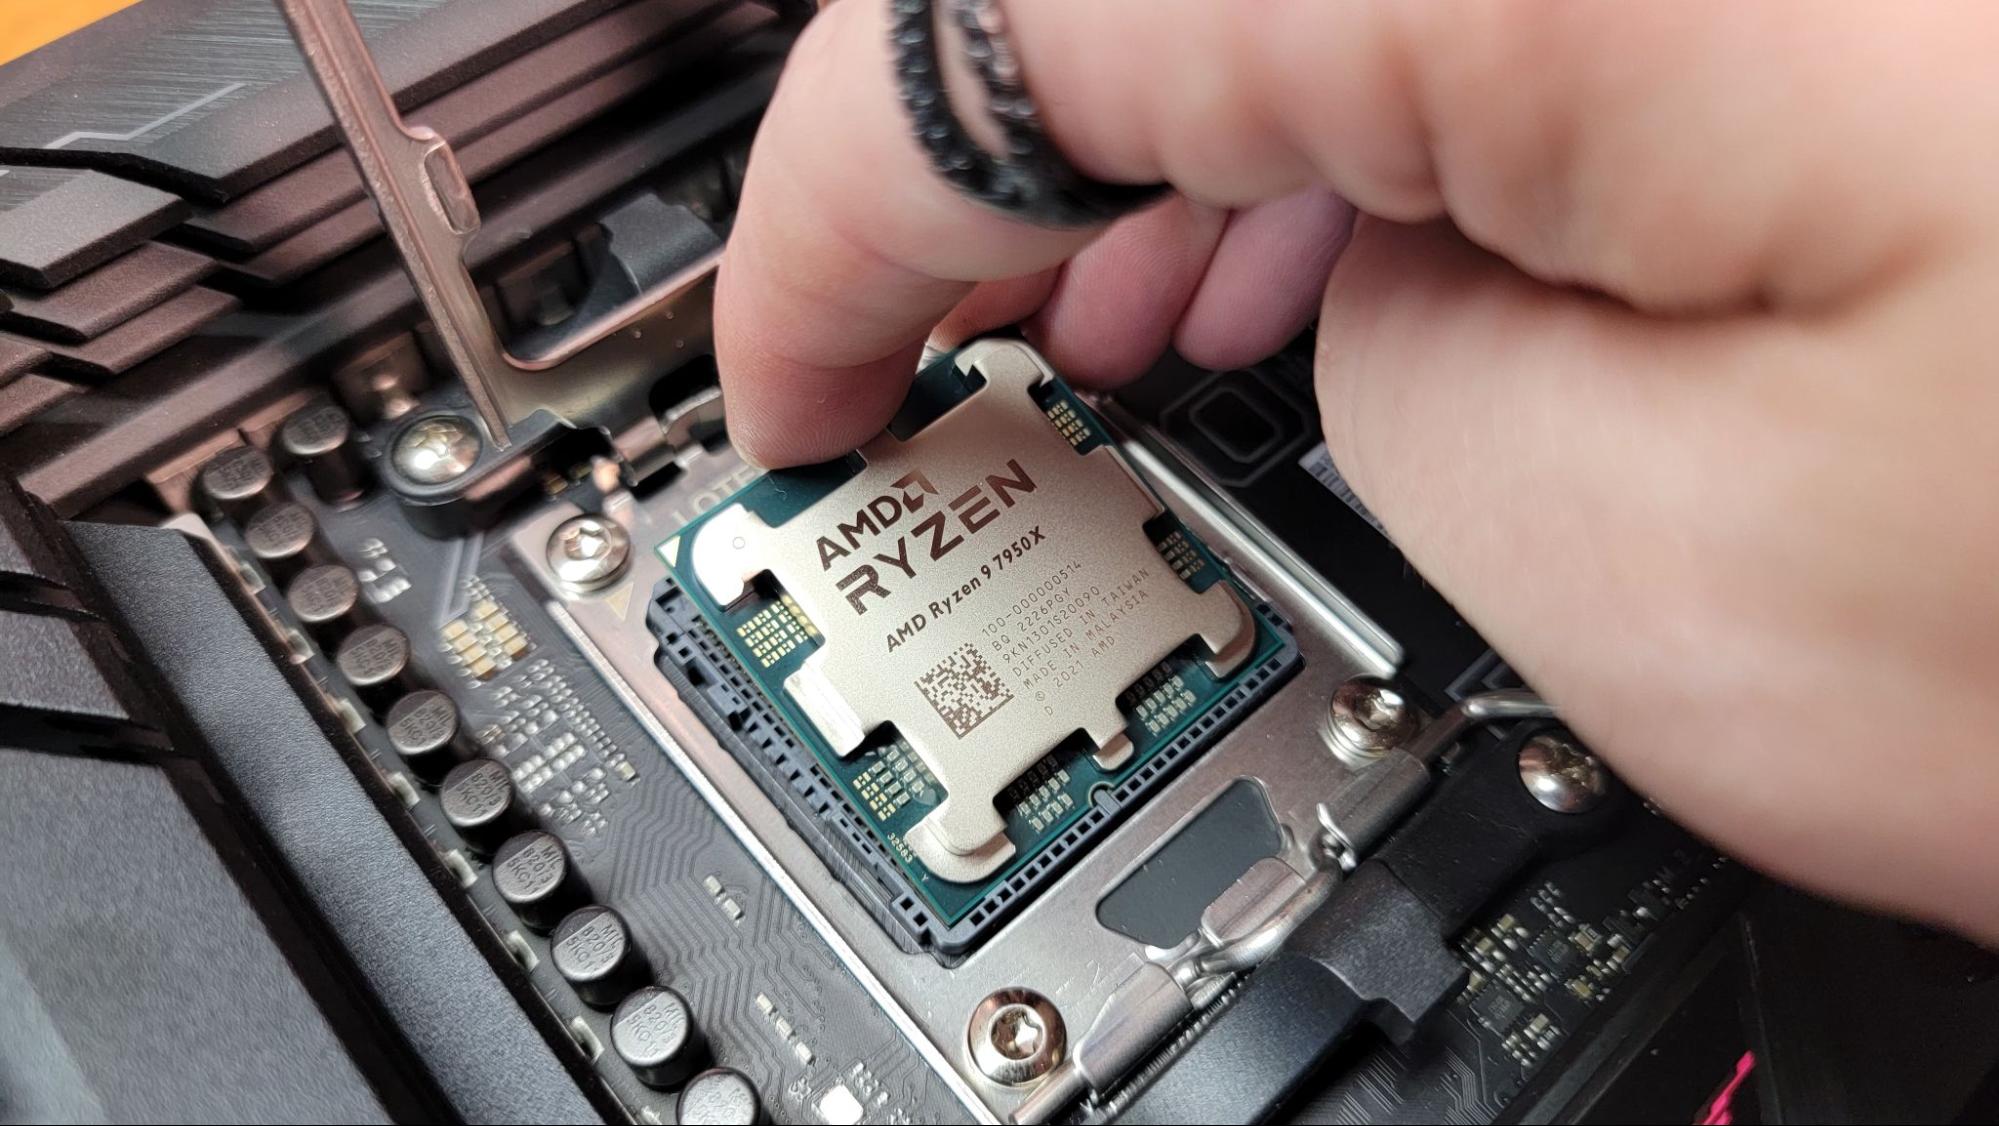
- LGA Sockets (Intel, AMD AM5): You’ll see a metal retention arm or lever at one side of the socket. Push down on this lever and gently swing it outwards and upwards. This will lift the metal load plate that covers the socket. Be cautious of the socket’s pins inside – they are incredibly fragile. Some sockets also have a small plastic protective cover. This cover will automatically pop off when you lower the load plate and secure the CPU, or you might need to gently remove it.
- PGA Sockets (AMD AM4): These sockets also have a small metal lever. Gently push the lever downwards and swing it fully outwards to a vertical position. This opens the locking mechanism within the socket, allowing the CPU pins to slide in without resistance.
Precise CPU Placement: Alignment is Key
This is the most critical step. Incorrect alignment can bend pins and destroy your CPU or motherboard.
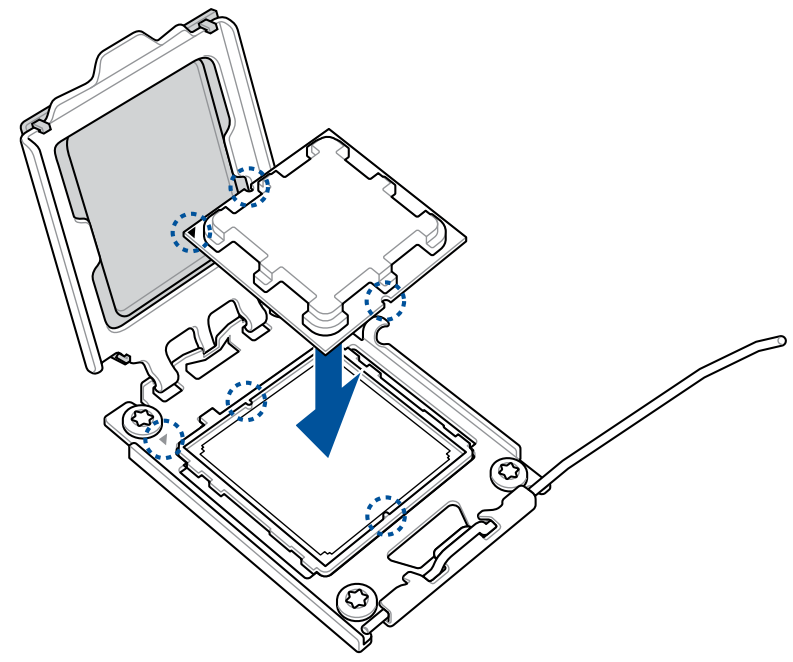
- LGA Sockets: Look for a small golden triangle or arrow on one corner of the CPU’s top surface. Match this triangle with a corresponding triangle or marker on one corner of the motherboard’s CPU socket. Slowly and gently lower the CPU straight down into the socket. Do not force it. It should fall into place perfectly with virtually no pressure. If it doesn’t, lift it, re-check the alignment, and try again. Rocking or wiggling the CPU can damage the pins.
- PGA Sockets: Similarly, identify the golden triangle or arrow on one corner of your CPU. Align this with the corresponding arrow or triangle on the motherboard’s CPU socket. Carefully lower the CPU straight down into the socket. Again, it should drop into place without any force. If there’s resistance, do not push. Remove the CPU, inspect for bent pins on the CPU itself, and re-align.
Securing the CPU in the Socket
Once the CPU is perfectly seated:
- LGA Sockets: Gently lower the metal load plate back over the CPU. Then, push the retention arm back down and clip it into its original position. You might feel a slight amount of resistance, which is normal as the CPU is firmly pressed into the socket. The plastic protective cover, if present, should pop off or be gently removed now.
- PGA Sockets: Once the CPU is fully seated, push the retention lever back down towards the motherboard until it clicks into its locked position. This secures the CPU’s pins in the socket.
Applying Thermal Paste (If Needed)
Thermal paste is essential for transferring heat from the CPU’s Integrated Heat Spreader (IHS) to the CPU cooler’s base plate. Without it, the microscopic air gaps between the two surfaces would severely impede heat transfer, leading to rapid overheating.
- Check Your Cooler: Many stock coolers and some aftermarket coolers come with thermal paste pre-applied to their base. If yours does, you can skip this step unless you plan to remove the cooler later, in which case you’ll need to reapply fresh paste.
- Applying New Paste: If no paste is present, apply a small amount (about the size of a pea or a grain of rice) directly to the center of the CPU’s IHS. There are various application methods (single dot, line, “X” pattern), but for most users, the pea-sized blob in the center is sufficient, as the pressure from the cooler will spread it evenly. Do not use too much, as excess paste can squeeze out and potentially cause issues if it’s electrically conductive (though most modern pastes are non-conductive). Do not spread it manually with your finger or a spreader, as this can introduce air bubbles and reduce effectiveness. The pressure from the cooler will do the job.
Installing the CPU Cooler
This step varies most depending on your cooler type, so always refer to your cooler’s manual. However, the general principles remain.
- Backplate (if applicable): Many aftermarket coolers require a backplate to be installed behind the motherboard. Align this correctly and pass the mounting screws through the appropriate holes.
- Mounting Brackets: Install any necessary mounting brackets around the CPU socket on the motherboard.
- Position the Cooler: Carefully place the CPU cooler’s base plate onto the CPU’s IHS, aligning the mounting holes or clips.
- Secure the Cooler: Tighten the mounting screws in a diagonal pattern (e.g., top-left, bottom-right, top-right, bottom-left) in small, incremental turns. This ensures even pressure distribution and optimal thermal contact. Do not overtighten, as this can damage the motherboard or CPU. Tighten until snug, but not to the point of extreme force.
- Connect Fan Cable: Locate the “CPUFAN” header on your motherboard (usually near the CPU socket) and plug in the CPU cooler’s fan cable. This is critical for fan operation and for the motherboard to monitor CPU temperatures. If you have an AIO liquid cooler, also connect its pump power header (often labeled “AIOPUMP” or “CPU_OPT”).
Post-Installation Checks and Troubleshooting Tips
You’ve done the hard part! Now, a few quick checks to ensure everything is perfect before you move on to other components.
Verifying Proper Seating and Connections
- CPU Cooler Stability: Gently try to wiggle the CPU cooler. It should be firmly attached with no significant movement. If it wobbles, re-check the mounting screws and ensure they are tightened evenly.
- Fan Header Connection: Double-check that the CPU cooler fan cable is securely plugged into the correct “CPU_FAN” header on the motherboard. This is a common oversight that leads to “CPU Fan Error” messages during the first boot.
- No Bent Pins: While you can’t see the pins once the CPU is secured, if you felt any resistance during placement, it’s worth a moment of concern. If you suspect bent pins, it’s safer to remove the cooler and CPU to inspect the socket/CPU thoroughly before proceeding.
- Visual Inspection: Take a final look around the CPU socket area. Are there any loose screws, cables, or debris?
Common Pitfalls and How to Avoid Them
- Bent Pins: This is the most dreaded issue. Always align the CPU perfectly and let it drop into the socket under its own weight. Never force it. If you discover bent pins on an LGA socket, tiny jewelry pliers or a thin razor blade can sometimes be used to carefully straighten them, but this is extremely risky and often unsuccessful.
- Incorrect Orientation: Installing the CPU backward will prevent it from seating properly and will likely damage pins if forced. Always rely on the alignment triangles/arrows.
- Insufficient or Excessive Thermal Paste: Too little paste means poor heat transfer. Too much can spill over, though most modern non-conductive pastes are harmless. A pea-sized blob is usually perfect.
- Loose CPU Cooler: An unstable cooler means poor contact and inefficient cooling. Ensure all screws are tightened evenly in a diagonal pattern.
- Forgetting the CPU Fan Header: The system won’t boot or will give a “CPU Fan Error” without the fan connected, as a safety measure.
- Removing the Plastic Socket Cover Too Early: For LGA sockets, the plastic cover is designed to protect the pins. Some covers pop off automatically when the lever is closed. Others need to be gently removed after the CPU is seated. Never touch the pins inside the socket.
First Boot Considerations
Once your entire PC is assembled, the first boot is the moment of truth.
- Monitor Temperatures: Immediately after the first boot into the BIOS (UEFI), check your CPU temperatures. Most motherboards display this prominently. Ensure they are within reasonable idle ranges (e.g., 30-50°C). If temperatures are alarmingly high (e.g., 80-90°C at idle), immediately shut down the system and inspect the cooler mounting and thermal paste application.
- Listen for Fan Noise: Confirm that your CPU cooler fan(s) are spinning. Abnormal noises or no spin at all indicate an issue.
- BIOS Updates: For newer CPUs on older motherboards, a BIOS update might be required for full compatibility and optimal performance. Check your motherboard manufacturer’s support page.
Congratulations! You’ve successfully installed the CPU and its cooler, completing one of the most critical steps in building your own computer. This hands-on experience not only equips you with valuable technical skills but also empowers you with a deeper understanding of your machine’s core components. Remember, patience, precision, and adherence to manufacturer guidelines are your best friends in PC building. Now that the brain of your computer is in place, you’re well on your way to completing your custom rig and enjoying the fruits of your labor. The next steps will involve installing RAM, storage, the graphics card, and finally, cabling everything together. Happy building!
aViewFromTheCave is a participant in the Amazon Services LLC Associates Program, an affiliate advertising program designed to provide a means for sites to earn advertising fees by advertising and linking to Amazon.com. Amazon, the Amazon logo, AmazonSupply, and the AmazonSupply logo are trademarks of Amazon.com, Inc. or its affiliates. As an Amazon Associate we earn affiliate commissions from qualifying purchases.