In the intricate symphony of your computer’s hardware, hundreds of components work in concert to deliver the seamless experience you expect. Yet, beneath the surface of blazing fast processors and high-capacity storage, a crucial, often overlooked element orchestrates much of this harmony: the chipset. The chipset, a group of integrated circuits on your motherboard, acts as the central communication hub, directing data flow between the CPU, memory, storage devices, and peripherals. For this vital component to function optimally and interact correctly with your operating system, it requires specific software known as chipset drivers.
Understanding how to install and update these drivers is not just a technicality for seasoned IT professionals; it’s a fundamental skill for anyone looking to maximize their PC’s performance, stability, and longevity. Whether you’re building a new system, troubleshooting an unstable machine, or simply aiming for peak efficiency, managing your chipset drivers is an essential part of maintaining a healthy computer. This comprehensive guide will demystify chipset drivers, walk you through the installation process, and equip you with the knowledge to keep your system running smoothly.
Understanding Chipset Drivers: The Unsung Heroes of Your PC
Before diving into the “how-to,” it’s crucial to grasp the “what” and “why” behind chipset drivers. They are more than just another piece of software; they are the interpretative layer that allows your operating system to speak the language of your motherboard’s core components.
What Exactly Are Chipset Drivers?
Imagine your motherboard as a bustling city, and the chipset as its central traffic control system. This system includes controllers for USB ports, SATA connections, PCIe lanes (for graphics cards, SSDs), audio interfaces, and network adaptors, among others. Without proper guidance, data traffic would grind to a halt, or worse, cause collisions.
Chipset drivers are the specific software instructions that allow your operating system (like Windows, macOS, or Linux) to understand and correctly communicate with the chipset. They translate the high-level commands from your OS into low-level instructions that the chipset can execute, ensuring that all integrated components perform as intended. This includes everything from how quickly your USB devices are recognized to the efficiency with which your CPU communicates with your RAM.
Modern chipsets are incredibly complex, often incorporating multiple controllers and features. For example, Intel’s H-series, B-series, and Z-series chipsets, or AMD’s B-series and X-series chipsets, each have distinct architectures and capabilities. The drivers tailor the OS’s interaction to these specific designs, unlocking features, optimizing power management, and ensuring hardware compatibility.
Why Chipset Drivers Are Crucial for System Performance
The importance of chipset drivers cannot be overstated. They are foundational to your system’s overall health and performance. Here’s why they are so crucial:
- System Stability and Reliability: Incorrect or outdated chipset drivers are a common culprit behind system crashes, freezes, and unexpected errors. They ensure that all components communicate seamlessly, preventing conflicts and data corruption that can lead to blue screens of death (BSODs) or application failures.
- Optimal Performance: Chipset drivers significantly impact the efficiency of data transfer between the CPU, RAM, storage, and other peripherals. Updated drivers can often introduce optimizations that reduce latency, increase bandwidth, and improve the responsiveness of your entire system. For instance, an updated storage controller driver might enhance SSD performance, or a new USB driver could improve transfer speeds for external devices.
- Hardware Compatibility: When you install new hardware, such as a faster NVMe SSD or a new USB 3.2 device, the chipset drivers ensure that your motherboard correctly identifies and supports these advancements. Without the appropriate drivers, your new hardware might not be recognized at all, or it might operate in a limited, suboptimal mode.
- Access to New Features: Chipset manufacturers continually refine their designs and sometimes release drivers that enable new features or improve existing ones. These could include better power management schemes, enhanced security protocols for certain data paths, or support for emerging technologies.
- Troubleshooting and Diagnosis: When facing system issues, ensuring your chipset drivers are up-to-date is often one of the first troubleshooting steps. A fresh installation can resolve a myriad of problems that might otherwise seem inexplicable.
In essence, chipset drivers are the bedrock upon which all other drivers and applications rely. Keeping them current and correctly installed is a proactive measure against performance bottlenecks, instability, and compatibility headaches, contributing significantly to a smooth and enjoyable computing experience.
When and Why You Should Update Your Chipset Drivers
While it might be tempting to “set it and forget it” with drivers, chipset drivers, like other critical software, benefit from timely updates. Knowing when to update and understanding the associated risks of not doing so is key to maintaining a robust system.
Key Scenarios for Driver Updates
There are several scenarios where updating your chipset drivers becomes not just advisable, but often necessary:
- New System Build or Motherboard Replacement: This is arguably the most critical scenario. When you assemble a new PC or replace your motherboard, installing the latest chipset drivers directly from the manufacturer’s website should be among your very first steps after installing the operating system. The drivers included with Windows might be generic or outdated, failing to unlock the full potential or ensure the stability of your brand-new hardware.
- Operating System Reinstallation: Performing a clean installation of Windows (or any OS) means starting fresh. Even if you’re using the same hardware, a clean OS install necessitates reinstalling all drivers, including chipset drivers, to ensure proper integration with the new operating system environment.
- Performance Issues or Instability: If you’re experiencing unexplained slowdowns, frequent crashes, device recognition issues, or general system instability, outdated chipset drivers are a common culprit. An update can often resolve these perplexing problems by re-establishing proper communication channels.
- Installing New Hardware: While a new graphics card primarily needs its own drivers, introducing other hardware like a high-speed NVMe SSD, a new network card, or specific USB peripherals can sometimes benefit from updated chipset drivers to ensure maximum compatibility and performance with the underlying motherboard architecture.
- Security Updates: Though less frequent for chipset drivers compared to network or graphics drivers, manufacturers sometimes release updates that patch security vulnerabilities within the chipset’s firmware or its interaction pathways. Staying updated can safeguard against potential exploits.
- BIOS/UEFI Updates: While not directly chipset drivers, a significant BIOS/UEFI update on your motherboard might sometimes necessitate or benefit from a corresponding chipset driver update to ensure full compatibility and functionality with the newly updated firmware.
The Risks of Outdated Chipset Drivers
Ignoring chipset driver updates can lead to a cascade of problems that detract from your computing experience and potentially compromise your system’s integrity:
- System Instability: This is the most common and frustrating consequence. Outdated drivers can cause conflicts, memory errors, and lead to frequent system crashes (e.g., Blue Screen of Death on Windows), unexpected reboots, or applications freezing.
- Reduced Performance: As mentioned, newer drivers often contain optimizations. Running on old drivers means you’re likely missing out on potential speed gains, reduced latency, and more efficient power management. Your CPU might not communicate optimally with RAM, or your storage devices might not hit their advertised speeds.
- Hardware Incompatibility or Malfunction: Newer peripherals might not work correctly, or at all, with an older chipset driver. For instance, a new generation USB device might only run at USB 2.0 speeds if the USB 3.x controller driver is outdated.
- Security Vulnerabilities: While less prevalent than with network drivers, a vulnerability in the chipset’s interaction with the OS, if left unpatched, could potentially be exploited by malicious software.
- Driver Conflicts: Installing other updated drivers (e.g., for a graphics card or sound card) on a system with severely outdated chipset drivers can sometimes lead to new conflicts, as the new drivers expect a more modern foundational layer.
Regularly checking for and installing chipset driver updates, especially during significant system changes or when troubleshooting, is a fundamental best practice for any PC user.
Preparing for Chipset Driver Installation
Proper preparation is half the battle when it comes to driver installation. A few simple steps can save you significant headaches and ensure a smooth, successful update.
Identifying Your Motherboard and Chipset
The most crucial piece of information you need before downloading any drivers is the exact model of your motherboard and its associated chipset. Drivers are highly specific to these components.
- Physical Inspection: The easiest way is often to physically open your computer case and look at the motherboard itself. The manufacturer’s name (e.g., ASUS, MSI, Gigabyte, ASRock) and the model number (e.g., “PRIME Z690-P,” “B550 GAMING PLUS”) are usually printed prominently near the CPU socket or along the edges. The chipset (e.g., Intel Z690, AMD B550) is typically indicated as well, often under a heatsink.
- System Information Tools (Windows):
- DirectX Diagnostic Tool: Press
Win + R, typedxdiag, and press Enter. Look under the “System” tab for “System Manufacturer” and “System Model.” This usually gives you the motherboard model. - System Information Utility: Press
Win + R, typemsinfo32, and press Enter. This comprehensive tool provides detailed hardware information. Look for “BaseBoard Manufacturer,” “BaseBoard Product,” and “BaseBoard Version.”
- DirectX Diagnostic Tool: Press
- Third-Party Software: Tools like CPU-Z or HWiNFO64 are excellent for providing detailed system information, including motherboard model, chipset, and even BIOS version. These are particularly useful if your motherboard model isn’t clearly stated in Windows’ built-in tools. Download them from reputable sources.
- Original Documentation: If you still have the box or manual for your motherboard, it will clearly state the model and chipset.
Once you have identified your motherboard model, you can proceed to the manufacturer’s official support website. For example, if you have an “ASUS ROG STRIX B550-F GAMING” motherboard, you would go to the ASUS support website, navigate to “Motherboards,” and search for your specific model.
Essential Pre-Installation Steps
Before you download or run any driver installer, take these precautionary measures:
- Create a System Restore Point: This is paramount. A system restore point allows you to revert your system to its previous state if the driver installation goes awry and causes instability. To do this in Windows:
- Search for “Create a restore point” in the Windows search bar and open it.
- In the “System Protection” tab, ensure system protection is “On” for your main drive (usually C:).
- Click “Create…” and give the restore point a descriptive name (e.g., “Before Chipset Driver Update [Date]”).
- Back Up Important Data: While a restore point covers system files, always have a separate backup of your personal documents, photos, and critical files. This is a general best practice for any significant system modification.
- Ensure a Stable Internet Connection: You’ll need this to download the drivers from the manufacturer’s website.
- Disable Antivirus (Temporarily): Some antivirus programs can interfere with driver installations, leading to incomplete or failed setups. It’s often advisable to temporarily disable your antivirus software during the installation process and re-enable it afterward.
- Close All Unnecessary Applications: To minimize potential conflicts and ensure the installer has full access to system resources, close any open programs before starting the driver installation.
- Note Current Driver Version (Optional but Recommended): In Device Manager (right-click Start -> Device Manager), expand “System devices.” Look for entries related to your chipset (e.g., “Intel(R) Chipset SATA/PCIe RST Premium Controller,” “AMD SMBus,” or similar). Right-click and choose “Properties,” then the “Driver” tab to note the current version. This helps verify the update.
By taking these preparatory steps, you significantly reduce the risk of issues and ensure a smoother, more confident driver installation process.
Step-by-Step Guide: Installing Chipset Drivers
The most reliable method for installing chipset drivers is always through your motherboard manufacturer’s official website. While other methods exist, they often don’t provide the same level of optimization or the latest versions.
Method 1: Via Your Motherboard Manufacturer’s Website (Recommended)
This is the gold standard for driver installation. It ensures you get the correct, optimized drivers specifically designed for your hardware.
- Identify Your Motherboard Model (as per preparation steps): Make sure you have the exact model number.
- Navigate to the Manufacturer’s Support Page:
- Go to the official website of your motherboard manufacturer (e.g., ASUS, MSI, Gigabyte, ASRock, Dell, HP, Lenovo for pre-built systems).
- Look for a “Support,” “Downloads,” or “Drivers” section.
- Use the search bar or navigation menus to find your specific motherboard model.
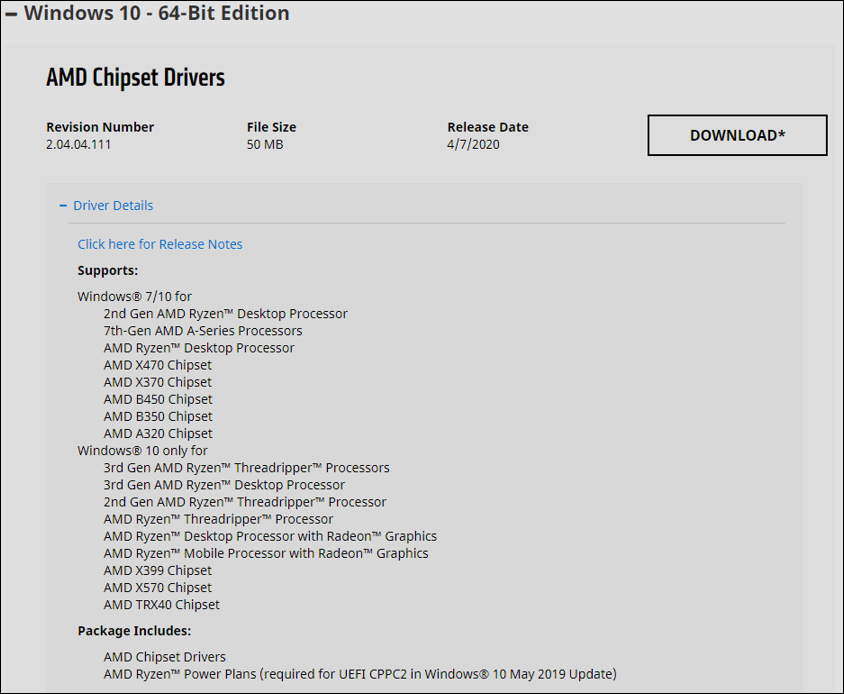
- Locate the Chipset Drivers:
- Once on your motherboard’s support page, you’ll usually see categories like “Drivers & Utilities,” “BIOS,” “Manuals,” etc.
- Select “Drivers & Utilities.” You’ll then typically need to select your operating system (e.g., “Windows 11 64-bit,” “Windows 10 64-bit”).
- Look for a section specifically labeled “Chipset,” “System & Chipset,” or “Platform Drivers.”
- Within this section, identify the latest available chipset driver package. Pay attention to the release date and version number.
- Download the Driver Package:
- Click the download link for the chipset drivers. The file will typically be an executable (
.exe), a.ziparchive, or a.rararchive. - Save the file to a location you can easily find, such as your “Downloads” folder or a dedicated “Drivers” folder on your desktop.
- Click the download link for the chipset drivers. The file will typically be an executable (
- Extract the Files (if necessary):
- If the downloaded file is a compressed archive (
.zip,.rar), right-click it and choose “Extract All” (or use a program like 7-Zip/WinRAR) to extract its contents to a new folder.
- If the downloaded file is a compressed archive (
- Run the Installer:
- Navigate to the extracted folder (or the location of the
.exefile). - Locate the setup file (often named
setup.exe,install.exe, or something similar related to the chipset). - Right-click the setup file and select “Run as administrator.” This is crucial to ensure the installer has the necessary permissions.
- Navigate to the extracted folder (or the location of the
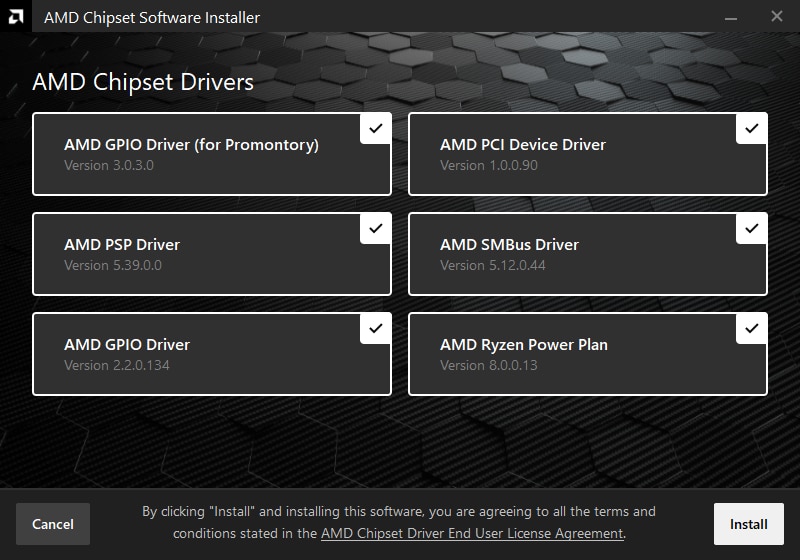
- Follow the On-Screen Instructions:
- The installer wizard will guide you through the process. Accept the license agreement, choose the installation location (usually default), and let the installer proceed.
- It might involve installing several sub-components. Let it complete.
- Restart Your Computer:
- Most chipset driver installations require a system restart to finalize the changes and ensure the new drivers are fully loaded by the operating system. Do not skip this step.
After the reboot, your system should be running with the newly installed chipset drivers.
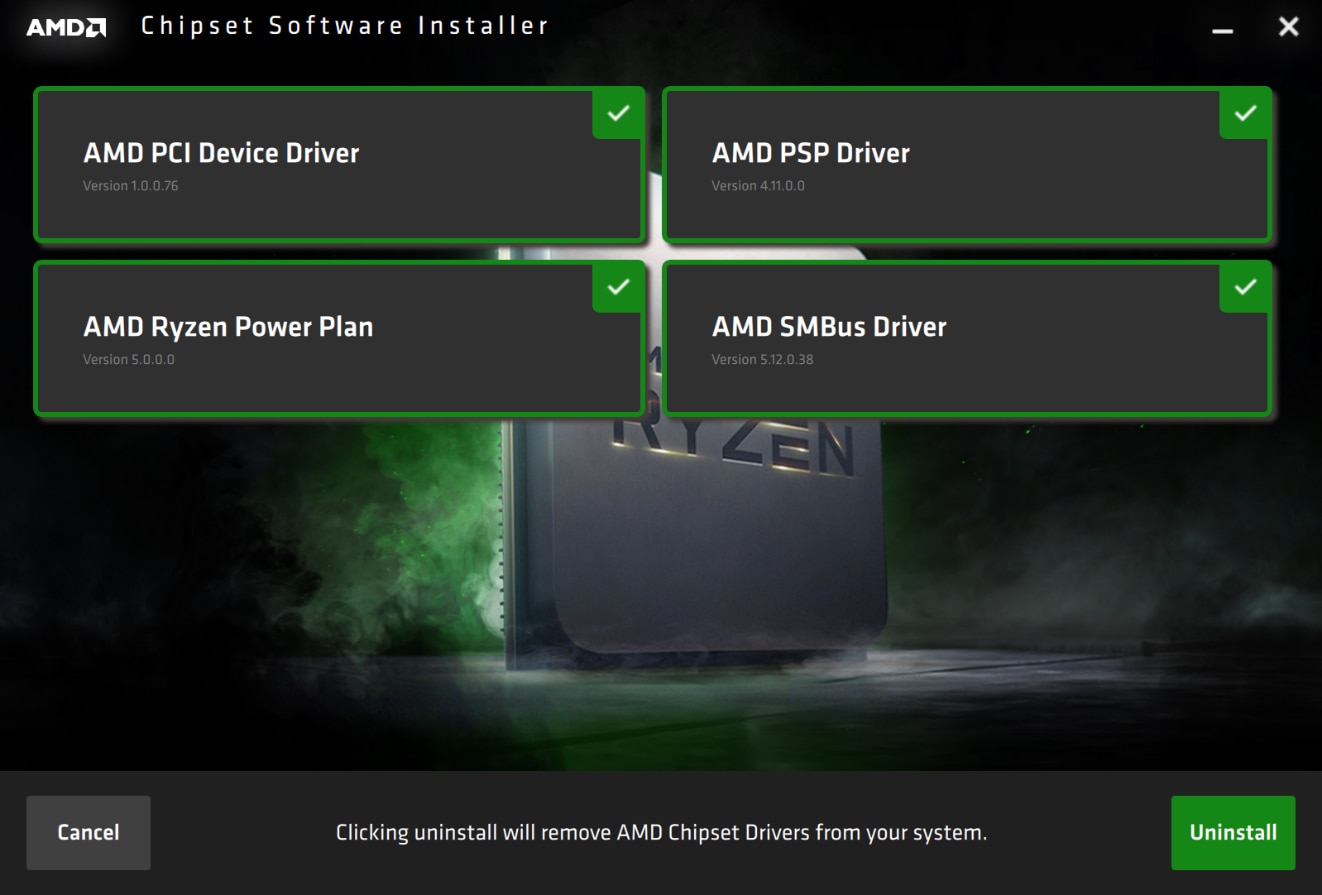
Method 2: Using Windows Device Manager (Less Ideal for Chipset)
While Device Manager is excellent for updating individual component drivers (like a network adapter or sound card), it’s generally not the primary method recommended for core chipset drivers. Windows Update often provides generic or slightly older versions, and may not fully optimize your specific chipset. However, it can be a fallback or used for quick updates if you’re not experiencing critical issues.
- Open Device Manager: Right-click the Start button and select “Device Manager.”
- Locate Chipset-Related Devices: Expand the “System devices” category. You’ll find many entries here. Look for items that mention “Chipset,” “PCIe,” “SMBus,” “SATA Controller,” or your CPU manufacturer (e.g., “Intel(R) Series chipset,” “AMD SMBus Driver”).
- Update Driver Software: Right-click on a relevant chipset entry and select “Update driver.”
- Choose Update Method:
- “Search automatically for updated driver software”: Windows will search your computer and online via Windows Update for a newer driver. This is less likely to find the absolute latest or most optimized chipset driver than the manufacturer’s website.
- “Browse my computer for driver software”: If you have manually downloaded the driver package but it didn’t come with an
.exeinstaller (or if the.exefailed), you can point Windows to the folder where you extracted the driver files. Windows will then attempt to install suitable drivers from that location.
- Follow Prompts and Restart: If a new driver is found and installed, you’ll likely be prompted to restart your computer.
A Word on Third-Party Driver Utilities (Use with Caution)
There are many third-party driver update utilities available (e.g., Driver Booster, Driver Easy, Snappy Driver Installer). These tools promise to scan your system, identify outdated drivers, and automatically update them.
- Pros: Can be convenient for less tech-savvy users, potentially identifying drivers you might have missed.
- Cons (and why caution is advised):
- Risk of Installing Incorrect or Generic Drivers: These tools sometimes install generic drivers that are not specifically optimized for your hardware, potentially leading to instability or reduced performance.
- Bundled Software/Adware: Many free versions bundle unwanted software or display aggressive ads.
- Subscription Models: Often push you towards paid versions for full functionality.
- Potential for Issues: Installing a faulty driver via these tools can lead to system problems, making it harder to diagnose than if you had sourced the driver directly.
Recommendation: For critical drivers like chipset drivers, always prioritize downloading directly from your motherboard or system manufacturer’s website. Only consider third-party tools if you’re comfortable with the risks, know how to create system restore points, and can troubleshoot issues. They are generally not recommended for core chipset components.
Post-Installation and Troubleshooting
Once you’ve installed your chipset drivers, there are a few final steps to ensure everything is working correctly and to prepare for any potential hiccups.
Verifying Driver Installation
After rebooting your system, you can verify that the new drivers have been successfully installed:
- Check Device Manager: Go back to Device Manager (right-click Start -> Device Manager). Expand “System devices” and look for the relevant chipset entries. Right-click on them, select “Properties,” then navigate to the “Driver” tab. Check the “Driver Version” and “Driver Date” to confirm they match the version you just installed or are newer than the previous ones.
- Check Manufacturer Utilities (if available): Some motherboard manufacturers provide utilities that can confirm driver versions or offer system health checks. Consult your motherboard’s support page for such tools.
- Observe System Behavior: Pay attention to how your system performs. Are issues you were experiencing resolved? Does the system feel snappier? Are all devices recognized and functioning correctly? This is the ultimate test.
Common Issues and Solutions
Even with careful preparation, issues can sometimes arise during or after a driver update.
- System Instability or Boot Problems:
- Solution: Immediately use the System Restore Point you created before installation. This is its primary purpose. If you can’t boot into Windows normally, try booting into Safe Mode (usually by repeatedly pressing F8 or Shift+F8 during boot, or via advanced startup options in Windows 10/11) and then perform the system restore.
- Device Not Working or Performance Degradation:
- Solution: Check Device Manager for any yellow exclamation marks next to devices. This indicates a problem. Try uninstalling the problematic driver (right-click -> Uninstall device, check “Delete the driver software for this device” if prompted), then reboot. Windows might reinstall a default driver, or you can try reinstalling the manufacturer’s driver again. If the issue persists, try an older stable version of the driver from the manufacturer’s website.
- Installer Fails or Freezes:
- Solution: Ensure you ran the installer “as administrator.” Temporarily disable your antivirus software. Restart your computer and try again. Ensure you have extracted the driver files completely if it was a compressed archive.
- “This driver is not compatible with your version of Windows” Error:
- Solution: Double-check that you selected the correct operating system (e.g., Windows 11 64-bit) when downloading the drivers from the manufacturer’s website. If you are running an older OS, you might need to find older driver versions compatible with it.
If you encounter persistent issues, refer to your motherboard’s manual or the manufacturer’s support website. Their FAQs or forums might offer specific solutions for your model. If all else fails, consider reaching out to their technical support.
Conclusion
Installing and maintaining updated chipset drivers is a fundamental aspect of PC upkeep, bridging the gap between your operating system and the core hardware that powers your machine. It’s a proactive step that pays dividends in terms of system stability, optimal performance, and hardware compatibility. By understanding the vital role these drivers play, knowing when and how to update them, and taking sensible preparatory steps like creating system restore points, you empower yourself to keep your computer running at its best.
While the process might seem technical at first glance, following the recommended method of downloading directly from your motherboard manufacturer’s website and carefully executing the installation steps will ensure a smooth and successful update. Embrace this crucial aspect of digital maintenance, and enjoy a more reliable, efficient, and responsive computing experience for years to come.
aViewFromTheCave is a participant in the Amazon Services LLC Associates Program, an affiliate advertising program designed to provide a means for sites to earn advertising fees by advertising and linking to Amazon.com. Amazon, the Amazon logo, AmazonSupply, and the AmazonSupply logo are trademarks of Amazon.com, Inc. or its affiliates. As an Amazon Associate we earn affiliate commissions from qualifying purchases.