In today’s interconnected digital landscape, wireless technology is no longer a luxury but a fundamental expectation. From untangling yourself from headphone cables to effortlessly controlling your PC with a wireless mouse, Bluetooth stands as a cornerstone of this convenience. For many modern devices, Bluetooth functionality is built-in, ready to go right out of the box. However, there are numerous scenarios where you might find yourself needing to install Bluetooth on an older desktop, a custom-built PC, or even troubleshoot an existing setup. This guide will walk you through everything you need to know, transforming your digital experience with the power of wireless.
As a core component of the “Tech” section of our website, which delves into Technology Trends, Software, Apps, Gadgets, and Tutorials, understanding how to integrate Bluetooth into your setup is crucial for maximizing productivity and embracing a truly wireless ecosystem.
Understanding Bluetooth: The Foundation of Wireless Freedom
Before diving into installation, it’s essential to grasp what Bluetooth is and why it’s so pervasive in our daily lives.
What Exactly is Bluetooth?
Bluetooth is a short-range wireless technology standard used for exchanging data between fixed and mobile devices over short distances using ultra-high frequency (UHF) radio waves in the ISM band, from 2.402 GHz to 2.480 GHz. It creates a personal area network (PAN), connecting devices like smartphones, headphones, keyboards, mice, speakers, and even smart home gadgets without the need for physical cables. Developed by Ericsson in 1990 and later standardized by the Bluetooth Special Interest Group (SIG), it has evolved through various versions, each offering improvements in speed, range, and energy efficiency.
Its primary appeal lies in its simplicity and ubiquity. A Bluetooth connection is typically straightforward to establish, often requiring just a few taps or clicks to pair devices. This ease of use makes it an indispensable feature for enhancing productivity, enabling seamless multitasking, and creating a more organized, cable-free workspace. Imagine moving freely around your home while on a call, or presenting wirelessly without fumbling for dongles – that’s the convenience Bluetooth brings.
Why You Might Need to Install Bluetooth
While most laptops and many modern desktop motherboards come with integrated Bluetooth modules, there are several compelling reasons why you might need to install Bluetooth manually:
- Older Desktop PCs: Many desktops, especially those built several years ago, simply didn’t include Bluetooth as a standard feature. If you’re still using such a machine, adding Bluetooth is the only way to enjoy wireless peripherals.
- Custom-Built Computers: When assembling a custom PC, users often prioritize components like the CPU, GPU, and RAM, sometimes overlooking integrated wireless capabilities. A separate Bluetooth adapter is then required.
- Upgrading Bluetooth Versions: Your existing computer might have an older Bluetooth module (e.g., Bluetooth 2.0 or 3.0) that offers limited range, slower data transfer, or struggles with newer devices requiring more advanced versions like Bluetooth 5.0 or 5.2 for improved audio codecs (like aptX Adaptive), lower latency, and better power efficiency. Upgrading can significantly enhance your wireless experience, especially for gaming headsets or high-fidelity audio.
- Replacing a Faulty Module: If your integrated Bluetooth module stops working due to hardware failure or driver corruption, installing an external adapter can be a quick and cost-effective fix.
- Enhanced Range and Performance: Some external Bluetooth adapters, particularly those with external antennas, can offer superior range and signal stability compared to basic integrated modules, which is beneficial for larger spaces or demanding applications.
Installing Bluetooth isn’t just about adding a feature; it’s about unlocking a new level of convenience and efficiency, integrating your computer more smoothly into your broader ecosystem of smart gadgets and accessories.
Preparing for Bluetooth Installation: What You Need to Know
Before you even think about plugging in an adapter or opening your PC case, a little preparation goes a long way. This ensures a smooth installation process and helps you choose the right solution for your specific needs.
Checking for Existing Bluetooth Capability
The first step is always to verify whether your computer already has Bluetooth. It’s surprisingly common for users to purchase an adapter only to discover their machine was already equipped!
- For Windows PCs:
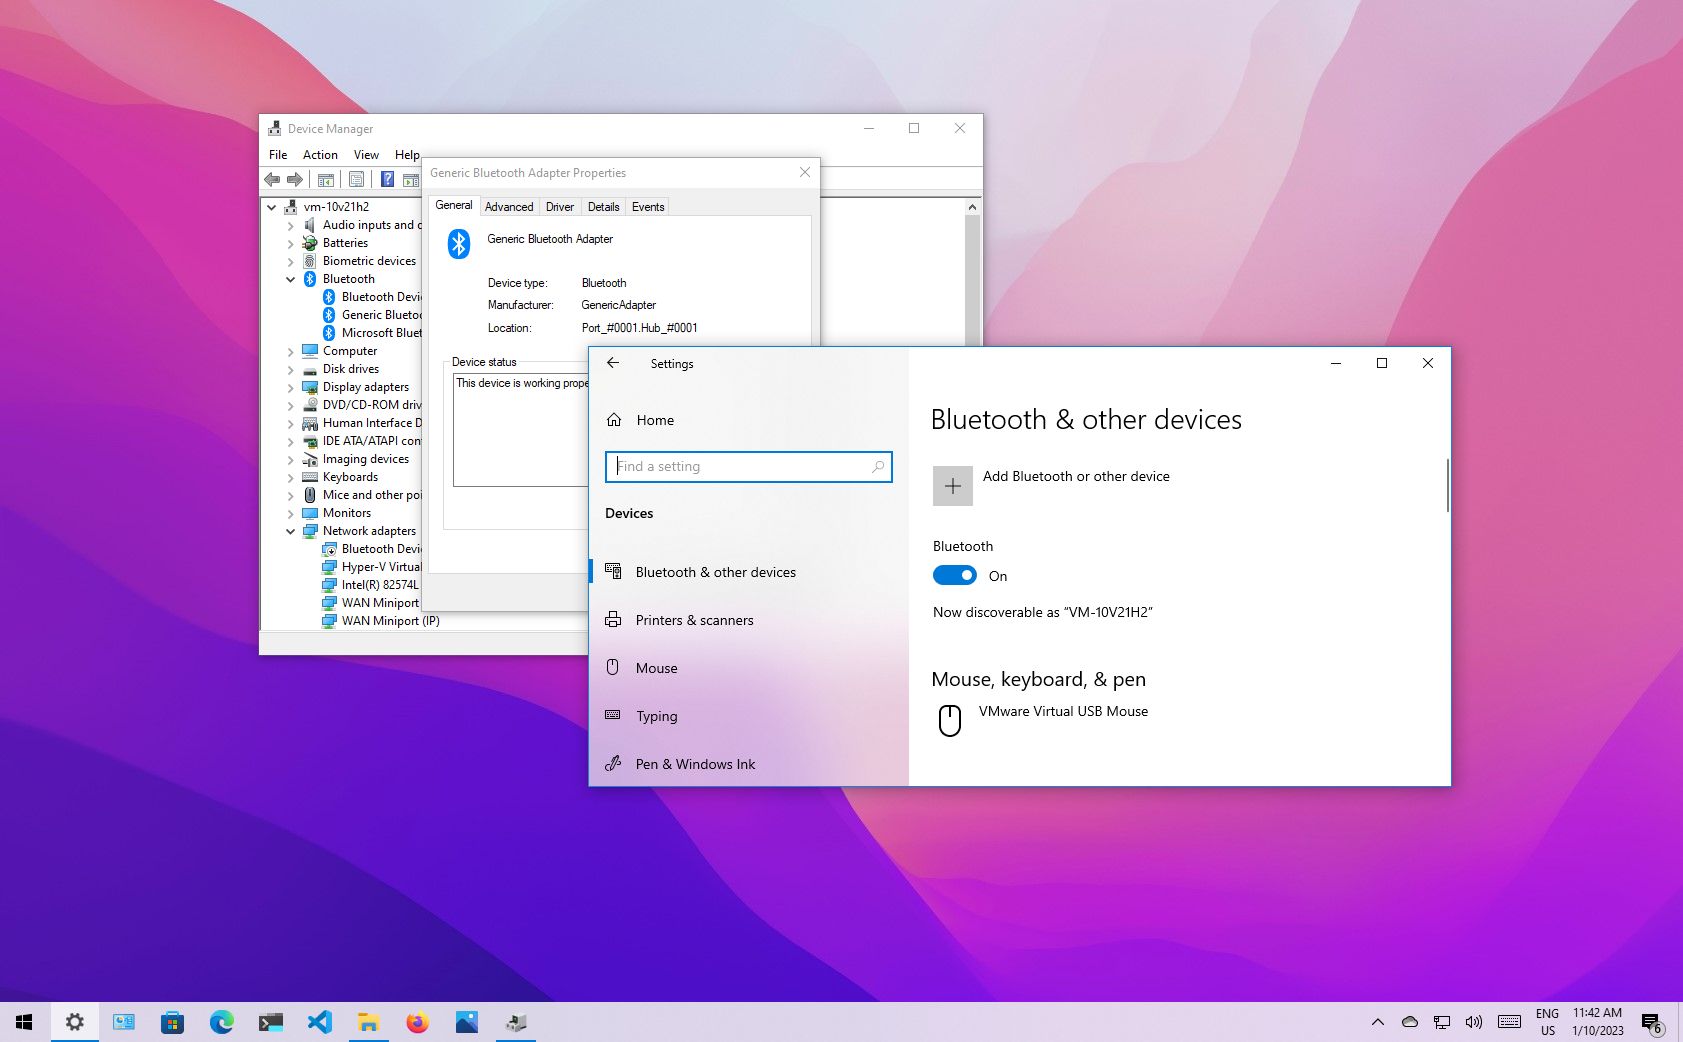
- Click the Start button and type “Device Manager” then select it from the search results.
- In the Device Manager window, look for a category named “Bluetooth.” If you see it, expand it to view the installed Bluetooth radio.
- Alternatively, go to Settings > Devices > Bluetooth & other devices. If there’s a toggle switch for Bluetooth, it’s present.
- For macOS:
- Click the Apple menu in the top-left corner.
- Select “About This Mac.”
- Click “System Report…”
- In the System Information window, under the “Hardware” section, look for “Bluetooth.” It will list details if present.
- You can also check the menu bar for the Bluetooth icon.
If Bluetooth is present but not working, a simple driver update or troubleshooting might be sufficient, rather than a full installation of new hardware.
Choosing the Right Bluetooth Adapter for Your Needs
If your computer lacks Bluetooth or you wish to upgrade, selecting the correct adapter is crucial. Bluetooth adapters primarily come in two forms: USB dongles and internal PCIe cards.
USB Bluetooth Adapters
These are the most common and easiest to install.
- Pros: Plug-and-play simplicity, highly portable (great for laptops), inexpensive, and available in various sizes (from tiny nano-adapters that practically disappear into a USB port to larger ones with external antennas).
- Cons: Occupies a USB port, can be accidentally dislodged, and may offer slightly less range or stability compared to a well-integrated internal card, especially budget models.
- Ideal for: Laptops, users needing quick and easy installation, those who frequently move their adapter between devices, or desktop users not comfortable opening their PC case.
Internal PCIe Bluetooth Cards
These adapters are installed directly onto your desktop computer’s motherboard, similar to a graphics card or sound card. Many also include Wi-Fi functionality.
- Pros: Integrated and discreet (no external dongle), often more stable and reliable connection due to better antenna placement, and can offer superior performance and range. Many PCIe cards come with Wi-Fi 6 or 6E capabilities, offering a dual upgrade.
- Cons: Requires opening your PC case and a free PCIe slot, more complex installation, typically more expensive than USB dongles, and not suitable for laptops.
- Ideal for: Desktop users seeking a permanent, high-performance, and integrated solution, especially those looking to upgrade both Bluetooth and Wi-Fi simultaneously.
Key Specifications to Consider:
- Bluetooth Version: Always aim for the latest version possible (e.g., Bluetooth 5.0, 5.1, or 5.2). Newer versions offer greater range, faster speeds, improved energy efficiency (critical for battery-powered devices), and enhanced audio capabilities (like LE Audio or aptX codecs for superior sound quality).
- Range: Standard range is about 10 meters (33 feet), but some adapters boast extended range (up to 20-30 meters or more), often indicated by external antennas.
- Compatibility: Ensure the adapter is compatible with your operating system (Windows 10/11, macOS, Linux).
- Brand Reputation: Stick with reputable brands known for quality drivers and reliable performance (e.g., TP-Link, ASUS, Intel, ZEXMTE, UGREEN). Check reviews, particularly regarding driver support and stability.
Gathering Necessary Drivers and Software

While many modern Bluetooth adapters are “plug-and-play” with Windows 10/11, meaning the operating system automatically installs generic drivers, it’s often best practice to use the manufacturer’s specific drivers. These drivers are typically optimized for the hardware, potentially offering better performance, more features, and greater stability.
- Check the manufacturer’s website: Before or after purchasing, visit the support section of the adapter’s manufacturer. Locate your specific model and download the latest drivers for your operating system. Keep these drivers saved on your hard drive or a USB stick, especially if you anticipate needing them without an internet connection immediately after installation.
- Driver CDs: Some older or less expensive adapters might still come with a mini-CD containing drivers. While convenient, these are often outdated. Always check the website for newer versions first.
Having the correct drivers ready is a crucial step in ensuring a smooth and successful Bluetooth installation, preventing common “device not recognized” or “Bluetooth not working” issues.
Step-by-Step Installation Guides
Now that you’ve prepared, let’s get down to the actual installation. The process differs significantly between USB adapters and internal PCIe cards.
Installing a USB Bluetooth Adapter
This is by far the simplest method.
- Unpack Your Adapter: Carefully remove the USB Bluetooth dongle from its packaging.
- Locate a Free USB Port: Choose an available USB port on your computer. For desktops, using a rear USB port directly on the motherboard is often recommended over front panel ports for better signal integrity, though front ports usually work fine.
- Insert the Adapter: Gently but firmly plug the USB Bluetooth adapter into the chosen USB port. It should fit snugly.
- Automatic Driver Installation (Windows 10/11):
- For most modern adapters and Windows versions, the operating system will immediately detect the new hardware and attempt to install generic drivers. You might see a “Device setup” notification in the bottom-right corner of your screen.
- Wait a few moments for this process to complete.
- Manual Driver Installation (if needed):
- If Windows doesn’t automatically install drivers, or if you prefer to use the manufacturer’s specific drivers (recommended):
- From a CD: Insert the driver CD that came with your adapter into your optical drive and follow the on-screen installation prompts.
- From a Downloaded File: Navigate to the folder where you saved the downloaded drivers. Run the
setup.exeorinstall.exefile and follow the instructions. This usually involves clicking “Next,” accepting terms, and possibly choosing an installation directory.
- If Windows doesn’t automatically install drivers, or if you prefer to use the manufacturer’s specific drivers (recommended):
- Restart Your Computer (if prompted): Some driver installations require a system restart to finalize the changes. Always restart if prompted.
- Verify Installation:
- Open Device Manager (as described earlier). You should now see “Bluetooth” listed, with your adapter named underneath.
- Go to Settings > Devices > Bluetooth & other devices. You should see the Bluetooth toggle switch, indicating it’s enabled and ready for use.
Installing an Internal PCIe Bluetooth Card (Desktop PCs Only)
This method is more involved as it requires opening your computer case. Only proceed if you are comfortable working inside a PC.
- Power Down and Disconnect:
- Completely shut down your computer.
- Unplug all power cables and peripheral cables (monitor, keyboard, mouse, etc.) from the back of the PC.
- Press and hold the power button for 10-15 seconds to discharge any residual power.
- Open the PC Case: Remove the side panel of your computer case. Typically, this involves unscrewing two thumbscrews or standard screws at the back and sliding the panel off.
- Locate a Free PCIe Slot: On your motherboard, look for a free PCIe slot. Bluetooth cards usually use smaller PCIe x1 slots, but they can fit into larger x4, x8, or x16 slots.
- Remove Slot Cover: Carefully remove the corresponding metal bracket cover from the back of your PC case. This usually involves unscrewing a single screw or releasing a latch.
- Insert the PCIe Card:
- Align the PCIe card with the chosen slot. The gold contacts on the card should line up with the slot.
- Apply even, firm pressure to the top edge of the card until it clicks securely into place. Ensure it’s fully seated.
- Secure the card with the screw or latch you removed earlier.
- Connect Internal USB Cable (if applicable): Some PCIe cards require a small internal USB cable to be connected from the card to an available USB header on your motherboard. This is often necessary for the Bluetooth functionality, as the PCIe lane might only handle the Wi-Fi. Consult your card’s manual for specific instructions.
- Attach Antennas: If your card came with external antennas, screw them onto the designated connectors on the back of the card, protruding from the back of your PC. Orient them for optimal signal.
- Close the PC Case: Replace the side panel and secure it with its screws.
- Reconnect Peripherals and Power: Plug all cables back into your PC.
- Power On and Install Drivers:
- Turn on your computer.
- Once booted into Windows, follow the manual driver installation steps outlined for USB adapters (from CD or downloaded file).
- Verify Installation: Check Device Manager and Bluetooth settings to confirm the card is recognized and functioning.
Enabling and Configuring Bluetooth for Device Pairing
Once your Bluetooth adapter is installed and recognized, the final step is to enable it and start pairing your devices.
- For Windows:
- Go to Settings > Devices > Bluetooth & other devices.
- Ensure the Bluetooth toggle switch is set to “On.”
- Click “Add Bluetooth or other device.”
- Select “Bluetooth.”
- Put your Bluetooth device (headphones, mouse, keyboard, etc.) into pairing mode. This usually involves holding down a button on the device until an LED blinks rapidly.
- Your computer will scan for nearby devices. Select your device from the list when it appears.
- Follow any on-screen prompts (e.g., confirming a PIN) to complete the pairing.
- For macOS:
- Go to System Preferences > Bluetooth.
- Click “Turn Bluetooth On” if it’s not already enabled.
- Put your Bluetooth device into pairing mode.
- Your device should appear in the list. Click “Connect” next to its name.
- Follow any additional pairing instructions.
Once paired, your devices should connect automatically whenever they are in range and Bluetooth is enabled on your computer. This seamless connectivity is where the true productivity benefits of Bluetooth shine.
Troubleshooting Common Bluetooth Issues
Even with careful installation, Bluetooth can sometimes be a bit finicky. Here are some common problems and their solutions, drawing upon our “Tutorials” and “Digital Security” best practices for driver management.
Device Not Detected or Not Working
- Check Adapter Connection: For USB adapters, ensure it’s firmly seated in the port. Try a different USB port. For PCIe cards, double-check that it’s fully seated in its slot and any internal USB cable is connected properly.
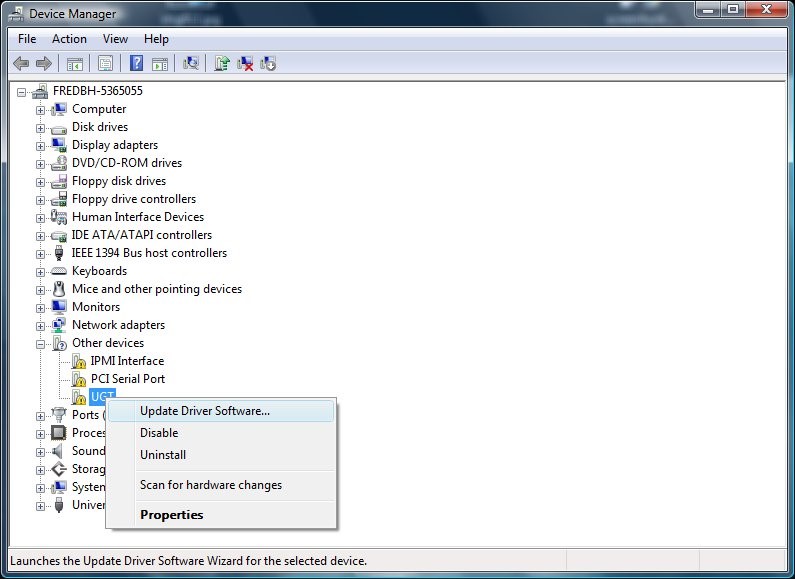
- Verify in Device Manager: If Bluetooth isn’t listed or has a yellow exclamation mark, it indicates a driver issue.
- Enable in BIOS/UEFI (for PCIe cards): Some motherboards have a setting in the BIOS/UEFI to enable/disable onboard Bluetooth (if applicable) or PCIe slots. Ensure the relevant settings are enabled.
- Run Bluetooth Troubleshooter (Windows): Go to Settings > Update & Security > Troubleshoot > Additional troubleshooters and run the Bluetooth troubleshooter.
Pairing Problems
- Device in Pairing Mode: Confirm your Bluetooth device is actually in pairing mode. Consult its manual, as the method varies by device.
- Proximity: Ensure the Bluetooth device is close to your computer during the pairing process.
- Charge/Battery: Make sure the Bluetooth device has sufficient battery charge.
- Other Connections: Disconnect the Bluetooth device from any other previously paired device it might be trying to connect to.
- Restart Everything: Sometimes, simply restarting your computer and the Bluetooth device can resolve pairing glitches.
- Remove and Re-add: If a device previously paired but now won’t connect, remove it from your computer’s Bluetooth device list and try pairing it again from scratch.
Audio Quality or Connection Stability Issues
- Interference: Bluetooth operates on the 2.4 GHz band, which can suffer interference from Wi-Fi routers, microwaves, cordless phones, and other wireless devices. Try moving your computer or the Bluetooth device away from these sources.
- Distance and Obstacles: Bluetooth range is limited. Thick walls, metal objects, and even your own body can significantly reduce signal strength. Try to maintain a clear line of sight.
- Drivers: Outdated or corrupted drivers can lead to unstable connections. Update your Bluetooth drivers from the manufacturer’s website.
- Bluetooth Version Mismatch: While backward compatible, an older Bluetooth adapter with a newer device (or vice-versa) might not achieve optimal performance.
- USB 3.0 Interference: USB 3.0 ports and devices can sometimes generate electromagnetic interference that affects 2.4 GHz wireless signals, including Bluetooth. If you’re using a USB Bluetooth dongle, try plugging it into a USB 2.0 port instead, or use a short USB extension cable to move it away from other USB 3.0 devices.
Driver-Related Problems
- Update Drivers: This is almost always the first step. Download the latest drivers from the adapter manufacturer’s official website. Avoid generic driver websites, as they can sometimes contain malware or incompatible drivers, posing a “Digital Security” risk.
- Reinstall Drivers:
- Open Device Manager.
- Expand “Bluetooth.”
- Right-click on your Bluetooth adapter and select “Uninstall device.” Check the box to “Delete the driver software for this device” if available, then click “Uninstall.”
- Restart your computer.
- Install the downloaded manufacturer drivers.
- Driver Rollback: If a recent driver update caused issues, you can often roll back to a previous version in Device Manager (right-click adapter > Properties > Driver tab > Roll Back Driver).
Conclusion: Embrace the Wireless Revolution
Installing Bluetooth on your computer, whether through a simple USB dongle or a more integrated PCIe card, is a relatively straightforward process that unlocks a world of convenience and productivity. By following the steps outlined in this comprehensive tutorial, you can effortlessly connect a vast array of wireless gadgets, from ergonomic mice and keyboards that free up desk space to high-fidelity headphones that let you enjoy your audio without being tethered.
In an era defined by Technology Trends and the continuous evolution of smart devices, having robust and reliable Bluetooth connectivity is essential. It contributes to a more organized workspace, facilitates seamless transitions between tasks, and ultimately enhances your overall digital experience. Don’t let a lack of built-in Bluetooth hold you back. Invest a little time in setting it up, and you’ll soon wonder how you ever managed without the freedom of wireless. Enjoy the untethered future!
aViewFromTheCave is a participant in the Amazon Services LLC Associates Program, an affiliate advertising program designed to provide a means for sites to earn advertising fees by advertising and linking to Amazon.com. Amazon, the Amazon logo, AmazonSupply, and the AmazonSupply logo are trademarks of Amazon.com, Inc. or its affiliates. As an Amazon Associate we earn affiliate commissions from qualifying purchases.