Arch Linux, renowned for its minimalism, flexibility, and rolling release model, empowers users with unparalleled control over their systems. However, its official repositories, while comprehensive, don’t always contain every piece of software a user might desire. This is where the Arch User Repository (AUR) steps in, transforming the Arch ecosystem into a virtually limitless software library. For anyone serious about maximizing their Arch Linux experience, understanding and utilizing the AUR is not just beneficial—it’s essential. This guide will walk you through the process of installing and managing packages from the AUR, ensuring you can access a broader range of applications while maintaining system integrity and security.
Understanding the Arch User Repository (AUR)
The Arch User Repository (AUR) is a community-driven repository for Arch Linux users. It’s not part of the official Arch Linux package repositories, but rather a vast collection of PKGBUILD scripts. These scripts are essentially shell scripts that contain instructions for building a package from source code, or sometimes from pre-compiled binaries, and installing it on an Arch Linux system.
The AUR exists to fill the gap between the official repositories and the plethora of software available in the Linux world. Developers and users contribute PKGBUILD files for applications that haven’t made it into the official repositories, for various reasons:
- Niche software: Applications that serve a very specific purpose and don’t have widespread demand.
- Bleeding-edge versions: Newer versions of software that haven’t been thoroughly tested for inclusion in the official repos yet.
- Proprietary software: Applications like Google Chrome, Spotify, or popular IDEs that cannot be open-source or distributed through official FOSS channels.
- Custom patches or forks: Variations of existing software with specific modifications.
When you install a package from the AUR, you are not downloading a pre-compiled binary directly. Instead, you’re downloading a PKGBUILD file and related metadata. This script then dictates how to fetch the source code (or binary), compile it (if necessary), and package it into an Arch Linux-compatible .pkg.tar.zst file, which pacman can then install. This build-from-source approach is a cornerstone of the Arch philosophy, offering transparency and control, though it requires a few more steps than a typical pacman -S command.
The power of the AUR lies in its community. Users can vote for packages, flag them as outdated, or comment on issues, creating a self-regulating system that generally keeps packages up-to-date and functional. However, this community-driven nature also means that packages in the AUR are not officially vetted or supported by Arch Linux developers. This brings us to a crucial point: installing from the AUR requires a degree of user vigilance, as you are essentially trusting the package maintainer and the community’s assessment of the PKGBUILD.
Prerequisites for AUR Installation
Before you dive into installing packages from the AUR, ensure your Arch Linux system is properly set up with the necessary tools and configurations. These prerequisites are essential for both manual installation and the use of AUR helpers.
1. An Up-to-Date Arch Linux Installation
First and foremost, you need a functional Arch Linux installation. While this guide assumes you already have one, it’s always good practice to ensure your system is fully updated before making significant changes or installing new software. This minimizes the risk of dependency conflicts or issues arising from outdated core components.
sudo pacman -Syu
This command syncs your local package database with the remote repositories and then upgrades all out-of-date packages on your system.
2. sudo Privileges
To perform system-wide installations and manage packages, you’ll need a user account with sudo privileges. This allows you to execute commands as the root user when necessary, without directly logging in as root, which is a good security practice.
3. Basic Terminal Familiarity
While this tutorial provides step-by-step commands, a basic understanding of how to navigate the Linux command line, use text editors like nano or vim, and understand file system structures will make the process much smoother.
4. git and base-devel Packages
The core tools required for building packages from the AUR are git and the base-devel group.
git: This version control system is used to clone thePKGBUILDrepositories from the AUR website.base-devel: This is a meta-package group containing essential tools for compiling software, such asmake,gcc,binutils, and other development libraries. Without these,makepkg(the tool used to build AUR packages) will not be able to function correctly.
You can install these necessary packages with a single pacman command:
sudo pacman -S --needed base-devel git
The --needed flag prevents pacman from reinstalling packages that are already up-to-date. If you already have git or some components of base-devel installed, this command will only install what’s missing.
With these prerequisites in place, your Arch Linux system is ready to explore the vast offerings of the Arch User Repository.
Installing AUR Packages Manually: The Traditional Method
While AUR helpers offer convenience, understanding the manual installation process is crucial. It demystifies what an AUR helper does under the hood and provides invaluable insight into the security implications. This method directly demonstrates the “build-from-source” philosophy.
Step 1: Create a Dedicated Build Directory
It’s good practice to create a specific directory in your home folder for building AUR packages. This keeps your system tidy and separates AUR-related files from other system directories.
mkdir -p ~/AUR_Builds
cd ~/AUR_Builds
The -p flag ensures that parent directories are created if they don’t already exist.
Step 2: Find Your Desired Package on the AUR Website
Navigate to the official Arch User Repository website (aur.archlinux.org) in your web browser. Use the search bar to find the package you want to install. For example, let’s search for “neofetch,” a popular system information tool.
Once you find the package, click on its name to go to its details page. On this page, you’ll see information like the package description, dependencies, votes, and most importantly, the “Git Clone URL.” Copy this URL.
Step 3: Clone the Package’s Git Repository
Back in your terminal, within the ~/AUR_Builds directory, use the git clone command with the URL you copied.
git clone https://aur.archlinux.org/neofetch.git
This command will download the PKGBUILD file and any associated configuration files into a new subdirectory named after the package (e.g., neofetch). Now, navigate into that new directory:
cd neofetch
Step 4: Inspect the PKGBUILD File (Crucial Security Step)
Before proceeding with the build, always inspect the PKGBUILD file. This is the most critical security step when installing from the AUR manually. Remember, AUR packages are community-contributed and not officially vetted. The PKGBUILD contains the instructions that will be executed on your system.
You can view the file using a text editor or a pager:
less PKGBUILD
Look for:
- Unusual commands: Are there any commands that seem suspicious or unrelated to building the software?
- Remote script execution: Does it download and execute scripts from unknown URLs?
- Permissions: Does it attempt to modify system permissions in an unexpected way?
- Source URLs: Are the source URLs for the software legitimate?
While a full audit can be complex, a quick scan for anything overtly malicious or unexpected can save you from potential security risks. If you are unsure, do not proceed, and seek advice from the Arch Linux community.
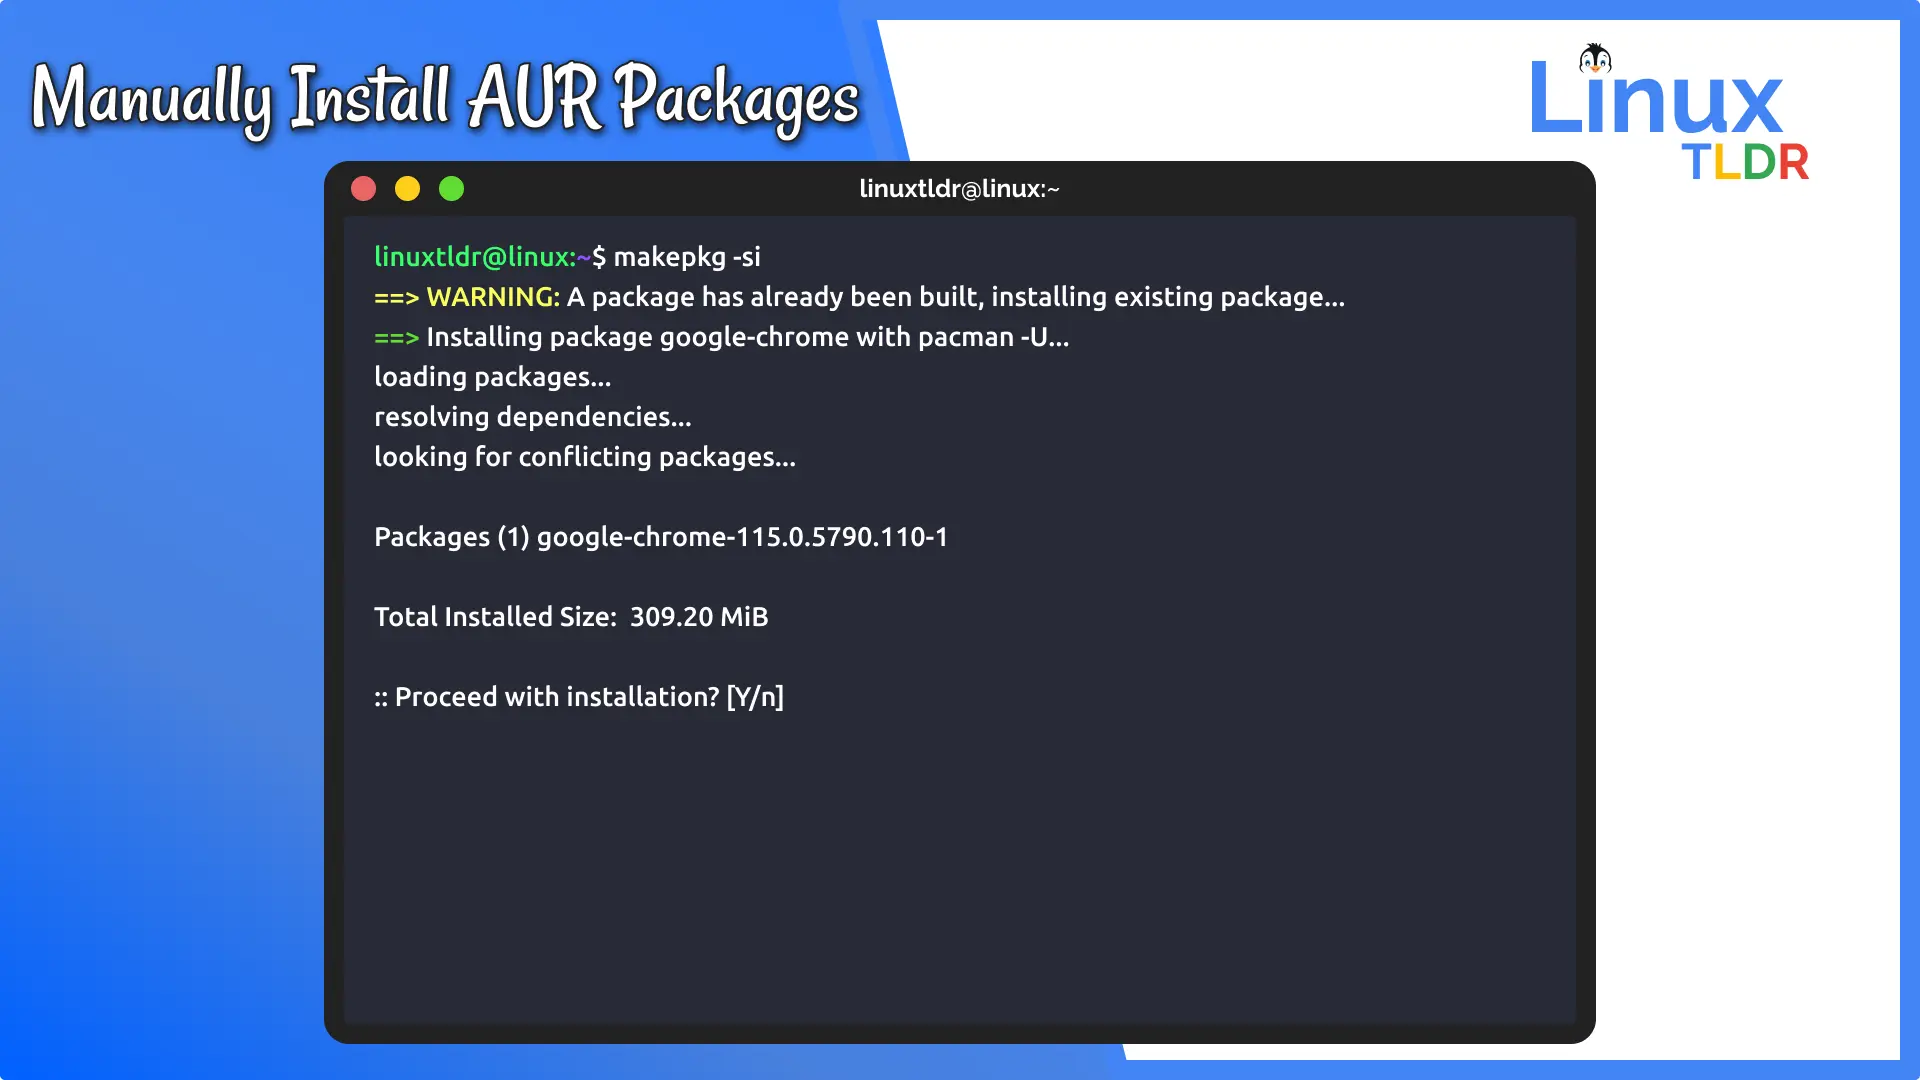
Step 5: Build and Install the Package with makepkg
Once you’re satisfied with the PKGBUILD, you can proceed to build the package. The makepkg utility handles this process.
makepkg -si
Let’s break down the flags:
-s(--syncdeps): Automatically resolves and installs any dependencies required by the package from the official repositories usingpacman. This is incredibly useful as many AUR packages rely on official packages.-i(--install): After successfully building the package,makepkgwill usepacmanto install the generated.pkg.tar.zstfile onto your system.- The
-f(--force) flag is sometimes used to force a rebuild or reinstallation, but generally avoided unless necessary.
makepkg will first check for dependencies, download source files, compile the software, and then create a local package file (e.g., neofetch-7.1.0-1-x86_64.pkg.tar.zst). Finally, because of the -i flag, it will prompt you for your sudo password to install this package using pacman.
If the build process encounters errors, carefully read the output. It often indicates missing build tools, incorrect paths, or issues with the source code itself. You might need to install additional pacman packages (if they’re not dependencies listed in the PKGBUILD) or consult the package’s AUR page comments for solutions.
After successful installation, neofetch should be available in your system’s PATH, and you can run it by simply typing neofetch in your terminal. This manual process, though more involved, gives you complete control and transparency over what gets installed on your Arch Linux system.
Streamlining with AUR Helpers: The Recommended Approach
While manual installation provides an excellent understanding of the AUR’s mechanics, it can become tedious, especially when dealing with many packages or frequent updates. AUR helpers automate the entire process, from fetching PKGBUILDs and resolving dependencies to building and installing packages, making your life significantly easier.
Why Use an AUR Helper?
AUR helpers offer several advantages:
- Automation: They automate the
git clone,cd,makepkg -sisteps. - Dependency Resolution: They intelligently handle both official (
pacman) and AUR dependencies. If an AUR package depends on another AUR package, the helper will manage the entire build chain. - Updating: They can update both official
pacmanpackages and AUR packages with a single command. - User-Friendly Interface: Most helpers offer interactive prompts for reviewing
PKGBUILDs, choosing build options, and resolving conflicts.
Popular AUR Helpers: yay and paru
Two of the most popular and actively maintained AUR helpers are yay (Yet Another Yaourt) and paru. Both are written in Go and Rust, respectively, known for their speed and reliability.
Installing an AUR Helper (Example: yay)
Since AUR helpers themselves are AUR packages, you’ll need to install them manually first, using the traditional method you just learned. This is a one-time process.
Step 1: Ensure git and base-devel are installed
If you haven’t already, run:
sudo pacman -S --needed base-devel git
Step 2: Clone the AUR helper’s Git repository
We’ll use yay as an example. First, navigate to your build directory (or create one if you didn’t in the previous section):
mkdir -p ~/AUR_Builds
cd ~/AUR_Builds
git clone https://aur.archlinux.org/yay.git
cd yay
Step 3: Build and install the AUR helper
Now, use makepkg to build and install yay.
makepkg -si
This command will compile yay and install it on your system, just like any other manually installed AUR package. Once installed, you can delete the ~/AUR_Builds/yay directory if you wish, as yay is now a system-wide command.
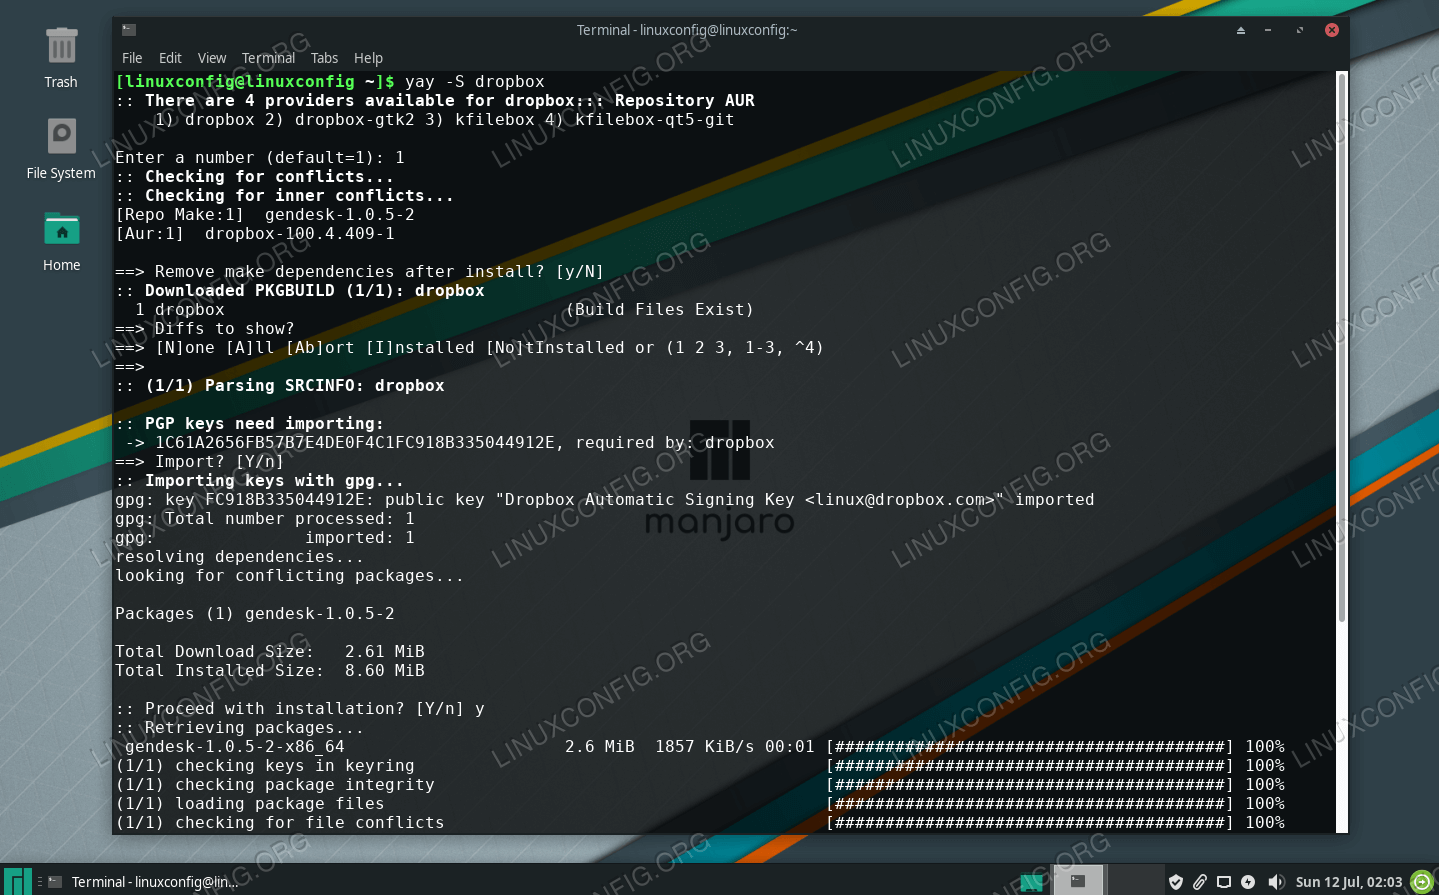
Using yay to Install AUR Packages
Now that yay is installed, installing any other AUR package becomes incredibly simple.
To install a package, just use:
yay -S package_name
For example, to install visual-studio-code-bin:
yay -S visual-studio-code-bin
yay will then:
- Search the AUR for the package.
- If found, list its dependencies (both official and AUR).
- Prompt you to review the
PKGBUILDfile. Always take this opportunity to review thePKGBUILD, even if it’s just a quick scan. This is your last line of defense against malicious packages. - If dependencies are missing,
yaywill ask if you want to install them. - Finally, it will build the package and prompt for your
sudopassword to install it usingpacman.
Using paru (Alternative to yay)
paru is another excellent AUR helper, often preferred by users who appreciate its speed and features, such as displaying diffs of PKGBUILDs directly in the terminal before installation. Its installation process is identical to yay:
Step 1: Ensure git and base-devel are installed.
Step 2: Clone paru‘s Git repository:
mkdir -p ~/AUR_Builds
cd ~/AUR_Builds
git clone https://aur.archlinux.org/paru.git
cd paru
Step 3: Build and install paru:
makepkg -si
Using paru to Install AUR Packages:
The syntax for paru is very similar to yay and pacman:
paru -S package_name
For updating your entire system (official and AUR packages):
paru -Syu
paru provides a colored, intuitive output and is designed as a drop-in replacement for pacman for many common commands.
Both yay and paru significantly enhance the Arch Linux user experience by simplifying AUR package management. Choose the one that best fits your workflow and preferences.
Maintaining and Securing Your AUR Packages
Integrating AUR packages into your Arch Linux system offers immense flexibility, but it also introduces responsibilities regarding maintenance and security. Unlike official packages, AUR packages require a bit more attention to ensure stability and protection.
Updating AUR Packages
One of the primary benefits of AUR helpers is their ability to update both official and AUR packages seamlessly.
With yay or paru:
To update your entire system, including all official repositories and installed AUR packages, simply run:
yay -Syu
# or
paru -Syu
This command will first sync the official pacman repositories and update those packages. Then, it will check for newer versions of your installed AUR packages, rebuild them if necessary, and install the updates. This unified update command is a massive time-saver and helps keep your system coherent.
Manual Updates (Not Recommended for Regular Use):
If you installed an AUR package manually, updating it requires repeating the manual installation steps:
- Navigate back to the package’s build directory (
cd ~/AUR_Builds/neofetch). - Pull the latest changes from the Git repository (
git pull). - Inspect the updated
PKGBUILDfor any changes. - Rebuild and reinstall the package (
makepkg -si).
As you can see, this is far less efficient than using an AUR helper for multiple packages.
Best Practices and Security Considerations
While AUR provides access to a vast software collection, it also requires users to exercise caution. Adhering to best practices can significantly enhance your system’s security and stability.
- Always Inspect
PKGBUILDs: This cannot be stressed enough. Even with an AUR helper, you will typically be prompted to review thePKGBUILDbefore building. Make it a habit to quickly scan the file. Look for unusual commands, remote execution of scripts, or attempts to modify system files outside the normal installation process. If anything looks suspicious, do not proceed. - Understand Dependencies: Be aware of what an AUR package depends on. Sometimes, an innocent-looking application might pull in many other less-known dependencies, some of which might also be from the AUR.
- Choose Reputable Packages: On the AUR website, observe the “Votes” count, “Last Updated” date, and “Maintainer” activity. Packages with many votes, recent updates, and active maintainers are generally more trustworthy and better maintained. Read the comments section for any warnings or issues reported by other users.
- Avoid Running
makepkg(oryay/paru) as Root:makepkgis designed to be run as a normal user. Onlypacman(whichmakepkgand AUR helpers call during the final installation stage) requires root privileges to install the generated package. Running the build process as root opens your system to unnecessary security risks, as a maliciousPKGBUILDcould then execute commands with root privileges directly. - Use Trusted AUR Helpers: Stick to widely adopted and well-maintained AUR helpers like
yayorparu. These tools are regularly audited by the community and are built with security features, such as interactivePKGBUILDreview prompts. - Backup Your System: As with any significant system modification, having a recent backup of your Arch Linux installation is always a wise precaution. Tools like
rsyncorTimeshiftcan be invaluable for disaster recovery. - Remove Unused Build Directories: After successfully installing a package, you can typically remove the build directory (
~/AUR_Builds/package_name) to free up space. Your AUR helper will recreate it if needed for updates.
Troubleshooting Common Issues
Despite the convenience of AUR helpers, you might occasionally encounter issues:
PKGBUILDErrors: Often, aPKGBUILDmight have a syntax error or a broken link. Check the AUR package’s comment section; someone might have already reported or fixed it.- Missing Dependencies: While helpers usually handle this, occasionally a dependency from the official repos might be overlooked or named differently. Read the error output carefully to identify what’s missing, then install it with
sudo pacman -S package_name. - Build Failures: This can happen due to various reasons: a missing build tool, an incompatible compiler version, or issues with the source code itself. Ensure your
base-develgroup is fully installed and up-to-date. Again, the AUR comments page is your best resource. - GPG Key Issues: Sometimes,
makepkgor your helper might fail to verify package sources due to missing GPG keys. The error message will usually tell you which key is missing. You can often import it withgpg --recv-keys <KEY_ID>.
By following these guidelines and understanding the underlying mechanisms, you can safely and effectively leverage the Arch User Repository to expand the capabilities of your Arch Linux system.

Conclusion
The Arch User Repository is an indispensable resource for any Arch Linux user, transforming a minimal system into a powerful, feature-rich environment. While it embodies the Arch philosophy of user control and choice, it also demands a proactive approach to security and maintenance. By understanding the manual installation process, carefully inspecting PKGBUILDs, and utilizing efficient AUR helpers like yay or paru, you gain access to an unparalleled wealth of software that extends far beyond the official repositories.
Embracing the AUR means embracing a more self-reliant and informed approach to software management. It empowers you to build, customize, and maintain your ideal Linux system, truly unlocking its full potential. Remember, with great power comes great responsibility: always stay vigilant, prioritize security, and actively participate in the vibrant Arch Linux community to make the most of this unique and powerful resource. Happy building!
aViewFromTheCave is a participant in the Amazon Services LLC Associates Program, an affiliate advertising program designed to provide a means for sites to earn advertising fees by advertising and linking to Amazon.com. Amazon, the Amazon logo, AmazonSupply, and the AmazonSupply logo are trademarks of Amazon.com, Inc. or its affiliates. As an Amazon Associate we earn affiliate commissions from qualifying purchases.