Installing a new Central Processing Unit (CPU) is a pivotal moment in any PC build or upgrade. For AMD processors, the process is remarkably straightforward, designed to be accessible even to those new to the world of hardware assembly. This guide will walk you through every step, from preparing your workspace to the final boot-up, ensuring a smooth and successful installation. Whether you’re building your dream machine from scratch or breathing new life into an older system, understanding how to install an AMD CPU is a fundamental skill for any tech enthusiast.
The “Tech” category on our website encompasses a vast array of topics, and at its core, understanding and manipulating the hardware that powers our digital lives is paramount. From the latest AI tools to essential digital security, the performance and reliability of your PC are deeply intertwined with its components. The CPU, often referred to as the “brain” of your computer, plays a critical role in this performance. This tutorial falls directly under our “Tutorials” section, offering practical, step-by-step instructions to empower you in your PC building endeavors.
Preparing for the Installation: What You’ll Need
Before you begin the physical installation of your AMD CPU, thorough preparation is key to a successful outcome. This not only ensures you have all the necessary tools but also minimizes the risk of damage to your delicate components. Think of this stage as setting the foundation for your PC’s performance and longevity. In the realm of “Tech,” preparation is a cornerstone of good practice, preventing costly mistakes and ensuring efficiency.
Essential Tools and Components
Gathering the right tools before you start is crucial. You wouldn’t embark on a complex project without the right implements, and PC building is no different.
- Your New AMD CPU: Ensure you have the correct model that is compatible with your motherboard’s socket type. AMD uses the AM4 and AM5 sockets for its mainstream desktop processors, with different generations of Ryzen CPUs designed for these sockets. Always double-check the CPU and motherboard specifications for compatibility.
- Motherboard: This is the central hub of your computer, and its CPU socket must match your chosen processor.
- CPU Cooler: Most AMD CPUs, especially those from the Ryzen series, come with a stock cooler. However, for higher-end processors or for those seeking better thermal performance and quieter operation, an aftermarket cooler might be preferred. If your aftermarket cooler doesn’t come with pre-applied thermal paste, you’ll need that too.
- Anti-Static Wrist Strap: This is perhaps the most critical tool for protecting your components. Static electricity can instantly fry sensitive electronics. Wearing an anti-static wrist strap and connecting it to a grounded metal object (like your PC case) is highly recommended.
- Small Phillips Head Screwdriver: For securing the CPU cooler and potentially any brackets.
- Thermal Paste (if not pre-applied): A small amount of thermal paste is essential for facilitating heat transfer between the CPU’s integrated heat spreader (IHS) and the CPU cooler’s base.
- Clean, Well-Lit Workspace: A clutter-free and well-lit area will prevent misplacing small screws and make the delicate installation process easier. Avoid working on carpet if possible, as it generates more static electricity.
- Your Motherboard Manual: This is an invaluable resource, providing specific details about your motherboard’s layout, CPU socket, and cooler installation procedure.
Handling Your CPU with Care
CPUs are remarkably resilient, but they are also incredibly sensitive to physical damage and static discharge. Treat your new AMD CPU with the utmost respect.
- Keep it in its Protective Packaging: Until you are ready to install it, keep the CPU in its original packaging. This protects the pins (on older AMD CPUs) or the contact points (on newer CPUs) from dust, damage, and electrostatic discharge.
- Handle by the Edges: When you do remove the CPU from its packaging, hold it by its edges. Avoid touching the gold contacts on the bottom (for AM4/AM5) or the pins (for older sockets).
- Never Force It: The CPU should drop into the socket with minimal effort. If it doesn’t seat properly, do not force it. This usually indicates an alignment issue.
Installing the AMD CPU: Step-by-Step
This is the core of the process. Following these steps meticulously will ensure your AMD CPU is correctly installed and ready to perform. This falls under our “Tutorials” in the “Tech” section, empowering you with practical skills.
Opening the CPU Socket Lever
Modern AMD motherboards, for both AM4 and AM5 sockets, utilize a lever mechanism to secure the CPU.
- Locate the CPU Socket: On your motherboard, find the large square socket where the CPU will be installed. It will likely have a plastic cover over it.
- Lift the Retention Arm/Lever: You’ll see a metal retention arm or lever on one side of the socket. Gently lift this arm. On most AM4/AM5 boards, this will also release a small retention bracket. This action slightly opens the socket, preparing it for the CPU.
- Remove the Plastic Socket Cover (if present): Some motherboards come with a plastic cover over the socket to protect it during shipping. Once the retention arm is lifted, this cover should come off easily. Important: Do not touch the pins inside the socket if they are exposed.
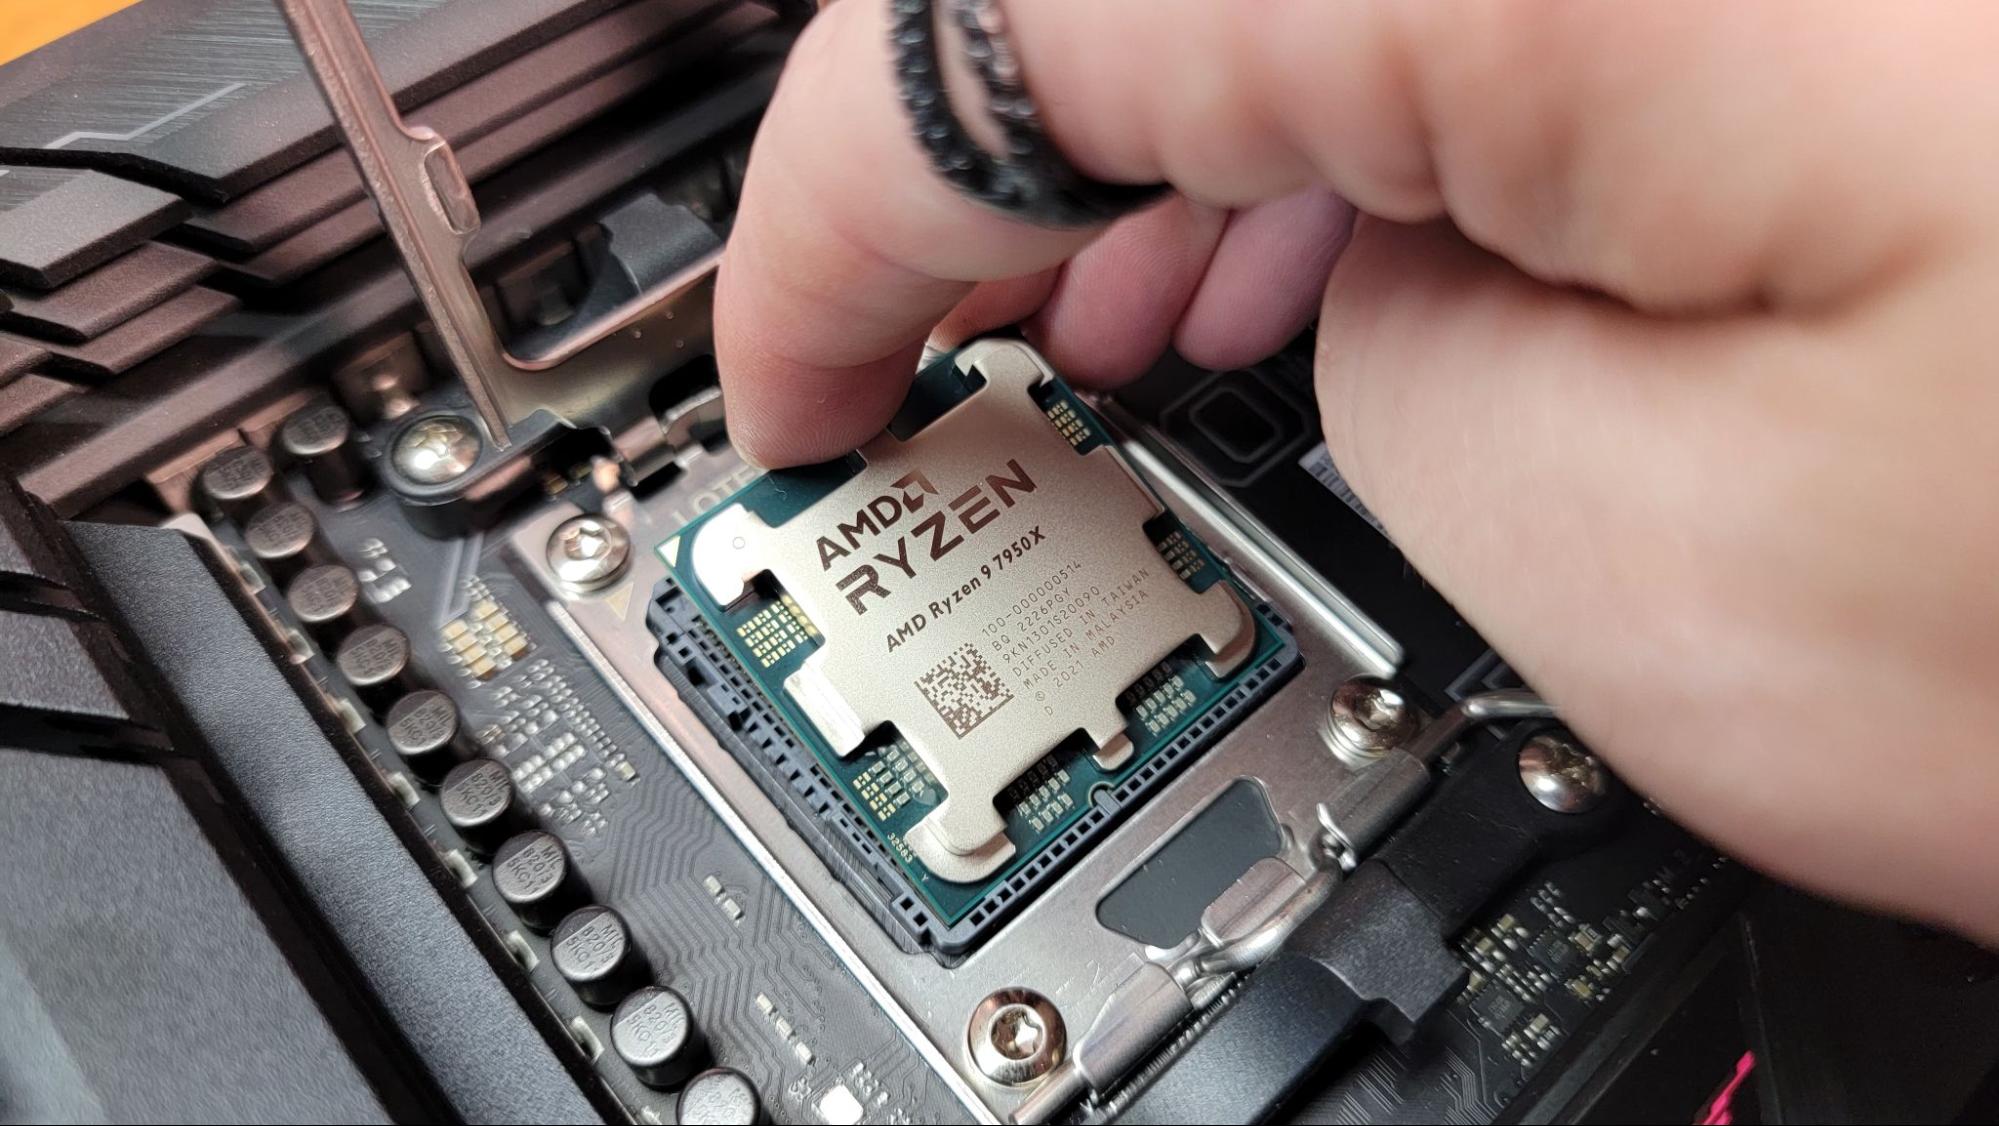
Aligning and Seating the CPU
This is the most critical part of the installation. Proper alignment is essential to avoid bent pins or misseated processors.
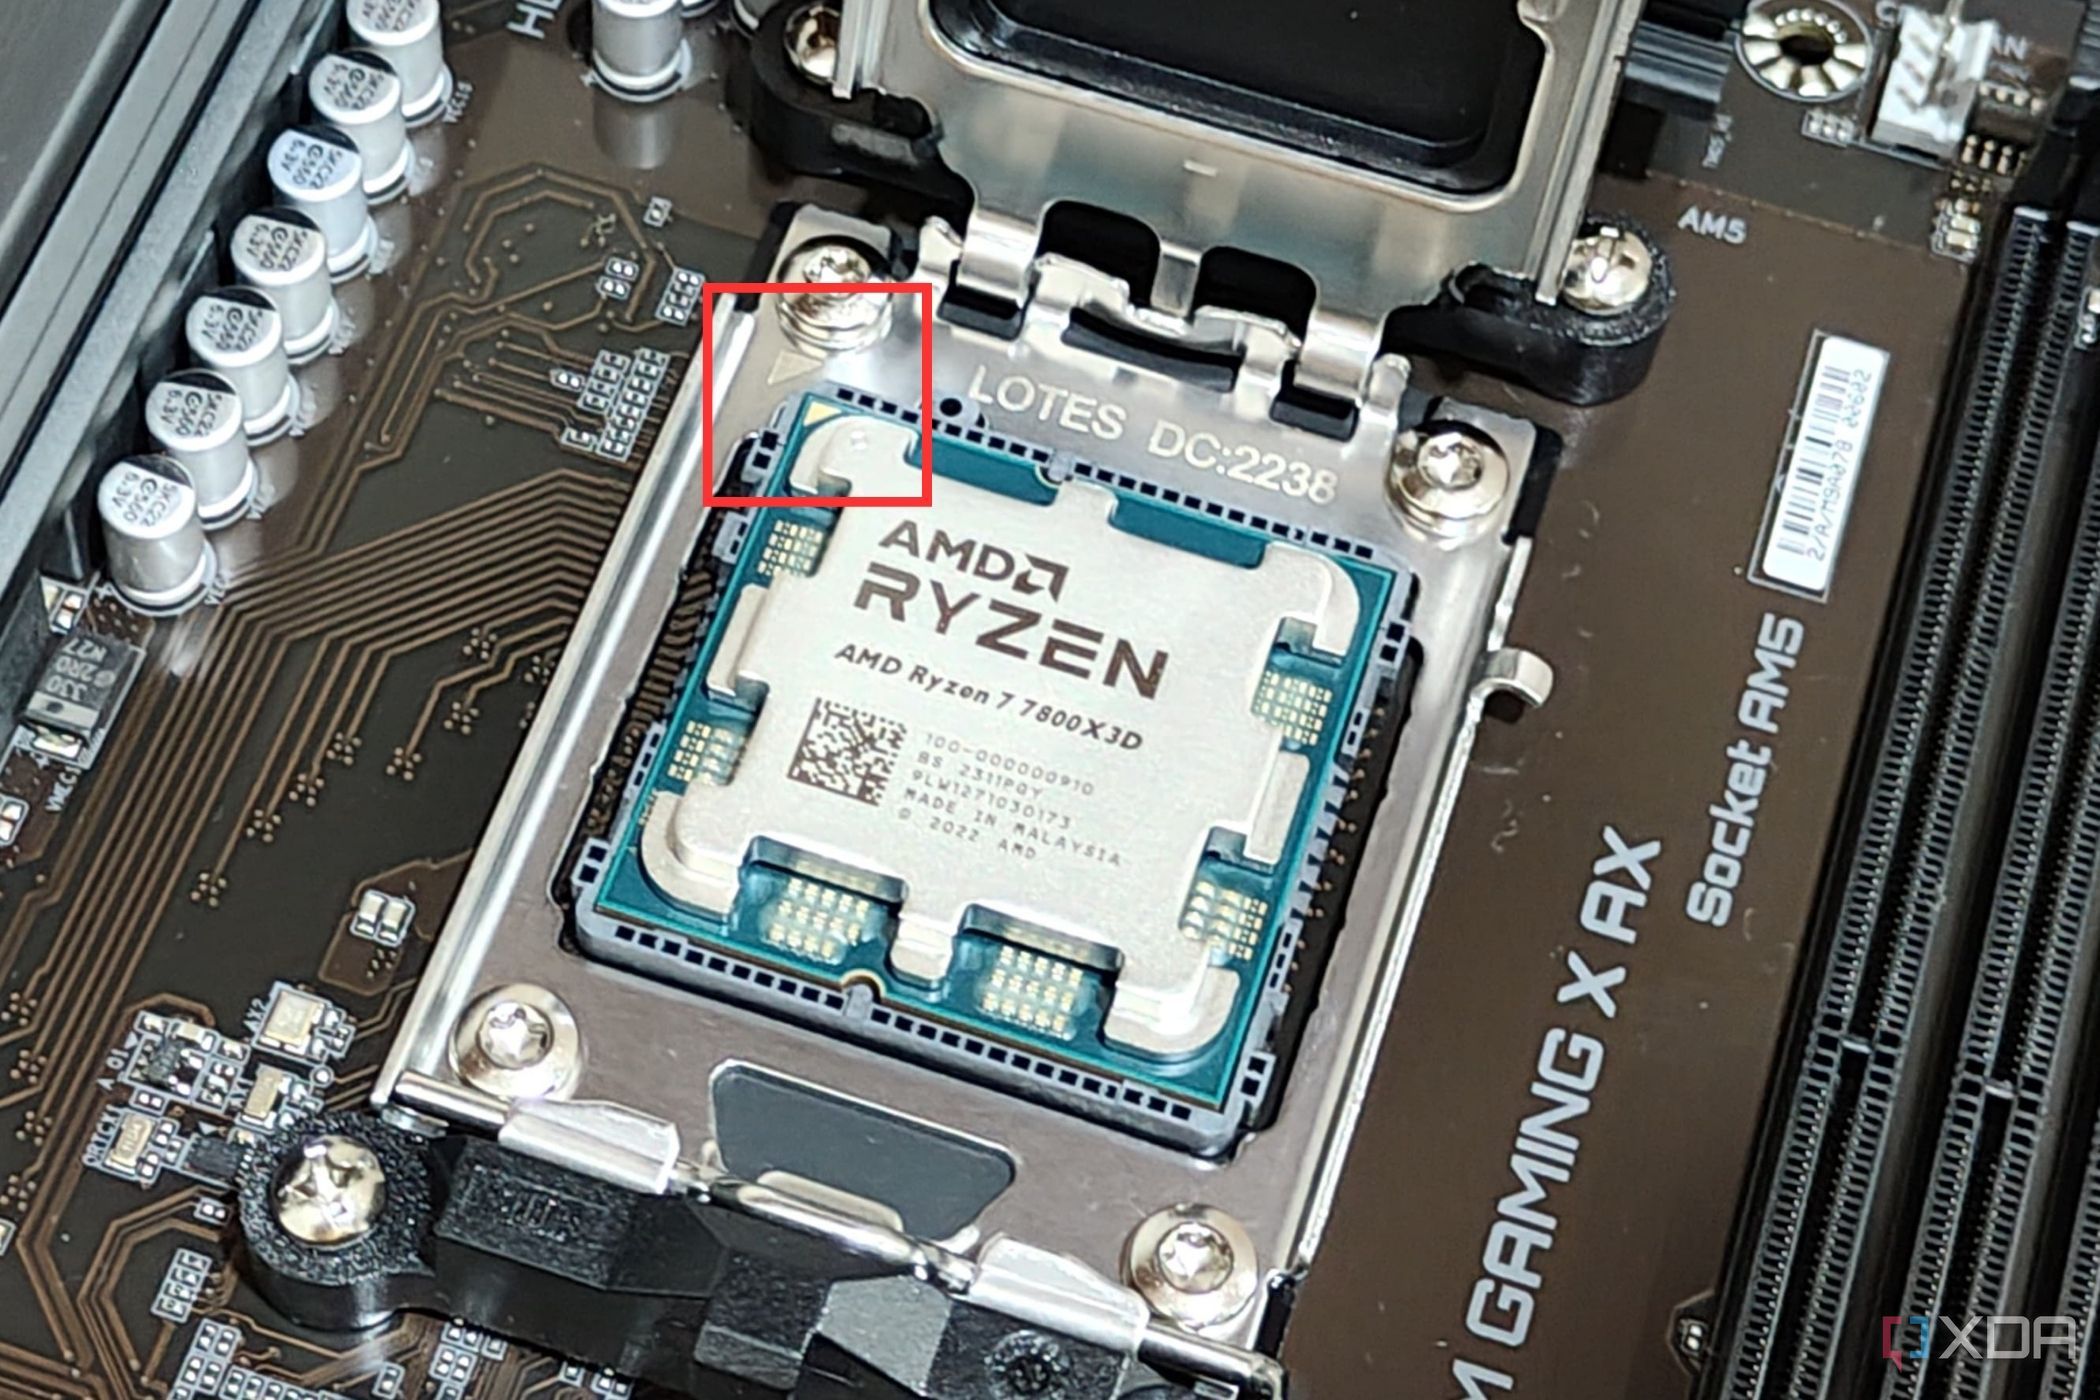
- Identify the Alignment Marks: Your AMD CPU and the CPU socket on the motherboard have specific alignment markers. For AMD Ryzen CPUs (AM4 and AM5), this is typically a gold triangle or an arrow on one of the corners of the CPU. This marker must align with a corresponding triangle or arrow on the CPU socket.
- Carefully Position the CPU: Holding the CPU by its edges, with the alignment markers aligned, gently hover it over the socket.
- Let it Drop: Once aligned, slowly lower the CPU into the socket. It should “drop” in smoothly with little to no resistance. If you feel any resistance, stop immediately. Do not force it.
- Troubleshooting a Misfit: If the CPU doesn’t drop in, double-check that you have the correct alignment. Ensure no pins (on older CPUs) are bent and that the CPU is oriented correctly according to the socket’s markings. Never force a CPU into the socket.
Securing the CPU with the Retention Arm

Once the CPU is seated correctly, you need to secure it.
- Lower the Retention Arm: Gently push the retention arm back down and secure it under the retention clip. You might feel a slight resistance as it seats, which is normal. This action will firmly hold the CPU in place.
- Reattach the Retention Bracket (if applicable): If your motherboard had a separate retention bracket that was also lifted with the arm, ensure it is now properly seated and holding the CPU down.
Installing the CPU Cooler
The CPU cooler is vital for dissipating the heat generated by your AMD processor. Improper installation can lead to overheating and performance throttling.
Preparing the Cooler and Thermal Paste
If your cooler comes with pre-applied thermal paste, you can often skip the paste application step. However, if you’re using a separate thermal paste or your cooler doesn’t have it pre-applied, this is where you’ll handle it.
- Stock AMD Coolers: Many AMD stock coolers, especially those included with Ryzen CPUs, have a thermal pad pre-applied to their base. These are designed for a straightforward installation.
- Aftermarket Coolers: These often require you to apply thermal paste manually.
- Cleaning: If you’re replacing an old cooler or your new cooler’s base isn’t perfectly clean, use a microfiber cloth and isopropyl alcohol to clean both the cooler’s base and the CPU’s integrated heat spreader (IHS) thoroughly.
- Applying Thermal Paste: Apply a small amount of thermal paste to the center of the CPU’s IHS. A common method is to apply a pea-sized dot in the center, or a thin line across the IHS. The pressure from the cooler will spread it evenly. Do not over-apply, as excess paste can be messy and less effective.
Mounting the Cooler
The mounting process varies significantly between stock and aftermarket coolers, and even between different aftermarket models. Always refer to your cooler’s specific manual.
-
Stock Wraith Coolers (AMD):
- Remove Plastic Clips: Remove the plastic retention clips from your motherboard that might be pre-installed for a stock cooler.
- Align Cooler: Align the cooler’s mounting bracket with the pre-installed standoffs on the motherboard.
- Clip it Down: The stock AMD cooler often uses a lever system. Attach one side of the lever to a standoff, then press down on the other side and hook it onto the opposing standoff. Ensure it’s securely fastened.
- Connect Fan Header: Connect the cooler’s fan cable to the designated “CPU_FAN” header on your motherboard.
-
Aftermarket Coolers (General Guide):
- Install Backplate (if necessary): Many aftermarket coolers require a specific backplate to be installed on the rear of the motherboard for support. Follow your cooler’s manual for this step.
- Attach Mounting Brackets: Attach the appropriate mounting brackets to the CPU socket area on the motherboard, according to your cooler’s instructions and your CPU socket type (AM4/AM5).
- Lower the Cooler: Carefully lower the heatsink onto the CPU, ensuring the thermal paste makes contact.
- Secure the Cooler: Fasten the cooler to the mounting brackets using screws or clips, often tightening them in a diagonal pattern to ensure even pressure.
- Connect Fan Header: Connect the cooler’s fan cable(s) to the “CPUFAN” header (or “CPUOPT” if you have multiple fans and your motherboard supports it).
Post-Installation and First Boot
With the CPU and cooler installed, you’re on the cusp of powering up your new system. This final stage confirms your successful installation and prepares you for using your PC.
Final Checks Before Powering On
Before you hit the power button, take a moment to review your work. This is a crucial step in our “Tech” tutorials, ensuring you don’t overlook something that could cause issues.
- CPU Seating: Visually confirm the CPU is still correctly seated and that the retention arm is securely fastened.
- Cooler Installation: Ensure the CPU cooler is firmly attached and making good contact with the CPU.
- Fan Connection: Verify that the CPU cooler’s fan is plugged into the correct motherboard header (“CPU_FAN”).
- RAM Installation: Make sure your RAM modules are properly seated in their slots.
- Other Components: Double-check that all other necessary components (GPU, storage drives, power supply) are correctly installed and connected.
- Cable Management: While not strictly necessary for boot-up, tidying up your cables now will make future maintenance easier.
The Moment of Truth: First Boot-Up
Now, it’s time to power on your system.
- Connect Peripherals: Connect your monitor, keyboard, and mouse.
- Power On: Flip the switch on your power supply unit (PSU) and press the power button on your PC case.
- Observe the BIOS/UEFI: If everything is installed correctly, your computer should power on, and you should see the motherboard’s BIOS/UEFI screen appear on your monitor. This indicates that the CPU is recognized and functioning.
- Check CPU Information: Within the BIOS/UEFI, navigate to the system information or CPU details section. Verify that the correct CPU model and speed are displayed.
- Troubleshooting Boot Issues: If your PC doesn’t boot or displays an error, don’t panic. Common issues include a misseated CPU, incorrect cooler installation, or improperly seated RAM. Power off your PC, unplug it, and carefully retrace your steps, paying close attention to the CPU installation and cooler mounting.
Conclusion
Installing an AMD CPU is a rewarding process that empowers you with a deeper understanding of your PC’s hardware. By following these detailed steps, from preparation to the final boot-up, you can confidently install your new processor. This knowledge not only enhances your DIY PC building skills but also contributes to your overall “Tech” literacy, enabling you to make informed decisions about your hardware and troubleshoot effectively. Remember, patience and attention to detail are your best allies throughout this process. Happy building!
aViewFromTheCave is a participant in the Amazon Services LLC Associates Program, an affiliate advertising program designed to provide a means for sites to earn advertising fees by advertising and linking to Amazon.com. Amazon, the Amazon logo, AmazonSupply, and the AmazonSupply logo are trademarks of Amazon.com, Inc. or its affiliates. As an Amazon Associate we earn affiliate commissions from qualifying purchases.