In today’s hyper-connected world, staying in touch while traveling abroad is no longer a luxury – it’s a necessity. From navigating unfamiliar cities to sharing your adventures in real-time, reliable mobile data is paramount. For many, the traditional hassle of sourcing local SIM cards upon arrival has become a significant pain point. This is where eSIM technology, and specifically Airalo, steps in, offering a modern, convenient, and often more cost-effective solution.
Airalo is a pioneering eSIM marketplace, allowing you to purchase and activate eSIM data plans for over 200 countries and regions worldwide, all from your smartphone. This article serves as your comprehensive guide to understanding what an eSIM is, why Airalo is a fantastic choice, and most importantly, the step-by-step process of how to install an Airalo eSIM, ensuring you’re connected the moment you land. We’ll also touch upon how this innovation aligns with broader trends in technology and how it can impact your personal finance and travel budget.

Understanding eSIM Technology and Its Advantages
Before diving into the installation process, it’s crucial to grasp the fundamental concept of eSIM technology and why it’s revolutionizing mobile connectivity.
What is an eSIM?
eSIM stands for “embedded SIM.” Unlike traditional physical SIM cards that you slot into your device, an eSIM is a small chip that is permanently embedded into your smartphone or other compatible device during manufacturing. This embedded chip can be programmed remotely by your mobile carrier or, in the case of Airalo, by a third-party eSIM provider.
This digital SIM card works just like a physical one, allowing your device to connect to a mobile network. The key difference is that you don’t need to physically swap cards when changing carriers or activating a new plan. Instead, you download a “digital SIM profile” onto your eSIM, which is then activated, granting you access to mobile data, calls, and texts (depending on the plan purchased).
The Benefits of Using Airalo eSIMs
Airalo has quickly become a go-to solution for travelers due to a multitude of benefits:
- Unparalleled Convenience: The most significant advantage is the elimination of the need to buy and swap physical SIM cards upon arrival. You can purchase and activate your eSIM data plan before you even leave home or during your flight.
- Cost-Effectiveness: Traditional roaming charges can be exorbitant. Airalo offers competitive local and regional data plans that are often a fraction of the cost of your home carrier’s roaming rates. This can lead to significant savings on your travel budget.
- Wide Coverage: With plans available for over 200 countries and regions, Airalo ensures you can find a data solution for almost any destination.
- Flexibility: You can choose from a range of data packages and validity periods, tailoring your plan to your specific travel needs. Need a short-term data boost for a week-long trip, or a longer-term plan for extended travel? Airalo has options for both.
- Dual SIM Functionality: For devices that support dual SIM, you can keep your primary physical SIM active for calls and texts from your home country while using an Airalo eSIM for affordable data abroad. This allows you to stay connected without missing important calls or incurring high charges.
- Eco-Friendly: By eliminating the need for physical SIM cards, eSIMs contribute to reducing plastic waste.
Installing Your Airalo eSIM: A Step-by-Step Guide
The process of installing an Airalo eSIM is designed to be straightforward and user-friendly. It primarily involves using the Airalo app, which is available for both iOS and Android devices.
Step 1: Download the Airalo App and Create an Account
Your journey begins with downloading the official Airalo app from your device’s app store (Apple App Store for iOS or Google Play Store for Android). Once installed, open the app and follow the prompts to create an account. This usually involves providing an email address and creating a password. You might also have the option to sign up using your Google or Apple account for quicker registration.
Step 2: Choose Your eSIM Package
With your account set up, you’ll be greeted by the Airalo app’s intuitive interface. Here’s where you’ll select your destination and desired data plan.
- Search for Your Destination: Use the search bar to enter the country or region you’ll be visiting. Airalo will then display all available eSIM packages for that location.
- Browse and Compare Plans: You’ll see a list of different data packages, typically categorized by data amount (e.g., 1GB, 3GB, 5GB) and validity period (e.g., 7 days, 15 days, 30 days). Carefully review the details of each plan, paying attention to:
- Data Amount: Ensure the data allowance is sufficient for your expected usage.
- Validity Period: Match the validity to the duration of your trip.
- Price: Compare the costs to find the most economical option.
- Network Provider: While Airalo handles the selection, it’s good to note the network(s) the eSIM will connect to.
- Hotspot/Tethering: Check if the plan allows you to share your data connection with other devices (hotspotting).
- Select Your Plan: Once you’ve found the perfect eSIM package that fits your needs and budget, tap on it to view its full details and proceed to purchase.
Step 3: Purchase Your eSIM and Payment
After selecting your desired eSIM plan, you’ll proceed to the checkout.

- Review Your Order: Double-check that you’ve chosen the correct destination and data package.
- Payment Options: Airalo offers a variety of secure payment methods, including major credit/debit cards (Visa, Mastercard, American Express), PayPal, and sometimes other local payment gateways.
- Complete the Transaction: Enter your payment details and confirm the purchase. Your eSIM plan will be digitally delivered to your account immediately after a successful transaction.
Step 4: Install Your eSIM on Your Device
This is the core of the “how to install Airalo eSIM” process. Airalo provides clear instructions within the app, but here’s a breakdown of the typical steps. The installation process can vary slightly depending on whether you’re using an iOS or Android device.
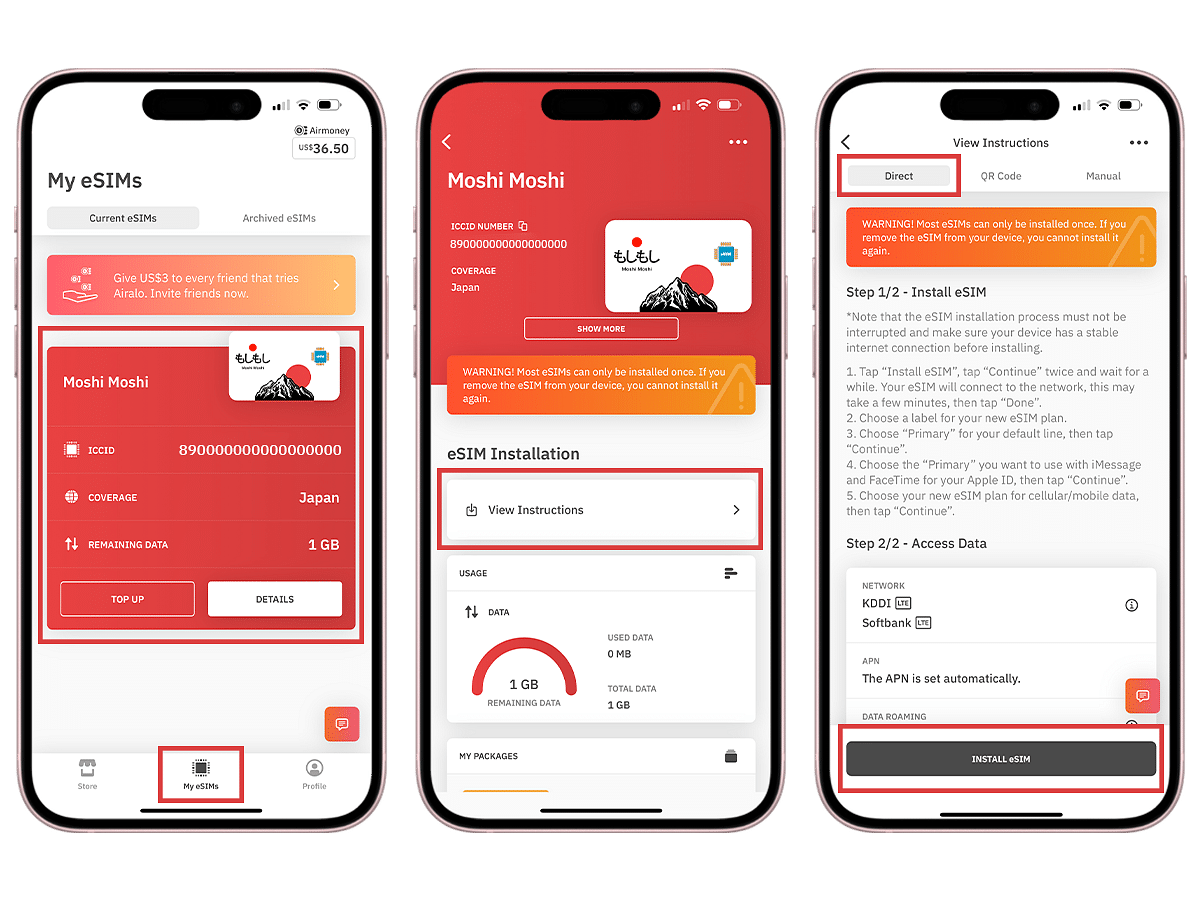
Installing on iOS Devices (iPhone)
- Access the eSIM: After purchasing, navigate to the “My eSIMs” section in the Airalo app. Tap on the eSIM you just bought.
- Tap “Install eSIM”: You’ll see a prominent button labeled “Install eSIM.” Tap this.
- Follow On-Screen Prompts: Your iPhone will guide you through the installation. You’ll likely be asked to confirm adding a new cellular plan.
- Label Your eSIM: It’s highly recommended to label your new eSIM. For example, you could name it “Airalo [Country Name]” or “Travel Data.” This helps distinguish it from your primary SIM.
- Set as Secondary or Travel SIM: When prompted, set the Airalo eSIM as your “Secondary” or “Travel” SIM. Crucially, do NOT set it as your primary SIM, as this could affect your main phone number and potentially incur roaming charges.
- Activation: Once installed, the eSIM profile is on your device. You will activate it when you are ready to use it (e.g., upon landing at your destination or when you want to start using the data). The activation button will be within the Airalo app.
Installing on Android Devices
The exact steps can differ slightly between Android manufacturers (Samsung, Google Pixel, etc.), but the general flow is similar.
- Access the eSIM: In the Airalo app, go to “My eSIMs” and select the purchased eSIM.
- Tap “Install eSIM”: You’ll see the installation option. Tap it.
- QR Code Method (Common): Airalo often provides a QR code that you’ll scan using your phone’s camera. The app will guide you through this.
- Manual Entry Method (Alternative): In some cases, you might be given a manual activation code or details that you need to enter directly into your phone’s cellular settings.
- Navigate to Settings: You’ll typically need to go to your phone’s Settings > Network & Internet (or Connections) > SIMs (or Mobile Network) > Add SIM or Add eSIM.
- Scan QR Code or Enter Details: Follow the on-screen prompts to either scan the QR code provided by Airalo or manually enter the activation details.
- Label Your eSIM: Similar to iOS, label your Airalo eSIM clearly (e.g., “Airalo Travel Data”).
- Set as Secondary: Ensure the Airalo eSIM is set as your secondary SIM for data usage. Avoid making it your primary SIM.
- Activation: Once installed, you’ll activate the eSIM through the Airalo app when you’re ready to use it.
Step 5: Activate Your eSIM and Connect to the Network
The final step is to activate your eSIM, which typically happens once you’ve arrived at your destination or just before you intend to use the data.
- Open the Airalo App: Go to the “My eSIMs” section.
- Select Your eSIM: Tap on the installed eSIM you wish to activate.
- Tap “Activate”: There will be a clear “Activate” button. Tap it.
- Confirm Activation: You might be asked to confirm. Once confirmed, your eSIM will connect to the designated network.
- Configure Data Settings:
- iOS: Go to Settings > Cellular > [Your Airalo eSIM label] > Turn On This Line. Ensure “Data Roaming” is ON for your Airalo eSIM line (this is safe as you’re using an eSIM plan, not your carrier’s roaming). Set your “Cellular Data” to your Airalo eSIM.
- Android: Go to Settings > Network & Internet > SIMs. Select your Airalo eSIM. Ensure it’s turned ON. Set your “Preferred network type” (often LTE or 5G) and ensure “Mobile data” is toggled ON for the Airalo eSIM.
Once these steps are completed, your device will connect to a local mobile network, and you’ll have internet access via your Airalo eSIM. You can then use apps like Google Maps, WhatsApp, and social media as you normally would.
Beyond Installation: Maximizing Your Airalo Experience
The installation of your Airalo eSIM is just the beginning. To truly leverage this technology, consider these aspects:
Managing Your Data and Account
- Monitor Usage: Keep an eye on your data consumption through the Airalo app. This helps you avoid running out of data unexpectedly or incurring charges for exceeding your plan.
- Recharging: If you need more data before your current plan expires or after it has, you can easily purchase and install a new plan within the Airalo app without needing a new eSIM.
- Customer Support: Airalo offers customer support through the app and their website, which can be invaluable if you encounter any issues.
Integrating with Your Travel Strategy and Personal Finance
Airalo seamlessly integrates with modern travel and personal finance principles.
- Budgeting for Travel: By opting for Airalo’s affordable data plans, you can allocate a specific, predictable amount to connectivity in your travel budget, avoiding surprise charges. This is a key aspect of smart personal finance for travelers.
- Digital Nomadism and Remote Work: For digital nomads or those working remotely while traveling, consistent and affordable data is non-negotiable. Airalo provides a reliable lifeline, enabling you to stay productive without breaking the bank.
- Leveraging Technology for Smarter Travel: The ease of use and cost-effectiveness of Airalo exemplify how technology can enhance our experiences. It simplifies a common travel friction point, allowing you to focus more on enjoying your trip.
Conclusion
The “how to install Airalo eSIM” process is a testament to the evolving landscape of mobile technology. Gone are the days of hunting for SIM cards in foreign airports. With Airalo, you have a powerful, flexible, and affordable way to stay connected across the globe, all at your fingertips. By following these simple steps, you can ensure that your next adventure is as connected as it is memorable. Embrace the convenience of eSIMs and make Airalo your trusted travel companion for seamless global communication.
aViewFromTheCave is a participant in the Amazon Services LLC Associates Program, an affiliate advertising program designed to provide a means for sites to earn advertising fees by advertising and linking to Amazon.com. Amazon, the Amazon logo, AmazonSupply, and the AmazonSupply logo are trademarks of Amazon.com, Inc. or its affiliates. As an Amazon Associate we earn affiliate commissions from qualifying purchases.