In an increasingly connected world, reliable and fast internet access is not just a luxury but a fundamental necessity for work, education, entertainment, and communication. At the heart of most modern home and small business networks lies the wireless router – a pivotal device that bridges your internet service provider’s (ISP) connection with all your Wi-Fi-enabled devices. While the concept of “installing a router” might sound daunting to some, it is, in fact, a straightforward process that anyone can accomplish with a little guidance. This comprehensive guide will walk you through every step, from understanding your network needs to optimizing your newly installed wireless internet connection, ensuring you achieve seamless connectivity and robust digital security.
Understanding Your Router and Network Needs
Before diving into the installation process, it’s crucial to grasp what a wireless router does and what factors you should consider to ensure you choose and set up the right device for your specific requirements. A well-informed decision at this stage can significantly impact your internet experience.
What is a Wireless Router?
At its core, a wireless router serves multiple critical functions. Firstly, it acts as a central hub, receiving the internet connection from your modem (which itself communicates with your ISP). Secondly, it creates a local area network (LAN) within your home or office, allowing all your devices – computers, smartphones, tablets, smart TVs, IoT gadgets – to communicate with each other. Most importantly, for wireless internet, it broadcasts a Wi-Fi signal, enabling these devices to connect to the internet without the need for physical cables. Modern routers also often include security features, parental controls, and quality-of-service (QoS) settings to manage bandwidth allocation, making them intelligent network managers rather than just simple signal broadcasters.
Key Considerations Before Installation
Choosing and preparing for a router installation involves more than just plugging it in. Thinking about these aspects beforehand will save you time and potential headaches down the line:
- Router Type and Technology: The world of wireless routers is constantly evolving. Look for routers supporting the latest Wi-Fi standards (e.g., Wi-Fi 6/802.11ax, Wi-Fi 6E, or the emerging Wi-Fi 7/802.11be) if you want future-proof performance, especially in congested areas or with many devices. Mesh Wi-Fi systems are ideal for larger homes or those with dead spots, offering expanded coverage by using multiple interconnected units. For smaller spaces, a single powerful router might suffice.
- Speed and Coverage: Consider your internet plan’s speed. Your router should be capable of handling and distributing that speed effectively. Also, assess the size of your space and potential obstacles (walls, floors) that could interfere with the signal. A router’s specifications will usually indicate its theoretical maximum speed and recommended coverage area.
- Security Features: Given the increasing threat of cyberattacks, robust security is paramount. Look for routers with WPA3 encryption, built-in firewalls, guest network capabilities (to isolate visitors from your main network), and regular firmware updates from the manufacturer. Some advanced routers also offer integrated VPN clients or more sophisticated intrusion detection systems.
- ISP Compatibility: While most routers are universally compatible with modems, it’s wise to double-check with your ISP, especially if they provided your current modem. Some ISPs have specific recommendations or even offer integrated modem-router units, which might simplify setup but could limit your upgrade options.
- Placement Strategy: Where you place your router significantly impacts its performance. A central, elevated location, free from obstructions and interference (like microwaves or cordless phones), is generally ideal. Planning this beforehand can help avoid frustration later.
By carefully evaluating these points, you can ensure that your new router not only provides wireless internet but does so efficiently, securely, and tailored to your specific connectivity demands.
Pre-Installation Checklist: Gathering Your Tools and Information
Preparation is key to a smooth router installation. Before you even unbox your new device, gathering all the necessary equipment and information will streamline the process and prevent interruptions. This phase is about setting the stage for a quick and successful setup.
Essential Equipment
Ensure you have all the physical components required for the installation:
- Your New Wireless Router: The star of the show. Make sure it’s fresh out of the box and undamaged.
- Modem: This device connects your home network to your ISP. It might be a standalone unit or integrated into your old router. If it’s separate, you’ll need to ensure it’s working correctly before connecting your new router.
- Ethernet Cables: Typically, one short Ethernet cable (often yellow or blue) comes with the router for connecting it to your modem. You might also need another one for a temporary wired connection from your computer to the router during setup, especially if your initial Wi-Fi connection isn’t immediately stable.
- Power Adapters: Both your modem and your new router will require their respective power adapters. Keep them handy.
- Computer or Smartphone: You’ll need a device with a web browser to access the router’s configuration page. A computer connected via Ethernet is often the most reliable method for initial setup, but most modern routers allow smartphone-based setup via an app or Wi-Fi.
Necessary Information
Having this information at your fingertips will make the configuration process much smoother:
- ISP Account Details: Sometimes, particularly when setting up a new internet service or replacing an ISP-provided router, you might need your ISP username and password or account number to activate the new connection.
- Existing Network Name (SSID) and Password (if replacing): If you’re replacing an old router and want to keep the same Wi-Fi network name and password to avoid reconfiguring every device in your home, make a note of them. This is a huge productivity booster!
- Router Login Credentials: Your new router will have a default IP address (e.g., 192.168.0.1 or 192.168.1.1) and a default username/password (often “admin/admin” or “admin/password”). This information is usually printed on a sticker on the bottom or back of the router or in the quick-start guide. Crucially, you will change these default credentials during setup for security reasons.
- Wi-Fi Name (SSID) and Password for New Router: Decide on a strong, unique Wi-Fi network name (SSID) and a complex password that’s easy for you to remember but hard for others to guess. Avoid using personal information. A strong password is a mix of upper and lower case letters, numbers, and symbols.
With your equipment ready and information gathered, you are now prepared to embark on the physical installation.
Step-by-Step Installation Guide
This section outlines the core process of physically connecting and configuring your new wireless router. Follow these steps meticulously to ensure a successful setup.
Disconnecting Your Old Setup (If Applicable)
If you’re replacing an existing router or modem-router combo, start by gracefully decommissioning the old equipment. This prevents potential network conflicts.
- Power Down: Unplug the power adapter from your old router and modem (if separate).
- Disconnect Cables: Disconnect all Ethernet cables from the old router.
- Wait: Allow a minute or two for any residual power to dissipate. This step helps in clearing old network configurations from your ISP’s system, especially important for cable modems.
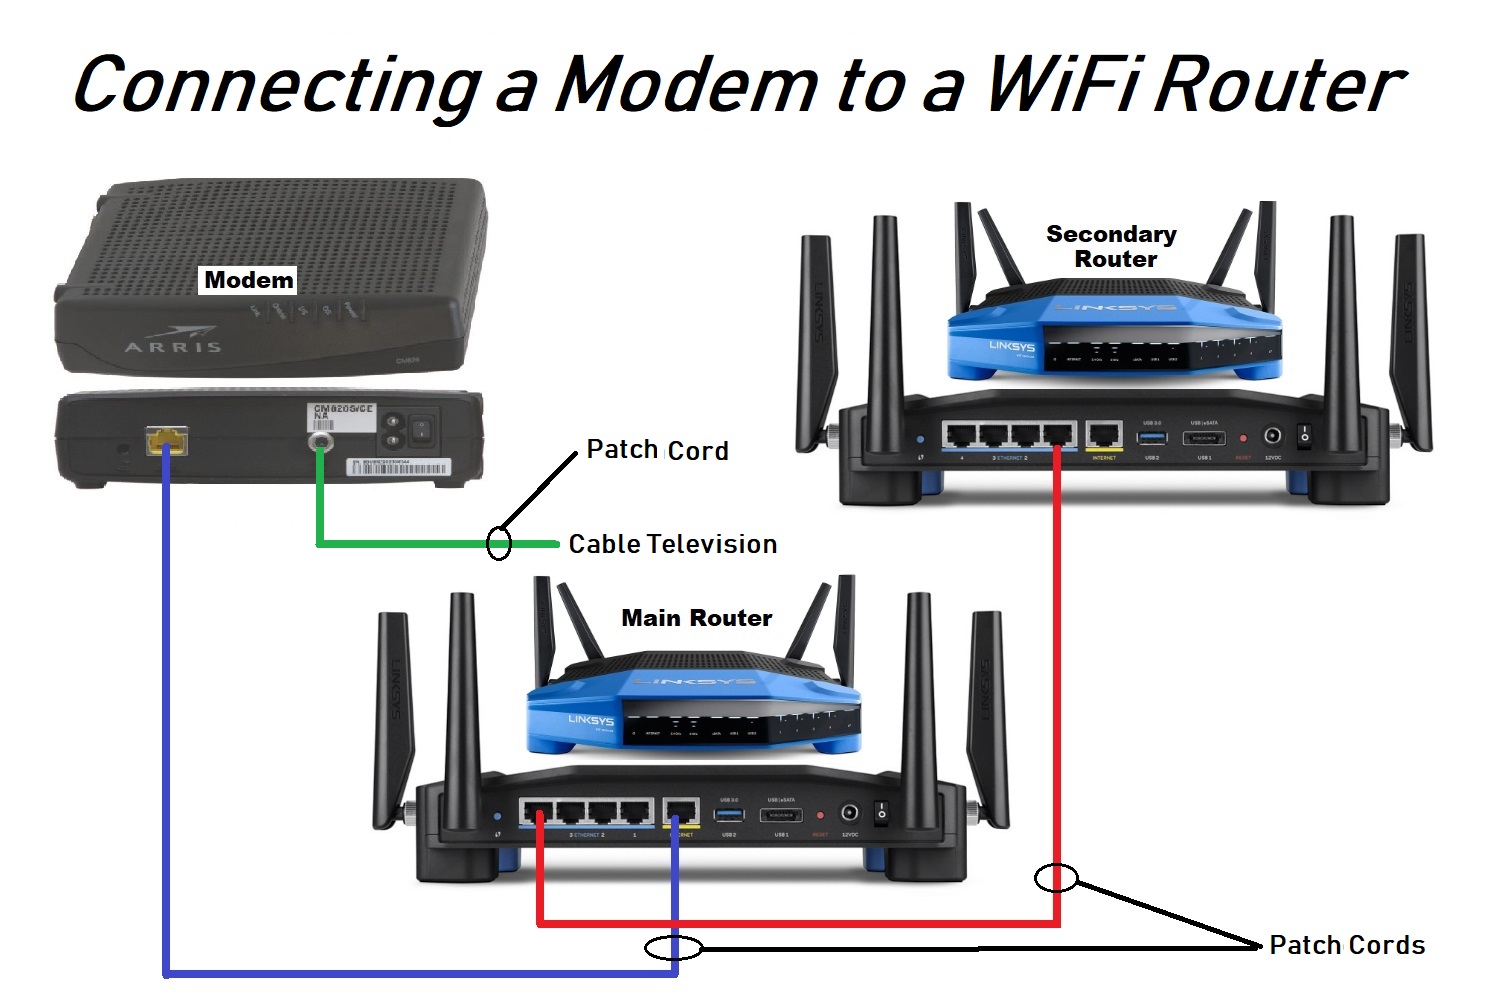
Connecting the Modem to the Router
This is the most critical physical connection for your internet access.
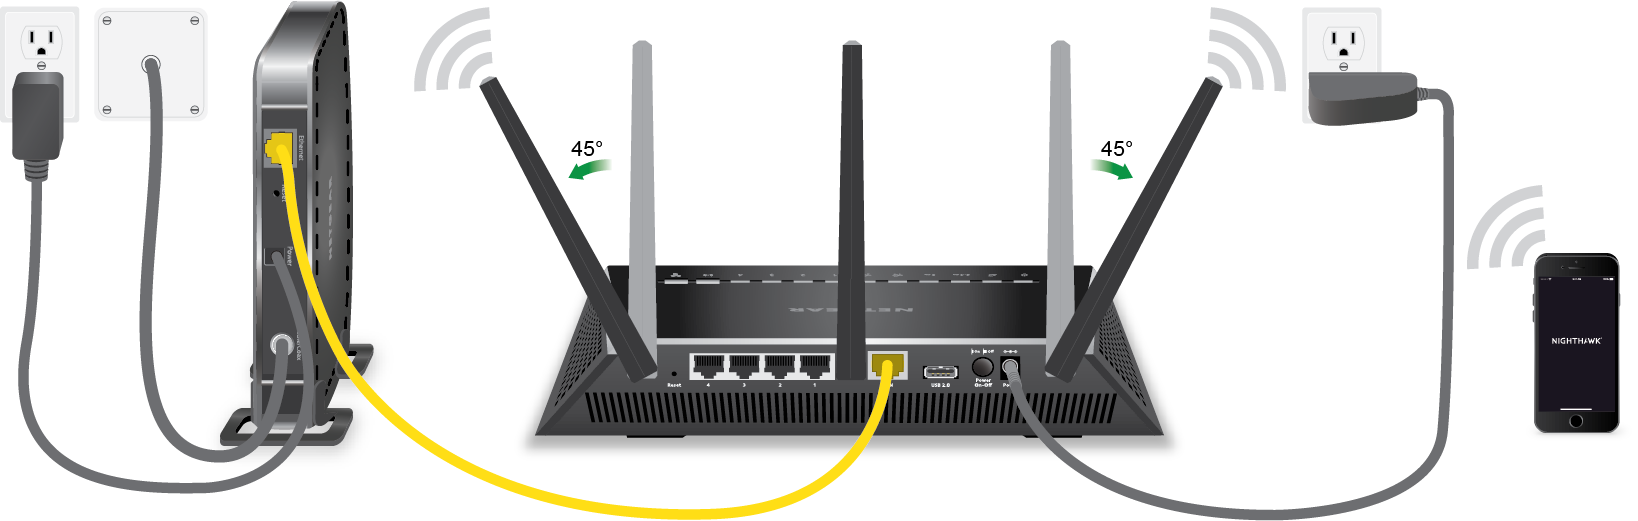
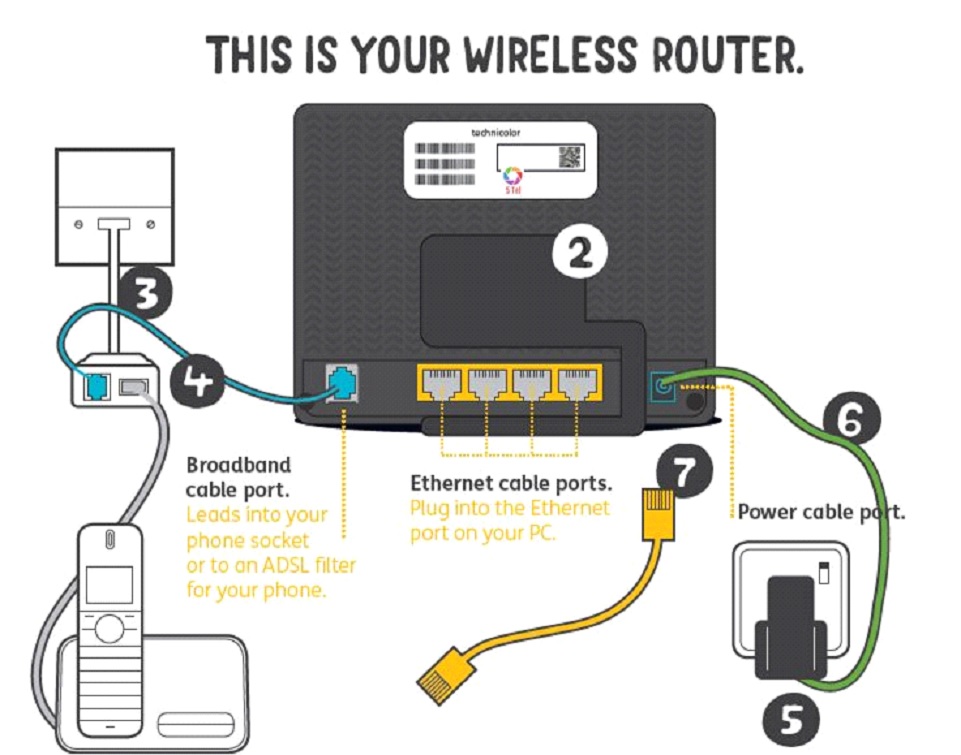
- Connect Modem to Router’s WAN Port: Take one end of an Ethernet cable and plug it into the “Ethernet Out” or “LAN” port on your modem.
- Connect to Router’s WAN Port: Take the other end of that same Ethernet cable and plug it into the “WAN” (Wide Area Network) or “Internet” port on your new wireless router. This port is usually colored differently (e.g., blue) and often distinct from the “LAN” ports (usually yellow) meant for wired devices on your local network.
Powering Up and Waiting
Proper boot-up sequence is important to establish a stable connection.
- Power On Modem First: Plug in your modem’s power adapter and turn it on (if it has a power button). Wait patiently for it to fully boot up and establish a connection with your ISP. This can take several minutes. Look for indicator lights on the modem that show it’s connected (e.g., a solid “Internet” or “Online” light).
- Power On Router: Once the modem is stable, plug in your new router’s power adapter and turn it on. Again, wait for it to boot up. The router’s indicator lights (power, internet, Wi-Fi) should eventually stabilize. Refer to your router’s manual for what the light patterns signify.
Connecting a Device to the Router
You’ll need a device to access the router’s settings.
- Wired Connection (Recommended for Initial Setup): For maximum reliability, connect your computer directly to one of your router’s LAN ports (usually yellow) using another Ethernet cable.
- Wireless Connection (Alternative): If you prefer, or if your router supports it, you can connect wirelessly. Look for the default Wi-Fi network name (SSID) printed on the router (e.g., “TP-LinkXXXX” or “NETGEARXXXX”) and connect using the default Wi-Fi password/security key, also printed on the router.
Accessing the Router’s Web Interface
This is where you’ll configure your network settings.
- Open Web Browser: On your connected computer or smartphone, open a web browser (Chrome, Firefox, Edge, Safari).
- Enter Router’s IP Address: In the address bar, type the router’s default IP address (e.g., 192.168.0.1 or 192.168.1.1) and press Enter. This will take you to the router’s login page.
- Log In: Enter the default username and password (e.g., admin/admin). If these don’t work, consult your router’s manual or the sticker on the device.
Running the Setup Wizard
Most modern routers feature an intuitive setup wizard.
- Follow the Wizard: The wizard will guide you through essential configurations. This typically includes:
- Internet Connection Type: Your router will usually auto-detect this (e.g., Dynamic IP, PPPoE). If it doesn’t, or if your ISP gave you specific settings, enter them here.
- Wi-Fi Network Name (SSID): Change the default SSID to something unique and recognizable.
- Wi-Fi Password (Security Key): Set a strong, secure password for your Wi-Fi network. This is critical for digital security. Ensure you select WPA2 or, preferably, WPA3 encryption.
- Administrative Password: Crucially, change the default router login password (e.g., from “admin” to something unique and strong). This protects your router’s settings from unauthorized access.
- Save Settings and Reboot: After completing the wizard, save your settings. The router will likely reboot. Once it’s back online, your new Wi-Fi network should be active and broadcasting with your chosen name and password.
Updating Firmware
This is a vital, often overlooked step for security and performance.
- Check for Updates: After logging back into your router’s interface, navigate to the “Administration,” “System,” or “Firmware Update” section.
- Download and Install: Check for available firmware updates. If an update is available, download and install it. Do not interrupt the router during a firmware update, as this can brick the device. Firmware updates often include critical security patches, performance enhancements, and new features.
Advanced Settings (Optional)
Once your basic network is functional, you might explore these for further customization:
- Guest Network: Create a separate Wi-Fi network for guests, isolating them from your main network for enhanced security.
- Quality of Service (QoS): Prioritize certain types of traffic (e.g., streaming video, online gaming) to ensure smooth performance during peak usage.
- Parental Controls: Block access to certain websites or set time limits for internet usage on specific devices.
- Port Forwarding: Necessary for some specific applications, like certain online games or hosting a server.
- VPN Configuration: Some routers allow you to set up a VPN client, encrypting all traffic from devices connected to it.
With these steps completed, your router is now fully installed and configured, providing you with reliable wireless internet access.
Post-Installation: Optimizing Your Wireless Network
Installing your router is the first step; optimizing it ensures you get the best possible performance, coverage, and security from your investment. This ongoing process helps maintain a fast, secure, and reliable connection.
Router Placement for Optimal Signal
The physical location of your router dramatically influences its Wi-Fi signal strength and coverage.
- Central Location: Place your router as centrally as possible within your home or office. This minimizes the distance to all connected devices.
- Elevated Position: Wireless signals propagate better when unobstructed. Placing the router on a shelf or high on a piece of furniture, rather than on the floor or hidden in a cabinet, can significantly improve signal strength.
- Avoid Obstructions and Interference: Keep the router away from large metal objects, thick concrete walls, and appliances that emit electromagnetic waves (like microwaves, cordless phones, and baby monitors), which can interfere with the Wi-Fi signal. If you have multiple floors, try to place it in a location that can reach both up and down.
- Antenna Orientation: If your router has external antennas, experiment with their orientation. Often, positioning them vertically (upwards) or at a 45-degree angle can provide the best omnidirectional coverage.
Enhancing Network Security
Digital security is not a one-time setup; it’s an ongoing commitment. Protect your network from unauthorized access and potential threats.
- Strong, Unique Passwords: As mentioned, always change the default administrative password for your router and use a strong, unique password for your Wi-Fi network (WPA2/WPA3 Personal). Never share these casually.
- WPA3 Encryption: If your router supports it, enable WPA3 encryption for your Wi-Fi network. It offers superior security compared to older WPA2.
- Disable WPS: Wi-Fi Protected Setup (WPS) is a convenient feature for connecting devices but has known security vulnerabilities. It’s generally recommended to disable it in your router settings.
- Regular Firmware Updates: Make it a habit to check for and install firmware updates regularly. Manufacturers often release updates to patch security vulnerabilities and improve performance.
- Guest Network Utilization: Use the guest network feature for visitors. This allows them internet access without giving them access to your main network and its connected devices, safeguarding your personal data and network integrity.
- Review Connected Devices: Periodically check your router’s interface for a list of connected devices. If you see any unfamiliar devices, you can block them from accessing your network.
Troubleshooting Common Issues
Even with a perfect setup, you might occasionally encounter network issues. Here are quick fixes for common problems:
- No Internet Connection:
- Check Cables: Ensure all Ethernet cables (especially from modem to router) are securely connected.
- Reboot Sequence: Power cycle your modem first, wait 1-2 minutes, then power cycle your router. Wait for both to fully boot up. This resolves many common connectivity glitches.
- Check ISP Status: Log into your ISP account or call their support to see if there’s an outage in your area.
- Slow Wi-Fi Speeds:
- Router Placement: Review your router’s location and move it to a more central, elevated, and obstruction-free spot.
- Interference: Move the router away from other electronics. Consider changing your Wi-Fi channel in the router settings to one less congested (use a Wi-Fi analyzer app on your phone).
- Bandwidth Hogs: Identify devices or applications consuming a lot of bandwidth (e.g., large downloads, 4K streaming) and manage their usage, or use QoS settings.
- Old Hardware: If your router or connected devices are very old, they might not support modern Wi-Fi speeds.
- Dropped Connections:
- Firmware: Ensure your router’s firmware is up to date.
- Overheating: Ensure your router has adequate ventilation.
- Signal Strength: Poor signal strength can lead to intermittent connections. Recheck placement and consider a mesh system or Wi-Fi extender for larger areas.
Conclusion
Installing a wireless router for your internet connection is a fundamental step in building a robust and reliable home or office network. By understanding the core functions of your router, preparing diligently with the right tools and information, and following a clear, step-by-step installation process, you can effortlessly set up your wireless internet. Beyond the initial setup, proactive optimization of router placement, coupled with stringent security measures and a basic understanding of troubleshooting, ensures not only a high-performance network but also a secure digital environment. As technology evolves, so too will our connectivity needs, but the principles of smart setup and continuous maintenance will always remain the cornerstone of a seamless and productive online experience. Embrace these practices, and enjoy the full potential of your wireless internet.
aViewFromTheCave is a participant in the Amazon Services LLC Associates Program, an affiliate advertising program designed to provide a means for sites to earn advertising fees by advertising and linking to Amazon.com. Amazon, the Amazon logo, AmazonSupply, and the AmazonSupply logo are trademarks of Amazon.com, Inc. or its affiliates. As an Amazon Associate we earn affiliate commissions from qualifying purchases.