The Mac ecosystem, renowned for its intuitive interface and robust performance, offers a distinct yet straightforward approach to software installation compared to other operating systems. Whether you’re a seasoned macOS user or new to the Apple world, understanding the various methods for installing applications is fundamental to maximizing your productivity, maintaining system security, and fully leveraging your device’s capabilities. This guide will walk you through the essential preparations, primary installation techniques, common troubleshooting tips, and best practices to ensure a smooth and secure experience when adding new software to your Mac.
In an era defined by rapid technological advancement, from cutting-edge AI tools to innovative apps designed to streamline every aspect of life, knowing how to properly integrate these solutions into your digital workflow is more important than ever. This tutorial cuts through the complexity, empowering you to confidently manage your Mac’s software landscape.
Navigating the Mac Ecosystem: Understanding Application Installation
Before diving into the specifics of installation, it’s beneficial to grasp the philosophy behind app management on a Mac. Apple prioritizes user experience, security, and performance. This is reflected in its Gatekeeper technology, sandboxing for applications, and the curated environment of the Mac App Store. Unlike Windows, where a single .exe file often dictates the installation process, macOS utilizes several methods, each tailored to different types of software and distribution channels. Recognizing these distinctions is the first step towards becoming a proficient Mac user. Proper installation not only ensures that your applications run efficiently but also safeguards your system against potential vulnerabilities and performance bottlenecks, contributing to a more productive digital environment.
Essential Preparations Before Installation
A little preparation goes a long way in preventing potential headaches during the installation process. Taking a few moments to ensure your Mac is ready can save significant time and effort.
Verifying System Requirements and Compatibility
Every program has specific requirements concerning the operating system version, processor type, and sometimes even minimum RAM. Before downloading any software, always check the developer’s website for compatibility information.
- Operating System: To check your macOS version, click the Apple menu () in the top-left corner of your screen and select “About This Mac.”
- Processor: Most modern Macs use Apple Silicon (M1, M2, M3 chips) or Intel processors. Ensure the software is compatible with your Mac’s architecture. Universal apps support both, while some older apps might require Rosetta 2 for Apple Silicon Macs.
- RAM and Storage: Verify that your Mac meets the recommended RAM for optimal performance and has enough available storage space for the application and its data.
Ensuring Sufficient Storage Space
Software installations can range from a few megabytes to several gigabytes. Lacking sufficient disk space is a common reason for failed installations or slow performance post-installation.
- Check Free Space: Go to “About This Mac” > “Storage” to see your available disk space.
- Clear Unnecessary Files: Delete old files, empty the Trash, or use macOS’s built-in storage management tools (found under “About This Mac” > “Storage” > “Manage…”) to free up space.
Maintaining a Stable Internet Connection
Many installations require downloading large files, and some applications even need to verify licenses or download additional components during the setup process. A stable and fast internet connection is crucial for a seamless download and installation experience, especially for larger software suites or updates.
Understanding Mac Security Settings (Gatekeeper)
macOS includes a security feature called Gatekeeper, which helps protect your Mac from malicious software. By default, Gatekeeper allows apps downloaded from the Mac App Store and identified developers. When you attempt to open an app from an “unidentified developer,” you might encounter a warning. We’ll cover how to handle this safely later. This security layer is a vital part of Apple’s commitment to digital security, a cornerstone of responsible tech usage.
Primary Methods for Installing Applications on Your Mac
The majority of applications you’ll install on your Mac will fall into one of three main categories, each with its own installation method. Understanding these distinctions is key to a smooth process.
Method 1: Installing from the Mac App Store
The Mac App Store is Apple’s official marketplace for macOS applications, offering the most secure and straightforward installation method. Apps from the App Store are vetted by Apple, ensuring they meet specific security and performance standards. They also benefit from automatic updates, simplifying maintenance.
The Simplest and Most Secure Approach
Installing from the Mac App Store is ideal for everyday applications, productivity tools, games, and utilities. It offers a centralized location for discovery, purchase, and updates.
Step-by-Step Guide:
- Open the App Store: Click the App Store icon in your Dock or find it in your Applications folder.
- Search for an App: Use the search bar in the top-left corner to find the application you want. You can browse categories or explore featured apps.
- View App Details: Click on an app’s icon to view its description, screenshots, reviews, and system requirements. This is crucial for ensuring the app meets your needs and is compatible with your Mac.
- Initiate Installation:
- For free apps, click the “Get” button, which will change to “Install App.”
- For paid apps, click the price button, which will change to “Buy App.”
- Authenticate: You’ll be prompted to enter your Apple ID password, use Touch ID, or Face ID (if your Mac supports it). This step confirms your identity and authorizes the download.
- Automatic Installation: The app will download and automatically install itself into your Applications folder. A progress indicator will show the download status.
- Launch the App: Once installed, the “Install App” or “Buy App” button will change to “Open.” You can click this to launch the app, or find it in your Applications folder or Launchpad.
When to Use It: The Mac App Store is your first stop for most software needs, particularly for those prioritizing ease of use, security, and automatic updates. Many popular apps, from creativity tools to communication platforms, are available here.
Method 2: Installing from Downloaded .dmg Files (Disk Images)
Many third-party applications not available on the Mac App Store are distributed as .dmg (disk image) files. These files are essentially virtual disks that contain the application and sometimes additional resources. This is arguably the most common method for installing software downloaded directly from a developer’s website.
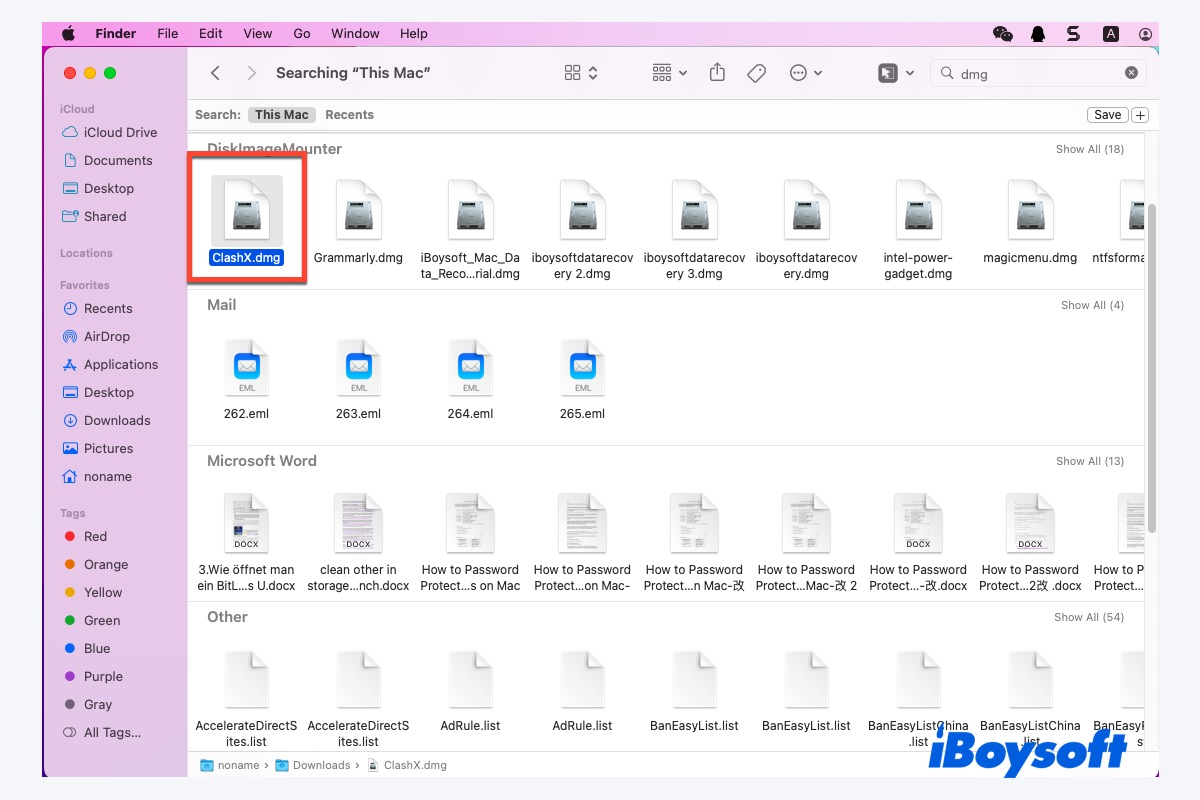
Understanding .dmg Files
A .dmg file acts like a physical CD or DVD drive, but virtually. When you open it, it “mounts” on your desktop, appearing as a new drive icon, revealing its contents.
Step-by-Step Guide:
- Download the .dmg File: Navigate to the software developer’s official website and download the
.dmgfile. Always prioritize official sources to avoid malicious software. - Locate and Open the .dmg: The file will usually be found in your Downloads folder. Double-click the
.dmgfile to open it. - Mount the Disk Image: A new window will appear, often displaying the application icon and an alias to your Applications folder, along with a background image. A disk image icon will also appear on your desktop and in the Finder sidebar.
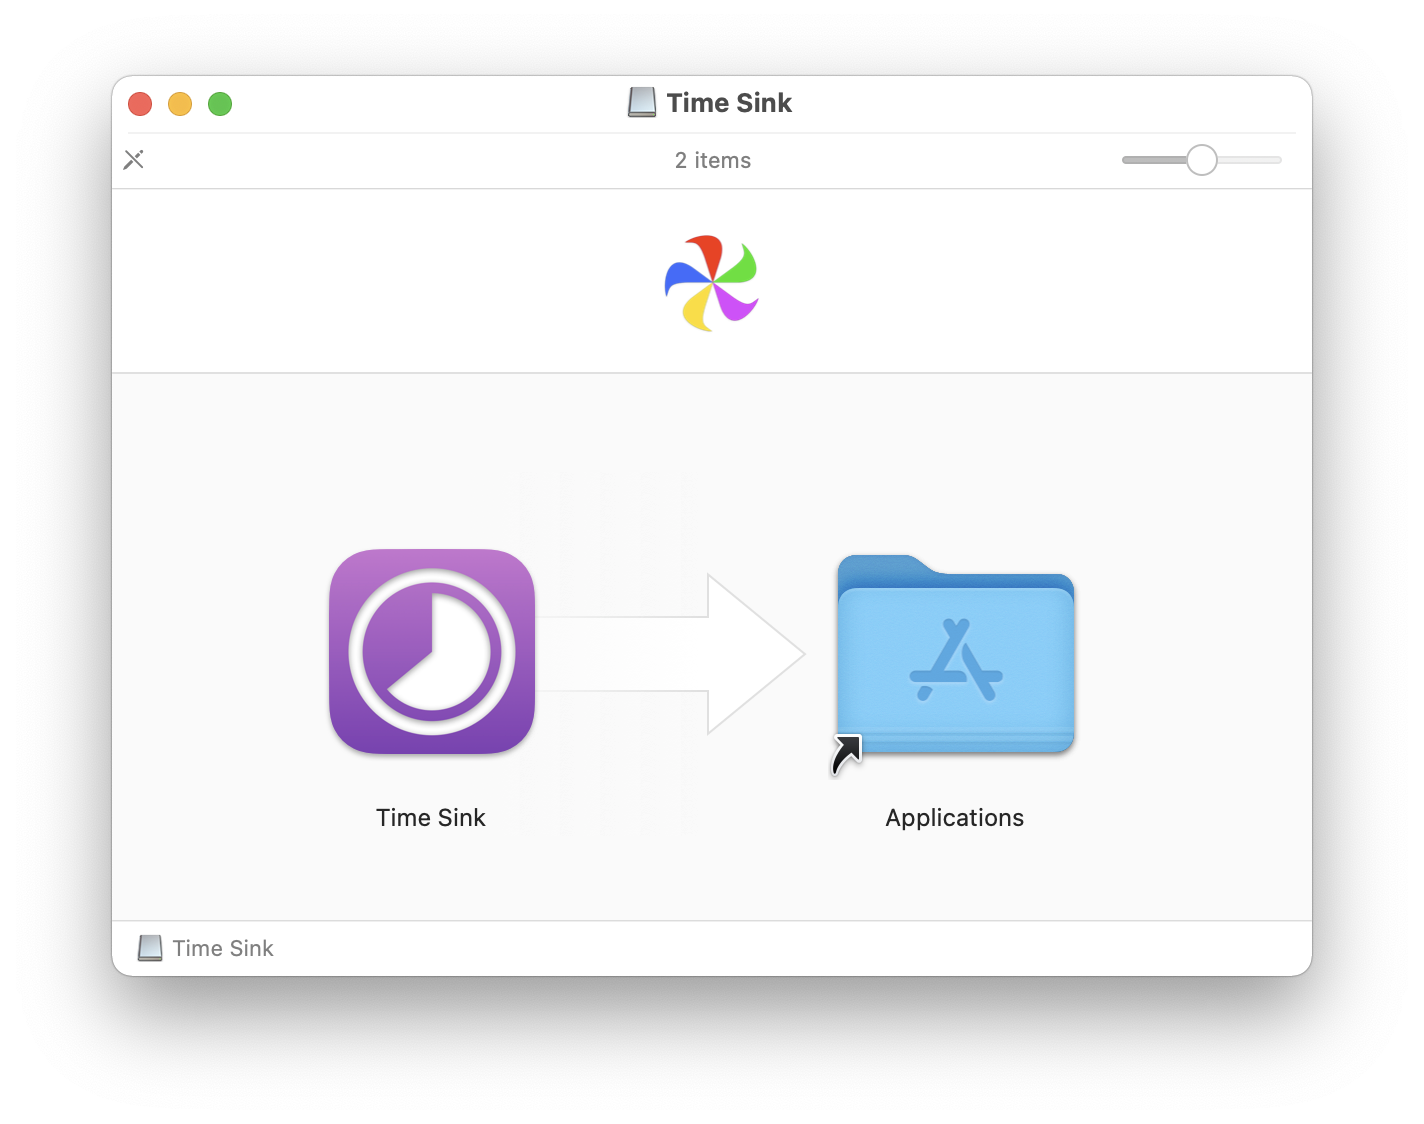
- Install the Application: Drag the application icon from the mounted disk image window directly into your Applications folder. This copies the application bundle to your Mac.
- Eject the Disk Image: Once the copy is complete, drag the disk image icon from your desktop or Finder sidebar to the Trash (the Trash icon will change to an Eject icon). Alternatively, right-click the icon and select “Eject [Disk Image Name].”
- Delete the .dmg File: After successfully installing and ejecting the disk image, you can drag the original
.dmgfile from your Downloads folder to the Trash to free up space. It’s no longer needed. - Launch the App: You can now find the application in your Applications folder or Launchpad and open it. The first time you open it, you might get a Gatekeeper warning (see “Running an Application for the First Time” below).
When to Use It: This method is prevalent for professional software, open-source projects, and niche applications that are not distributed via the Mac App Store. It offers developers greater control over their distribution.
Method 3: Installing from .pkg Files (Installer Packages)
For more complex software, especially those that include multiple components, system extensions, or require specific setup configurations, developers often use .pkg (installer package) files. These are similar to traditional installers found on Windows.
Understanding .pkg Files
A .pkg file launches an installer program that guides you through a wizard-like process. This method is often used for operating system updates, large productivity suites, or utilities that need to install files in multiple locations beyond the standard Applications folder.
Step-by-Step Guide:
- Download the .pkg File: Obtain the
.pkgfile from the official developer’s website. - Open the .pkg File: Double-click the
.pkgfile in your Downloads folder. - Follow the Installer Prompts: A wizard will open, guiding you through the installation process. You will typically:
- Agree to terms and conditions.
- Choose an installation location (usually your main hard drive, but sometimes you can specify a different volume).
- Select custom components if applicable (e.g., specific language packs or plugins).
- Enter your macOS administrator password when prompted. This is necessary because
.pkginstallers often make changes to system files or install components in protected directories.
- Complete the Installation: Once the installer finishes, it will usually notify you of successful completion. You might be prompted to restart your Mac, especially if system-level changes were made.
- Move Installer to Trash: After a successful installation, the installer will often ask if you want to move the installer to the Trash. Click “Move to Trash” to free up space. If it doesn’t, you can manually drag the
.pkgfile from your Downloads folder to the Trash. - Launch the App: The newly installed application will be in your Applications folder, ready to use.
When to Use It: This method is common for large software packages like Adobe Creative Suite applications, Microsoft Office, developer tools, or utilities that integrate deeply with macOS.
Method 4: Other Installation Scenarios
While less common for end-users, there are a couple of other scenarios worth noting:
- Direct Drag-and-Drop: Occasionally, a downloaded file will already be the
.appbundle itself, not encapsulated in a.dmgor.pkg. In this rare case, you simply drag the.appbundle directly into your Applications folder. - Command Line Tools (Homebrew): For developers and advanced users, package managers like Homebrew provide a powerful way to install command-line tools and open-source software. While outside the scope of basic user installation, it represents another layer of the Mac’s tech ecosystem, demonstrating flexibility for those deep into AI tools or software development.
Post-Installation Best Practices and Troubleshooting
Once your program is installed, there are a few final steps and considerations to keep in mind for optimal performance and security.
Running an Application for the First Time
The first time you open an application downloaded from outside the Mac App Store, you might encounter a security prompt from Gatekeeper.
- “Application downloaded from the internet. Are you sure you want to open it?” This is a standard warning. If you downloaded the app from a trusted developer’s official website, click “Open.”
- “App cannot be opened because it is from an unidentified developer.” This means Gatekeeper doesn’t recognize the developer. If you trust the source:
- Go to System Settings (or System Preferences on older macOS versions) > Privacy & Security.
- Scroll down to the “Security” section. You should see a message stating that the app was blocked from opening.
- Click “Open Anyway” or “Allow Anyway” next to the application’s name.
- You’ll be asked to confirm one more time, then the app will open.
- Granting Permissions: Many apps, especially those relating to productivity or digital security, will ask for permission to access parts of your system, like Contacts, Photos, Microphone, Camera, or your Desktop/Documents folders. Always review these requests carefully and grant only the permissions necessary for the app to function. You can manage these permissions later in System Settings > Privacy & Security.
Common Installation Issues and Their Solutions
Even with careful preparation, issues can arise. Here are some common problems and how to address them:
- “Application is damaged and cannot be opened.” This often indicates a corrupted download. Delete the downloaded file and redownload it. Ensure your internet connection is stable during the download. Sometimes, clearing the browser cache can help.
- “App cannot be opened because it is from an unidentified developer.” As explained above, override Gatekeeper in
System Settings > Privacy & Security. Only do this if you absolutely trust the source of the application. - Insufficient Disk Space: If an installation fails due to lack of space, delete unnecessary files, empty your Trash, and restart the installation.
- Application Crashing/Not Launching: Try restarting your Mac. If the problem persists, check the developer’s website for known issues or updates. Reinstalling the application can also resolve corrupted files.
- Stuck Installation: If an installer hangs, you might need to force quit it (Cmd + Option + Esc) and then restart your Mac before attempting the installation again.
- Application Icon with a Circle and Slash: This typically means the application is not compatible with your current macOS version or processor type. Check the app’s system requirements.
Maintaining Your Applications and System Health
Effective software management doesn’t end with installation. Ongoing maintenance is key to a healthy Mac.
- Regular Updates: Always keep your applications updated. Developers frequently release updates that include new features, performance improvements, and crucial security patches. For App Store apps, updates are automatic or easily managed through the App Store. For third-party apps, check for updates via the app’s preferences or the developer’s website. This is a critical aspect of digital security.
- Uninstalling Programs: When an app is no longer needed, uninstall it properly to free up space and prevent leftover files. For most apps (especially those installed via
.dmg), simply dragging the app from the Applications folder to the Trash works. For.pkginstallations, or complex apps, check if the developer provides an uninstaller utility. Third-party uninstallers can also help remove residual files. - Security Best Practices: Only download software from official developer websites or the Mac App Store. Be wary of downloading “cracked” software or from unofficial download sites, as these are common vectors for malware. Regularly backing up your Mac is also a wise precaution.
Conclusion: Empowering Your Mac Experience
Mastering the art of installing programs on your Mac is an essential skill for any user. By understanding the different methods – from the secure confines of the Mac App Store to the versatility of .dmg and .pkg files – you gain control over your digital environment. Following proper preparation, installation, and post-installation practices ensures that your applications run smoothly, your system remains secure, and your overall Mac experience is productive and enjoyable.
As technology continues to evolve, bringing forth new tools and applications, your ability to seamlessly integrate them into your workflow will be a significant asset. With this comprehensive guide, you are now equipped to confidently manage software on your Mac, unlocking its full potential for creativity, productivity, and digital exploration.
aViewFromTheCave is a participant in the Amazon Services LLC Associates Program, an affiliate advertising program designed to provide a means for sites to earn advertising fees by advertising and linking to Amazon.com. Amazon, the Amazon logo, AmazonSupply, and the AmazonSupply logo are trademarks of Amazon.com, Inc. or its affiliates. As an Amazon Associate we earn affiliate commissions from qualifying purchases.