In the intricate world of personal computing, the motherboard often serves as the unsung hero, the central nervous system that orchestrates communication between all components. From the powerful CPU and memory to the high-speed graphics card and storage devices, everything plugs into and interacts via this crucial circuit board. Yet, even the most cutting-edge hardware is only as effective as the software that allows it to communicate with the operating system – and this is where motherboard drivers come into play.
Motherboard drivers are essentially specialized software programs that act as translators. They enable your operating system (like Windows, macOS, or Linux) to understand and interact correctly with the specific hardware components integrated into or connected to your motherboard. Without these drivers, your computer would be akin to a conductor trying to lead an orchestra where the musicians don’t understand the sheet music – chaos, or more likely, complete silence. Missing or outdated drivers can lead to a litany of issues, ranging from minor annoyances like poor audio quality or internet connectivity problems to more severe system instability, performance bottlenecks, and even frequent system crashes or the dreaded Blue Screen of Death (BSOD).
For anyone building a new PC, upgrading components, or troubleshooting an existing system, understanding how to properly install and manage motherboard drivers is an indispensable skill. It’s not just about getting your system to boot; it’s about unlocking its full potential, ensuring optimal performance, enhancing stability, and even bolstering digital security by patching vulnerabilities that older driver versions might possess. This comprehensive guide will walk you through everything you need to know, from identifying your motherboard to installing the correct drivers and troubleshooting common pitfalls.
Preparing for Driver Installation: Essential Pre-requisites
Before you dive into the installation process, a little preparation can save you a significant amount of time and frustration. Proper identification and precautionary steps are key to a smooth driver installation experience.
Identifying Your Motherboard Model
The single most critical piece of information you need is your motherboard’s exact model number. Drivers are highly specific; a driver for an ASUS Z590 board will not work for an MSI B550, even if they share the same chipset generation. There are several reliable ways to pinpoint your motherboard’s identity:
- Physical Inspection: If you built the PC yourself or are comfortable opening the case, the motherboard model is usually printed clearly on the board itself, often near the CPU socket, RAM slots, or PCI-e slots. It might also be on a sticker.
- Using Software Tools: Several free utilities can scan your system and provide detailed hardware information. Popular choices include:
- CPU-Z: A lightweight tool that provides extensive information about your CPU, mainboard (motherboard), memory, and graphics card. Navigate to the “Mainboard” tab to find your manufacturer and model.
- Speccy: Another excellent system information tool from Piriform (makers of CCleaner) that offers a comprehensive overview of your PC’s hardware, including the motherboard details.
- Via Command Prompt (Windows): For a quick check without installing third-party software:
- Press
Win + R, typecmd, and press Enter to open the Command Prompt. - Type
wmic baseboard get product,manufacturer,version,serialnumberand press Enter. - This command will display the manufacturer, product (model), version, and serial number of your motherboard.
- Press
- System Information (Windows):
- Press
Win + R, typemsinfo32, and press Enter. - In the System Information window, look for “BaseBoard Manufacturer” and “BaseBoard Product” to find your motherboard’s details.
- Press
Checking Current Driver Status
Once you know your motherboard model, it’s a good idea to assess the current driver situation. This helps you understand which drivers might be missing or outdated.
- Open Device Manager:
- Press
Win + Xand select “Device Manager” from the power user menu.
- Press
- Look for Warning Signs: In Device Manager, expand the categories. Any device with a yellow exclamation mark indicates a problem – either the driver is missing, corrupted, or incompatible. Devices listed as “Unknown Device” also point to missing drivers.
- Check Driver Versions: You can right-click on a specific device (e.g., your network adapter under “Network adapters”), select “Properties,” and then go to the “Driver” tab. This will show you the currently installed driver version and date. Comparing this to the latest available drivers on your motherboard manufacturer’s website will tell you if an update is needed.
Essential Preparations Before You Begin
Before you start downloading and installing:
- Stable Internet Connection: If you’re downloading drivers, a reliable internet connection is crucial.
- Backup Important Data: While driver installation is generally safe, unforeseen issues can occur. Always back up critical files and documents before making significant system changes. This aligns with good digital security and productivity practices, ensuring your work is safe.
- Create a System Restore Point: This is a lifesaver. A System Restore Point allows you to revert your system to a previous working state if a new driver causes problems.
- Search for “Create a restore point” in the Windows search bar and open it.
- Ensure System Protection is “On” for your main drive (usually C:).
- Click “Create…” and give your restore point a descriptive name (e.g., “Before Motherboard Driver Update”).
- Disable Antivirus Temporarily (Optional): In rare cases, antivirus software can interfere with driver installations, flagging legitimate executables as threats. If you encounter issues, consider temporarily disabling it, but remember to re-enable it immediately after installation.
Step-by-Step: Methods to Install Motherboard Drivers
With your preparations complete, you’re ready to proceed with installing your motherboard drivers. There are several primary methods, each suitable for different scenarios.
Method 1: Using the Manufacturer’s Installation Disc (Legacy Approach)
While less common with modern systems, some new PC builds or older motherboards still come with an installation CD/DVD containing drivers and utilities.
- Insert the Disc: Place the motherboard’s driver disc into your optical drive.
- Run the Installer: The disc should auto-run, presenting you with an installation menu. If not, open “This PC” or “My Computer,” navigate to your optical drive, and look for an
autorun.exeorsetup.exefile. - Follow On-Screen Prompts: The utility will typically offer to install all necessary drivers or allow you to select specific ones. For a fresh installation, installing all essential drivers (Chipset, Audio, LAN, USB, SATA) is a good starting point.
- Restart: After installation, the system will likely prompt you to restart.
- Important Caveat: Drivers on installation discs are almost always outdated. Use this method to get your system to a functional state (especially for network connectivity), but then immediately proceed to Method 2 to download and install the latest versions.
Method 2: Downloading Drivers from the Official Manufacturer’s Website (Recommended)
This is the most reliable and recommended method for obtaining the latest, most optimized drivers for your motherboard. Always prioritize the official manufacturer’s website to ensure authenticity and avoid potentially malicious or incompatible third-party drivers. This is a critical digital security practice.
- Go to Your Motherboard Manufacturer’s Website:
- ASUS:
asus.com - MSI:
msi.com - Gigabyte:
gigabyte.com - ASRock:
asrock.com - Intel:
intel.com(for chipsets on generic boards) - AMD:
amd.com(for chipsets on AMD platform boards)
- ASUS:
- Navigate to the Support/Drivers Section: Look for sections like “Support,” “Downloads,” “Service,” or “Drivers & Utilities.”
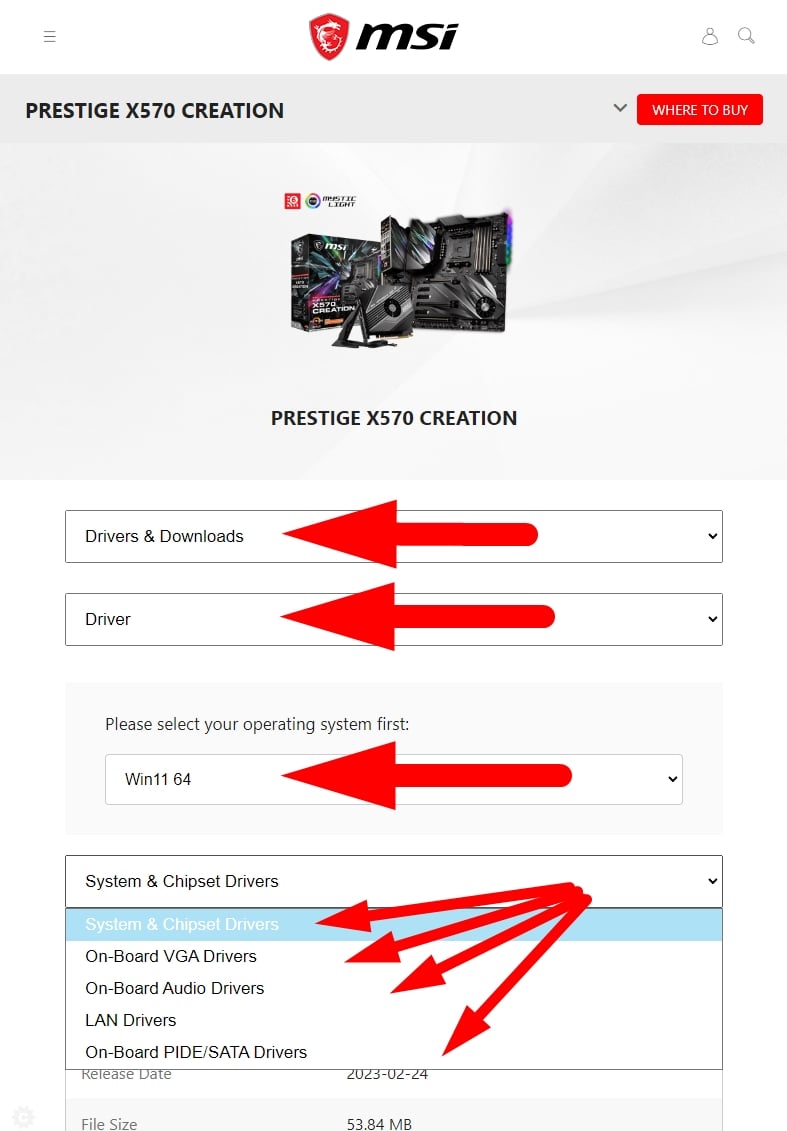
- Enter Your Motherboard Model: Use the exact model number you identified earlier. Most sites have a search bar or a product selector (e.g., “Motherboards” -> “Intel Platform” -> “Z690” -> “Your Specific Model”).
- Select Your Operating System: Crucially, select your specific Windows version (e.g., Windows 11 64-bit, Windows 10 64-bit). The correct OS ensures driver compatibility.
- Identify and Download Essential Drivers: You’ll typically find a list of various drivers. Focus on downloading these core drivers first:
- Chipset Driver: This is paramount as it manages communication between the CPU and other components. Install this first if available.
- LAN/Ethernet Driver: Essential for wired internet connectivity.
- Audio Driver: For sound output and input (e.g., Realtek Audio Driver).
- USB Drivers: For USB functionality (sometimes part of the chipset or separate, especially for specific controller versions).
- SATA/AHCI Drivers: For optimal storage drive performance (often included in chipset).
- Optional Drivers: Consider others like Wi-Fi/Bluetooth (if integrated), RAID (if using a RAID setup), specific utility drivers, or firmware updates.
- Download and Extract: Download the driver files. They are usually compressed in ZIP or RAR format. Extract them to a recognizable folder on your desktop (e.g., “Motherboard Drivers”).
- Installation Process:
- Open the extracted driver folder.
- Look for an
install.exe,setup.exe, ordriver.exefile. - Run the executable. Follow the on-screen installation wizard.
- Most drivers will prompt you to restart after installation.
- Installation Order: While not always strictly necessary for all drivers, it’s good practice to install the Chipset driver first, then LAN/Ethernet, then Audio, and then any other specific device drivers. This ensures the foundational communication layers are established.
Method 3: Installing via Device Manager (Manual or “Have Disk” Method)
This method is particularly useful when you have already downloaded the driver files, or when Windows isn’t automatically detecting a device, and you want to point it directly to the driver’s location.
- Extract Drivers: Ensure you have extracted the downloaded driver files to an easily accessible folder.
- Open Device Manager: (Win + X > Device Manager).
- Locate the Device:
- If the driver is missing, you’ll see a yellow exclamation mark next to the device or it might be listed under “Other devices” as an “Unknown device.”
- If you’re updating an existing driver, find the specific device under its category (e.g., “Network adapters,” “Sound, video and game controllers”).
- Update Driver Software: Right-click on the device and select “Update driver” or “Update driver software.”
- Choose “Browse my computer for drivers”: This option allows you to manually specify the location of the driver files.
- Browse to the Driver Folder: Click “Browse” and navigate to the folder where you extracted the driver files. Ensure “Include subfolders” is checked.
- Click “Next”: Windows will scan the specified folder and its subfolders for compatible drivers. If found, it will install them.
- Restart: If prompted, restart your computer.
Method 4: Utilizing Windows Update (for Basic Functionality)
Windows Update can automatically download and install some drivers, especially for common components. While convenient, it often provides generic or slightly older versions, not always the latest or most feature-rich drivers from the manufacturer.
- Check for Updates:
- Go to
Settings(Win + I). - Select
Windows Update(orUpdate & Security>Windows Updateon older Windows versions). - Click “Check for updates.”
- Go to
- View Optional Updates: After checking, Windows might list “Optional updates” or “View optional updates.” Click on this to see if any driver updates are available. You can select the ones you wish to install.
- Install Updates: Allow Windows to download and install the chosen updates.
- Restart: Restart your system if prompted.
This method is useful for quickly getting basic functionality or for devices where the manufacturer doesn’t provide frequently updated drivers. However, for critical drivers like the chipset or high-performance components, manually downloading from the manufacturer’s website is generally preferred for optimal performance and stability.
Post-Installation and Verification
Once you’ve installed your drivers, a few final steps ensure everything is working correctly and your system is protected.
Restart Your System
Even if not explicitly prompted, it’s always a good practice to restart your computer after installing new drivers. This allows the operating system to fully integrate the new software and load the drivers correctly, ensuring all changes take effect.
Verifying Driver Installation
After restarting, confirm that the drivers are indeed installed and functioning as expected.
- Device Manager Check: Revisit Device Manager (Win + X > Device Manager). Look for any yellow exclamation marks. All devices should be recognized and functioning normally without any warnings. You can also right-click on specific devices, go to “Properties” > “Driver” tab, and verify the driver version and date to ensure the correct, updated driver is active.
- System Stability: Observe your system for any signs of instability, such as crashes, freezes, or unusual behavior.
- Test Functionality: Check the specific functionalities that the drivers govern. For example, test your internet connection (LAN driver), play some audio (audio driver), and plug in a USB device (USB driver).
Creating a System Restore Point (After Successful Installation)
Now that your system is in a stable, optimized state with the correct drivers, it’s an excellent time to create another System Restore Point. This acts as a reliable rollback point if any future updates or installations cause issues, effectively preserving your current, functional configuration.
Troubleshooting Common Motherboard Driver Issues and Best Practices
Even with careful preparation, you might encounter issues during or after driver installation. Knowing how to troubleshoot and adhere to best practices can save you a lot of headache.
Common Installation Problems
- Driver Not Found or Compatible: You downloaded the wrong driver (incorrect motherboard model, wrong OS version) or the driver package is corrupt.
- Installation Errors: Windows reports an error during installation, or the setup utility crashes.
- System Instability After Installation: New drivers cause crashes, freezes, or performance degradation. This might indicate an incompatible or corrupted driver.
- Blue Screen of Death (BSOD): A critical error caused by a faulty driver can lead to a BSOD, often with a message indicating the problematic driver file.
Troubleshooting Steps
- Re-download from Official Source: If you suspect a corrupt download or incorrect driver, re-download the driver package directly from the manufacturer’s website, double-checking your motherboard model and OS version.
- Run as Administrator: Right-click the driver setup file and select “Run as administrator” to ensure it has the necessary permissions.
- Install in Compatibility Mode: If you’re installing an older driver on a newer OS (or vice-versa), right-click the setup file, go to “Properties” > “Compatibility” tab, and try running it in compatibility mode for an older Windows version.
- Roll Back Driver (Device Manager): If a new driver causes issues, you can revert to the previous one:
- Open Device Manager.
- Right-click the problematic device.
- Select “Properties” > “Driver” tab.
- Click “Roll Back Driver.” If this option is grayed out, Windows doesn’t have a previous driver to revert to.
- Use System Restore: If rolling back isn’t an option or the issue is system-wide, use the System Restore Point you created before installation to revert your system to its previous state.
- Check Event Viewer: The Windows Event Viewer (search
eventvwr) can provide detailed logs of system errors, including those related to driver installations, which can help diagnose the root cause. - Seek Manufacturer Support/Online Forums: If all else fails, consult your motherboard manufacturer’s support resources or popular tech forums. Describe your issue in detail, including your motherboard model, OS, and what steps you’ve already taken.
Best Practices for Driver Management
- Always Download from Official Sources: This cannot be stressed enough. Third-party driver download sites are risky and can lead to malware, incompatible drivers, or unstable systems. Prioritize official manufacturer websites.
- Keep a Local Backup: Once you have a stable set of drivers for your specific motherboard, consider backing up the extracted driver folders to an external drive or cloud storage. This can be invaluable for future clean installations or troubleshooting without internet access.
- Update Drivers Judiciously: While important, constant driver updates are not always necessary. If your system is stable and performing well, the old adage “if it ain’t broke, don’t fix it” often applies. Prioritize updates for critical drivers (chipset, LAN, GPU) that address security vulnerabilities, significant performance improvements, or compatibility issues with new software/hardware.
- Understand Driver Importance: Focus on ensuring core motherboard drivers (chipset, audio, LAN) are up-to-date. These form the bedrock of your system’s stability.
- Regular System Maintenance: Coupled with driver management, regularly cleaning your system, running antivirus scans, and monitoring hardware temperatures contribute to a healthy, productive PC environment.
Conclusion: Empowering Your PC’s Foundation
Installing motherboard drivers might seem like a daunting task, but it’s a fundamental aspect of maintaining a healthy, high-performing computer. By understanding what these drivers do, meticulously identifying your hardware, and following the recommended installation and troubleshooting steps, you empower yourself to resolve common system issues and unlock the full potential of your PC.
Proper driver management ensures system stability, maximizes component performance, and contributes to overall digital security. It’s an investment of time that pays dividends in terms of a smooth, reliable, and productive computing experience. With this guide, you now possess the knowledge to confidently manage the foundation of your computer, ensuring all its components work in perfect harmony.
aViewFromTheCave is a participant in the Amazon Services LLC Associates Program, an affiliate advertising program designed to provide a means for sites to earn advertising fees by advertising and linking to Amazon.com. Amazon, the Amazon logo, AmazonSupply, and the AmazonSupply logo are trademarks of Amazon.com, Inc. or its affiliates. As an Amazon Associate we earn affiliate commissions from qualifying purchases.