In a world increasingly dominated by a handful of proprietary operating systems, Linux stands as a beacon of freedom, flexibility, and unparalleled power. For many, the journey into the Linux ecosystem begins with a simple, yet profoundly impactful step: installing it. While there are various methods to bring Linux onto your machine, installing it from a USB drive remains one of the most popular, efficient, and user-friendly approaches. This guide will walk you through every stage of the process, transforming your computer into a versatile platform powered by the open-source spirit.
Linux isn’t just an operating system; it’s a philosophy, a vibrant community, and a toolkit for everyone from casual users to seasoned developers. Its open-source nature fosters continuous innovation, robust security, and a level of customization that commercial alternatives simply cannot match. Whether you’re looking to revitalize an old laptop, enhance your digital security, dive into programming, or simply explore an alternative computing experience, installing Linux from a USB offers a gateway to these possibilities.
This tutorial is designed to be accessible to newcomers while providing sufficient detail for those seeking a deeper understanding. We’ll cover everything from selecting your ideal Linux distribution to navigating the installation wizard, ensuring you have a smooth and successful transition. By the end, you’ll not only have Linux running on your machine but also a clearer appreciation for the technical freedom it represents, aligning perfectly with the core tenets of technology exploration and productivity that our platform champions.
Why Choose Linux? Unlocking a World of Possibilities
Before we dive into the technicalities, it’s worth understanding why millions of users worldwide choose Linux. This operating system, which underpins everything from Android smartphones and smart TVs to the majority of the world’s web servers and supercomputers, offers a compelling array of benefits that resonate strongly with our focus on technology trends, digital security, and productivity.
The Linux Advantage: Performance, Security, and Customization
One of the most immediate benefits of Linux is its performance. Many distributions are lightweight and designed to run efficiently, even on older hardware, breathing new life into machines that might struggle with more resource-intensive operating systems. This isn’t just about speed; it’s about making technology accessible and extending the lifecycle of your gadgets, a savvy approach to both tech and personal finance (reducing upgrade costs).
Digital Security is another cornerstone of the Linux experience. Due to its open-source nature, the code is constantly scrutinized by a global community of developers, making vulnerabilities quicker to identify and patch. Furthermore, the architecture of Linux generally makes it less susceptible to the widespread malware and viruses that plague other operating systems. This inherent security offers peace of mind, especially in an era where cyber threats are ever-present, directly addressing our digital security concerns.
For those interested in productivity and AI tools, Linux offers an unparalleled environment. It’s the preferred operating system for developers, data scientists, and engineers due to its robust command-line interface, powerful scripting capabilities, and native support for a vast array of programming languages and development tools. Many cutting-edge AI frameworks and machine learning libraries are first developed and optimized for Linux, putting you at the forefront of technological innovation. Beyond niche applications, Linux offers a plethora of free and open-source alternatives to proprietary software, from office suites (LibreOffice) to graphic design tools (GIMP), enhancing productivity without incurring additional software costs – a significant “Money” advantage.
Finally, Customization is where Linux truly shines. Unlike other operating systems that dictate how your desktop should look and function, Linux gives you complete control. From choosing your desktop environment (GNOME, KDE Plasma, XFCE, etc.) to tweaking every visual element and shortcut, you can tailor your system precisely to your workflow and aesthetic preferences. This level of personalization not only makes your computer feel truly yours but also allows for optimization that directly impacts your productivity and user experience.
Is Linux Right for You?
Considering these advantages, Linux is an excellent choice for:
- Students and Developers: Providing a powerful, flexible, and free development environment.
- Users Concerned with Privacy and Security: Offering a robust and community-vetted security model.
- Budget-Conscious Individuals: Eliminating software licensing costs for the OS and many applications.
- Users with Older Hardware: Revitalizing machines that struggle with modern commercial OS performance.
- Anyone Seeking Greater Control and Customization: Enabling a truly personalized computing experience.
If any of these resonate with your computing needs and interests, then installing Linux from USB is your next exciting step.
Preparing for Your Linux Journey: What You’ll Need
Embarking on a Linux installation is straightforward, but a little preparation goes a long way. Gathering the necessary tools and understanding some key concepts beforehand will ensure a smooth and successful experience.
Selecting Your Linux Distribution (Distro)
The first and arguably most crucial decision is choosing your Linux distribution, or “distro.” There isn’t just one Linux; there are hundreds, each with its own philosophy, default software, and target audience. For beginners, some popular and highly recommended options include:
- Ubuntu: Widely recognized, user-friendly, and boasting a massive community and extensive documentation. Great for first-timers.
- Linux Mint: Based on Ubuntu, offering a more traditional desktop experience that many Windows users find familiar. Known for its stability and ease of use.
- Fedora: A cutting-edge, community-driven distribution known for integrating the latest open-source technologies. A good choice for those who want a more up-to-date experience.
- Pop!_OS: A polished, Ubuntu-based distro from System76, optimized for developers and gamers, offering excellent out-of-the-box hardware support, especially for NVIDIA GPUs.
Consider your priorities: ease of use, hardware compatibility, specific software needs, or a desire for the latest features. A quick online search for “best Linux distro for beginners” can provide more insights, often including video reviews and comparisons that fall under our “Tech Reviews” umbrella.
Gathering Your Essential Tools
Once you’ve picked your distro, it’s time to assemble your toolkit:
- A USB Flash Drive (8GB or larger): This will be your bootable installer. Ensure it’s empty or contains no critical data, as it will be completely erased during the process. USB 3.0 or higher is recommended for faster read/write speeds, reducing installation time.
- Your Chosen Linux Distribution’s ISO Image: This is the installation file for your selected distro. You’ll download this from the official website of the distribution. Always download from the official source to ensure authenticity and security.
- A USB Creation Tool: Software used to “burn” the ISO image onto your USB drive, making it bootable. Popular choices include:
- Rufus (Windows only): Fast, reliable, and feature-rich.
- Etcher (Balena Etcher – Windows, macOS, Linux): Simple, intuitive, and cross-platform. Highly recommended for beginners.
- Ventoy (Windows, Linux): Allows you to put multiple ISOs on a single USB drive and boot from any of them without reformatting. Great for testing multiple distros.
- An Internet Connection: Essential for downloading the ISO image and highly recommended during the installation process for updates and additional software.
- Your Target Computer: The PC or laptop where you intend to install Linux.
- Optional: External Hard Drive for Backup: While not strictly mandatory for installation, backing up your data is a critical safeguard.
Backing Up Your Data: A Critical First Step
This cannot be stressed enough: ALWAYS BACK UP YOUR IMPORTANT DATA before making any changes to your hard drive, especially when installing a new operating system. This is a non-negotiable step that can save you immense heartache. Whether you’re dual-booting (installing Linux alongside Windows) or completely replacing your current OS, there’s always a small risk of data loss.
Copy all your essential documents, photos, videos, and other files to an external hard drive, cloud storage, or another safe location. This simple act of foresight aligns with responsible digital security and personal finance practices, protecting your valuable digital assets.
Crafting Your Bootable USB Drive
With your distro chosen and tools gathered, the next phase involves preparing the USB drive that will facilitate the Linux installation. This process transforms a standard flash drive into a powerful installer capable of booting your computer into the Linux environment.
Downloading the Linux ISO Image
Navigate to the official website of your chosen Linux distribution (e.g., ubuntu.com, linuxmint.com, getfedora.org). Look for a “Download” section. You’ll typically find several versions or desktop environments. For beginners, stick to the recommended stable release. The file you’ll download will have a .iso extension. These files can be several gigabytes in size, so ensure you have a stable internet connection.
After downloading, it’s good practice to verify the integrity of the ISO file. Most official download pages provide MD5, SHA256, or SHA512 checksums. You can use a utility on your current operating system to calculate the checksum of your downloaded ISO and compare it to the one on the website. This step, while optional, ensures that your downloaded file is not corrupted and hasn’t been tampered with, adding another layer of digital security.
Choosing the Right USB Creator Tool
As mentioned, several tools can create a bootable USB. For simplicity and cross-platform compatibility, Balena Etcher is often recommended for beginners.
- Balena Etcher: Download it from balena.io/etcher. It has a clean, three-step interface that makes the process almost foolproof.
- Rufus (Windows): If you’re on Windows and prefer more control, Rufus (rufus.ie) is an excellent choice. It offers various options for partition schemes and file systems.
- Ventoy (Windows/Linux): For advanced users or those who want to carry multiple OS installers on one USB, Ventoy (ventoy.net) is revolutionary. You install Ventoy once to your USB, then simply copy ISO files directly to it – no re-flashing needed for each new ISO.
For this guide, we’ll focus on the general steps applicable to most tools, with a nod to Etcher’s user-friendliness.
The Step-by-Step Process of Creating the Bootable Drive
- Insert your USB drive: Plug your empty (or backed-up) USB flash drive into an available port on your computer.
- Launch your USB Creator Tool: Open Etcher, Rufus, or Ventoy.
- Select your ISO image:
- In Etcher, click “Flash from file” and navigate to where you saved your downloaded
.isofile. - In Rufus, click the “SELECT” button next to “Boot selection” and choose your
.isofile.
- In Etcher, click “Flash from file” and navigate to where you saved your downloaded
- Select your USB drive:
- In Etcher, click “Select target” and carefully choose your USB drive from the list. Double-check this step to ensure you’re not accidentally selecting an internal hard drive, which would lead to data loss.
- In Rufus, ensure your USB drive is selected under “Device.”
- Start the writing process:
- In Etcher, click “Flash!”.
- In Rufus, click “START.” You might be prompted about an internet connection for downloading additional files (like Syslinux or GRUB); allow it if necessary. Confirm any warnings about data being erased on the USB drive.
- Wait for completion: The tool will now write the ISO image to your USB drive. This process can take anywhere from a few minutes to half an hour, depending on the speed of your USB drive, port, and computer.
- Eject the USB drive: Once the process is complete (Etcher will typically validate the write), safely eject the USB drive from your computer. It is now a bootable Linux installer.
You’ve successfully created your Linux installation media! The hard part is over, and the exciting phase of bringing Linux to life on your machine awaits.
The Installation Process: Bringing Linux to Life
With your bootable USB ready, it’s time to install Linux on your target computer. This involves booting from the USB drive and then navigating the intuitive installation wizard provided by your chosen distribution.
Booting from Your USB Drive
This is often the trickiest part for newcomers, as it requires interacting with your computer’s firmware (BIOS or UEFI).
- Restart Your Computer: With the bootable USB drive inserted, restart your computer.
- Access the Boot Menu or BIOS/UEFI Settings: As your computer starts up, you’ll need to press a specific key repeatedly to enter either the Boot Menu or the BIOS/UEFI Setup Utility. Common keys include:
- Boot Menu: F2, F10, F12, Esc
- BIOS/UEFI Setup: Del, F1, F2, F10
The exact key varies by manufacturer (Dell, HP, Lenovo, ASUS, Acer, etc.). Look for a message on the screen during startup, or consult your computer’s manual/manufacturer’s website.
- Select the USB Drive to Boot From:
- If you accessed the Boot Menu: You’ll see a list of bootable devices. Select your USB drive (it might be listed by its brand name, “USB HDD,” or “UEFI: [USB Drive Name]”).
- If you accessed BIOS/UEFI Setup: Navigate to the “Boot” tab or section. You might need to change the boot order to prioritize USB devices, or disable “Secure Boot” and enable “CSM” (Compatibility Support Module) if you encounter issues, especially with older Linux versions or specific hardware. Save your changes and exit, which will restart your computer.
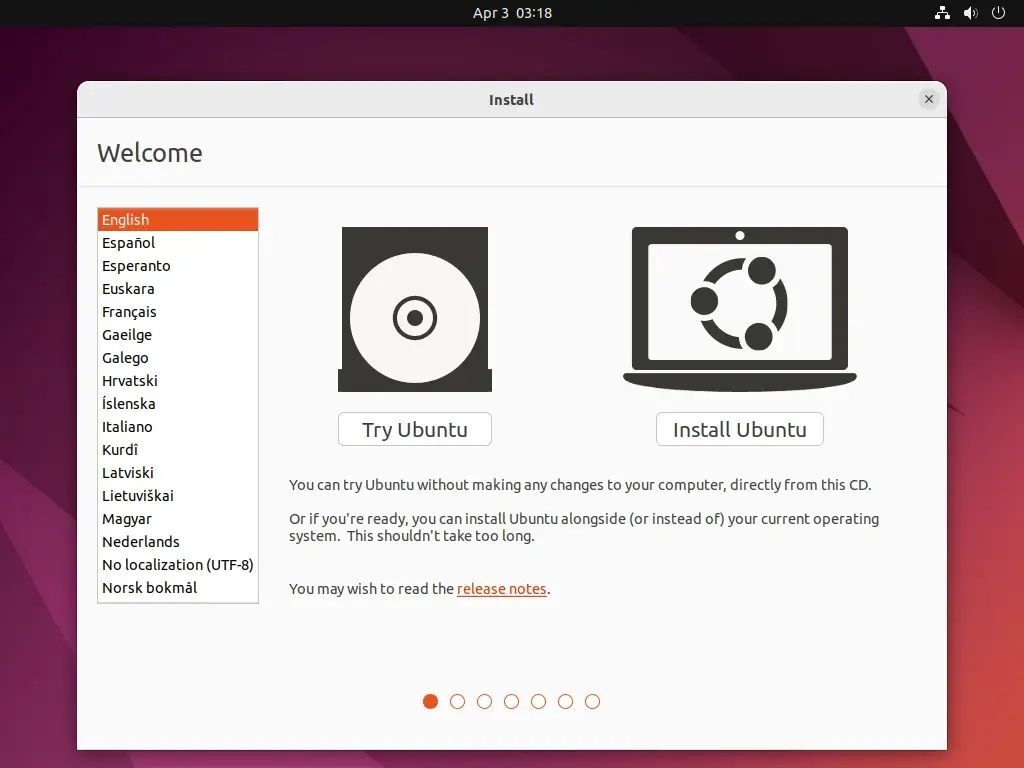
- Enter the Linux Live Environment: If successful, your computer will boot from the USB drive, and you’ll typically be presented with a GRUB boot menu for your Linux distro. Here, you usually have two main options:
- “Try Ubuntu/Linux Mint/Fedora without installing”: This boots into a fully functional live environment of the OS, running entirely from the USB. It’s excellent for testing hardware compatibility, exploring the desktop environment, and ensuring everything works before committing to an installation.
- “Install Ubuntu/Linux Mint/Fedora”: This starts the installation wizard directly.
It’s generally recommended to “Try” first to ensure Wi-Fi, graphics, and other peripherals are recognized. If everything seems fine, you can usually launch the installer from within the live environment (there’s often an “Install” icon on the desktop).
Navigating the Linux Installer
The installation wizard for most beginner-friendly distributions like Ubuntu or Linux Mint is highly intuitive:
-
Language Selection: Choose your preferred language.
-
Keyboard Layout: Select your keyboard layout.
-
Network Connection: Connect to a Wi-Fi network or plug in an Ethernet cable. This allows the installer to download updates and third-party drivers during the installation, improving post-install experience.
-
Updates and Other Software:
- “Install third-party software for graphics and Wi-Fi hardware, and additional media formats”: Highly recommended to check this box, as it ensures better hardware support and multimedia playback.
- “Download updates while installing”: Also recommended, as it saves time after the installation is complete.
-
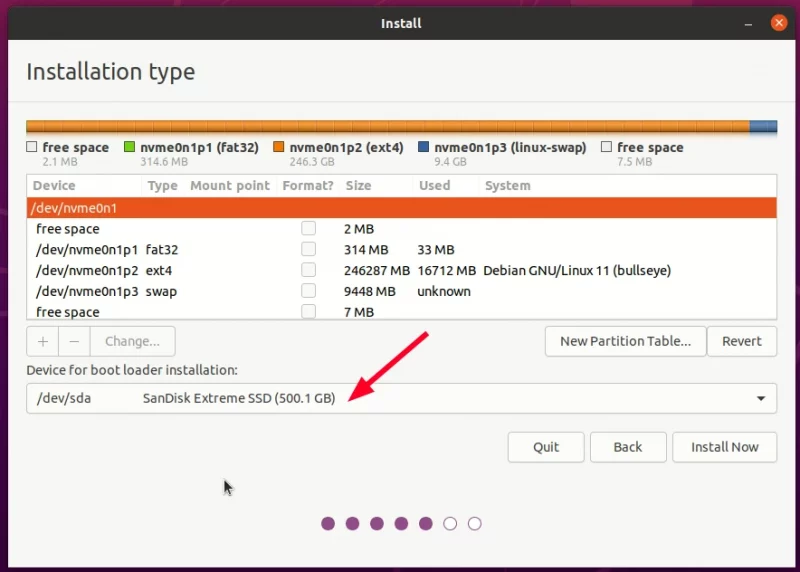
Installation Type (Disk Partitioning Strategies): This is the most critical step. Be extremely careful here.
- “Erase disk and install Linux”: This option will delete everything on your hard drive and install Linux. Only choose this if you’ve backed up your data and want Linux to be the only operating system on your machine.
- “Install Linux alongside Windows Boot Manager” (Dual-boot): If you want to keep your existing Windows installation, this option will automatically shrink your Windows partition and create space for Linux. This is the easiest way to dual-boot for beginners.
- “Something else” (Manual Partitioning): This option gives you full control over partitioning. It’s recommended for experienced users or those with specific partitioning needs (e.g., separate
/homepartition, LVM, encryption).- For a typical setup, you’ll need at least a root partition (
/, typically 20-30GB or more), a swap partition (equal to or double your RAM, or a swap file), and optionally a separate/homepartition for your user data (highly recommended for easier reinstallation later). You might also need an EFI System Partition (ESP) if your system uses UEFI and doesn’t already have one.
- For a typical setup, you’ll need at least a root partition (
If dual-booting, ensure you select the correct drive if you have multiple drives installed.
-
Location and Time Zone: Select your geographical location for accurate time zone settings.
-
User Setup:
- Enter your name.
- Choose a computer name.
- Pick a username.
- Create a strong password (this is your admin password for system changes).
- Choose whether to log in automatically or require a password at startup. Requiring a password is a better digital security practice.
-
Begin Installation: Once you confirm these details, the installation will begin. Files will be copied, and the system configured. This can take 15-30 minutes or more.
-
Restart: When the installation is complete, you’ll be prompted to restart your computer. Remove the USB drive when prompted (or before it reboots to avoid booting from it again).
Congratulations! Your computer should now boot into your newly installed Linux system.
Post-Installation: Optimizing Your New Linux System
Installing Linux is just the beginning of your journey. To ensure a smooth, secure, and productive experience, a few post-installation steps are highly recommended. These steps will help you integrate your new OS into your daily workflow, enhancing its performance and security.
Updating Your System and Installing Drivers
The very first thing you should do after booting into your new Linux system is to update it. The ISO image you downloaded might not contain the absolute latest software versions, and updates often include crucial security patches and bug fixes.
-
Open a Terminal: This is a fundamental tool in Linux. You can usually find it in your applications menu by searching for “Terminal” or pressing
Ctrl + Alt + T. -
Run Update Commands: Enter the following commands, pressing Enter after each. You’ll be prompted for your password for the
sudo(superuser do) command.sudo apt update sudo apt upgrade sudo apt dist-upgrade(For Fedora/Red Hat-based systems, use
sudo dnf update.)
These commands refresh the list of available packages, download new versions, and install them, ensuring your system is fully up-to-date. -
Install Proprietary Drivers (if needed): If you have specific hardware like NVIDIA graphics cards or certain Wi-Fi adapters, you might need proprietary drivers for optimal performance.
- Ubuntu/Mint: Look for “Drivers” or “Additional Drivers” in your system settings (sometimes found under “Software & Updates”). This utility can detect proprietary hardware and recommend drivers.
- Fedora: You might need to enable third-party repositories (like RPM Fusion) and install drivers via the terminal. Consult your distro’s documentation for specific instructions.
Proper driver installation ensures peak performance for your “gadgets” and a smooth user experience, especially for gaming or graphic-intensive tasks.
Essential Software Recommendations
Linux offers a vast ecosystem of software, much of it free and open-source. Here are some immediate recommendations to get you started:
- Web Browser: Most distros come with Firefox. Google Chrome is also readily available as a
.deb(for Ubuntu/Mint) or.rpm(for Fedora) package from Google’s website. - Office Suite: LibreOffice is the default for most distros and is a powerful, free alternative to Microsoft Office, covering word processing, spreadsheets, presentations, and more.
- Media Player: VLC Media Player is a cross-platform favorite for its ability to play almost any audio or video format.
- Email Client: Thunderbird (Mozilla) is a popular, full-featured email client.
- Cloud Storage: Install clients for your preferred cloud services like Dropbox, Google Drive (often integrated via GNOME Online Accounts), or Mega.
- Image Editor: GIMP (GNU Image Manipulation Program) is a free and powerful alternative to Photoshop.
- Code Editors: If you’re into programming or web development, Visual Studio Code (VS Code) and Sublime Text are excellent cross-platform choices with great Linux support.
- Package Managers: Explore your distro’s software center (e.g., “Software” in Ubuntu, “Software Manager” in Mint) for thousands of additional applications. Command-line package managers (
apt,dnf,pacman) offer even more control and options.
These “Apps” and “AI Tools” (many data science and AI tools are Linux-native) will quickly transform your new Linux system into a highly productive workstation.
Customizing Your Desktop Environment
One of Linux’s greatest strengths is its customizability. Your desktop environment (GNOME, KDE Plasma, XFCE, Cinnamon, MATE, LXQt, etc.) dictates the look and feel of your system.
- Themes and Icons: Most desktop environments allow you to easily change themes, icon sets, and fonts through their system settings.
- Widgets/Plasmoids (KDE Plasma): Add useful widgets to your desktop for quick access to information or tools.
- Extensions (GNOME): GNOME Shell Extensions can add significant functionality and visual flair to the GNOME desktop.
- Terminal Customization: For advanced users, customizing your terminal with tools like Zsh, Oh My Zsh, and powerline fonts can greatly enhance productivity and aesthetics.
- Wallpapers: Of course, personalize your background with an image that reflects your style.
Spend some time exploring the customization options available in your chosen desktop environment. Tailoring your workspace to your preferences not only makes it more enjoyable to use but can also boost your overall “productivity” by creating an environment that feels natural and efficient. This personal touch also aligns with the concept of “Personal Branding” – your digital workspace reflecting your identity.
Conclusion
Installing Linux from a USB drive is a straightforward process that unlocks a world of technological possibility. From the initial decision of choosing your ideal distribution to the final steps of customizing your desktop, each stage empowers you with greater control over your computing experience. You’ve navigated the technicalities of creating a bootable drive, successfully installed a robust operating system, and taken the first steps towards optimizing it for your needs.
Embracing Linux means choosing performance, security, and unparalleled customization. It’s a strategic move for anyone keen on staying abreast of “Technology Trends,” safeguarding their “Digital Security,” and maximizing “Productivity” without incurring prohibitive costs, reflecting a smart approach to “Money” and “Software” management.
Now that Linux is running on your machine, the real adventure begins. Explore its vast software ecosystem, delve into the command line, join online communities for support and inspiration, and discover why millions consider Linux to be the ultimate computing platform. Your journey into the open-source world is just getting started, and with this comprehensive guide, you’re well-equipped to make the most of it. Welcome to Linux – the future of computing, reimagined by you.
aViewFromTheCave is a participant in the Amazon Services LLC Associates Program, an affiliate advertising program designed to provide a means for sites to earn advertising fees by advertising and linking to Amazon.com. Amazon, the Amazon logo, AmazonSupply, and the AmazonSupply logo are trademarks of Amazon.com, Inc. or its affiliates. As an Amazon Associate we earn affiliate commissions from qualifying purchases.