In today’s digital landscape, our computers are more than just tools; they are extensions of our professional aspirations, creative outlets, and personal lives. For macOS users, the elegance and efficiency of the Apple ecosystem are a significant draw, but getting started with new applications can sometimes seem daunting, especially if you’re transitioning from another operating system or are new to the platform. Whether you’re looking to enhance your productivity with a new suite of office tools, unleash your creativity with advanced design software, or protect your digital assets with robust security solutions, knowing how to properly and securely install software on your Mac is a fundamental skill.
This comprehensive guide will demystify the process, walking you through every major method of software installation on macOS. We’ll cover everything from the simplicity of the Mac App Store to the versatility of disk images and installer packages, even venturing into advanced techniques for power users. Beyond mere installation, we’ll equip you with best practices for digital security, explore the financial implications of software choices, and highlight how a well-managed software library contributes to both your personal brand and overall tech proficiency. By the end of this article, you’ll not only be able to install any application with confidence but also understand the underlying principles that ensure your Mac remains fast, secure, and perfectly tailored to your needs.
The Foundation: Understanding the macOS Software Ecosystem
Before diving into the mechanics of installation, it’s crucial to grasp the philosophy behind macOS software distribution. Apple has meticulously crafted an environment designed for user-friendliness, security, and performance. Unlike some operating systems where software acquisition can be a free-for-all, macOS guides users towards trusted channels, employing various mechanisms to protect against malicious software and ensure system stability. This ecosystem is a cornerstone of Apple’s brand identity, emphasizing reliability and a seamless user experience.
Why Mac Software Installation Differs from Other Operating Systems
For those coming from a Windows or Linux background, the Mac approach might seem subtly different. Windows primarily uses .exe (executable) files, which can be direct installers or portable applications. Linux relies heavily on package managers (like apt, yum, dnf) and repository systems, alongside direct compilation from source code. macOS, while offering some similarities, introduces its own unique methodologies.
The most noticeable difference lies in the concept of “Bundles.” Most macOS applications are self-contained bundles, meaning the application, its resources, and all necessary files are packaged into a single .app directory. This simplifies uninstallation (often just dragging to the Trash) and makes applications feel more robust and less prone to fragmented files across the system. This architectural choice significantly contributes to the renowned stability and ease of use associated with Apple’s technology. Understanding this underlying structure helps clarify why certain installation methods are prevalent and why others are less common.
The Importance of a Secure Installation Process
In an era rife with cyber threats, from ransomware to sophisticated phishing scams, digital security is paramount. Every piece of software you install introduces potential vulnerabilities if not acquired from a reputable source. Malicious software, often disguised as legitimate applications, can compromise your personal data, financial information, and even your digital identity. This concern transcends personal finance, impacting the security of online income streams, business operations, and the integrity of your professional brand.
macOS incorporates several security features, such as Gatekeeper and notarization, to scrutinize downloaded software. However, these are not foolproof. User vigilance remains the first line of defense. By sticking to recommended installation methods and exercising caution with untrusted sources, you actively protect your digital life, ensuring that your valuable data remains private and your Mac operates without compromise. A secure installation process isn’t just a technical step; it’s an investment in your digital safety and peace of mind.
Your Primary Channels for Software Installation
The vast majority of software installations on a Mac will fall into one of three main categories. Each method offers distinct advantages and is suited for different types of applications. Familiarity with these core channels will make installing virtually any Mac application a breeze.
The Mac App Store: Simplicity and Security
The Mac App Store is Apple’s curated digital marketplace, offering the most straightforward and secure way to acquire software. Launched in 2011, it mirrors the success of the iOS App Store, providing a centralized platform for discovering, purchasing, and installing applications. For users prioritizing ease of use and maximum security, the App Store is the go-to choice.
How to Install Software from the Mac App Store:
- Launch the App Store: Click on the blue App Store icon in your Dock or find it via Spotlight Search (Cmd + Space, then type “App Store”).
- Browse or Search: Explore featured categories, editor’s picks, or use the search bar in the top-left corner to find a specific application.
- Select an App: Click on the app’s icon to view its product page, which includes screenshots, descriptions, reviews, and system requirements.
- Get or Buy:
- For free apps, click the “Get” button, which will then change to “Install.”
- For paid apps, click the price button (e.g., “$9.99”), which will then change to “Buy.”
- Authenticate: You’ll be prompted to enter your Apple ID password, use Touch ID (if available), or confirm with your Apple Watch. This step ensures that only authorized users can make purchases or install applications.
- Installation and Launch: The app will download and automatically install itself into your
/Applicationsfolder. A progress circle appears on the app icon in your Dock. Once installed, you can launch it from the Dock, your Applications folder, or Launchpad.
Benefits and Considerations:
- Security: Every app in the Mac App Store undergoes an approval process by Apple, ensuring it’s free of malware and adheres to strict guidelines for privacy and performance. This gives users a high degree of confidence in the software’s integrity.
- Ease of Use: The entire process, from discovery to installation, is streamlined and intuitive.
- Automatic Updates: Apps purchased through the App Store are automatically updated in the background or with a single click in the Updates tab, keeping your software current and secure without manual intervention.
- Sandboxing: App Store apps are typically “sandboxed,” meaning they have limited access to your system’s core files and other applications, further enhancing security.
- Limitations: Not all software is available on the Mac App Store. Many professional applications, open-source tools, or apps with specific system-level integrations choose to distribute independently due to Apple’s guidelines or revenue-sharing models. This might influence a brand’s distribution strategy, opting for direct downloads to maintain control over their financial models.
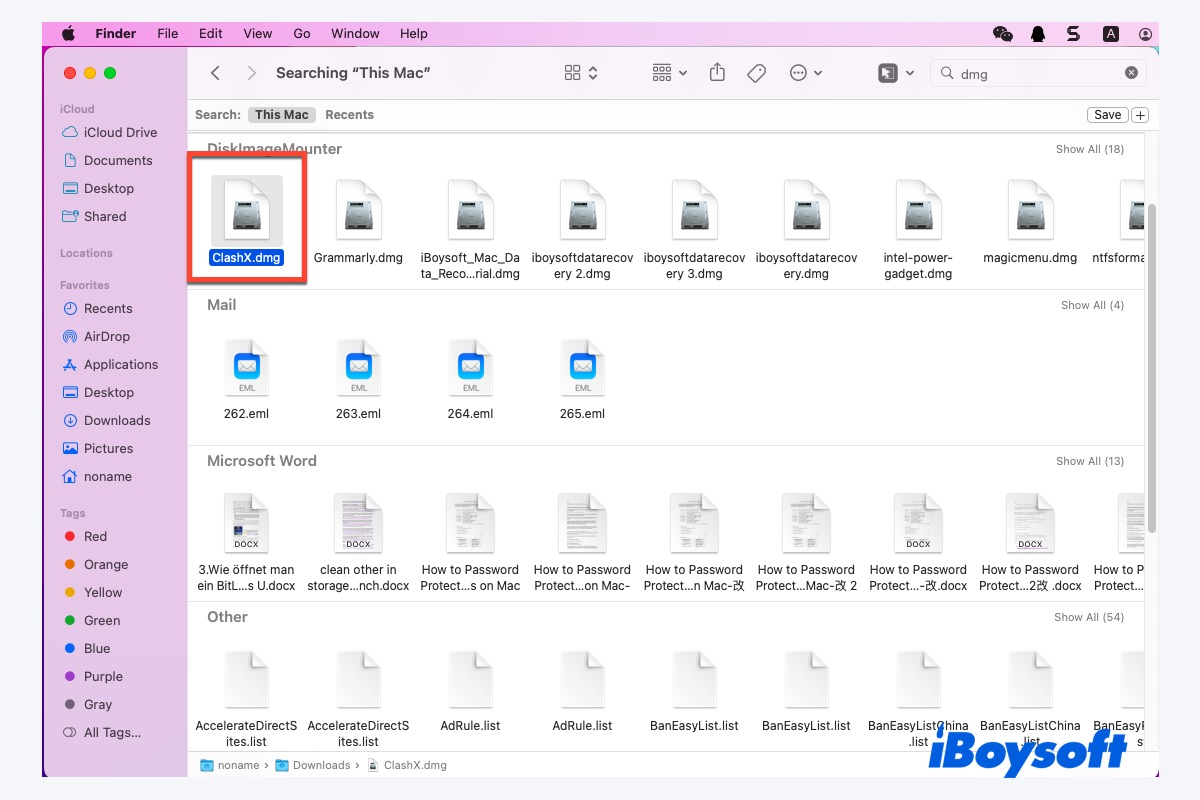
Installing from Disk Images (.DMG Files): The Classic Mac Way
For applications not found on the Mac App Store, .dmg (Disk Image) files are the most common distribution method. A DMG file is essentially a virtual hard drive that, when opened, mounts a temporary volume on your desktop, much like inserting a CD or USB drive. This method is incredibly versatile and widely used by developers for everything from niche utilities to major creative software.
How to Install Software from a .DMG File:
- Download the .DMG File: Obtain the
.dmgfile from the developer’s official website. Always ensure you are downloading from a trusted source to prevent malware infection. This is a critical step for digital security and protecting your financial data. - Open the .DMG File: Double-click the downloaded
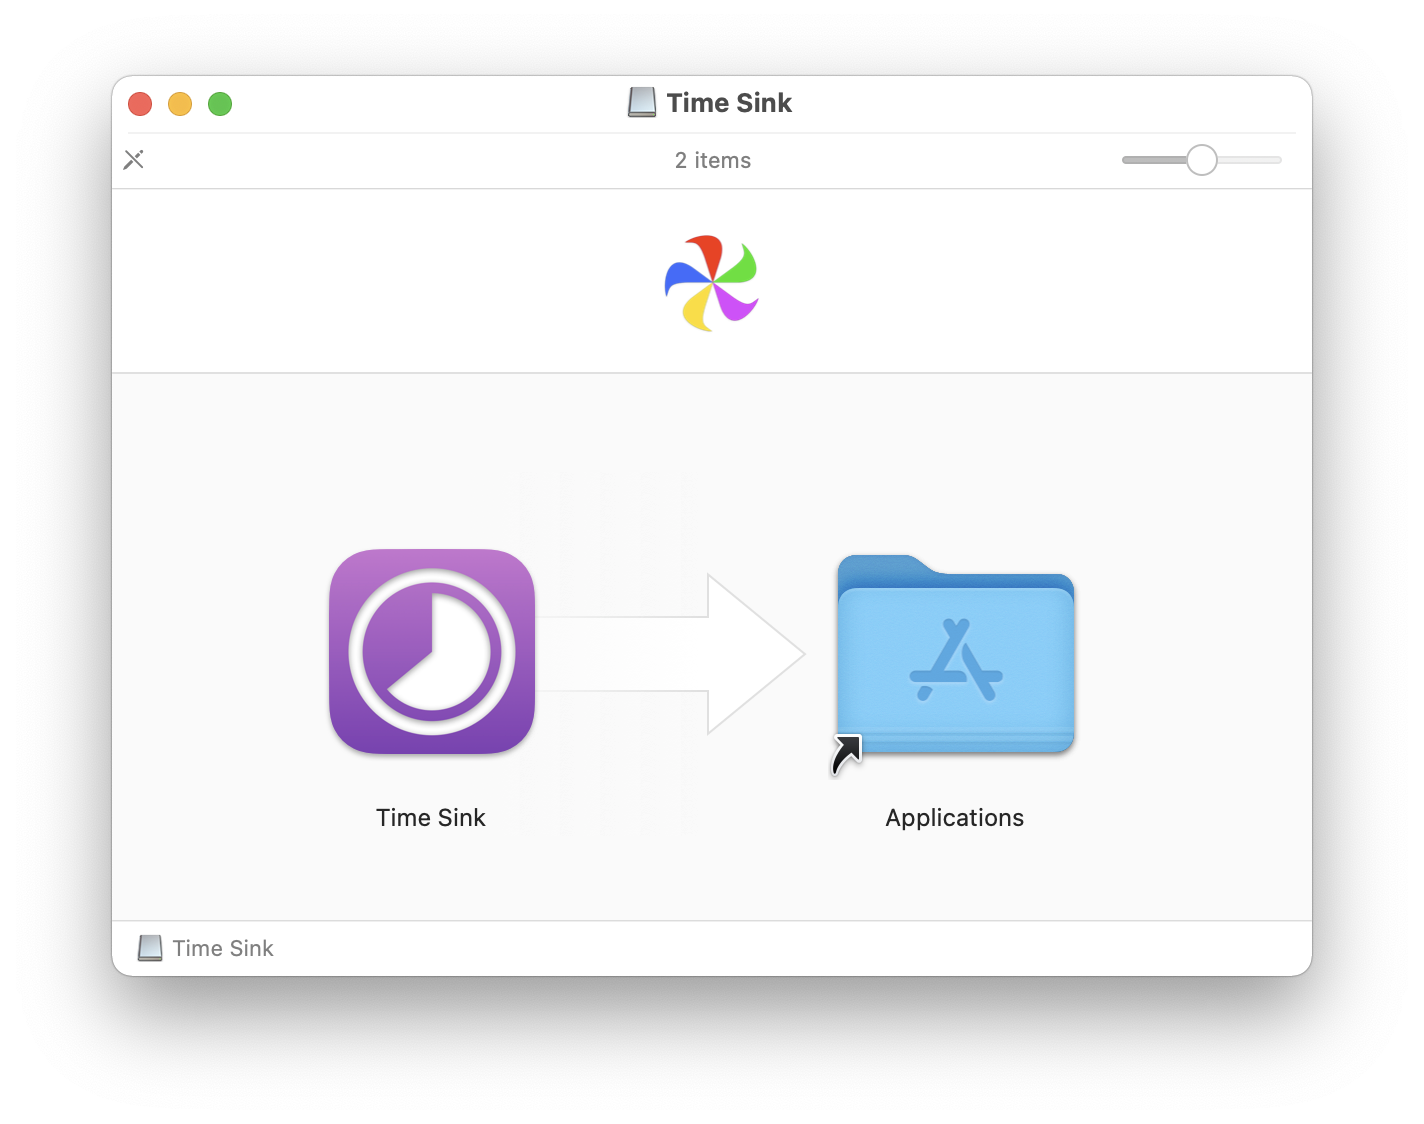
.dmgfile. macOS will verify the image, and a new virtual disk icon will appear on your desktop and in the Finder sidebar. A Finder window usually opens, displaying the contents of the disk image. - Drag to Applications: The Finder window typically contains the application icon and a shortcut to your
/Applicationsfolder. Drag the application icon directly into the/Applicationsfolder alias. This copies the app from the disk image to your Mac’s storage.- Important Note: Ensure you drag the actual application into the Applications folder, not just an alias or the entire disk image.
- Eject the Disk Image: Once the copying process is complete, drag the disk image icon from your desktop to the Trash (which will change to an Eject icon), or right-click the icon and select “Eject [Disk Image Name].” You can then delete the original
.dmgfile from your Downloads folder. - Launch the App: You can now find and launch the application from your
/Applicationsfolder, Launchpad, or by searching with Spotlight.
Security and Gatekeeper:
When you first launch an application downloaded via a .dmg, macOS Gatekeeper will often verify the app. If the app is from an “identified developer” (one registered with Apple), you’ll see a prompt asking if you’re sure you want to open it. If it’s from an “unidentified developer,” macOS might initially block it. To bypass this for trusted applications:
- Go to
System Settings(orSystem Preferenceson older macOS versions) >Privacy & Security. - Scroll down to the
Securitysection, and you’ll often see a message about the blocked app with an “Open Anyway” button. Click it and confirm. - You’ll typically only need to do this once per application.
Running Installer Packages (.PKG Files): Guided Setup
Some applications, particularly larger software suites, system utilities, or those that need to install components in various system locations, use .pkg (package) files. These are self-contained installers that guide you through a wizard-like setup process, similar to installers on Windows.
How to Install Software from a .PKG File:
- Download the .PKG File: As with
.dmgfiles, download the.pkgfile from the official developer website. - Launch the Installer: Double-click the
.pkgfile. This will launch the macOS Installer application. - Follow the On-Screen Prompts: The installer will guide you through several steps:
- Introduction: Provides information about the software.
- License Agreement: You’ll need to agree to the software’s terms and conditions.
- Destination Select: Choose where you want to install the software (usually your main hard drive).
- Installation Type: Sometimes allows for custom installations (e.g., selecting specific components).
- Enter Administrator Password: At some point, usually before the actual installation begins, you’ll be prompted to enter your macOS administrator password to authorize the installation. This is a security measure to prevent unauthorized changes to your system.
- Installation Progress: The installer will display a progress bar.
- Completion: Once finished, the installer will inform you that the software has been successfully installed. You can then close the installer and, optionally, move the
.pkgfile to the Trash.
When to Expect .PKG Files:
.pkg files are typically used for:
- Large creative suites (e.g., Adobe Creative Cloud components).
- Applications that include drivers or system extensions.
- Software that needs to create multiple files across different system directories.
- Corporate software deployments, often aligned with corporate identity and brand consistency.
Advanced Installation Methods and Management
While the App Store, DMG, and PKG methods cover most user needs, macOS also offers more advanced avenues for software acquisition, catering to power users, developers, and those seeking specialized tools. Furthermore, efficient software management—including updates and uninstallation—is key to maintaining a healthy and productive Mac.
Beyond the Basics: Homebrew for Power Users
For developers, IT professionals, and power users, Homebrew is an invaluable, open-source package manager for macOS (and Linux). Think of it as a command-line App Store for tools that Apple doesn’t officially support or that are primarily used in a development environment. It greatly simplifies the installation and management of command-line utilities, programming languages, and even some desktop applications (“casks”). This is a prime example of leveraging technology trends for enhanced productivity and digital security through community-vetted tools.
What is Homebrew?
Homebrew allows you to install thousands of open-source software packages with simple commands in Terminal, such as brew install [package_name]. It handles dependencies, updates, and ensures your system paths are correctly configured, saving immense time and effort compared to manual compilation or tracking down individual installers.
How to Install Homebrew:
- Open Terminal: Find “Terminal” in your
/Applications/Utilitiesfolder or via Spotlight. - Paste and Run Command: Paste the following command into Terminal and press Enter:
bash

/bin/bash -c "$(curl -fsSL https://raw.githubusercontent.com/Homebrew/install/HEAD/install.sh)"
You may be prompted for your administrator password during the installation. - Follow On-Screen Instructions: Homebrew will guide you through the setup process.
Basic Homebrew Usage:
- Install a package:
brew install [package_name](e.g.,brew install git) - Install a desktop app (using Cask):
brew install --cask [app_name](e.g.,brew install --cask vlc) - Update Homebrew itself:
brew update - Upgrade installed packages:
brew upgrade - Remove a package:
brew uninstall [package_name]
Homebrew is a testament to the power of open-source collaboration, offering access to a vast array of tools that can enhance everything from coding to digital security analysis. For those in tech, or managing online income streams that require specific developer tools, Homebrew is an essential part of a robust digital toolbox.
Web-Based Installers and Third-Party Managers
While less common, some software utilizes web-based installers, where a small initial download connects to a server to download the rest of the application. This is often seen with large software suites or cloud-integrated services. Additionally, third-party software subscription services like Setapp offer an alternative model. Setapp provides access to a curated collection of Mac apps for a single monthly fee, eliminating the need to purchase individual licenses and simplifying discovery and updates. This model highlights a growing trend in software consumption, moving from one-time purchases to subscription-based access, a significant consideration in personal and business finance.
When encountering web-based installers or third-party managers, it’s crucial to exercise caution:
- Verify the Source: Ensure you are downloading from the official developer’s website or a reputable service.
- Read Reviews: Check for user reviews or security reports before committing to an unfamiliar manager.
Managing Your Software: Updates and Uninstallation
Installing software is only half the battle; proper management ensures your Mac remains efficient, secure, and free of clutter. Regular updates are critical for digital security and performance, while effective uninstallation keeps your system clean.
Keeping Software Updated:
- Mac App Store Apps: Updates are handled directly through the App Store’s “Updates” section. You can configure automatic updates in
System Settings>App Store. - Non-App Store Apps:
- Built-in Updaters: Many applications (e.g., Google Chrome, Microsoft Office) have their own built-in update mechanisms. Check the app’s menus (e.g.,
[App Name]>Check for Updates). - Manual Download: For some apps, you may need to periodically visit the developer’s website to download and install the latest version, overwriting the old one.
- Homebrew: Use
brew updatefollowed bybrew upgradeto update all Homebrew-installed packages.
- Built-in Updaters: Many applications (e.g., Google Chrome, Microsoft Office) have their own built-in update mechanisms. Check the app’s menus (e.g.,
Uninstalling Software:
Unlike Windows, most Mac applications don’t have a dedicated “Uninstall” utility.
- Standard Applications (.app bundles):
- Quit the application completely (Cmd + Q).
- Open your
/Applicationsfolder in Finder. - Drag the application’s icon to the Trash.
- Empty the Trash.
- Note: While this removes the app, it often leaves behind preference files, caches, and support files in your User Library (
~/Library). For a more thorough cleanup, you can manually search for related files in~/Library/Application Support,~/Library/Caches, and~/Library/Preferences, but be cautious not to delete anything critical.
- Applications Installed via .PKG Files: Some
.pkginstallations might include a dedicated uninstaller program, often found in the/Applications/Utilitiesfolder or within the original.pkgfile’s contents. Always check for this first. - Homebrew-installed apps: Use
brew uninstall [package_name]orbrew uninstall --cask [app_name]. - Third-Party Uninstallers: Tools like CleanMyMac X or AppCleaner can help identify and remove all associated files when uninstalling an application, providing a cleaner system. While these tools can cost money, their value in maintaining system health and performance can be a worthwhile investment in productivity.
Best Practices, Security, and Troubleshooting
Mastering software installation goes beyond the steps; it involves adopting habits that ensure your Mac remains secure, performs optimally, and contributes positively to your digital workflow. These practices tie directly into digital security, financial stability (by avoiding costly repairs or data loss), and the overall strength of your personal and professional brand.
Verifying Software Sources and Gatekeeper
The most critical security measure is discerning where you get your software.
- Always Download from Official Sources: Prioritize the Mac App Store or the developer’s official website. Avoid third-party download sites that bundle software with adware or potentially unwanted programs (PUPs). This simple step significantly reduces your exposure to malware and protects your data, a direct impact on your financial and personal security.
- Understand Gatekeeper: Gatekeeper is Apple’s built-in security feature that verifies software downloads. It checks if an app has been notarized by Apple (meaning Apple has scanned it for malicious components) and if it’s signed by an identified developer.
- If macOS blocks an app from an “unidentified developer,” and you know the software is legitimate (e.g., an open-source tool or beta software from a trusted community), you can override Gatekeeper as described earlier (via
System Settings>Privacy & Security>Open Anyway). Exercise this option with extreme caution.
- If macOS blocks an app from an “unidentified developer,” and you know the software is legitimate (e.g., an open-source tool or beta software from a trusted community), you can override Gatekeeper as described earlier (via
- Check Developer Signatures: When launching a
.dmgor.pkgfile, macOS will often display the developer’s name. Look for reputable names. If it says “Unidentified Developer” and you have any doubts, do not proceed.
Common Installation Issues and Solutions
Even with the best practices, you might occasionally encounter a hiccup.
- “App Can’t Be Opened Because It Is From An Unidentified Developer”: This is Gatekeeper in action. If you trust the source, override it in
System Settings>Privacy & Security. - App Fails to Launch or Crashes:
- Restart Your Mac: The oldest trick in the book often works wonders.
- Reinstall the App: Sometimes a corrupted download or installation can cause issues. Delete the app and reinstall it.
- Check for Compatibility: Ensure the app is compatible with your macOS version and hardware. Older apps might not run on the latest macOS, and vice-versa.
- Check Developer Website: Look for support forums, FAQs, or known issues for the specific app.
- Insufficient Disk Space: Installation requires free space. Check your available storage in
About This Mac>Storageand free up space if necessary. - Slow Installation or Download: Check your internet connection. For large files, a stable connection is crucial.
- Corrupted Download: If a download is interrupted, it might be corrupted. Delete the file and try downloading it again.
- Permissions Issues: In rare cases, file permissions can cause problems. Disk Utility’s First Aid might help, or a clean reinstallation.
Maintaining a Clean and Secure Mac Environment
Proactive maintenance is crucial for long-term productivity and digital security.
- Regular Software Updates: As discussed, keep both macOS and all your applications updated. Updates often include critical security patches and performance improvements.
- Antivirus/Anti-Malware Scans: While macOS is robust, it’s not immune. Consider reputable antivirus/anti-malware software for an extra layer of protection, especially if you handle sensitive financial information or receive online income.
- Periodically Review Installed Software: Uninstall applications you no longer use. Clutter not only takes up valuable disk space but can also introduce unnecessary background processes or potential security risks.
- Backup Your Data: Regularly back up your Mac using Time Machine or a cloud service. This is your ultimate safety net against data loss, whether due to software issues, hardware failure, or malware. This is a critical investment in your digital security and financial protection.
- Understand Your Digital Footprint: Be mindful of the permissions you grant applications and the data they collect. Regularly review privacy settings in
System Settings.
By embracing these installation methods and best practices, you transform from a passive user into a confident manager of your digital workspace. Your Mac becomes a finely tuned instrument, empowering you to tackle technology trends, manage your brand effectively, and navigate your financial landscape with the best tools at your disposal, all while maintaining a robust shield against digital threats. Happy installing!
aViewFromTheCave is a participant in the Amazon Services LLC Associates Program, an affiliate advertising program designed to provide a means for sites to earn advertising fees by advertising and linking to Amazon.com. Amazon, the Amazon logo, AmazonSupply, and the AmazonSupply logo are trademarks of Amazon.com, Inc. or its affiliates. As an Amazon Associate we earn affiliate commissions from qualifying purchases.