In an increasingly digital world, where every click, transaction, and communication relies on a robust foundation of security, understanding the tools that underpin this safety is paramount. OpenSSL stands as one of the most critical and widely used open-source cryptographic libraries available today. It’s the silent workhorse behind countless secure web connections (HTTPS), VPNs, email encryption, and many other applications where data integrity and confidentiality are non-negotiable. For anyone involved in technology – from developers and system administrators to cybersecurity enthusiasts and even curious power users – knowing how to install and utilize OpenSSL is a fundamental skill that significantly enhances digital security and productivity.
This comprehensive guide will demystify the process of installing OpenSSL across various major operating systems. We’ll explore its importance within the broader tech landscape, provide step-by-step instructions, and offer insights into verifying your installation and exploring its basic functionalities. Whether you’re setting up a secure server, generating cryptographic keys, or simply exploring the depths of digital security, mastering OpenSSL installation is your first crucial step.
Understanding OpenSSL: A Foundation for Digital Security
OpenSSL is a powerful, open-source command-line tool and library that provides a full-featured toolkit for the Transport Layer Security (TLS) and Secure Sockets Layer (SSL) protocols. These protocols are the bedrock of secure communication over computer networks, ensuring that data exchanged between two parties remains private and unaltered. Essentially, when you see a padlock icon in your browser’s address bar, indicating a secure connection, OpenSSL or a similar library is very likely at play in the background.
The versatility of OpenSSL extends far beyond just enabling HTTPS. It’s an indispensable tool for generating private keys, creating Certificate Signing Requests (CSRs) for SSL/TLS certificates, encrypting and decrypting data, creating digital signatures, and even testing the security of network services. Its open-source nature means it’s continuously scrutinized and improved by a global community of experts, fostering a high level of trust and reliability – a critical factor in the realm of digital security. For businesses and individuals alike, leveraging OpenSSL means upholding best practices in protecting sensitive information, aligning perfectly with the core tenets of digital security and software management within the broader tech domain. Its presence is vital for everything from securing web servers and email systems to facilitating secure VPN connections and developing secure applications, making its proper installation a key part of any robust digital infrastructure.
Preparing for Installation: What You Need to Know
Before diving into the installation process, it’s beneficial to understand a few key considerations. OpenSSL typically comes in two main distributions: the source code (for compiling yourself) and pre-compiled binaries (for easier installation). While compiling from source offers the most flexibility and control, it’s generally more complex and time-consuming. For most users, especially those not needing highly customized builds, using pre-compiled binaries or package managers is the recommended and most straightforward approach.
It’s also crucial to be aware of the different versions of OpenSSL. The project regularly releases updates to fix bugs, improve performance, and, most importantly, address security vulnerabilities. Always aim for the latest stable version available for your operating system. Older versions might have known exploits that could compromise your system’s security. Additionally, ensure you have administrative privileges on your system, as installing system-wide software often requires elevated permissions. A stable internet connection will also be necessary to download the required files.
Step-by-Step Installation Guides for Major Operating Systems
The installation process for OpenSSL varies significantly depending on your operating system. Below, we provide detailed instructions for Windows, macOS, and popular Linux distributions.
Installing OpenSSL on Windows
Installing OpenSSL on Windows is not as straightforward as on Unix-like systems, as it doesn’t typically come pre-installed or with a simple package manager. The recommended method is to use pre-compiled binaries provided by third parties, as the OpenSSL project itself does not provide official binaries for Windows. One of the most reputable sources is the Shining Light Productions website.
-
Download the Installer:
- Navigate to the Shining Light Productions website.
- Look for the latest stable version of “Win32 OpenSSL” or “Win64 OpenSSL” (choose based on your system architecture, 32-bit or 64-bit). Most modern systems are 64-bit.
- You’ll typically find two versions: a “Light” version and a standard version. The “Light” version usually suffices for most users, containing the core libraries and tools without development headers. If you plan to compile software against OpenSSL, download the full version.
- Download the
.exeinstaller.
-
Run the Installer:
- Locate the downloaded
.exefile and double-click it to start the installation wizard. - You might encounter a User Account Control (UAC) prompt; click “Yes” to allow the installer to make changes.
- Follow the on-screen prompts:
- Accept the license agreement.
- Choose the installation directory (the default
C:Program FilesOpenSSL-Win64or similar is usually fine). - When prompted to “Select Additional Tasks,” ensure “The OpenSSL binaries (/bin) directory” is selected to be copied to “The Windows system directory” or “The OpenSSL installation directory.” Choosing the latter and then manually adding it to your system’s PATH environment variable provides more control and is generally recommended for avoiding conflicts.
- Locate the downloaded
-
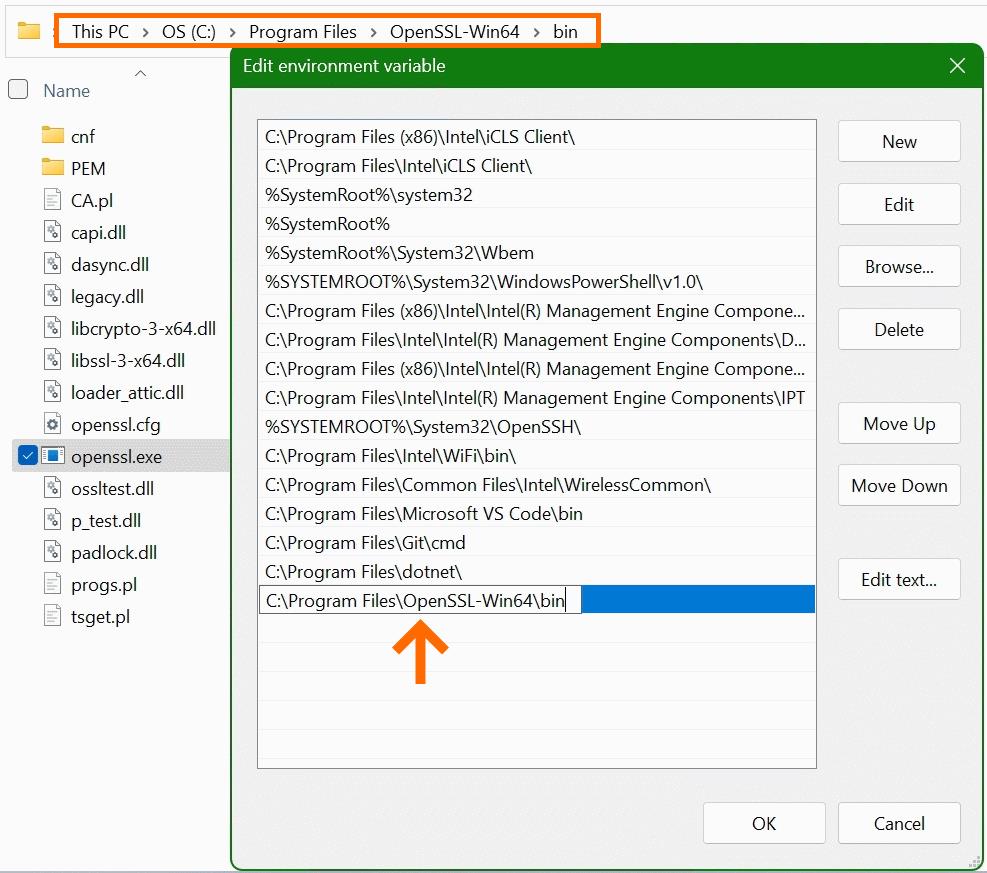
Add to System PATH (if not done by installer):
- If you chose to install to the OpenSSL installation directory and not the Windows system directory, you’ll need to manually add the
bindirectory of your OpenSSL installation to your system’s PATH environment variable. This allows you to run OpenSSL commands from any command prompt. - Search for “Environment Variables” in the Windows search bar and select “Edit the system environment variables.”
- Click “Environment Variables…”
- Under “System variables,” find and select the
Pathvariable, then click “Edit.” - Click “New” and add the path to your OpenSSL
bindirectory (e.g.,C:Program FilesOpenSSL-Win64bin). - Click “OK” on all windows to save the changes.
- Important: You might need to restart your command prompt or PowerShell windows (or even your computer) for the changes to take effect.
- If you chose to install to the OpenSSL installation directory and not the Windows system directory, you’ll need to manually add the
Installing OpenSSL on macOS
macOS typically comes with a version of OpenSSL pre-installed or has command-line tools that include it. However, this bundled version can often be outdated or symbolically linked to Apple’s own LibreSSL. For the latest, fully functional OpenSSL, using Homebrew (the “missing package manager for macOS”) is the cleanest and most recommended method.
-
Install Homebrew (if you haven’t already):
- Open your Terminal application (found in
Applications/Utilities). - Paste the following command and press Enter:
bash

/bin/bash -c "$(curl -fsSL https://raw.githubusercontent.com/Homebrew/install/HEAD/install.sh)"
- Follow the on-screen instructions, which might include entering your password and installing Xcode Command Line Tools.
- Open your Terminal application (found in
-
Install OpenSSL via Homebrew:
- Once Homebrew is installed, simply run the following command in your Terminal:
bash

brew install openssl
- Homebrew will download and install the latest stable version of OpenSSL.
- Once Homebrew is installed, simply run the following command in your Terminal:
-
Link OpenSSL to your PATH (if necessary):
- Homebrew typically installs OpenSSL in
/usr/local/opt/openssl(or a similar path) and then symlinks it. Homebrew will often provide instructions post-installation on how to ensure this version is prioritized in your shell’s PATH. - You might need to add something like the following to your shell’s configuration file (
~/.zshrcfor zsh,~/.bash_profileor~/.bashrcfor bash):
bash

echo 'export PATH="/usr/local/opt/openssl@3/bin:$PATH"' >> ~/.zshrc # or ~/.bash_profile

echo 'export LDFLAGS="-L/usr/local/opt/openssl@3/lib"' >> ~/.zshrc

echo 'export CPPFLAGS="-I/usr/local/opt/openssl@3/include"' >> ~/.zshrc
- After adding these lines, reload your shell configuration:
bash

source ~/.zshrc # or source ~/.bash_profile
- Replace
openssl@3with the version number Homebrew indicates, if different.
- Homebrew typically installs OpenSSL in
Installing OpenSSL on Linux
Linux distributions generally provide OpenSSL through their native package managers, making installation quite straightforward.
Debian/Ubuntu-based Distributions:
-
Update Package Lists:
- Open a terminal and update your package list to ensure you’re getting the latest version information:
bash

sudo apt update
- Open a terminal and update your package list to ensure you’re getting the latest version information:
-
Install OpenSSL:
- Install the
opensslpackage. You might also wantlibssl-devif you plan to compile applications that use OpenSSL.
bash

sudo apt install openssl libssl-dev
- Install the
Red Hat/CentOS/Fedora-based Distributions:
- Install OpenSSL:
- Open a terminal and use
dnf(oryumon older versions) to install OpenSSL. Again,openssl-develis for development headers.
bash

sudo dnf install openssl openssl-devel
(For older CentOS/RHEL versions usingyum:sudo yum install openssl openssl-devel)
- Open a terminal and use
Verifying Your OpenSSL Installation and Basic Usage
Once you’ve completed the installation steps for your operating system, it’s crucial to verify that OpenSSL is correctly installed and accessible from your command line. This simple check confirms that you can now begin to leverage its powerful capabilities.
-
Check the Version:
- Open a new terminal or command prompt window (restart it if you just modified environment variables).
- Type the following command and press Enter:
bash

openssl version
- If the installation was successful, you should see output similar to this, indicating the installed version:
OpenSSL 3.0.12 18 Jan 2024 (Library: OpenSSL 3.0.12 18 Jan 2024)
- If you receive an error like “command not found” or similar, double-check your PATH environment variable settings and ensure you restarted your shell.
-
Basic Usage – Generating a Private Key:
- To demonstrate a fundamental use case and further confirm functionality, let’s generate a new RSA private key. This is a common first step for creating SSL certificates.
bash

openssl genrsa -out mykey.pem 2048
- This command will generate a 2048-bit RSA private key and save it to a file named
mykey.pemin your current directory. You can then list the file to confirm its creation:
bash

ls -l mykey.pem   # For Linux/macOS

dir mykey.pem     # For Windows
- To demonstrate a fundamental use case and further confirm functionality, let’s generate a new RSA private key. This is a common first step for creating SSL certificates.
-
Basic Usage – Viewing Key Information:
- You can also inspect the contents of your generated key (without revealing the sensitive key itself) to confirm it’s a valid RSA private key:
bash

openssl rsa -in mykey.pem -text -noout
- This will display information about the key, such as its modulus and public exponent, confirming OpenSSL is actively processing cryptographic commands.
- You can also inspect the contents of your generated key (without revealing the sensitive key itself) to confirm it’s a valid RSA private key:
These verification steps not only confirm a successful installation but also provide a tangible introduction to the command-line power of OpenSSL, connecting directly to productivity and digital security tasks.
Common Use Cases and Troubleshooting Common Installation Issues
With OpenSSL successfully installed, a vast array of digital security and development tasks become accessible. Beyond generating simple keys, OpenSSL is used for:
- Generating Certificate Signing Requests (CSRs): Essential for obtaining SSL/TLS certificates from Certificate Authorities (CAs) to secure websites.
- Managing SSL/TLS Certificates: Converting certificate formats, inspecting certificate details, and verifying certificate chains.
- Encrypting and Decrypting Files: Protecting sensitive data at rest using symmetric and asymmetric encryption algorithms.
- Testing SSL/TLS Connectivity: Diagnosing connection issues with web servers or other network services.
- Creating Self-Signed Certificates: Useful for internal testing environments or small, non-public applications where a trusted CA is not required.
Troubleshooting Common Installation Issues:
Even with careful steps, you might encounter issues. Here are a few common problems and their solutions:
- “Command not found” error: This almost always indicates that the OpenSSL executable’s directory is not in your system’s PATH environment variable, or your shell session hasn’t refreshed after modifying it.
- Solution: Double-check your PATH settings. For Windows, restart Command Prompt/PowerShell. For Linux/macOS,
sourceyour shell configuration file (e.g.,source ~/.zshrc).
- Solution: Double-check your PATH settings. For Windows, restart Command Prompt/PowerShell. For Linux/macOS,
- Version Mismatch (macOS): On macOS,
openssl versionmight show an Apple-provided (and potentially outdated) LibreSSL version even after installing with Homebrew.- Solution: Ensure you’ve correctly added the Homebrew OpenSSL path to your shell’s configuration and sourced it. You can explicitly call the Homebrew version using its full path, e.g.,
/usr/local/opt/openssl@3/bin/openssl version.
- Solution: Ensure you’ve correctly added the Homebrew OpenSSL path to your shell’s configuration and sourced it. You can explicitly call the Homebrew version using its full path, e.g.,
- Permission Denied (Linux/macOS): When running
sudo apt installorsudo dnf install.- Solution: Ensure you are entering the correct password for your user account.
- Download Failures: If installers or package manager downloads fail.
- Solution: Check your internet connection. For package managers, try
sudo apt updateorsudo dnf updatefirst to refresh repositories.
- Solution: Check your internet connection. For package managers, try
- Installer Errors (Windows): For specific error messages during the Windows
.exeinstallation.- Solution: Consult the documentation on the Shining Light Productions website or search for the specific error code. Ensure you have sufficient disk space.
By understanding these common scenarios and their fixes, you can efficiently resolve hiccups and ensure a smooth experience with OpenSSL, further enhancing your productivity in managing digital security tools.
Conclusion
Installing OpenSSL is a foundational step for anyone navigating the intricate landscape of digital security and network communication. From encrypting sensitive data to securing web traffic and beyond, OpenSSL is an indispensable tool in the modern tech stack. By following the detailed instructions provided for Windows, macOS, and Linux, you can confidently set up this powerful cryptographic toolkit on your system.
A successful OpenSSL installation opens the door to a wealth of possibilities, empowering you to generate secure keys, manage certificates, and enhance the overall security posture of your digital projects and infrastructure. Remember to always prioritize using the latest stable versions to benefit from the most recent security patches and features. As technology continues to evolve, the demand for robust digital security will only grow, making your proficiency with tools like OpenSSL an increasingly valuable asset in both personal and professional spheres. Embrace this powerful utility, and take another significant step towards mastering your digital environment and contributing to a more secure online world.
aViewFromTheCave is a participant in the Amazon Services LLC Associates Program, an affiliate advertising program designed to provide a means for sites to earn advertising fees by advertising and linking to Amazon.com. Amazon, the Amazon logo, AmazonSupply, and the AmazonSupply logo are trademarks of Amazon.com, Inc. or its affiliates. As an Amazon Associate we earn affiliate commissions from qualifying purchases.