MySQL is a cornerstone of modern web development and data management. Whether you’re a budding developer building your first application, a seasoned professional looking to set up a robust backend, or a business owner aiming to leverage the power of relational databases, understanding how to install MySQL is a fundamental skill. This guide will walk you through the process, covering everything from choosing the right version to post-installation best practices, all within the context of the technology landscape and its impact on brands and financial strategies.
Understanding MySQL’s Role in Your Tech Stack
Before diving into the installation process, it’s crucial to grasp why you might need MySQL and its significance in your broader technological ecosystem. MySQL is a free and open-source relational database management system (RDBMS) that plays a vital role in powering a vast number of applications, from dynamic websites and e-commerce platforms to complex business intelligence tools. Its reliability, performance, and flexibility have made it a popular choice for developers and organizations alike.

Why Choose MySQL?
- Open Source and Cost-Effective: As an open-source solution, MySQL offers significant cost savings compared to proprietary database systems, making it an attractive option for startups and budget-conscious businesses.
- Performance and Scalability: MySQL is known for its speed and ability to handle large volumes of data, making it suitable for applications that require high performance and can scale as your needs grow.
- Reliability and Stability: With a long history of development and widespread adoption, MySQL has proven itself to be a stable and reliable database system.
- Extensive Community Support: The vast and active MySQL community provides a wealth of resources, forums, and documentation, making troubleshooting and learning much easier.
- Cross-Platform Compatibility: MySQL runs on various operating systems, including Windows, macOS, and Linux, offering flexibility in deployment.
MySQL and Your Brand’s Digital Foundation
In today’s digital-first world, your brand’s online presence is paramount. A robust and efficient backend powered by a reliable database like MySQL is the invisible engine driving this presence. Think of your brand as a meticulously crafted product; the underlying technology is the manufacturing plant and supply chain. A poorly managed database can lead to slow website loading times, data corruption, or security vulnerabilities – all of which can severely damage your brand’s reputation and customer trust.
For businesses, a well-implemented MySQL database is not just a technical requirement; it’s a strategic asset. It enables:
- Personalized Customer Experiences: By storing and managing customer data effectively, you can deliver tailored content, product recommendations, and marketing messages, enhancing engagement and loyalty.
- Efficient Operations: Streamlining inventory management, order processing, and customer service through a structured database improves operational efficiency, leading to cost savings and better resource allocation.
- Data-Driven Decision Making: MySQL allows you to collect, organize, and analyze vast amounts of data, providing insights that can inform marketing strategies, product development, and overall business direction. This is crucial for understanding market trends and adapting your brand’s message accordingly.
Financial Implications of Database Choices
The decision of which database to use, and how to manage it, has direct financial implications. For individuals and small businesses venturing into online income or side hustles, opting for an open-source solution like MySQL can be a significant financial advantage. It reduces initial setup costs, allowing more capital to be invested in marketing, product development, or other growth-driving activities.
For larger corporations, the cost of licensing proprietary database systems can be substantial. MySQL, particularly its community edition, offers a cost-effective alternative, freeing up budget for other critical financial areas like research and development, employee training, or strategic acquisitions. Furthermore, the efficiency gains from a well-optimized MySQL installation can translate into reduced operational expenses and increased profitability. Financial tools that integrate seamlessly with MySQL can further enhance this by providing real-time financial reporting and analysis.
Installing MySQL: A Step-by-Step Approach
The installation process for MySQL can vary slightly depending on your operating system. We will focus on the most common methods for Windows, macOS, and Linux.
Option 1: Using the MySQL Installer (Windows)
For Windows users, the MySQL Installer is the most straightforward method. It bundles the MySQL Server, MySQL Workbench (a graphical tool for managing your database), and other essential components.
Downloading the MySQL Installer
- Visit the Official MySQL Downloads Page: Navigate to the official MySQL website and find the “Downloads” section.
- Select MySQL Community Downloads: Choose the “MySQL Community (GPL) Downloads” link.
- Choose MySQL Installer for Windows: Locate and click on the “MySQL Installer for Windows” link.
- Download the Installer: You’ll typically find two download options: a web installer (smaller, downloads components as needed) and a full installer (larger, includes all components). For most users, the web installer is sufficient. Click “Download” next to your preferred option. You may be prompted to log in or sign up for an Oracle Web account; you can usually skip this by clicking “No thanks, just start my download.”
Running the MySQL Installer
- Execute the Downloaded File: Once the download is complete, run the
.msifile. - Choose a Setup Type: The installer will present you with several setup types:
- Developer Default: Installs MySQL Server, MySQL Workbench, connectors, and other tools for development. This is often the best choice for individual developers.
- Server only: Installs only the MySQL Server.
- Client only: Installs only client tools like MySQL Workbench.
- Full: Installs all available products.
- Custom: Allows you to select specific products to install.
For this guide, we’ll assume you’re choosing Developer Default or Custom and selecting at least MySQL Server and MySQL Workbench.
- Check Requirements: The installer will check for any prerequisites. If any are missing, it will prompt you to download and install them.
- Product Configuration: After installing the selected products, the installer will guide you through configuring the MySQL Server.
- Type and Networking: Choose “Development Computer” or “Server Computer” depending on your use case. For development, “Development Computer” is suitable. Ensure the port is set to the default
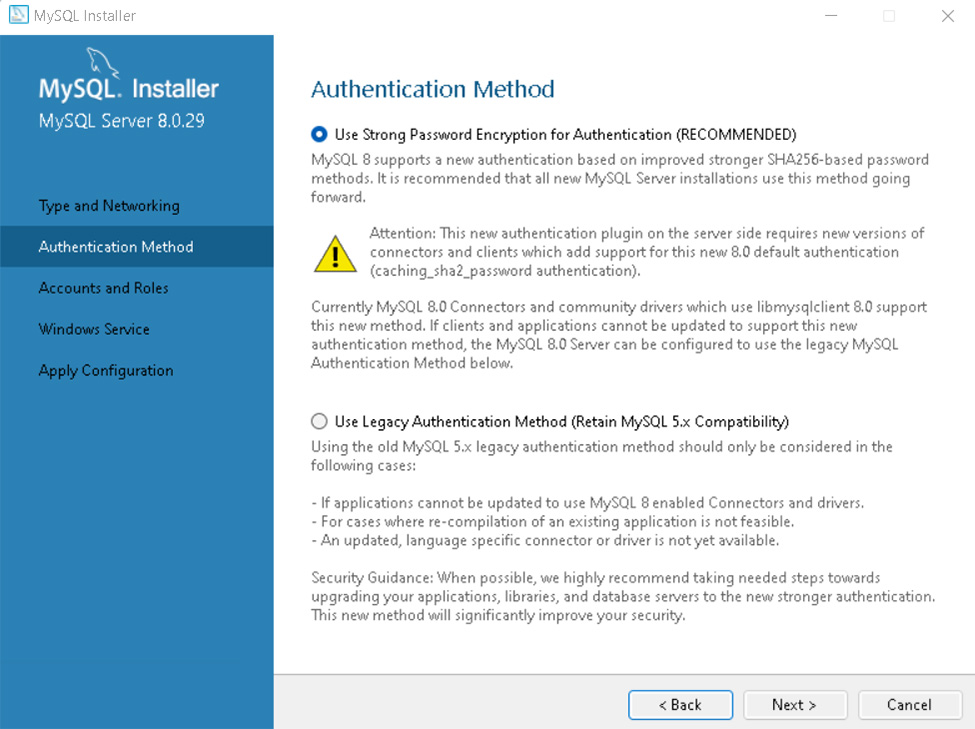
3306. - Authentication Method: Select “Use Strong Password Encryption for Authentication (RECOMMENDED).” This is the more secure option.
- Account and Roles: This is a critical step. You will be prompted to set a root password. Choose a strong, unique password and store it securely. You can also add other user accounts here if needed.
- Windows Service: Configure MySQL to run as a Windows Service. This ensures it starts automatically when your computer boots up.
- Apply Configuration: The installer will apply the configuration settings.
- Type and Networking: Choose “Development Computer” or “Server Computer” depending on your use case. For development, “Development Computer” is suitable. Ensure the port is set to the default
Verifying the Installation
After the installation and configuration are complete, you can verify that MySQL is running:
- Open MySQL Workbench: Launch MySQL Workbench from your Start Menu.
- Connect to the MySQL Instance: You should see a connection to your local instance (usually named “Local instance MySQL80” or similar). Click on it.
- Enter the Root Password: You’ll be prompted to enter the root password you set during installation.
- Successful Connection: If the connection is successful, you’ll be greeted by the MySQL Workbench interface, indicating that your MySQL server is up and running.
Option 2: Installing on macOS

macOS users have several installation options, including the MySQL DMG archive and Homebrew.
Using the MySQL DMG Archive
- Download the DMG File: Go to the MySQL Community Downloads page, select “MySQL Community (GPL) Downloads,” and then choose “MySQL Community Server.” Download the appropriate DMG archive for macOS.
- Run the Installer Package: Open the downloaded
.dmgfile and run the.pkginstaller. - Follow the Installation Wizard: Proceed through the installer, accepting the license agreement and choosing the installation location.
- Set Root Password: During the installation, you will be prompted to set a password for the
rootuser. Choose a strong password and save it. - Configure MySQL Server: After installation, you’ll find MySQL in your System Preferences. You can start/stop the server from here. You can also configure network settings and other options.
Using Homebrew (Recommended for Developers)
Homebrew is a popular package manager for macOS, simplifying the installation of software.
- Install Homebrew (if not already installed): Open your Terminal and run:
bash

/bin/bash -c "$(curl -fsSL https://raw.githubusercontent.com/Homebrew/install/HEAD/install.sh)"
- Install MySQL: Once Homebrew is installed, run the following command in your Terminal:
bash

brew install mysql
- Start the MySQL Server: After installation, start the MySQL server:
bash

brew services start mysql
- Secure the Installation: Run the security script to set a root password, remove anonymous users, disallow root login remotely, and remove test databases:
bash

mysql_secure_installation
Follow the prompts, setting a strong root password when asked.
Verifying the Installation (macOS)
- Open Terminal:
- Connect to MySQL:
bash

mysql -u root -p
- Enter Root Password: Provide the password you set.
- Success: You should see the MySQL prompt (
mysql>), indicating a successful connection.
Option 3: Installing on Linux (Ubuntu/Debian Example)
Linux distributions offer various ways to install MySQL, with package managers being the most common and recommended.
Using APT Package Manager (Ubuntu/Debian)
- Update Package Lists: Open your Terminal and run:
bash

sudo apt update
- Install MySQL Server:
bash

sudo apt install mysql-server
- Secure the Installation: After the installation is complete, run the security script:
bash

sudo mysql_secure_installation
This script will guide you through setting the root password, removing anonymous users, disallowing root login remotely, and removing test databases. Pay close attention to setting a strong root password. - Check MySQL Status:
bash

sudo systemctl status mysql
This command will show you if the MySQL service is running.
Verifying the Installation (Linux)
- Open Terminal:
- Connect to MySQL:
bash

sudo mysql -u root -p
(You might needsudodepending on your configuration). - Enter Root Password: Provide the password you set during
mysql_secure_installation. - Success: You should see the MySQL prompt (
mysql>).
Post-Installation: Securing and Configuring MySQL
Installing MySQL is just the first step. Proper configuration and security are vital for protecting your data and ensuring optimal performance.
Essential Security Measures
- Strong Root Password: This is non-negotiable. Use a complex password with a mix of uppercase and lowercase letters, numbers, and symbols.
- Remove Anonymous Users: Anonymous users can be a security risk, allowing unauthorized access. The
mysql_secure_installationscript handles this. - Disallow Remote Root Login: For enhanced security, disable the root user from logging in remotely. Create separate user accounts for remote access with specific privileges.
- Remove Test Databases: Default installations often include test databases that should be removed.
- Regular Updates: Keep your MySQL server updated to the latest versions to benefit from security patches and performance improvements.
Creating New Users and Granting Privileges
For most applications, it’s best practice to create specific user accounts with only the necessary privileges, rather than using the root account for daily operations.
- Log in as root:
bash

mysql -u root -p
- Create a new user:
sql

CREATE USER 'your_username'@'localhost' IDENTIFIED BY 'your_strong_password';
Replace'your_username'and'your_strong_password'with your desired credentials.'localhost'means the user can only connect from the local machine. - Grant privileges:
sql

GRANT ALL PRIVILEGES ON your_database_name.* TO 'your_username'@'localhost';
Replaceyour_database_namewith the name of the database you want this user to access.ALL PRIVILEGESgrants full control. You can grant more specific privileges likeSELECT,INSERT,UPDATE,DELETEif needed. - Flush privileges:
sql

FLUSH PRIVILEGES;
This command reloads the grant tables, making the new privileges active.
Configuring MySQL for Performance
my.cnformy.ini: This configuration file (located in different directories depending on your OS) allows you to fine-tune MySQL’s performance. Parameters likeinnodb_buffer_pool_size,max_connections, andquery_cache_sizecan significantly impact performance.- Indexing: Proper database indexing is crucial for fast query execution. Ensure your tables have appropriate indexes defined for frequently queried columns.
Conclusion
Installing MySQL is a foundational skill for anyone involved in web development, data management, or building data-driven applications. By following the steps outlined in this guide, you can successfully install and secure your MySQL server on Windows, macOS, or Linux. Remember that a well-configured and secured database is not just a technical necessity but a critical component of a strong brand identity and a sound financial strategy, enabling efficient operations and informed decision-making. As you continue your journey with MySQL, explore its vast capabilities, leverage community resources, and always prioritize security and performance to build robust and reliable systems.
aViewFromTheCave is a participant in the Amazon Services LLC Associates Program, an affiliate advertising program designed to provide a means for sites to earn advertising fees by advertising and linking to Amazon.com. Amazon, the Amazon logo, AmazonSupply, and the AmazonSupply logo are trademarks of Amazon.com, Inc. or its affiliates. As an Amazon Associate we earn affiliate commissions from qualifying purchases.