Navigating the world of printers and their integration with your operating system can sometimes feel like deciphering a complex code. For many, especially those less technically inclined, the process of installing a new printer on Windows 10 can be a source of frustration. However, with a clear understanding of the steps involved and a few helpful tips, this task can be accomplished efficiently, ensuring you can get back to printing your documents, photos, and projects without a hitch. This guide will walk you through the entire process, from preparation to troubleshooting, covering both wired and wireless printer installations.
Preparing for Printer Installation
Before you even think about plugging in cables or searching for drivers, a little bit of preparation can save you significant time and potential headaches. Ensuring you have the right information and that your printer is ready to go is a crucial first step.
Understanding Your Printer’s Connection Type
Printers connect to your computer in a few primary ways, and knowing which type you have will dictate the installation process.
USB Printers: The Direct Connection
The most common type of printer connection is USB (Universal Serial Bus). These printers connect directly to your computer via a USB cable. This is generally the simplest method of installation as Windows 10 often recognizes and installs USB printers automatically. You’ll typically find a USB-A port on your printer and a corresponding port on your computer.
Wireless Printers: Freedom from Cables
Wireless printers offer greater flexibility, allowing you to print from multiple devices without being tethered by a cable. There are two main types of wireless connections:
- Wi-Fi: These printers connect to your home or office Wi-Fi network. Once connected to the network, any device on the same network can send print jobs to the printer. This requires you to have a Wi-Fi network set up and the printer to be able to connect to it.
- Bluetooth: Less common for standard printers but found in some portable or specialized devices, Bluetooth printers create a direct, short-range wireless connection with your computer or mobile device.
Network Printers (Ethernet): For Larger Environments
While less common for home users, network printers (often referred to as wired network printers) connect to your router or network switch via an Ethernet cable. This allows multiple devices on the network to access the printer. For Windows 10, treating these similarly to Wi-Fi printers is often the approach, as they are accessible through the network.
Gathering Essential Information and Accessories
To ensure a smooth installation, have the following ready:
- Printer Manual: This is your ultimate resource. It will contain specific instructions for your model, including network setup details, initial configuration steps, and often troubleshooting advice.
- Printer Name and Model Number: You’ll need this information to find drivers if Windows doesn’t detect them automatically. It’s usually found on the printer itself or on the original packaging.
- Wi-Fi Network Name (SSID) and Password: If you’re installing a wireless printer, you’ll need to know your network’s name and password to connect the printer to it.
- USB Cable (if applicable): Ensure you have the correct USB cable for your printer. Some printers come with one, while others require you to purchase it separately.
- Power Cable: Naturally, your printer needs to be plugged in and powered on.
Installing Your Printer on Windows 10: Step-by-Step
Windows 10 is designed to make printer installation as straightforward as possible. Most of the time, the operating system will handle the heavy lifting. However, there are scenarios where manual intervention is required.
Automatic Installation: The Plug-and-Play Experience
For many USB printers, Windows 10’s plug-and-play feature means the installation is almost entirely automatic.
- Power On and Connect: Ensure your printer is powered on and connected to your computer via a USB cable. If it’s a wireless printer, ensure it’s powered on and has been initially configured to join your Wi-Fi network (refer to your printer’s manual for this step).
- Windows Detection: Windows 10 will typically detect the new hardware. You might see a notification in the bottom-right corner of your screen saying “Setting up a device” or “Device driver software installation.”
- Driver Installation: In most cases, Windows will automatically search for and download the necessary driver software from Windows Update. This process can take a few minutes.
- Confirmation: Once the driver is successfully installed, you’ll usually receive a notification confirming that your printer is ready to use.
If Windows automatically detects and installs your printer, you’re essentially done with the initial setup! You can proceed to printing a test page.
Manual Installation: When Automatic Doesn’t Work
Sometimes, Windows might not automatically detect your printer, or it might not have the correct driver. In these situations, you’ll need to manually add the printer.
Adding a Printer Manually Through Settings
This is the primary method for adding printers that weren’t automatically detected or for printers connected over a network.
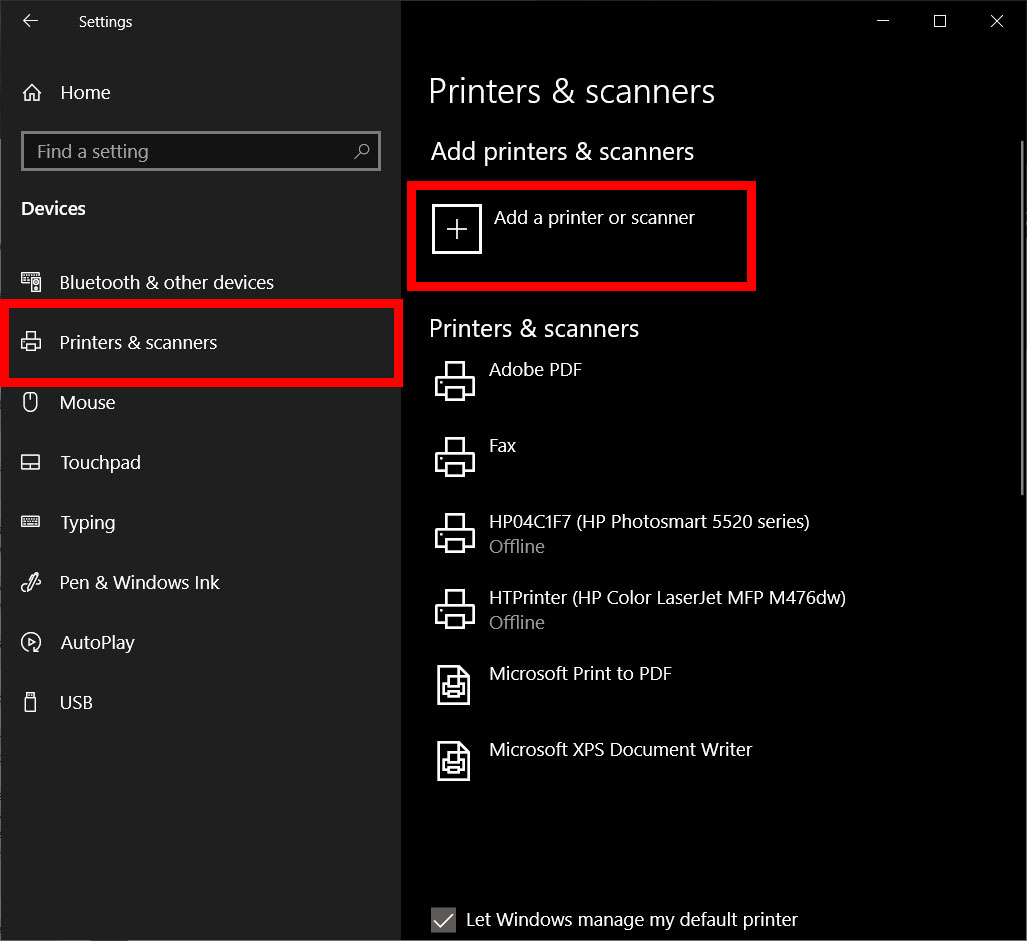
- Open Settings: Click the Start button and then click on the gear icon to open Settings.
- Navigate to Devices: In the Settings window, click on Devices.
- Select Printers & Scanners: On the left-hand menu, click on Printers & scanners.
- Add a Printer: Click the “Add a printer or scanner” button.
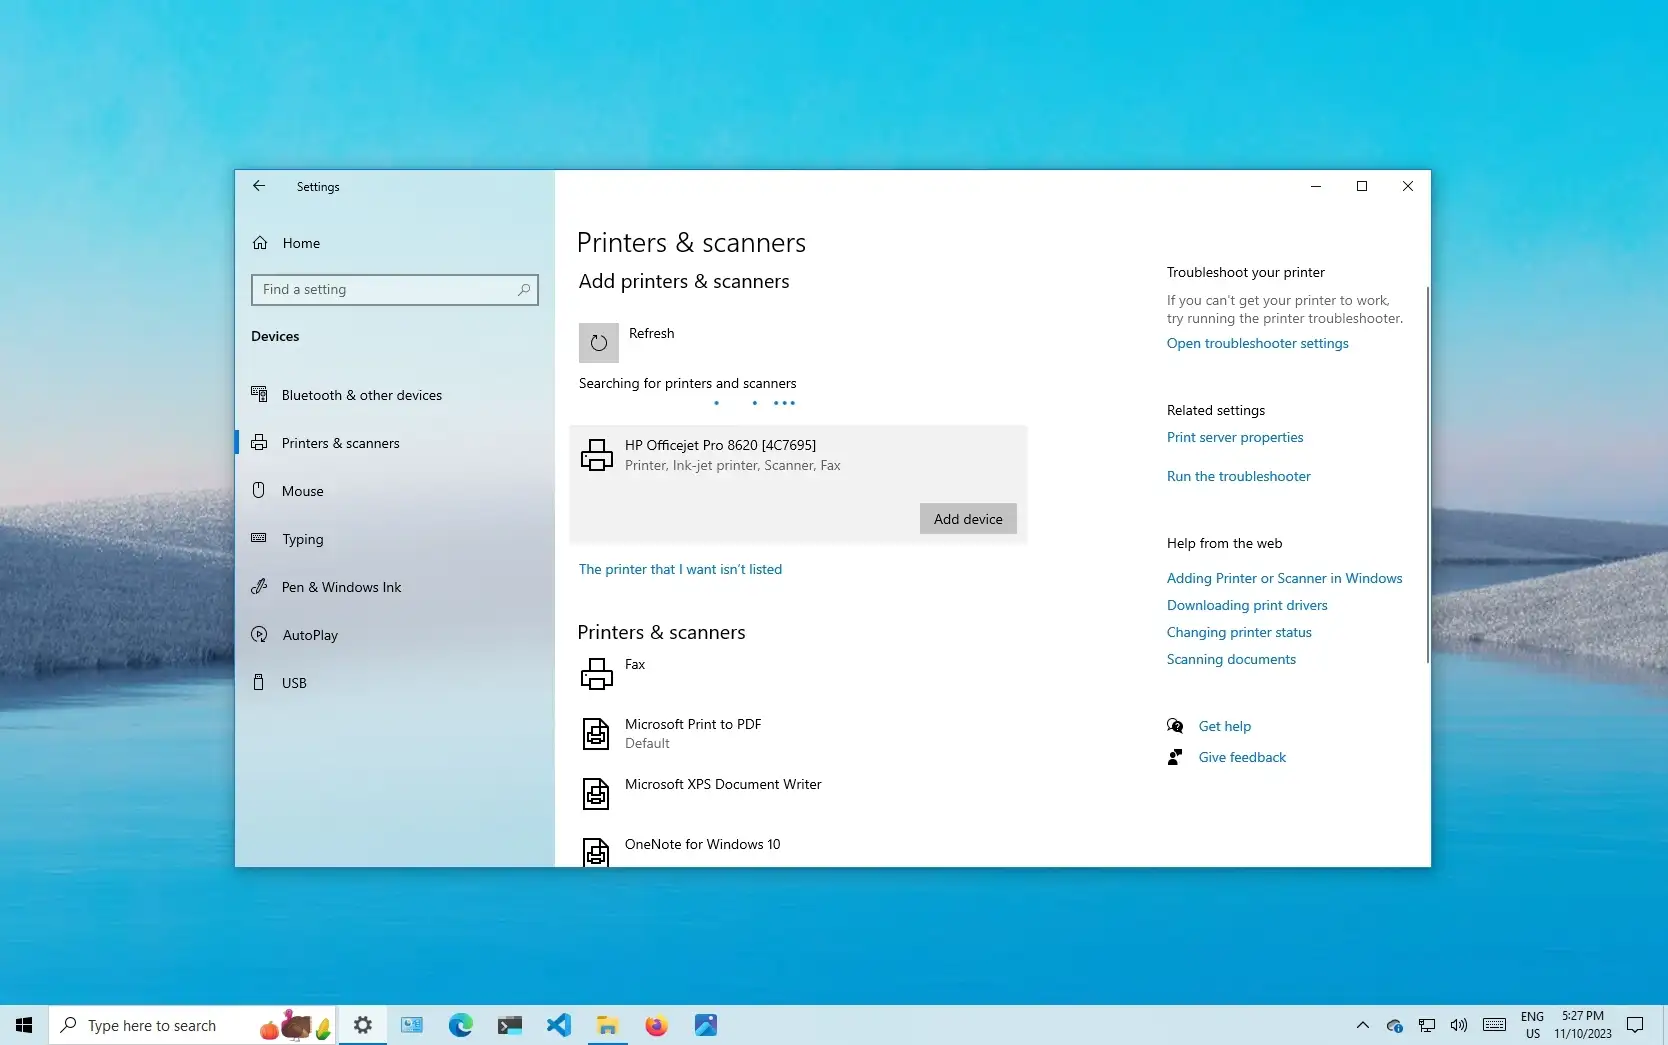
- Windows Search: Windows will begin searching for printers on your network and connected via USB.
- If your printer appears in the list: Click on your printer’s name and then click “Add device.” Windows will attempt to install it.
- If your printer doesn’t appear: Click the link that says “The printer that I want isn’t listed.” This will open a new window with more advanced options.
The “Add Printer” Wizard: Advanced Options
This wizard offers several ways to find and install your printer.
- “My printer is a little older. Help me find it.”: This option is useful for older printers that might not be immediately discoverable by modern protocols. Windows will try to locate them by scanning the network.
- “Select a shared printer by name.”: This is for printers that are shared from another computer on your network. You’ll need to know the network path to the shared printer (e.g.,
\ComputerNamePrinterShareName). - “Add a printer using a TCP/IP address or hostname.”: This is crucial for network printers. If you know the IP address of your printer, you can enter it here. This bypasses the need for Windows to discover it automatically.
- Finding your printer’s IP address: This can usually be found in your printer’s control panel settings or by printing a network configuration page from the printer itself.
- “Add a Bluetooth, wireless or network discoverable printer.”: This option is similar to the initial search but provides a dedicated path for wireless and network printers.
- “Add a local printer or network printer with manual settings.”: This is often the most comprehensive option and allows you to specify a port and install drivers manually.
Installing Drivers Manually
If you chose “Add a local printer or network printer with manual settings” or if Windows prompts you to select a driver, you’ll need to:
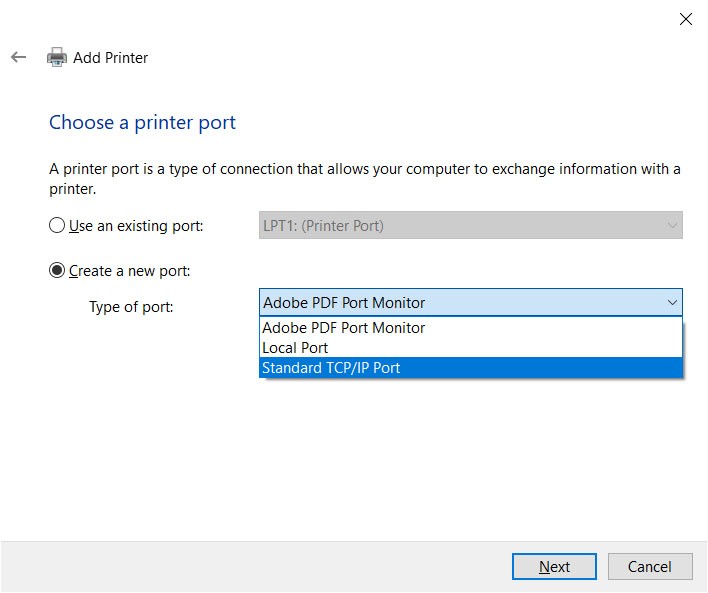
- Choose a Port: Select the appropriate port. For USB printers, it’s usually a “USB Virtual Printer Port.” For network printers, you’ll likely select a “Standard TCP/IP Port” and enter the printer’s IP address.
- Install the Driver:
- Windows Update: You can often click “Windows Update” to let Windows search its vast database for drivers.
- Have Disk: If you’ve downloaded the driver software from the manufacturer’s website, you’ll click “Have Disk…” and browse to the folder containing the driver files (usually a
.inffile). - Select from List: If the driver is already on your system, you can select your printer manufacturer from the left pane and then choose your specific printer model from the right pane.
Printer Name and Sharing
After installing the driver, you’ll be prompted to name your printer. Choose a descriptive name. You’ll also have the option to share the printer on your network. If you choose to share it, you’ll need to provide a share name.
Installing Wireless Printers: The Network Connection
Wireless printer setup can sometimes be a bit more involved, as the printer needs to be connected to your Wi-Fi network first.
- Printer’s Initial Setup: Follow your printer’s manual to connect it to your Wi-Fi network. This usually involves using the printer’s control panel or a dedicated setup utility on your computer or smartphone. You’ll need your Wi-Fi network name (SSID) and password.
- Windows Detection: Once the printer is on your network, go back to Settings > Devices > Printers & scanners and click “Add a printer or scanner.” Windows should detect your wireless printer.
- Add the Printer: Click on your printer’s name when it appears and click “Add device.” Windows will attempt to install the necessary drivers.
If Windows struggles to find it, you might need to use the “Add a printer using a TCP/IP address or hostname” option, after finding the printer’s IP address.
Testing Your Printer and Basic Troubleshooting
Once your printer is installed, the next crucial step is to confirm it’s working correctly.
Printing a Test Page
This is the most reliable way to ensure your printer is set up and functional.
- Navigate to Printers & Scanners: Go to Settings > Devices > Printers & scanners.
- Select Your Printer: Click on the printer you just installed.
- Manage: Click the “Manage” button.
- Print a Test Page: On the printer management screen, click “Print a test page.”
If the test page prints successfully, congratulations! Your printer is ready for use.
Common Troubleshooting Steps
If the test page doesn’t print or you encounter errors, here are some common issues and how to resolve them:
- Check Connections:
- USB: Ensure the USB cable is securely plugged into both the printer and the computer. Try a different USB port on your computer.
- Wireless: Verify that the printer is connected to the correct Wi-Fi network. Check your router to ensure it’s functioning. Restart both your router and your printer.
- Restart Your Computer and Printer: A simple restart can resolve many temporary glitches.
- Check Printer Status: Ensure your printer isn’t out of ink or paper, and that there are no error lights or messages on the printer’s display.
- Windows Troubleshooter: Windows 10 has a built-in troubleshooter that can often diagnose and fix printer problems. Go to Settings > Update & Security > Troubleshoot > Additional troubleshooters and run the “Printer” troubleshooter.
- Update or Reinstall Drivers:
- Go to Settings > Devices > Printers & scanners, select your printer, click “Manage,” and then click “Printer properties.” Under the “Advanced” tab, you might see an option to update the driver.
- Alternatively, go to the printer manufacturer’s website, download the latest drivers for your specific printer model and Windows 10 version, and then run the installer. You may need to uninstall the existing driver first through “Apps & features” in Settings.
- Check Print Queue: Sometimes print jobs can get stuck. Go to Settings > Devices > Printers & scanners, select your printer, click “Manage,” and then click “Open queue.” You can cancel any stuck documents.
By following these steps, you should be able to confidently install your printer on Windows 10. Whether it’s a trusty USB device or a modern wireless marvel, getting it connected and operational is a key part of a productive digital setup. Remember that your printer’s manual is your best friend, and a little patience goes a long way in navigating any technical hurdle.
aViewFromTheCave is a participant in the Amazon Services LLC Associates Program, an affiliate advertising program designed to provide a means for sites to earn advertising fees by advertising and linking to Amazon.com. Amazon, the Amazon logo, AmazonSupply, and the AmazonSupply logo are trademarks of Amazon.com, Inc. or its affiliates. As an Amazon Associate we earn affiliate commissions from qualifying purchases.