In the ever-evolving landscape of technology, accessing your favorite applications across different operating systems is paramount for seamless productivity and a personalized digital experience. For users of Ubuntu, a popular and robust Linux distribution, the question of installing Google Chrome, one of the most widely used web browsers, is a common one. While Ubuntu comes with its own excellent browser, Firefox, many users prefer the familiarity, features, and integration offered by Google Chrome. This guide will walk you through the straightforward process of installing Google Chrome on your Ubuntu system, ensuring you can navigate the web with your preferred tool.

Why Google Chrome on Ubuntu?
Before diving into the installation process, it’s worth considering why someone might opt for Google Chrome on Ubuntu. While open-source alternatives are fantastic, Google Chrome boasts several advantages that appeal to a broad user base:
- Cross-Platform Synchronization: If you use Chrome on other devices (Windows, macOS, Android), installing it on Ubuntu allows you to seamlessly sync your bookmarks, history, passwords, extensions, and settings. This provides a consistent browsing experience across all your platforms.
- Vast Extension Ecosystem: The Chrome Web Store offers an unparalleled selection of extensions that can significantly enhance your browsing experience, from productivity tools and ad blockers to developer utilities and entertainment apps.
- Performance and Stability: Chrome is renowned for its speed and stability, thanks to its multi-process architecture that isolates tabs and extensions. This can lead to smoother browsing, especially when dealing with complex web pages or multiple tabs.
- Google Services Integration: For users deeply embedded in the Google ecosystem (Gmail, Google Drive, Google Docs, etc.), Chrome offers the most integrated and optimized experience.
- Developer Tools: Chrome’s built-in developer tools are considered industry-leading, providing powerful features for web developers to debug, inspect, and optimize websites.
While Ubuntu’s default browser, Firefox, is a formidable competitor with its own strengths in privacy and customization, the reasons above often lead Ubuntu users to seek out Chrome.
Preparing for Installation
Before we begin the actual installation, it’s good practice to ensure your system is up-to-date. This helps avoid potential dependency conflicts and ensures you’re installing the latest, most stable version of Chrome.
Updating Your Ubuntu System
To update your system, open the Terminal. You can usually find the Terminal application by searching for it in the application menu or by pressing Ctrl + Alt + T. Once the Terminal is open, execute the following commands:
sudo apt update
sudo apt upgrade
sudo apt update: This command refreshes the list of available packages and their versions from the Ubuntu repositories. It’s like checking for the latest catalog of software.sudo apt upgrade: This command installs the newer versions of all the packages that are currently installed on your system. If there are any security patches or feature updates for your existing software, this command will apply them.
You will be prompted to enter your user password to authorize these commands, as they require administrative privileges.
Understanding Package Formats: DEB vs. Snap
When installing software on Ubuntu, you’ll often encounter different package formats. For Google Chrome, the most common and recommended methods involve using either the .deb package format or the Snap package format.
.debPackages: These are the traditional package files for Debian-based systems like Ubuntu. They contain all the files and metadata needed to install an application. When you download Chrome directly from Google’s website, it’s typically provided as a.debfile.- Snap Packages: Snaps are a newer packaging system developed by Canonical (the company behind Ubuntu). Snaps are “universal” packages designed to work across different Linux distributions. They are self-contained, meaning they bundle most of their dependencies, which can simplify installation and ensure applications run consistently.
Both methods are valid and have their pros and cons, which we’ll explore in the installation sections.
Installing Google Chrome via the DEB Package
This is often the most direct method for installing Google Chrome on Ubuntu. Google provides an official .deb package for its browser.
Downloading the Google Chrome DEB Package
- Open your current web browser (likely Firefox).
- Navigate to the official Google Chrome download page: You can search for “download Google Chrome” on your preferred search engine, or directly visit the URL:
https://www.google.com/chrome/ - Click the “Download Chrome” button.
- Select the correct package type. For Ubuntu and Debian-based systems, choose the “64 bit .deb (For Debian/Ubuntu)” option.
- Click “Accept and Install.”
The browser will prompt you to save the file. Save it to your Downloads folder or another easily accessible location.
Installing the DEB Package Using the Terminal
Once the .deb file is downloaded, you can install it using the Terminal.
-
Open the Terminal (
Ctrl + Alt + T). -
Navigate to the directory where you saved the
.debfile. If you saved it to yourDownloadsfolder, use the following command:cd Downloads -
Install the package using
dpkgandapt: Whiledpkgcan install.debfiles,aptis better at handling dependencies. The following command installs the downloaded package and automatically resolves any missing dependencies:sudo apt install ./google-chrome-stable_current_amd64.debsudo: Executes the command with administrative privileges.apt install: The command to install packages using APT../: This tellsaptto look for the package in the current directory.google-chrome-stable_current_amd64.deb: This is the typical name of the downloaded file. If your downloaded file has a slightly different name, adjust it accordingly.
-
Enter your password when prompted.
-
Confirm installation: You may be asked to confirm the installation by typing
Yand pressing Enter.
The installation process will begin, downloading and installing Chrome along with any necessary dependencies.
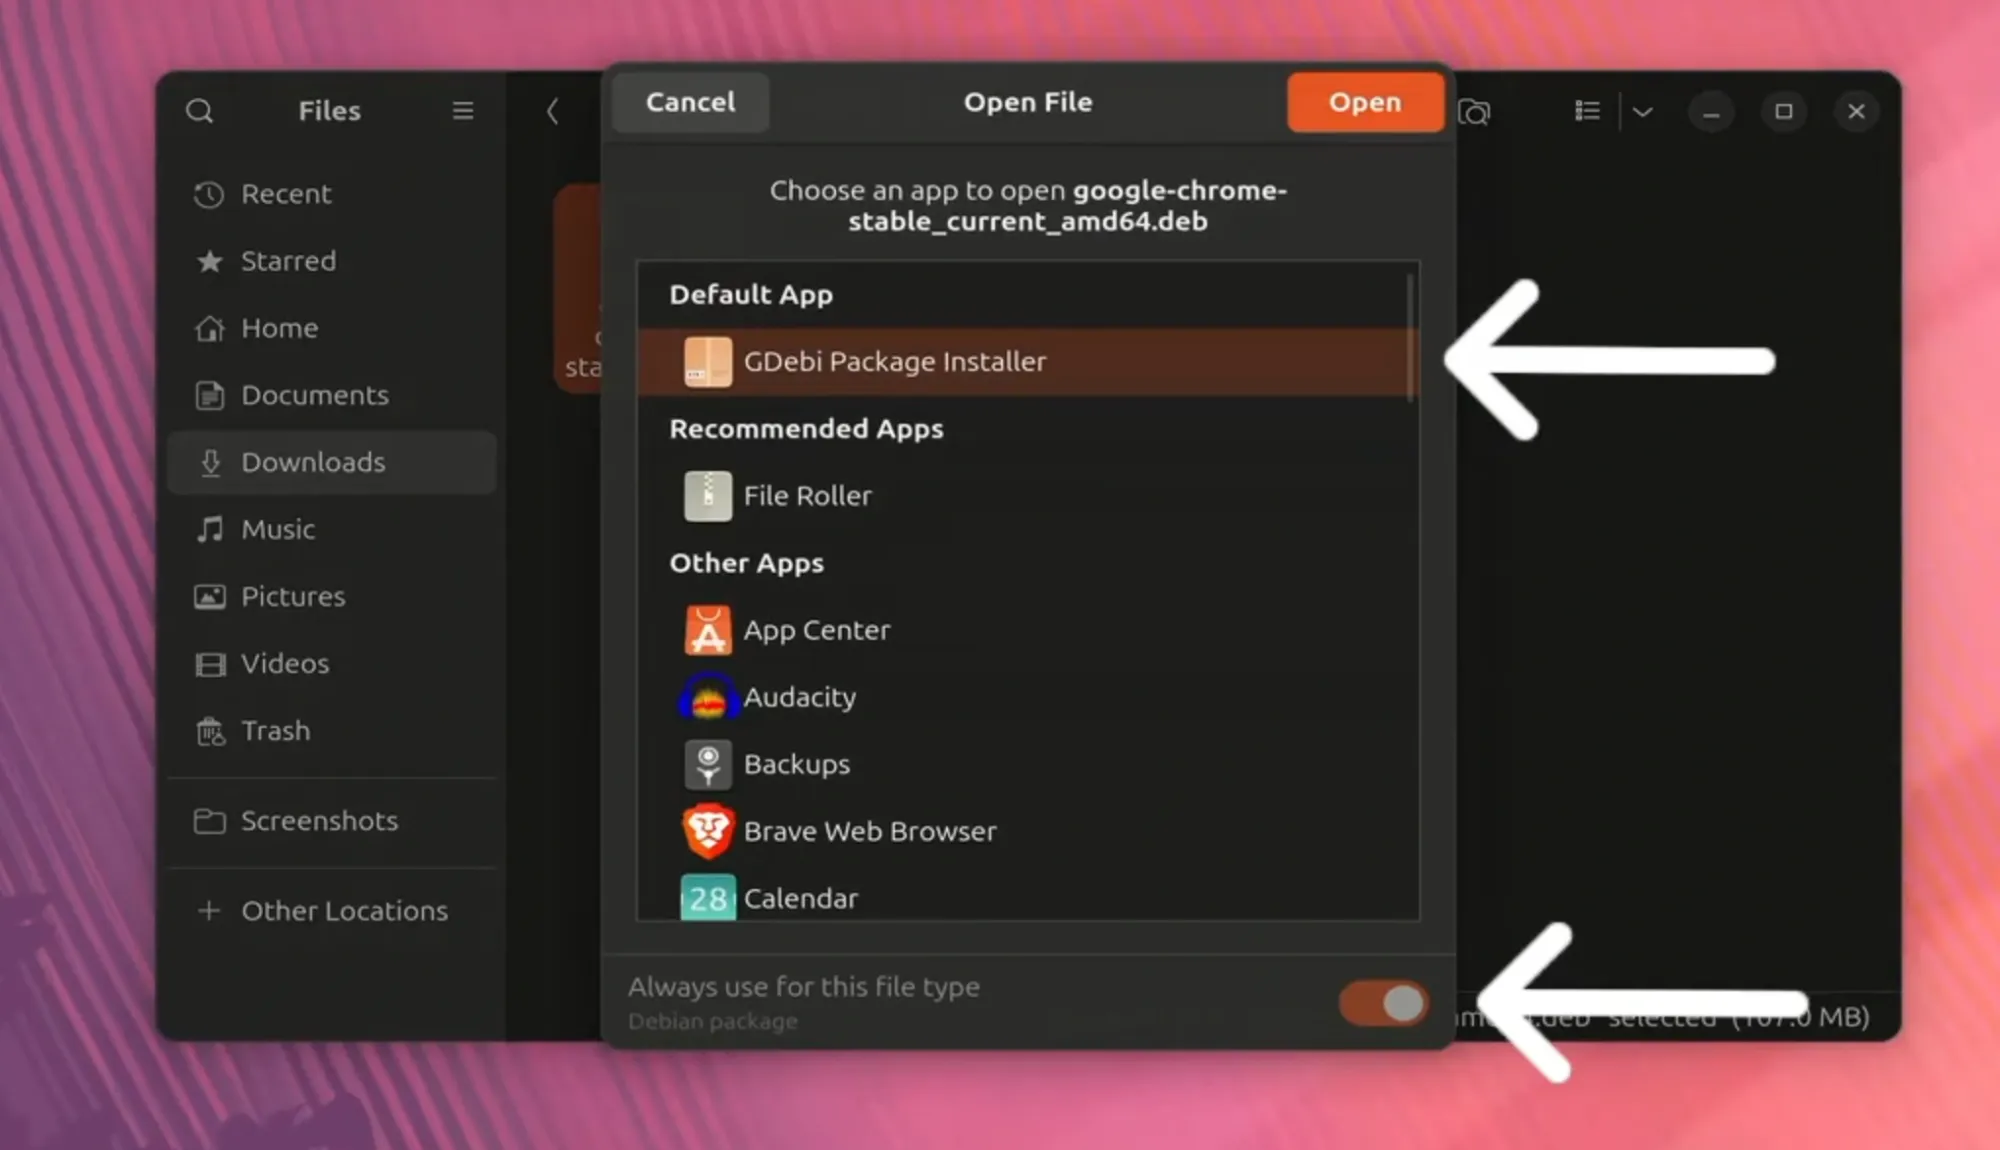
Installing the DEB Package via a GUI (Graphical User Interface)
If you prefer a graphical approach, Ubuntu provides an easier way to install .deb files.
- Open your File Manager.
- Navigate to your
Downloadsfolder (or wherever you saved the.debfile). - Double-click the downloaded
google-chrome-stable_current_amd64.debfile. - The Software Install application will open. This application is Ubuntu’s default tool for managing software installations.
- Click the “Install” button.
- Enter your password in the authentication prompt.
The software will be installed automatically, and you’ll see a confirmation once it’s complete.
Installing Google Chrome via Snap
Ubuntu also offers Google Chrome as a Snap package. Snaps are designed to be more robust and easier to manage, as they bundle their dependencies.
Installing Chrome as a Snap
-
Open the Terminal (
Ctrl + Alt + T). -
Execute the following command to install the Chrome Snap:
sudo snap install google-chromesudo snap install: This is the command to install a Snap package.google-chrome: This is the name of the Chrome Snap package in the Snap Store.
-
Enter your password when prompted.
-
Confirm installation: You may be asked to confirm by typing
Yand pressing Enter.
The Snap system will download and install Google Chrome. This method often handles dependencies automatically and can be more isolated from your main system.
Benefits of the Snap Method
- Automatic Updates: Snaps are generally configured to update automatically in the background, meaning you’ll always be on the latest version without manual intervention.
- Sandboxing: Snaps run in a confined environment (sandbox), which can enhance security by limiting the access an application has to your system.
- Cross-Distribution Compatibility: While you’re on Ubuntu now, if you switch to another Linux distribution that supports Snaps, your installed Chrome Snap could theoretically work there as well.
Launching Google Chrome
After installation, you can launch Google Chrome in a couple of ways:
From the Application Menu
- Click on the “Show Applications” icon (usually a grid of dots) in the bottom-left corner of your screen (or press the
Superkey, often the Windows key). - Type “Chrome” in the search bar.
- Click on the Google Chrome icon to launch the browser.
From the Terminal
You can also launch Chrome directly from the Terminal:
google-chrome-stable
Setting Google Chrome as Your Default Browser
If you plan to use Chrome regularly, you’ll likely want to set it as your default browser. This means that when you click on links in other applications (like emails or documents), they will open in Chrome automatically.
Using the System Settings
- Open System Settings. You can find this by searching for it in the application menu or by clicking the gear icon in the system tray.
- Navigate to Default Applications (or a similar section, depending on your Ubuntu version).
- Under the Web or Browser category, select Google Chrome from the dropdown menu.
Using the Terminal (for older Ubuntu versions or specific configurations)
While the GUI method is preferred, you can also manage default applications via the command line.
xdg-settings set default-web-browser google-chrome.desktop
Managing Google Chrome Updates
When you install Google Chrome via the .deb package, Ubuntu’s package management system (APT) will also handle its updates. Google adds its own repository to your system during the .deb installation, which allows apt update and apt upgrade to fetch new Chrome versions.
If you installed Chrome as a Snap, updates are managed automatically by the Snap daemon. You typically don’t need to do anything; Chrome will update itself in the background.
Troubleshooting Common Issues
While the installation is usually smooth, you might encounter a few hiccups.
“Package is not installed” after sudo apt install ./file.deb
This can happen if there are unmet dependencies. The recommended way to handle this is to use apt for installation, as it can resolve dependencies:
sudo apt --fix-broken install
sudo apt update
sudo apt install ./google-chrome-stable_current_amd64.deb
Alternatively, if the .deb installation failed, try the Snap method, which often bundles its dependencies.
Google Chrome Doesn’t Launch
- Check for errors: If you launched from the terminal, any error messages might provide clues.
- Reinstall: Sometimes, a clean reinstallation can resolve issues.
- System Resources: Ensure your system has enough RAM and processing power, especially if you have many tabs or extensions open.
Graphics Issues
In rare cases, especially with older hardware or specific graphics drivers, you might encounter rendering issues. This is less common with Chrome but can sometimes be resolved by disabling hardware acceleration in Chrome’s settings.

Conclusion
Installing Google Chrome on Ubuntu is a straightforward process that empowers users to leverage the features and familiarity of their preferred browser on a powerful Linux operating system. Whether you opt for the traditional .deb package or the modern Snap format, you’ll be browsing the web with Google Chrome in no time. By following the steps outlined above, you can ensure a smooth installation and enjoy a consistent, feature-rich browsing experience across all your devices. Remember to keep your system updated and your browser patched for optimal security and performance. Enjoy your Google Chrome experience on Ubuntu!