Fallout: New Vegas stands as a titan in the pantheon of role-playing games, a decade-old masterpiece renowned for its intricate narrative, compelling choices, and iconic Mojave Wasteland. Despite its age, a vibrant community continues to explore and enhance this classic, largely thanks to the power of modding. However, diving into the world of Fallout: New Vegas mods can feel like navigating the irradiated wastes themselves – complex, fraught with peril, and potentially overwhelming for the uninitiated. Installing mods improperly can lead to instability, crashes, and ultimately, a frustrating experience.
This comprehensive guide aims to demystify the process, providing a structured, step-by-step approach to properly install Fallout: New Vegas mods. We’ll equip you with the knowledge and tools necessary to transform your game into a stable, personalized masterpiece, ensuring countless more hours of adventures in the post-apocalyptic Southwest. Whether you’re looking to fix bugs, enhance graphics, or introduce entirely new content, mastering proper mod installation is the key to unlocking New Vegas’s full potential.
The Imperative of Modding: Why Enhance Your Wasteland Experience?
For many, playing Fallout: New Vegas vanilla (unmodded) is an enjoyable experience in itself. Yet, the game, like many titles of its era, carries a few quirks, technical limitations, and areas that could benefit from modern polish. Modding isn’t just about adding new guns or quirky outfits; it’s about refining, expanding, and safeguarding your beloved game against the ravages of time and technical debt.
Breathing New Life into a Classic
The reasons to mod Fallout: New Vegas are as diverse as the choices you make in the game itself. At its core, modding allows players to transcend the original game’s boundaries. This includes critical bug fixes and stability improvements that address long-standing issues overlooked by official patches, transforming a crash-prone experience into a smooth journey. Graphic overhauls can push the visual fidelity of the Mojave to unprecedented levels, making character models more detailed, environments more immersive, and lighting more dynamic.
Beyond aesthetics and stability, mods introduce an incredible breadth of new content. This ranges from quality-of-life adjustments like improved UI and inventory management, to entirely new quests, companions, weapons, armor, and even expansive worldspaces that feel like official DLCs. For those who have explored every nook and cranny of the original game, mods offer a fresh incentive to return, providing hundreds, if not thousands, of additional hours of gameplay. Ultimately, modding is about tailoring the game to your exact preferences, creating a truly personalized and timeless adventure.
Essential Preparations for a Stable Modding Journey
Before you even think about downloading your first mod, meticulous preparation is paramount. A stable foundation is the bedrock of any successful modded Fallout: New Vegas playthrough. Neglecting these initial steps is a common pitfall that often leads to instability and troubleshooting headaches down the line.
Firstly, ensure you have a clean installation of Fallout: New Vegas, ideally the Ultimate Edition, which includes all official DLCs. The DLCs are integral to a vast majority of mods and provide a more comprehensive base for modding. “Clean” means no previous mod files, no residual INI tweaks, just the game as Steam (or your platform of choice) installed it. It’s highly recommended to perform a fresh install even if you think your game is clean, especially if you’ve modded it before. Verify the integrity of game files through your game launcher (e.g., Steam’s “Verify integrity of game files…”) to catch any corrupt or missing core files.
Next, run the game vanilla at least once to the main menu. This step ensures that the game generates its essential configuration files (Fallout.ini and FalloutPrefs.ini) in your DocumentsMy GamesFalloutNV folder. Without these files, many modding tools and utilities will not function correctly. Furthermore, it’s advisable to make a backup of these initial INI files, as they can sometimes be tweaked by mods or tools, and having a pristine copy can be a lifesaver for troubleshooting. Familiarizing yourself with the game’s installation directory and document folders will also prove invaluable as you navigate various mod installation methods.
Mastering Your Toolkit: Core Utilities and Mod Managers
The vast majority of modern Fallout: New Vegas mods rely on a specific set of tools and utilities to function correctly and stably. These aren’t optional additions; they are the fundamental building blocks that enable advanced modding, expand the game’s capabilities, and manage your growing collection of enhancements. Understanding and correctly installing these components is the second crucial step in your modding journey.
The Unsung Heroes: Essential Script Extenders and Fixes
At the heart of a stable modded Fallout: New Vegas experience lie several indispensable utilities that patch engine limitations, extend scripting capabilities, and fix long-standing bugs. These “behind-the-scenes” components are often prerequisites for more complex mods and are vital for overall game stability.
-
New Vegas Script Extender (NVSE): This is arguably the most critical utility. NVSE expands Fallout: New Vegas’s scripting capabilities, allowing mod authors to create much more sophisticated and dynamic content than the base game engine would otherwise permit. Most complex mods, especially those adding new gameplay mechanics or UIs, explicitly require NVSE. Without it, these mods simply won’t function, or they will cause immediate crashes. NVSE is installed directly into your game’s root directory (where
FalloutNV.exeis located). -
FNV 4GB Patcher: Fallout: New Vegas is a 32-bit application, meaning it can only natively access up to 2GB of RAM. In a heavily modded scenario, especially with high-resolution textures and numerous script-heavy mods, the game can quickly exceed this limit, leading to frequent crashes, particularly in memory-intensive areas. The 4GB Patcher modifies the game’s executable to allow it to access up to 4GB of RAM, significantly improving stability and reducing crashes on modern 64-bit systems. This is a simple executable that you run once on
FalloutNV.exe. -
JIP LN NVSE Plugin: This is a powerful extension to NVSE that adds a multitude of new functions and fixes to the game engine, often addressing bugs that even official patches couldn’t resolve. Many modern quality-of-life mods and bug fixes rely on JIP LN NVSE to function correctly. It also improves performance in various aspects. It’s installed as a plugin within your NVSE setup.
-
JohnnyGuitar NVSE: Another crucial NVSE plugin, JohnnyGuitar NVSE offers further engine fixes and expands scripting capabilities, particularly relating to UI elements, animations, and various other game systems. It’s often required by mods that introduce complex new animations, visual effects, or custom user interfaces. Like JIP LN, it’s installed as an NVSE plugin.
These utilities form the backbone of a stable modding setup. Installing them correctly and in the proper order, usually before you start adding numerous content mods, will save you immense headaches later on.
Your Command Center: Mod Organizer 2 (MO2)
While manual mod installation might seem straightforward for a single mod, managing dozens or hundreds of mods quickly becomes an untenable nightmare. This is where a robust mod manager becomes indispensable. Among the various options, Mod Organizer 2 (MO2) stands head and shoulders above the rest for Fallout: New Vegas.
MO2 is a powerful and sophisticated mod manager known for its “virtual file system.” Unlike older mod managers that directly install files into your game’s data folder, MO2 keeps all mod files isolated in separate folders. When you launch the game through MO2, it creates a virtual data folder on the fly, merging all active mods without altering your original game installation. This offers several critical advantages:
- Clean Game Directory: Your
Fallout New VegasDatafolder remains pristine, containing only the base game files. This makes troubleshooting, disabling mods, or even uninstalling everything incredibly easy, as you simply deactivate or remove mods within MO2. - Conflict Management: MO2 clearly shows you which mods are overwriting files from other mods, indicating potential conflicts. Its left pane manages mod order (which mod wins conflicts for loose files), while its right pane manages plugin load order (which plugin takes priority in the game’s engine).
- Profiles: You can create multiple modding profiles, each with its own set of active mods, load order, and even INI settings. This is perfect for experimenting with different mod setups or having distinct playthroughs (e.g., a vanilla-friendly lore-abiding profile and an insane, over-the-top profile).
- Easy Installation and Uninstallation: Installing new mods is typically a drag-and-drop affair or a simple click to install from a downloaded archive. Deactivating or uninstalling is just as simple, with no residual files left behind in your game directory.
Installing MO2 is a straightforward process. Download the latest stable version, typically from its GitHub page or Nexus Mods. Run the installer, choosing a location outside of your game directory and Program Files. Once installed, launch it, point it to your Fallout: New Vegas installation, and begin configuring your profiles and executables. MO2 will become your central hub for all modding activities.
The Step-by-Step Modding Process: From Setup to Stable Gameplay
With your game prepared and your essential tools at the ready, it’s time to embark on the actual mod installation process. This section breaks down the journey into manageable steps, ensuring a logical and stable progression from a vanilla game to a fully modded experience.
Laying the Foundation: Game Installation and Initial Configuration
- Clean Installation: As previously emphasized, start with a fresh installation of Fallout: New Vegas Ultimate Edition. Delete any previous mod files or remnants if you’ve modded before.
- Verify Game Files: Use your game launcher (e.g., Steam) to verify the integrity of the game files.
- Initial Launch: Run the game at least once to the main menu. This generates the necessary INI files in
DocumentsMy GamesFalloutNV. Exit the game. - INI Tweaks (Optional but Recommended): For better performance and stability, open
Fallout.iniandFalloutPrefs.ini.- In
FalloutPrefs.ini, search foriNumHWThreads. If you have a quad-core CPU or higher, set this value toiNumHWThreads=2. The game’s engine doesn’t handle more than 2 threads efficiently, and setting it higher can cause stuttering. - Also in
FalloutPrefs.ini, findbUseThreadedAIand set it tobUseThreadedAI=0. The multi-threading AI is notoriously buggy. - In
Fallout.ini, under the[General]section, addbPostExportSizeLimit=1to allow more save game data. - For stuttering issues, you might want to consider
iFPSClamp=60under[General]inFallout.ini, though this can cause physics issues if your FPS goes above 60. A better solution is a proper FPS limiter. - Save changes to both files.
- In
Integrating Core Utilities with MO2
This is where you bring your “Unsung Heroes” into play, ensuring they are correctly recognized by MO2.
- Install NVSE:
- Download the latest stable NVSE from its official source (usually Silverlock.org).
- Extract the contents of the archive directly into your Fallout: New Vegas root directory (e.g.,
C:Program Files (x86)SteamsteamappscommonFallout New Vegas). Ensurenvse_loader.exe,nvse_1_4.dll,nvse_steam_loader.dll, and theDatafolder (containing NVSE plugins) are alongsideFalloutNV.exe.
- Run FNV 4GB Patcher:
- Download the 4GB Patcher.
- Place the executable in your Fallout: New Vegas root directory.
- Run the patcher. It will automatically patch
FalloutNV.exe. You should see a confirmation message. You can then delete the patcher executable.
- Install JIP LN NVSE Plugin and JohnnyGuitar NVSE:
- Download these from Nexus Mods.
- Crucially, install these as normal mods through Mod Organizer 2. Do not place them directly in the Data folder. Drag and drop their archives into MO2’s left pane (or click the “Install new mod from archive” button). MO2 will guide you through the installation. Ensure they are enabled in MO2’s left pane.
- Configure MO2 Executables:
- In MO2, click the “Configure executables” dropdown menu at the top.
- Click the
+button and select “Add from file…” - Navigate to your Fallout: New Vegas root directory and select
nvse_loader.exe. - Name it something like “New Vegas (NVSE)” and click “Add.”
- From now on, you will always launch Fallout: New Vegas through this “New Vegas (NVSE)” executable from within MO2. This ensures all your mods and NVSE are correctly loaded.
Curating Your Mod List and Resolving Conflicts
Now for the exciting part: adding content mods!
- Start with Essential Bug Fixes:
- Yukichigai Unofficial Patch (YUP): Download YUP from Nexus Mods. This is the most comprehensive bug-fixing mod for FNV and should be one of the very first mods you install. Install it via MO2 like JIP LN and JohnnyGuitar.
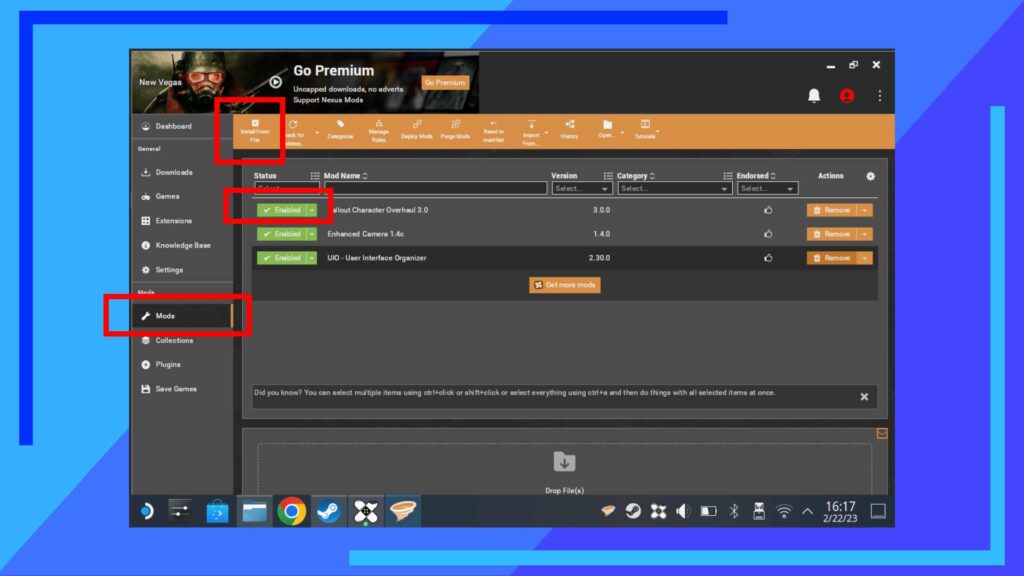
- Install Other Mods via MO2:
- Browse Nexus Mods for content that interests you (graphics, gameplay, new quests, etc.).
- For each mod, carefully read its description, requirements, installation instructions, and check for any known conflicts.
- Download the mod archives.
- Drag and drop the archives into MO2’s left pane or use the “Install a new mod from an archive” button. MO2 will guide you through the installation. If the mod has an installer (e.g., FOMOD installer), MO2 will activate it.
- Enable the mod in MO2’s left pane.
- Manage Load Order with LOOT:
- LOOT (Load Order Optimisation Tool) is an essential utility that automatically sorts your plugin load order (
.esp,.esm,.eslfiles) to minimize conflicts and improve stability. - Download and install LOOT (outside of your game directory).
- In MO2, add LOOT as an executable (similar to how you added NVSE_loader.exe).
- Run LOOT through MO2 regularly as you add new mods. After running, LOOT will inform you of any missing masters, dirty plugins, or critical issues. Apply the sorted order.
- LOOT (Load Order Optimisation Tool) is an essential utility that automatically sorts your plugin load order (
- Address Loose File Conflicts:
- MO2’s left pane shows your mod installation order. If a mod has a
+symbol or an!indicating an overwrite, hover over it. MO2 will tell you which files are being overwritten and by which mods. - The mod lower down in the left pane (higher priority number) wins conflicts for loose files (textures, meshes, scripts). Adjust this order based on which mod’s assets you prefer or what the mod author recommends.
- MO2’s left pane shows your mod installation order. If a mod has a
First Launch and Beyond: Testing and Troubleshooting
- Initial Launch: Launch “New Vegas (NVSE)” from MO2. If the game crashes before the main menu, you likely have a critical issue:
- Missing Master: Check LOOT’s report. A mod is trying to load but requires another plugin that isn’t present or enabled.
- Corrupt Mod: Re-download and reinstall the last mod you added.
- NVSE Not Running: Ensure
nvse_loader.exeis the selected executable in MO2.
- In-Game Testing: Once you reach the main menu, start a new game (or load a clean save if you’re confident). Test areas where you’ve added texture/mesh mods. Check if new items appear or new quests trigger.
- Frequent Saving: Save frequently, and use multiple save slots. This is standard good practice in modded games.
- Adding Mods Incrementally: Avoid installing 50 mods at once. Add 3-5 mods, test thoroughly, then add more. This makes identifying the culprit of any new issues far easier.
- Read Mod Descriptions: This cannot be stressed enough. Mod authors often include critical information about requirements, known conflicts, and specific installation steps.
Advanced Techniques and Sustaining Your Modded Game
As your mod list grows, and you become more comfortable with the basics, you’ll inevitably encounter more complex scenarios that require a deeper understanding of modding tools and practices. These advanced techniques are key to maintaining a stable and highly customized game.
Deep Dive into Conflict Resolution with FNVEdit
While LOOT handles plugin load order, it doesn’t resolve actual content conflicts within plugins. For this, FNVEdit (also known as xEdit) is your invaluable scalpel. FNVEdit allows you to view, compare, and modify records within your .esm and .esp files.
- Cleaning Dirty Plugins: Many official game masters and even some older mods contain “dirty edits” – accidental changes that can cause instability. LOOT will typically flag these. FNVEdit allows you to “clean” these files by removing identical-to-master records and deleted references. Always back up your files before cleaning.
- Identifying Record Conflicts: When two or more plugins modify the same game record (e.g., two mods changing the stats of the same weapon), FNVEdit highlights these conflicts. The plugin lowest in your load order (highest priority) “wins” by default.
- Creating Merged Patches: For minor conflicts where you want specific changes from multiple mods to coexist, you can create a “merged patch” or “bashed patch.” This involves manually selecting preferred record changes from conflicting mods and consolidating them into a new
.espfile. This custom patch ensures compatibility without sacrificing desired features from different mods. While creating a full merged patch is an advanced topic, simply understanding why FNVEdit is crucial for resolving deep conflicts is a vital step in high-level modding.
The Art of Performance Optimization
Heavily modded games, especially with high-resolution texture packs and numerous script-heavy additions, can put a significant strain on your system. Optimizing performance is about striking a balance between visual fidelity, content, and stability.
- Texture Optimization: High-resolution texture mods are often significant performance hogs. Tools like Ordenador or similar texture optimizers can compress textures without a noticeable loss in quality, reducing VRAM usage and improving load times.
- Performance-Enhancing Mods: Several mods exist specifically to improve game performance and stability, often by streamlining scripts, reducing unnecessary background processes, or optimizing game systems. Examples include the NV Stutter Remover (though some modern systems may prefer alternatives or built-in NVSE features), and various memory management mods.
- Resource Monitoring: Keep an eye on your CPU, GPU, and RAM usage while playing. Tools like MSI Afterburner can help identify bottlenecks. If your VRAM is consistently maxed out, it’s a sign to reduce texture quality or count.
- FPS Limiting: While counter-intuitive, capping your frame rate (e.g., at 60 FPS) can actually improve stability, especially in games built on older engines like Gamebryo, where physics and scripts can break at very high frame rates.
Community Wisdom and Best Practices
The Fallout: New Vegas modding community is a vast reservoir of knowledge, experience, and support. Tapping into this collective wisdom is a cornerstone of successful and enjoyable modding.
- Read Mod Descriptions (Again!): Reiterate this golden rule. Mod authors put considerable effort into detailing compatibility, requirements, and troubleshooting tips. Skimming can lead to frustrating hours trying to fix self-inflicted problems.
- Check Requirements: Always ensure you have all prerequisite mods installed (e.g., NVSE, specific NVSE plugins, other base mods) before installing a new mod.
- Backup Your Saves: Regularly back up your entire save game folder (
DocumentsMy GamesFalloutNVSaves). While MO2 protects your game installation, your saves are unique to your playthrough. - Test Incrementally: As mentioned, install a few mods, test, then install a few more. This methodical approach makes troubleshooting exponentially easier.
- Engage with the Community: If you encounter an issue you can’t solve, utilize the forums on Nexus Mods, dedicated modding subreddits (like r/fnv and r/falloutmods), and Discord servers. When asking for help, provide as much detail as possible: your mod list, load order (from LOOT), game version, and a clear description of the problem. Screenshots or crash logs (if available) are also incredibly helpful.
- Don’t Overdo It: While tempting to install every cool mod you find, restraint is a virtue in modding. More mods equal more potential conflicts and increased instability. Prioritize quality over quantity.
Modding Fallout: New Vegas is a journey, not a destination. It requires patience, attention to detail, and a willingness to learn. But the rewards – a personalized, stable, and endlessly replayable version of one of the greatest RPGs ever made – are immeasurable. By following this guide and adhering to best practices, you’re well-equipped to tame the Mojave and truly make it your own. Happy modding, Courier!
aViewFromTheCave is a participant in the Amazon Services LLC Associates Program, an affiliate advertising program designed to provide a means for sites to earn advertising fees by advertising and linking to Amazon.com. Amazon, the Amazon logo, AmazonSupply, and the AmazonSupply logo are trademarks of Amazon.com, Inc. or its affiliates. As an Amazon Associate we earn affiliate commissions from qualifying purchases.