In an increasingly automated digital world, where operating systems boast sophisticated plug-and-play capabilities, the idea of manually installing a driver might seem like a relic of the past. Yet, for tech enthusiasts, IT professionals, and even the everyday user looking to squeeze every ounce of performance or compatibility out of their hardware, understanding “how to manually install a driver” remains an invaluable skill. This comprehensive guide will demystify the process, empowering you to take control of your system’s hardware, enhance performance, bolster security, and ultimately extend the life and value of your technology investments.

Understanding When and Why Manual Driver Installation is Necessary
While Windows and other operating systems are adept at identifying and installing drivers for most common peripherals, there are numerous scenarios where this automatic process falls short. Knowing when and why to intervene manually is the first step towards becoming a more proficient tech user.
Beyond Plug-and-Play: Common Scenarios
Automatic driver installation, typically handled by Windows Update or a quick plug-and-play detection, works wonders for mainstream hardware. However, several situations necessitate a manual approach:
- New Hardware Not Automatically Recognized: You’ve just installed a brand-new graphics card, a specialized network adapter, or a high-end audio interface, and your operating system either doesn’t detect it at all or installs a generic, non-optimal driver. This often happens with bleeding-edge technology or niche professional equipment.
- Performance Optimization: Default drivers might get your hardware working, but they rarely unlock its full potential. Manufacturers frequently release updated drivers that offer significant performance boosts, stability improvements, or new features, especially for components like graphics cards, chipsets, and SSDs. Gamers and content creators frequently update drivers manually to stay at the forefront of their respective fields.
- Troubleshooting Hardware Issues: If a piece of hardware is acting erratically, crashing, or displaying error codes, a corrupted or outdated driver is often the culprit. Manually uninstalling the problematic driver and installing a fresh, verified version can resolve a host of issues, saving you from expensive repairs or premature hardware replacement.
- Legacy Hardware Support: You might have an older, perfectly functional printer, scanner, or specialized device that newer operating systems no longer automatically support. Finding and manually installing an older, compatible driver (often from the manufacturer’s archived support pages) can breathe new life into these “retired” components, aligning with a frugal approach to technology spending.
- Specific Feature Activation: Some drivers come with companion software that enables advanced features, control panels, or customization options not available with a basic driver. Installing these manually ensures you get the complete software package and functionality.
- Offline Installation: In environments without internet access, or when setting up a fresh OS install without network drivers, manual installation from a USB drive or disc is the only option.
- Overcoming Driver Conflicts: Occasionally, two drivers might conflict, or Windows might stubbornly insist on using a less suitable driver. Manual intervention allows you to force the installation of a preferred driver, resolving the conflict and restoring proper functionality.
The Benefits of Taking Control
Embracing manual driver installation offers a multitude of benefits that extend beyond simply getting hardware to work. It’s about empowering yourself, enhancing your digital security, and maximizing your tech investments.
- Enhanced Performance and Stability: By ensuring your hardware always runs on the most current and correct drivers, you’re guaranteeing optimal performance, smoother operation, and fewer system crashes. This directly impacts your productivity and overall user experience.
- Extended Hardware Lifespan: Keeping drivers updated can prevent unnecessary strain on components, resolve bugs that could lead to hardware stress, and even prolong the operational life of your devices. This translates to significant cost savings by delaying the need for replacements.
- Improved Security: Drivers are a crucial interface between your hardware and operating system. Outdated drivers can sometimes contain security vulnerabilities that attackers might exploit. Manually updating drivers from trusted sources closes these potential gaps, contributing to a more robust digital security posture.
- Greater Control and Customization: Manual installation often means gaining access to manufacturer-specific control panels and settings, allowing you to fine-tune your hardware’s behavior to your exact needs, whether it’s for gaming, professional work, or everyday use.
- Problem Solving Skills: Learning this process builds valuable troubleshooting skills, making you more self-reliant and less dependent on external technical support. This boosts your confidence and understanding of your system.
Essential Preparations Before You Begin
Before diving into the actual installation process, a few critical preparatory steps can save you time, frustration, and potential system instability. These steps are crucial for a smooth and secure driver installation experience.
Identifying Your Hardware and Operating System
The first and most vital step is to accurately identify the hardware component for which you need a driver and the specifics of your operating system.
- Identify the Hardware:
- Manufacturer and Model: For internal components like graphics cards, motherboards, and network adapters, you might need to open your computer case or use system information tools. For peripherals (printers, mice, keyboards), the model number is usually printed on the device itself.
- Device Manager: A great tool within Windows. Right-click the Start button, select “Device Manager.” Look for the device, noting its name. If it has an exclamation mark or is listed as “Unknown Device,” you’ll need to research its Vendor ID (VID) and Device ID (PID) by right-clicking it, selecting “Properties,” then “Details” tab, and choosing “Hardware IDs” from the Property dropdown. Searching these IDs online can help identify the exact hardware.
- Identify Your Operating System:
- Version and Architecture: You need to know if you’re running Windows 10, Windows 11 (or macOS/Linux if applicable), and whether it’s 64-bit (x64) or 32-bit (x86). To check on Windows, right-click the Start button, select “System,” and look under “System type.” Incorrect OS architecture can lead to driver incompatibility.
Acquiring the Correct Driver Files
Once you know your hardware and OS, the next step is to obtain the right driver files. This is where “Brand” awareness comes into play.
- Official Manufacturer Websites (Recommended): Always prioritize downloading drivers directly from the official website of the hardware manufacturer (e.g., NVIDIA, AMD, Intel, Logitech, HP, Dell, Asus). This ensures you get the latest, most stable, and malware-free drivers. Navigate to their “Support” or “Downloads” section, enter your product model, and select your operating system.
- Driver Discs (If Available): If your hardware came with a driver CD/DVD, it’s a reliable source, especially for older systems or offline installations. However, these drivers are often outdated, so check the manufacturer’s website for newer versions afterward.
- Windows Update (Limited): While Windows Update does provide drivers, they are often generic or slightly older versions. It’s a good first step, but not always optimal for performance.
- Avoid Third-Party Driver Websites: Be extremely cautious with websites that promise “universal drivers” or offer driver downloads from unofficial sources. These can be a significant digital security risk, potentially containing malware, adware, or incorrect drivers that destabilize your system.
Before downloading, create a dedicated folder for your driver files. This makes them easy to find later. If the download is a compressed file (ZIP, RAR), extract its contents to this folder. Look for .inf, .sys, .dll, and executable (.exe) files within the extracted folder.
Creating a System Restore Point
This is a non-negotiable step for safe manual driver installation. A system restore point acts as a snapshot of your system’s working state, allowing you to easily revert to it if the new driver causes problems. This is a critical productivity and digital security measure, protecting your data and system integrity.
- How to Create a Restore Point (Windows):
- Search for “Create a restore point” in the Windows search bar and open it.
- In the System Properties dialog box, go to the “System Protection” tab.
- Ensure System Protection is “On” for your main drive (usually C:). If not, select “Configure” and turn it on.
- Click the “Create…” button.
- Give the restore point a descriptive name (e.g., “Before installing [Driver Name]”).
- Click “Create” and wait for the process to complete.
Step-by-Step Guide to Manual Driver Installation
With your preparations complete, you’re ready to proceed with installing the driver. There are typically three main methods, depending on how the driver files are packaged.
Method 1: Installing via Device Manager (The Standard Approach)
This method is ideal when you have specific driver files (often a .inf file) downloaded from the manufacturer, and it gives you granular control.
Accessing Device Manager and Identifying the Device
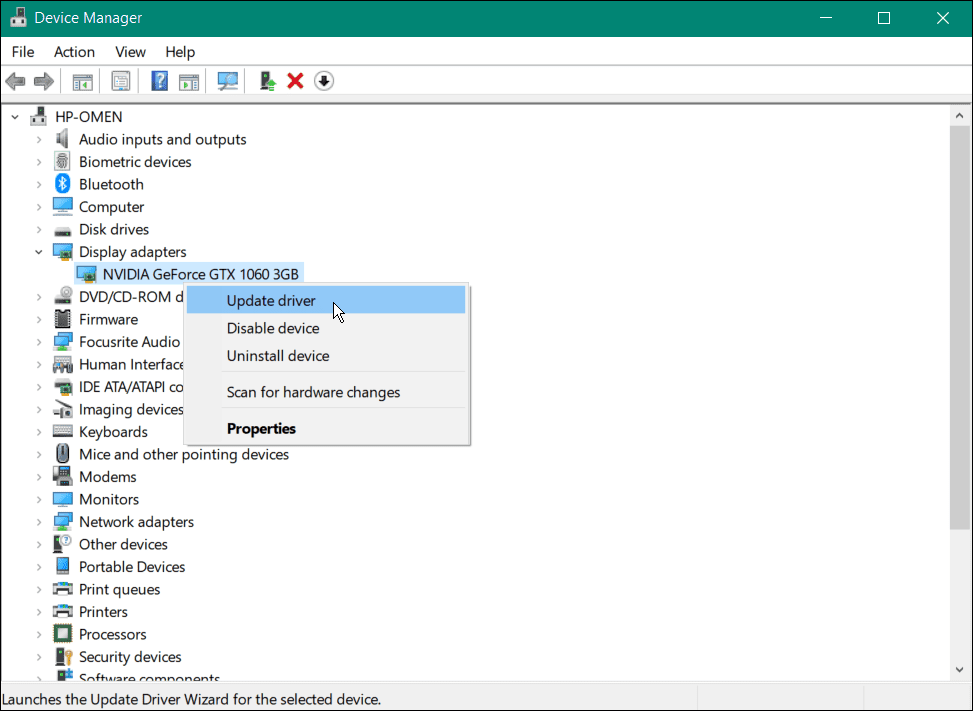
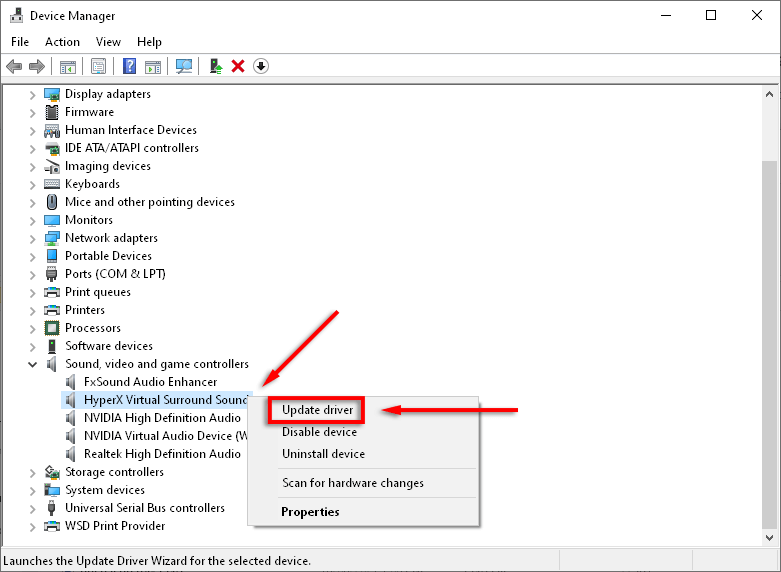
- Open Device Manager: Right-click the Start button and select “Device Manager.”
- Locate the Device: Find the category for your hardware (e.g., “Display adapters,” “Network adapters,” “Sound, video and game controllers”). Expand it and locate your specific device. If it’s not working, it might have an exclamation mark, or be listed as “Unknown Device” under “Other devices.”
- Right-Click and Select “Update Driver”: Right-click on the device you want to update and choose “Update driver.”
Option A: Browse My Computer for Driver Software
This is the most common manual installation route.
- Choose “Browse my computer for driver software.”
- Specify the Driver Location: Click “Browse…” and navigate to the folder where you extracted or saved your driver files. It’s usually sufficient to point to the parent folder containing the
.inffile and other driver components. - Ensure “Include subfolders” is checked. This allows Windows to search through any subdirectories within your specified folder to find the correct
.inffile. - Click “Next.” Windows will now attempt to find and install the driver from the specified location.
- Follow On-Screen Prompts: If Windows finds a suitable driver, it will install it. You might see a progress bar. If successful, you’ll get a confirmation message. You may be prompted to restart your computer.
Option B: Let Me Pick from a List of Available Drivers on My Computer
This option is useful for forcing an older driver, selecting a specific driver from multiple available ones, or when “Browse my computer” doesn’t work.
- From the “Update Driver” window, choose “Let me pick from a list of available drivers on my computer.”
- Click “Have Disk…” (This is the key step for manual
.inffile selection). - Click “Browse…” and navigate to the specific
.inffile within your driver folder. Select it and click “Open,” then “OK.” - Select the Driver: A list of compatible drivers from that
.inffile will appear. Choose the correct driver for your hardware from the list. - Click “Next.” Windows will proceed with the installation.
- Follow On-Screen Prompts: Complete the installation and restart if prompted.
Method 2: Using a Dedicated Installer/Executable (Simpler for Many)
Many manufacturers provide drivers in an easy-to-use executable file (e.g., setup.exe or install.exe). This is often the simplest method if available.
- Locate the Executable: Go to the folder where you downloaded or extracted your driver files. Look for a file named
setup.exe,install.exe, or something similar. - Run as Administrator: Right-click the executable file and select “Run as administrator.” This ensures the installer has the necessary permissions to modify system files.
- Follow On-Screen Instructions: The installer will typically guide you through the process with a wizard. Read each step carefully, accepting license agreements, choosing installation locations (usually default), and selecting components if offered.
- Restart Your Computer: Most driver installers will prompt you to restart your computer after installation to finalize the changes. Do not skip this step.
Method 3: The Advanced INF File Installation (For Tricky Situations)
Occasionally, you might have a driver package without an obvious installer or a device manager path doesn’t quite work. This method directly targets the .inf file. Use this with caution and only if other methods fail.
- Locate the .inf File: Navigate to the folder containing your extracted driver files and find the
.inffile. (e.g.,nv_dispi.inffor an NVIDIA card, orhdaudio.inf). - Right-Click the .inf File: Right-click on the
.inffile. - Select “Install”: In the context menu, you might see an “Install” option. Click it.
- Confirm Installation (if prompted): Windows might ask for confirmation or display a User Account Control prompt.
- Check Device Manager: After installation, go to Device Manager and see if your device is now correctly recognized and functioning. A restart might still be necessary.
Important Note on Unsigned Drivers: If Windows warns you about installing an “unsigned driver,” it means the driver hasn’t been digitally signed by Microsoft. While many legitimate drivers (especially older or niche ones) might be unsigned, they can also pose a security risk if from an untrusted source. Only proceed if you are absolutely certain of the driver’s origin and necessity. You may need to temporarily disable driver signature enforcement in Windows to install such drivers, but this is generally not recommended for average users due to the associated security risks.
Troubleshooting Common Driver Installation Issues
Even with careful preparation, manual driver installation can sometimes hit a snag. Knowing how to troubleshoot common issues can save you a lot of headache and keep your system running smoothly.
Driver Signature Verification Problems
As mentioned, Windows prioritizes digitally signed drivers for security. If you encounter errors about “unsigned drivers” or “driver has been blocked,” and you are certain the driver is legitimate (e.g., directly from the manufacturer for legacy hardware):
- Temporarily Disable Driver Signature Enforcement: This is a last resort and should be used with extreme caution.
- Restart your PC while holding the Shift key to enter the Advanced Startup Options.
- Go to “Troubleshoot” > “Advanced options” > “Startup Settings” > “Restart.”
- After restarting, you’ll see a list of options. Press
7orF7to “Disable driver signature enforcement.” - Install your driver. Crucially, restart your PC normally afterwards to re-enable signature enforcement.
“This Device Cannot Start” or Error Codes
After installing a driver, if the device in Device Manager still shows an exclamation mark or an error code (e.g., Code 10, Code 31, Code 43), it indicates a problem.
- Re-verify Driver Compatibility: Double-check that the driver you installed is indeed for your exact hardware model and operating system version/architecture. A slight mismatch can cause these errors.
- Try an Older Driver Version: Sometimes, the very latest driver might have a bug or incompatibility with your specific system configuration. Try downloading and installing an older, stable version from the manufacturer’s archives.
- Run System File Checker (SFC) and DISM: Corrupted system files can interfere with driver loading.
- Open Command Prompt as Administrator.
- Type
sfc /scannowand press Enter. Let it complete. - If issues persist, type
DISM /Online /Cleanup-Image /RestoreHealthand press Enter. This can repair the Windows image.
- Check for Hardware Malfunction: In rare cases, the error might indicate a physical problem with the hardware itself, not just the driver. If no driver solution works, consider testing the hardware in another system if possible.
Reverting to a Previous Driver Version
If a newly installed driver causes instability or performance degradation, you can often “roll back” to the previous working version.
- Open Device Manager: Right-click the Start button and select “Device Manager.”
- Locate the Device: Find the problematic device.
- Open Properties: Right-click the device and select “Properties.”
- Go to the “Driver” Tab: Look for the “Roll Back Driver” button.
- Click “Roll Back Driver”: If the button is active, click it and follow the prompts. You’ll usually be asked to provide a reason for rolling back.
- Restart Your Computer: A restart is typically required to complete the rollback.
If the “Roll Back Driver” button is grayed out, it means there’s no previous driver version stored to revert to. In this case, you would need to manually uninstall the current driver and then install an older, known-good driver package.
The Long-Term Benefits of Proper Driver Management
Mastering manual driver installation and proactive driver management isn’t just about fixing immediate problems; it’s a strategic approach to optimizing your technology ecosystem. It aligns perfectly with the broader goals of tech proficiency, financial prudence, and digital resilience.
Enhancing System Performance and Stability
Drivers are the bedrock of hardware-software interaction. Regularly updating them, especially for critical components like graphics cards, chipsets, and network adapters, ensures that your system benefits from:
- Performance Improvements: Often seen in benchmarks and real-world application responsiveness.
- Bug Fixes: Addressing issues that could cause crashes, freezes, or glitches.
- Compatibility Updates: Ensuring smooth operation with the latest operating system updates and software.
- New Feature Unlock: Accessing functionalities that might not have been available with older driver versions.
This proactive approach to driver management translates directly into a more fluid, reliable, and enjoyable computing experience, boosting your productivity and reducing downtime.
Extending Hardware Lifespan and Value
In an era of rapid technological cycles, getting the most out of your existing hardware is both environmentally conscious and financially savvy. By keeping drivers updated and correctly installed:
- Prevent Premature Obsolescence: An older piece of hardware, with the right drivers, can often perform admirably for years beyond its initial “prime,” delaying the need for costly upgrades. Think of an older but still capable graphics card receiving performance boosts from new drivers, allowing it to run newer games at acceptable settings.
- Maintain Resale Value: Well-maintained hardware, with all its components functioning optimally thanks to proper drivers, will generally command a higher resale price.
- Avoid Repair Costs: Many seemingly “hardware problems” are, in fact, driver-related. Being able to diagnose and fix these yourself through manual driver installation can save you significant money on professional repair services.
This financial angle of “Money” management is clear: by intelligently managing your drivers, you protect and maximize the return on your initial hardware investment.
A Proactive Approach to Digital Security
Drivers are low-level components with deep access to your system. As such, they are potential vectors for security vulnerabilities.
- Patching Vulnerabilities: Manufacturers frequently release driver updates that patch newly discovered security flaws. Staying current with these updates helps safeguard your system against potential exploits.
- Ensuring Trusted Sources: The process of manually installing drivers reinforces the importance of downloading from official, trusted brand websites. This habit reduces the risk of inadvertently installing malicious software disguised as drivers, a common tactic for cybercriminals.
- System Stability as a Security Measure: A stable system, free from driver conflicts and errors, is inherently more secure. It provides fewer cracks for malware to exploit and makes it easier for security software to function effectively.
In conclusion, while automatic updates offer convenience, the ability to manually install and manage drivers is a fundamental skill for anyone serious about optimizing their technology. It grants greater control, enhances performance, extends hardware life, and strengthens your digital security posture, transforming you from a passive user into an empowered tech guardian.
aViewFromTheCave is a participant in the Amazon Services LLC Associates Program, an affiliate advertising program designed to provide a means for sites to earn advertising fees by advertising and linking to Amazon.com. Amazon, the Amazon logo, AmazonSupply, and the AmazonSupply logo are trademarks of Amazon.com, Inc. or its affiliates. As an Amazon Associate we earn affiliate commissions from qualifying purchases.