In today’s hyper-connected world, efficient and reliable communication tools are no longer a luxury but a necessity. Whether you’re collaborating with colleagues across continents, attending online classes, or simply catching up with loved ones, a robust video conferencing platform can make all the difference. Among the leading solutions, Zoom has emerged as a dominant force, renowned for its user-friendly interface, robust features, and broad compatibility. For Mac users, integrating Zoom into their daily workflow is a straightforward process, unlocking a world of seamless virtual interactions.
This guide will walk you through every step of installing Zoom on your Mac, from the initial download to understanding its core functionalities. We’ll also touch upon how Zoom can significantly enhance productivity and digital security, aligning with the broader technological landscape that defines our modern digital lives.
Understanding Zoom: More Than Just a Video Call
Before diving into the installation process, it’s beneficial to understand why Zoom has become such a pivotal tool. Zoom isn’t merely an application for making video calls; it’s a comprehensive communication suite designed to facilitate various forms of interaction.
Core Features and Benefits for Mac Users
Zoom’s appeal lies in its rich feature set, thoughtfully designed to cater to a wide range of users:
- High-Quality Video and Audio: Experience crystal-clear video and audio, ensuring that your virtual meetings feel as close to in-person interactions as possible. This is crucial for effective communication, especially in professional settings where nuances can be easily missed.
- Screen Sharing: Effortlessly share your entire screen, specific application windows, or even a whiteboard. This feature is invaluable for presentations, collaborative document editing, and technical support.
- Recording Capabilities: Record your meetings for future reference, training purposes, or to share with those who couldn’t attend. This feature adds a layer of accountability and accessibility to your virtual interactions.
- Breakout Rooms: Divide participants into smaller groups for focused discussions, workshops, or team-building activities. This is a powerful tool for fostering engagement and encouraging active participation in larger meetings.
- Chat Functionality: Beyond video, Zoom offers integrated chat features for real-time text communication during meetings, allowing for quick sharing of links, files, and thoughts without interrupting the flow of conversation.
- Virtual Backgrounds: Personalize your meeting environment with custom virtual backgrounds, adding a touch of professionalism or fun to your calls.
- Security Features: Zoom has invested heavily in enhancing its security protocols, including end-to-end encryption for meetings, password protection, and waiting rooms, ensuring your conversations remain private and secure.
For Mac users, Zoom offers a native experience, integrating seamlessly with macOS features and providing a smooth, intuitive operation. The application is optimized for Apple hardware, ensuring performance and stability.
Installing Zoom on Your Mac: A Step-by-Step Approach
The installation process for Zoom on a Mac is designed to be user-friendly and efficient. Whether you’re a tech novice or an experienced user, these steps will guide you through the process with ease.
Downloading the Zoom Client for Meetings
The primary way to use Zoom on your Mac is by downloading the Zoom Client for Meetings. This is the dedicated application that provides access to all of Zoom’s core functionalities.
- Navigate to the Zoom Download Center: Open your preferred web browser on your Mac and go to the official Zoom download page. You can usually find this by searching for “Zoom download” or directly visiting zoom.us/download.
- Locate the “Zoom Client for Meetings” Section: On the download page, you’ll see various download options. Find the section specifically for “Zoom Client for Meetings.”
- Click the “Download” Button: There will be a prominent “Download” button. Click on it. Your Mac will then begin downloading the Zoom installer file, which typically has a
.pkgextension. - Open the Downloaded File: Once the download is complete, locate the downloaded file (usually in your “Downloads” folder) and double-click it.
- Run the Installer: A Zoom installer window will appear. Follow the on-screen prompts. You’ll likely need to agree to the license agreement and choose an installation location (the default is usually fine).
- Grant Permissions (if prompted): macOS may ask for your permission to install the application or make changes to your system. Enter your Mac’s administrator password to proceed.
- Installation Completion: The installer will run, and Zoom will be installed on your Mac. You’ll typically see a confirmation message when the installation is complete.
First-Time Launch and Account Setup
After successfully installing the Zoom application, the next step is to launch it and set up your account.
![]()
- Launch Zoom: You can find the Zoom application in your “Applications” folder or by searching for “Zoom” using Spotlight (Command + Spacebar).
- Join a Meeting vs. Sign In: Upon launching Zoom, you’ll be presented with two primary options:
- “Join a Meeting”: This option allows you to join an existing Zoom meeting without an account, provided you have the meeting ID and password.
- “Sign In”: This option is for users who already have a Zoom account or wish to create one.
- Signing In or Creating an Account:
- Existing Account: If you have a Zoom account, click “Sign In” and enter your email address and password.
- New Account: If you don’t have an account, click “Sign In” and then look for an option to “Sign Up Free.” This will redirect you to the Zoom website to create a new account. The process is straightforward and typically involves providing your email address and creating a password.
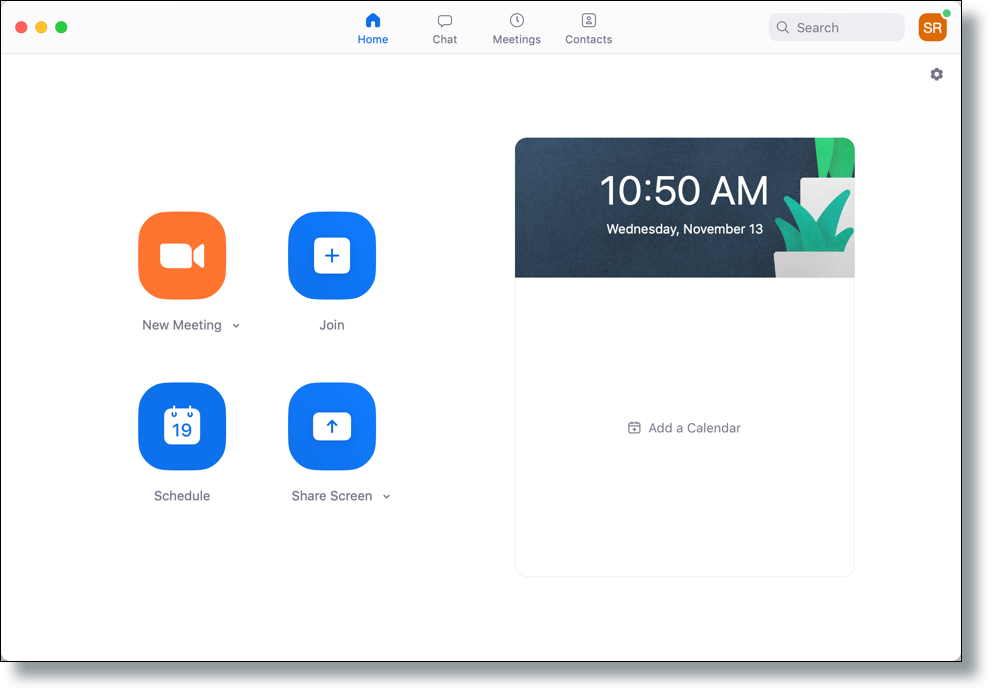
- Explore the Zoom Interface: Once signed in, you’ll be greeted with the Zoom desktop client’s main interface. Here you’ll find options to:
- New Meeting: Start an instant meeting.
- Join: Join an existing meeting.
- Schedule: Plan and schedule future meetings.
- Share Screen: Share your screen into a running meeting.
- Contacts: View and manage your Zoom contacts.
Leveraging Zoom for Enhanced Productivity and Digital Security
The installation of Zoom is just the first step in unlocking its potential for transforming your communication and collaboration. Integrating Zoom effectively can significantly boost productivity and reinforce your digital security practices.
Maximizing Productivity with Zoom
Zoom’s features are designed to streamline workflows and improve efficiency, particularly in a remote or hybrid work environment.
- Efficient Meeting Scheduling: The “Schedule” feature allows you to set up meetings in advance, invite participants, and even integrate with your calendar applications (like Outlook or Google Calendar) for seamless scheduling and reminders. This prevents last-minute scrambling and ensures everyone is on the same page.
- Collaborative Work Sessions: The screen sharing and annotation tools are invaluable for collaborative work. Teams can brainstorm ideas, review documents, and troubleshoot issues together in real-time, fostering a sense of shared progress and problem-solving.
- Remote Team Management: For managers, Zoom provides a vital channel for connecting with remote teams. Regular video check-ins, one-on-one meetings, and team-wide announcements can help maintain team cohesion and morale, even when physically apart.
- Online Learning and Training: Zoom is a powerful platform for educators and trainers. Live lectures, interactive Q&A sessions, breakout room activities, and the ability to share educational materials make online learning engaging and effective.
Ensuring Digital Security with Zoom
While Zoom’s popularity has grown, so has the awareness of digital security best practices. Zoom has made significant strides in bolstering its security features, and users can further enhance their safety by adopting these simple measures.
- Use Strong Passwords: Always set a password for your Zoom meetings. This adds a crucial layer of protection against unauthorized access.
- Enable Waiting Rooms: The waiting room feature allows the host to control who enters the meeting. This is a powerful tool to prevent “Zoombombing” and ensure that only invited participants join.
- Keep Your Software Updated: Regularly updating your Zoom client to the latest version is paramount. Updates often include critical security patches that address newly discovered vulnerabilities. Your Mac’s operating system updates are also crucial for overall system security.
- Be Mindful of Shared Information: While Zoom offers secure communication, remember to be judicious about the information you share during calls, especially if you are not using end-to-end encryption.
- Understand Zoom’s Security Settings: Familiarize yourself with Zoom’s security options within the application and in your account settings on the Zoom website. Features like locking meetings, removing participants, and disabling chat can be valuable for controlling the meeting environment.
Troubleshooting Common Installation Issues
While the Zoom installation process is generally smooth, occasionally, users might encounter minor hiccups. Here are a few common issues and their solutions.
Installer Not Opening or Quitting Unexpectedly
- Problem: The
.pkgfile doesn’t open, or the installer quits unexpectedly during the process. - Solution:
- Redownload the Installer: The download might have been incomplete or corrupted. Try downloading the Zoom client again from the official Zoom website.
- Check macOS Permissions: Ensure your Mac has the necessary permissions to install software. Go to “System Settings” (or “System Preferences”) > “Security & Privacy” > “General.” You might need to unlock it and allow apps downloaded from identified developers.
- Restart Your Mac: A simple restart can often resolve temporary system glitches that might be interfering with the installation.

Application Not Launching After Installation
- Problem: The Zoom application icon is in your Applications folder, but it won’t open.
- Solution:
- Force Quit and Relaunch: If the application seems to be frozen, try force-quitting it. Press Option + Command + Esc, select Zoom from the list of applications, and click “Force Quit.” Then, try launching Zoom again.
- Reinstall Zoom: If relaunching doesn’t work, the installation might have been corrupted. Uninstall Zoom by dragging the Zoom.us application from your Applications folder to the Trash, and then reinstall it following the steps outlined earlier.
- Check for System Compatibility: Ensure your macOS version is compatible with the latest Zoom client. You can usually find system requirements on the Zoom download page.
By following these detailed steps and troubleshooting tips, Mac users can ensure a seamless installation of Zoom, opening the door to enhanced communication, collaboration, and productivity in their digital lives. Zoom’s integration into your Mac is a gateway to a more connected and efficient way of working and interacting.
aViewFromTheCave is a participant in the Amazon Services LLC Associates Program, an affiliate advertising program designed to provide a means for sites to earn advertising fees by advertising and linking to Amazon.com. Amazon, the Amazon logo, AmazonSupply, and the AmazonSupply logo are trademarks of Amazon.com, Inc. or its affiliates. As an Amazon Associate we earn affiliate commissions from qualifying purchases.