In an increasingly interconnected world, where remote work, online education, and virtual social gatherings have become the norm, robust and reliable communication tools are indispensable. Zoom has emerged as a frontrunner in this digital revolution, offering a powerful and intuitive platform for video conferencing, webinars, and collaborative meetings. Whether you’re a professional looking to streamline your team’s workflow, a student attending virtual classes, or simply wanting to connect with loved ones across distances, installing Zoom on your laptop is the first step towards unlocking a world of seamless digital interaction.
This comprehensive guide will walk you through everything you need to know about getting Zoom up and running on your Windows or macOS laptop. We’ll delve into why Zoom stands out, detail the necessary preparations, provide a clear step-by-step installation process, guide you through initial setup, and offer valuable tips for optimizing your experience, all while keeping digital security and productivity at the forefront.
Why Choose Zoom for Your Communication Needs?
Zoom has revolutionized how we communicate, collaborate, and connect in the digital age. Its widespread adoption is a testament to its powerful features, ease of use, and versatility across various sectors. Understanding what makes Zoom a preferred choice can help you leverage its full potential.
The Power of Seamless Video Conferencing
At its core, Zoom excels as a video conferencing tool. It provides high-definition video and audio quality, ensuring that your virtual interactions feel as close to in-person as possible. Beyond basic calls, Zoom offers an impressive array of features designed to enhance productivity and collaboration:
- Screen Sharing: Effortlessly share your desktop, specific applications, or even whiteboard for dynamic presentations and collaborative brainstorming sessions. This feature is invaluable for business meetings, educational tutorials, and remote project work, aligning perfectly with modern “Tech Trends” in collaborative software.
- Virtual Backgrounds: Maintain a professional or fun aesthetic by choosing from a variety of virtual backgrounds, or even uploading your own. This not only adds a touch of personality but also helps maintain privacy by obscuring your actual surroundings, a subtle nod to “Digital Security” and “Personal Branding.”
- Breakout Rooms: Facilitate smaller group discussions within a larger meeting, making it ideal for workshops, team exercises, and interactive learning environments. This boosts engagement and productivity, making it a crucial “Productivity” tool.
- Chat Functionality: Communicate with participants privately or publicly during a call, share links, files, and important information without interrupting the flow of conversation.
- Recording Capabilities: Record meetings for future reference, allowing those who couldn’t attend to catch up, or to create evergreen content for training and documentation. This feature ties into both “Productivity” and potentially “Online Income” for content creators.
- Webinars and Large Meetings: Zoom isn’t just for small groups; it scales to host large webinars and virtual events, accommodating hundreds or even thousands of participants, making it a versatile “App” for various organizational needs.
These features collectively make Zoom a robust platform that goes beyond simple video calls, transforming it into a comprehensive collaboration suite that supports diverse communication styles and objectives.
Bridging Distances in the Digital Age
The global shift towards remote work and online learning has underscored the importance of reliable digital connectivity. Zoom has been instrumental in bridging geographical distances, allowing individuals and organizations to maintain continuity and foster connections.
- Remote Work Enablement: For businesses, Zoom has become a cornerstone of remote operations. It facilitates daily stand-ups, client presentations, team meetings, and HR interviews, ensuring that business processes remain efficient and effective regardless of location. This directly impacts “Business Finance” by reducing travel costs and increasing workforce flexibility.
- Educational Continuity: Educational institutions worldwide have adopted Zoom to deliver virtual lectures, conduct online classes, and facilitate student-teacher interactions. Its interactive features support engaging learning experiences, ensuring academic continuity during disruptions.
- Personal Connections: Beyond professional use, Zoom helps friends and families stay connected. Virtual gatherings, celebrations, and casual chats have become common, demonstrating its role in maintaining social bonds.
- Accessibility and Inclusivity: Zoom continuously works on accessibility features, making it a more inclusive platform for individuals with diverse needs. This commitment reflects broader “Tech Trends” towards universal design.
By enabling seamless communication across various facets of life, Zoom not only enhances individual “Productivity” but also plays a significant role in shaping the future of work, education, and social interaction.
Preparing for Installation: System Requirements and Best Practices
Before you dive into downloading and installing Zoom, it’s crucial to ensure your laptop is ready. A few preliminary checks can prevent common installation hiccups and ensure a smooth experience.
Essential System Specifications
While Zoom is relatively lightweight, meeting its minimum system requirements is essential for optimal performance. These requirements can vary slightly depending on your operating system and the specific features you plan to use.
- Operating System:
- Windows: Windows 7, 8, 8.1, 10, or 11 (64-bit or 32-bit). Requires at least Windows 7 SP1 for certain features.
- macOS: macOS X with macOS 10.9 (Mavericks) or later.
- Linux: Various distributions supported (Ubuntu, Mint, Red Hat, Oracle Linux, CentOS, Fedora, OpenSUSE, Arch Linux, Debian).
- Processor (CPU):
- Minimum: Single core 1 GHz or higher (for basic functionality).
- Recommended: Dual-core 2 GHz or higher (i3/i5/i7 or AMD equivalent) for smooth video conferencing, especially with multiple participants or screen sharing. Quad-core or higher is ideal for demanding scenarios.
- Memory (RAM):
- Minimum: 4 GB RAM.
- Recommended: 8 GB RAM or more for best performance, particularly when running other applications alongside Zoom.
- Hard Drive Space: At least 200 MB of free space for the installation file and application itself. More space will be needed for recorded meetings.
- Internet Connection: A stable broadband internet connection is crucial.
- Minimum: 600kbps (up/down) for high-quality video.
- Recommended: 1.2 Mbps (up/down) or higher for group video calls and screen sharing. For optimal HD video, 2.5 Mbps (up/down) is preferred.
- Audio/Video Hardware: Integrated or external speakers, microphone, and webcam are necessary for full participation in video calls. Most modern laptops come equipped with these.
Checking these specifications will help you anticipate any potential performance issues and ensure your laptop can handle Zoom effectively.
Ensuring a Smooth Setup
Beyond technical specifications, a few best practices can streamline the installation process and enhance “Digital Security.”
- Administrative Rights: You’ll typically need administrator privileges on your laptop to install software. If you’re on a work or school laptop, you might need to contact your IT department for assistance.
- Stable Internet Connection: Ensure you have a stable and reliable internet connection before starting the download. Interrupted downloads can lead to corrupted files and failed installations.
- Close Unnecessary Applications: While not strictly mandatory, closing other applications can free up system resources and prevent conflicts during the installation process, contributing to a smoother setup.
- Download from the Official Source: This is paramount for “Digital Security.” Always download the Zoom client directly from the official Zoom website (
zoom.us). Avoid third-party download sites, as they may bundle malware or provide outdated versions. This safeguard protects your system from potential vulnerabilities and ensures you receive legitimate, up-to-date software. - Temporary Disable Firewall/Antivirus (If Problems Arise): In rare cases, overly aggressive firewall or antivirus software might interfere with the download or installation. If you encounter issues, you might temporarily disable them (at your own risk and only from trusted sources) during the installation, but remember to re-enable them immediately afterward. This should only be a last resort troubleshooting step.
By following these preparatory steps, you lay the groundwork for a successful and secure Zoom installation.
Step-by-Step Installation Guide for Windows and macOS
Installing the Zoom client on your laptop is a straightforward process, whether you’re using Windows or macOS. The steps are designed to be user-friendly, guiding you from download to a fully installed application.
Downloading the Zoom Client
The first step for both operating systems is to obtain the Zoom installer.
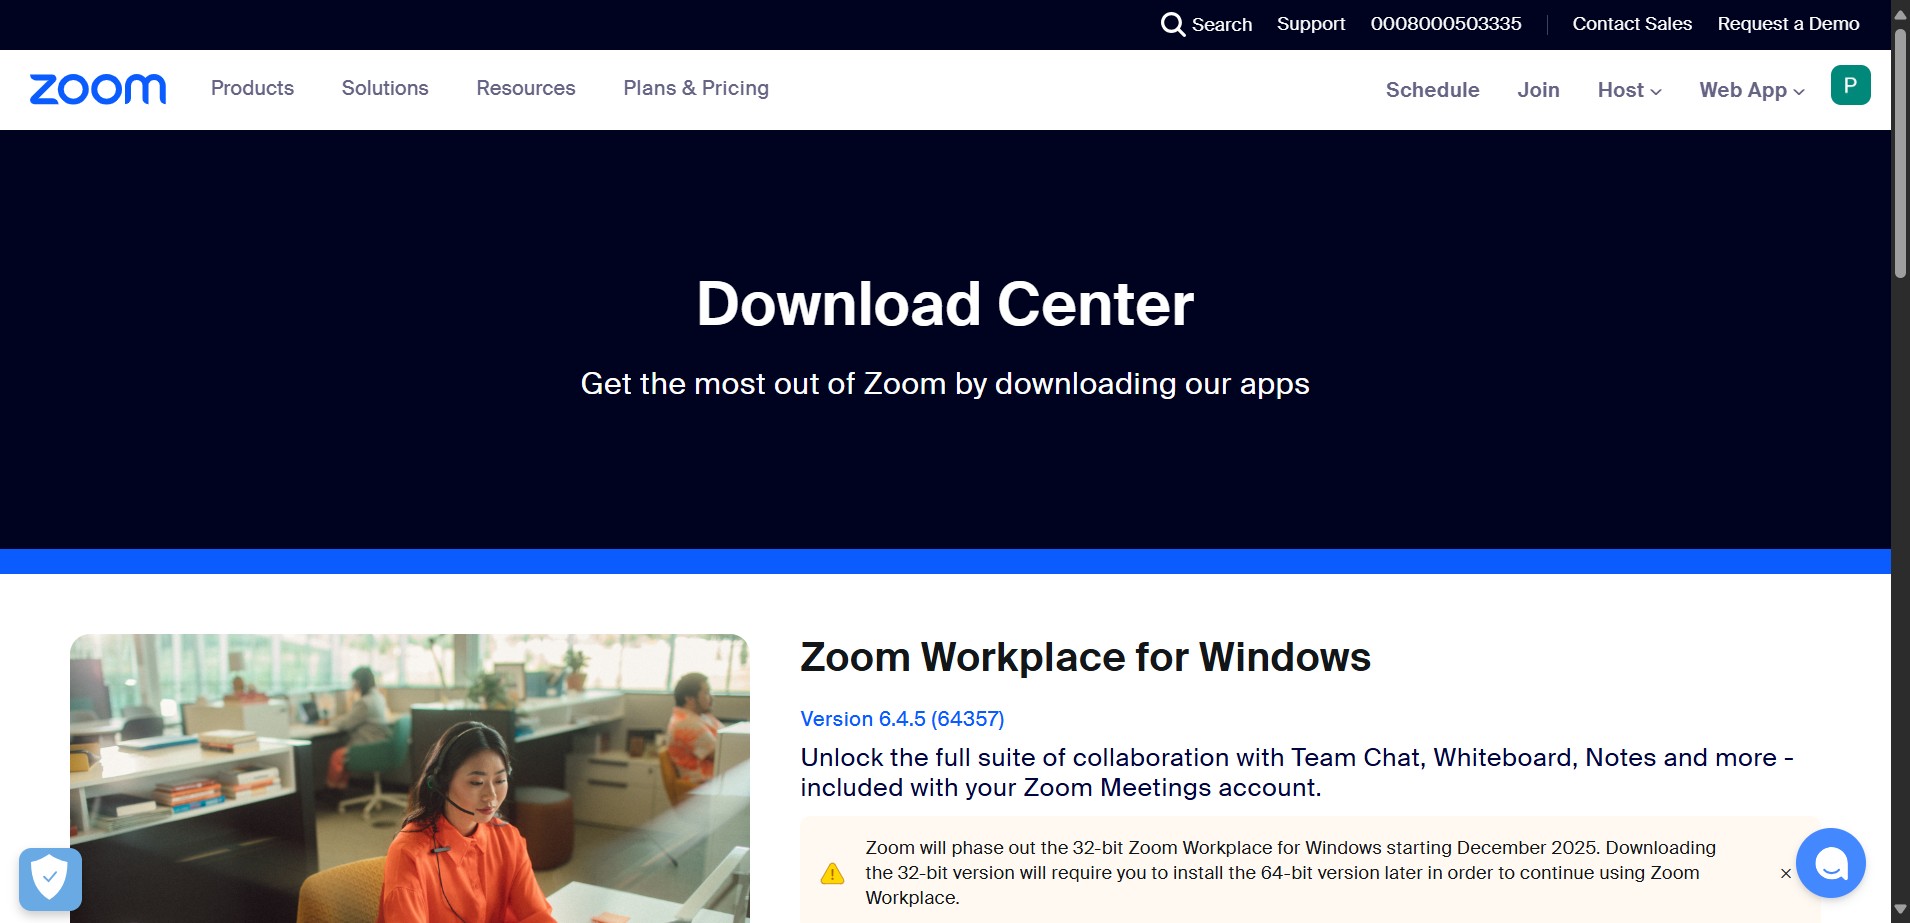
- Navigate to the Official Zoom Website: Open your web browser and go to zoom.us/download. This is the dedicated download page for the Zoom client.
- Identify the Correct Installer: On the download page, you’ll see a section titled “Zoom Desktop Client” or “Zoom Client for Meetings.” Zoom’s website usually auto-detects your operating system (Windows or macOS) and highlights the recommended download.
- Click “Download”: Click the prominent “Download” button.
- For Windows, this will download an executable file (e.g.,
ZoomInstaller.exe). - For macOS, this will download a disk image file (e.g.,
zoom.pkg).
- For Windows, this will download an executable file (e.g.,
- Save the File: Your browser will prompt you to save the file. Choose a location that’s easy to find, such as your “Downloads” folder or desktop, and click “Save.”
Once the download is complete, you’re ready to proceed with the installation specific to your operating system.
Installing on Windows Laptops
The installation process on Windows is typical for most applications, involving a setup wizard.
- Locate the Downloaded File: Go to the folder where you saved
ZoomInstaller.exe(usually your “Downloads” folder). - Run the Installer: Double-click on
ZoomInstaller.exe. - Installation Process: The Zoom installer will automatically begin. Unlike many applications that require multiple clicks through a wizard, the Zoom installer is designed to be very quick and largely automatic. You’ll typically see a progress bar indicating the installation status.
- Automatic Launch: Once the installation is complete, the Zoom application will usually launch automatically, presenting you with the option to “Join a Meeting” or “Sign In.”
Congratulations! Zoom is now installed on your Windows laptop.
Installing on macOS Laptops
Installing Zoom on macOS also follows a familiar pattern for Mac applications, using a .pkg installer.
- Locate the Downloaded File: Navigate to the folder where you saved
zoom.pkg(typically your “Downloads” folder). - Run the Installer: Double-click on
zoom.pkg. This will open the macOS Installer wizard. - Follow the Installer Prompts:
- Introduction: Click “Continue.”
- Destination Select: Choose the destination where you want to install Zoom. For most users, the default “Install for all users of this computer” is appropriate. Click “Continue.”
- Installation Type: Confirm the standard installation. Click “Install.”
- Authentication: Your Mac will likely ask for your administrator password to authorize the installation. Enter your password and click “Install Software.”
- Installation Progress: A progress bar will indicate the installation status.
- Summary: Once completed, you’ll see a “The installation was successful” message.
- Close the Installer: Click “Close.” You might be asked if you want to move the installer to the Trash; it’s generally safe to do so.
- Launch Zoom: You can find the Zoom application in your “Applications” folder or by searching for “Zoom” using Spotlight (Cmd + Space).
With these steps, Zoom is now successfully installed on your macOS laptop, ready for use.
Post-Installation: Setting Up Your Zoom Account and First Steps
Once Zoom is installed, the next phase involves setting up your account and familiarizing yourself with the basic functionalities. This initial setup is crucial for personalizing your experience and ensuring you can effortlessly join or host meetings.
Signing Up or Logging In
When you first launch Zoom after installation, you’ll be presented with a welcome screen.
- Join a Meeting: If you only need to join a meeting using an invitation link or meeting ID, you can click “Join a Meeting” and enter the necessary details without needing to sign in.
- Sign In: If you plan to host meetings, schedule calls, or access advanced features, you’ll need to sign in. Click “Sign In.”
- Existing Account: Enter your email address and password if you already have a Zoom account.
- New Account: If you don’t have an account, click “Sign Up Free” (usually in the bottom left corner). This will redirect you to the Zoom website to create a free account using your email, Google, or Facebook credentials. Follow the on-screen prompts to complete registration, which typically involves email verification.
- SSO (Single Sign-On): Many organizations use SSO. If your company or school provides Zoom, you might sign in using your organizational credentials via the “SSO” option. This streamlines login and integrates with your company’s “Brand Strategy” for consistent identity management.
Once signed in, you’ll see the Zoom home screen, which offers options to start a new meeting, join, schedule, or share your screen.
Exploring Essential Settings
Before jumping into your first meeting, it’s a good idea to check and configure some essential settings. These are accessible from the gear icon (⚙️) on the Zoom home screen.
- Audio Settings:
- Go to “Audio.” Here, you can test your speaker and microphone. Select the correct input (microphone) and output (speaker/headphones) devices if you have multiple options.
- Check “Automatically adjust microphone volume” for convenience, or uncheck it to manually set the level.
- Consider “Suppress background noise” for better audio clarity, aligning with “Productivity” in professional communication.
- Video Settings:
- Go to “Video.” Confirm your webcam is selected and working.
- You can enable “Touch up my appearance” for a subtle softening effect or “Adjust for low light” for better visibility in dim environments.
- Explore “Virtual Backgrounds” and “Filters” here to customize your appearance.
- Profile Settings:
- Update your display name, profile picture, and personal meeting ID. A professional profile picture and clear name contribute to “Personal Branding.”
- General Settings:
- Review options like “Start Zoom when I start Windows/macOS” for quick access or “Ask me to confirm when I leave a meeting” to prevent accidental exits.
- Security:
- Familiarize yourself with the “Security” section. This includes options for meeting passcodes, waiting rooms, and locking meetings, all vital for “Digital Security.”
Spending a few minutes in these settings can significantly enhance your Zoom experience and tailor it to your preferences.
Joining and Hosting Your First Meeting
Now that you’re set up, you can engage in meetings.
- Joining a Meeting:
- Click “Join.”
- Enter the Meeting ID or Personal Link Name provided by the host.
- Enter your display name.
- Choose whether to connect audio and video.
- Click “Join.” If a passcode is required, enter it when prompted.
- Hosting a Meeting:
- Click “New Meeting” on the home screen to instantly start a meeting.
- Click “Schedule” to set up a meeting for a future date and time. This allows you to generate an invitation link and details to share with participants.
- Once in a meeting, you’ll find controls at the bottom of the screen for muting/unmuting, starting/stopping video, sharing screen, inviting participants, and more.
Successfully navigating these initial steps means you’re now fully equipped to leverage Zoom for all your communication needs.
Optimizing Your Zoom Experience: Tips for Productivity and Security
Installing Zoom is just the beginning. To truly maximize its potential, it’s important to understand how to optimize your settings for both productivity and “Digital Security.” These advanced tips will help you conduct more effective and secure virtual interactions.
Enhancing Meeting Productivity
Zoom offers a suite of features designed to make your meetings more productive and engaging. Mastering these can significantly improve your remote collaboration.
- Keyboard Shortcuts: Learn essential keyboard shortcuts to quickly mute/unmute audio (Alt+A on Windows, Cmd+Shift+A on macOS), start/stop video (Alt+V on Windows, Cmd+Shift+V on macOS), and toggle screen sharing. These small efficiencies add up, boosting overall “Productivity.”
- Effective Screen Sharing: When sharing your screen, remember to select the specific application window rather than your entire desktop, especially if you have sensitive information open in other windows. Also, enable “Share computer sound” if you’re playing videos or audio. Utilize the “Whiteboard” option for dynamic brainstorming.
- Annotations: During screen sharing, use the annotation tools (available from the top menu when sharing) to highlight, draw, or add text directly on the shared content. This is excellent for collaborative feedback and visual explanations in both business and educational contexts.
- Polling and Q&A: For larger meetings or webinars, leverage Zoom’s polling feature to gather instant feedback or conduct quick surveys. The Q&A feature helps manage participant questions efficiently without interrupting the speaker, enhancing engagement and streamlining information flow.
- Breakout Room Strategy: If you’re a host, plan your breakout room usage. They are invaluable for small group discussions, team-building exercises, or deeper dives into specific topics. Clear instructions before sending participants into rooms are key for “Productivity.”
- Integrations: Explore Zoom’s integrations with other “Apps” like Google Calendar, Outlook, Slack, or project management tools. These integrations can automate scheduling, notifications, and file sharing, creating a more cohesive workflow.
By thoughtfully applying these features, you can transform your Zoom meetings from basic calls into highly interactive and productive sessions, saving time and fostering better collaboration.
Prioritizing Digital Security and Privacy
In an era of increasing cyber threats, ensuring the security and privacy of your Zoom meetings is paramount. Zoom has made significant strides in bolstering its security features, but users also play a crucial role in maintaining a secure environment. This aligns directly with the “Digital Security” focus of the website.
- Always Use Passcodes (or Waiting Rooms): Make sure your meetings are protected with a passcode or utilize the waiting room feature. A waiting room allows the host to admit participants individually, preventing uninvited guests (Zoom bombers) from disrupting your meeting. These are essential for meeting “Digital Security.”
- Never Share Meeting Links Publicly: Avoid posting meeting links directly on public social media or open forums. If you must, always ensure your meeting has a strong passcode and waiting room enabled.
- Keep Your Zoom Client Updated: Regularly check for and install Zoom updates. Updates often include critical security patches and performance improvements. You can check for updates directly within the Zoom application by clicking your profile picture and selecting “Check for Updates.” This is a fundamental aspect of secure “Tech” usage.
- Understand Host Controls: As a host, familiarize yourself with the security options available during a live meeting (accessible via the “Security” icon in the meeting toolbar). These include “Lock Meeting,” “Remove Participant,” “Disable participant annotation,” and “Suspend Participant Activities,” giving you full control over your meeting environment.
- Use Strong, Unique Passwords: For your Zoom account (if not using SSO), use a strong, unique password. Consider a password manager to help you create and remember complex passwords for all your online accounts, a key tip for “Digital Security” and “Productivity.”
- Review Recording Settings: If you record meetings, be aware of where these recordings are stored (locally or in the Zoom cloud) and who has access to them. Only record when necessary and inform participants that the meeting is being recorded.
By adopting these security practices, you can significantly mitigate risks and ensure that your virtual interactions remain private and protected, reinforcing trust and professional integrity (a nod to “Brand” reputation).
Troubleshooting Common Installation Issues
Even with careful preparation, you might occasionally encounter issues during or after installation. Here are some common problems and their solutions:
- “Installation Failed” Error:
- Admin Rights: Ensure you have administrator privileges. Try right-clicking the installer and selecting “Run as administrator.”
- Corrupted Download: The installer file might be corrupted. Delete the downloaded file and re-download it from the official Zoom website.
- Antivirus/Firewall: Temporarily disable your antivirus or firewall software (only if you’re absolutely sure the installer is from the official source) and try again. Remember to re-enable them immediately.
- Zoom Doesn’t Launch After Installation:
- Restart Laptop: A simple restart can often resolve minor software glitches.
- Check Task Manager (Windows) / Activity Monitor (macOS): See if a Zoom process is running in the background but not displaying the application window. If so, end the process and try launching again.
- Reinstall: If all else fails, uninstall Zoom completely and perform a fresh installation.
- Audio/Video Not Working:
- Check Settings: Go to Zoom’s audio and video settings (as discussed above) and ensure the correct microphone, speaker, and webcam are selected.
- System Permissions: On macOS, ensure Zoom has permission to access your microphone and camera in System Preferences > Security & Privacy > Privacy. On Windows, check similar privacy settings for mic and camera access.
- Device Drivers: Ensure your audio and video device drivers are up to date. You can usually do this through your operating system’s settings or your laptop manufacturer’s website.
- “Network connection error” when joining/hosting:
- Internet Connection: Verify your internet connection is stable.
- Firewall: Your network firewall might be blocking Zoom. Ensure Zoom is whitelisted in your firewall settings.
- VPN/Proxy: If you’re using a VPN or proxy server, try disabling it temporarily to see if it resolves the issue.
Most installation and initial usage issues can be resolved with these common troubleshooting steps, allowing you to quickly get back to productive communication.

Conclusion
Installing Zoom on your laptop is a gateway to staying connected, productive, and collaborative in our increasingly virtual world. By following this comprehensive guide, you’ve not only learned the practical steps for installation on both Windows and macOS but also gained insights into optimizing your experience for enhanced “Productivity” and robust “Digital Security.”
From understanding Zoom’s powerful features for seamless video conferencing to performing crucial pre-installation checks, navigating the step-by-step setup, and mastering essential post-installation configurations, you are now well-equipped. Remember to always prioritize downloading from official sources and keeping your client updated to ensure maximum security and access to the latest functionalities.
As technology continues to evolve, tools like Zoom will remain vital for businesses, educators, and individuals alike. By confidently integrating Zoom into your digital toolkit, you’re embracing a powerful “Tech” solution that bridges distances, fosters collaboration, and keeps you at the forefront of modern communication trends. Happy Zooming!
aViewFromTheCave is a participant in the Amazon Services LLC Associates Program, an affiliate advertising program designed to provide a means for sites to earn advertising fees by advertising and linking to Amazon.com. Amazon, the Amazon logo, AmazonSupply, and the AmazonSupply logo are trademarks of Amazon.com, Inc. or its affiliates. As an Amazon Associate we earn affiliate commissions from qualifying purchases.