In the dynamic world of technology, where visual fidelity and computational demands are constantly escalating, the graphics card – often still referred to by its legacy term, VGA card, though technically modern cards are GPUs – stands as the cornerstone of any high-performance PC. Whether you’re a passionate gamer seeking to immerse yourself in the latest AAA titles with breathtaking visuals, a creative professional rendering intricate 3D models or editing high-resolution video, or simply looking to enhance your multi-monitor productivity, upgrading your graphics card is one of the most impactful improvements you can make to your system. This comprehensive guide will walk you through every step of installing a new graphics card, ensuring a smooth and successful transition, empowering you to unlock your PC’s full visual potential.
Why Upgrade Your Graphics Card? Elevating Your PC Experience
Before diving into the installation process, it’s worth understanding the compelling reasons behind a graphics card upgrade. In an era dominated by visually rich applications and demanding digital experiences, your GPU is more than just a component; it’s the heart of your machine’s visual prowess.
Elevating Your Gaming Experience
For gamers, the benefits of a new graphics card are immediately apparent. A powerful GPU translates directly into higher frame rates, allowing for smoother gameplay and a more responsive experience. It enables you to play games at higher resolutions, from crisp 1080p to immersive 4K, and crank up graphical settings like anti-aliasing, shadow quality, and texture detail without performance compromises. Furthermore, modern GPUs support advanced technologies such as real-time ray tracing, which simulates light behavior for incredibly realistic reflections, shadows, and global illumination, fundamentally transforming the visual fidelity of games. Virtual Reality (VR) also heavily relies on robust graphics processing, and an upgrade can open doors to incredibly immersive VR experiences. Keeping pace with the latest Technology Trends in gaming often means staying current with GPU advancements.
Boosting Productivity and Creative Workflows
Beyond gaming, a potent graphics card is an indispensable tool for professionals in creative fields. Video editors leverage GPU acceleration to speed up rendering times, playback high-resolution footage smoothly, and apply complex effects in real-time within applications like Adobe Premiere Pro or DaVinci Resolve. 3D artists and designers utilizing software like Blender, AutoCAD, or SolidWorks find that GPU power dramatically reduces rendering cycles and improves viewport performance, allowing for faster iterations and more complex scene constructions. Even general productivity users can benefit from a modern GPU by driving multiple high-resolution monitors with ease, creating an expansive and efficient workspace that boosts overall Productivity. Some AI tools are also increasingly leveraging GPU power for local processing, making a powerful card a versatile asset.
Preparing for Future-Proof Performance
While “future-proofing” in technology is often a fleeting concept, investing in a high-quality graphics card certainly extends the relevant lifespan of your PC. As new software, games, and applications are released, their graphical demands tend to increase. A modern GPU provides a buffer against these rising requirements, ensuring your system remains capable and performs adequately for years to come. It allows you to engage with emerging technologies and new visual paradigms without immediately needing another hardware overhaul. By understanding these reasons, you’re not just installing a piece of hardware; you’re investing in an enhanced digital future.
Essential Preparations Before You Begin: The Foundation for Success
A successful graphics card installation hinges on meticulous preparation. Skipping these crucial preliminary steps can lead to compatibility issues, performance bottlenecks, or even damage to your components. This phase is about ensuring harmony between your new gadget and existing system, and prioritizing Digital Security by taking proper anti-static precautions.
Compatibility Checks: Motherboard, PSU, and Case
The first and most critical step is to verify compatibility. Your new graphics card needs to fit physically and electrically within your existing system.
- Motherboard Compatibility: The vast majority of modern graphics cards use a PCI Express (PCIe) x16 slot. Your motherboard will almost certainly have at least one of these. It’s important to identify the version of your PCIe slot (e.g., PCIe 3.0, PCIe 4.0, PCIe 5.0). While newer cards are generally backward compatible with older PCIe slots (e.g., a PCIe 4.0 card will work in a PCIe 3.0 slot), you won’t get the full bandwidth performance of the newer standard. Ensure the slot is free and accessible.
- Power Supply Unit (PSU) Compatibility: This is paramount. Modern high-performance graphics cards are power-hungry. You need to verify two things:
- Wattage: Check the recommended minimum PSU wattage for your chosen graphics card (this information is readily available on the manufacturer’s website or product specifications). Then, compare it to the total wattage output of your current PSU. A general rule of thumb is to aim for a PSU that provides at least 100-150W more than the recommended minimum for your GPU, especially if you have other power-hungry components like multiple hard drives or an overclocked CPU. Tools like online PSU calculators can help you estimate your system’s total power consumption.
- Connectors: High-end graphics cards require dedicated PCIe power connectors, typically 6-pin, 8-pin, or sometimes 12-pin (for NVIDIA’s newer cards). Some cards may require two or even three such connectors. Inspect your PSU’s cables to ensure it has the necessary connectors available. Using Molex-to-PCIe adapters is generally discouraged, as they can be fire hazards and do not provide stable power delivery for demanding cards.
- Case Size: Physically measure the available space within your PC case. Graphics cards vary significantly in length, height, and thickness. Compare these measurements with the dimensions of your new GPU. Pay attention to clearances for hard drive bays, CPU coolers, and other internal components. Some larger cards may also require more than two expansion slots at the back of the case.
Gathering Your Tools and Workspace Setup
Having the right tools at hand will make the installation process smoother and safer.
- Phillips Head Screwdriver: This is the primary tool you’ll need for opening your case, removing existing components, and securing the new card.
- Anti-Static Wrist Strap (Recommended): Static electricity is the silent killer of electronic components. An anti-static wrist strap, connected to a grounded metal object (like your PC’s metal chassis), safely dissipates any static charge from your body. This is a crucial step for Digital Security of your hardware.
- Flashlight or Headlamp: Your PC case can have dark corners. A light source will help you see clearly, especially when connecting power cables or seating the card.
- Zip Ties or Velcro Straps (Optional): For cable management, which improves airflow and makes future maintenance easier.
- Clean, Well-Lit Workspace: Clear your desk and ensure you have ample space to work comfortably. Avoid working on carpets or anything that generates static electricity.
Safety First: Static Electricity and Power Precautions
Safety is paramount when working inside your computer.
- Power Down and Unplug: Completely shut down your PC, then disconnect it from the wall outlet. Press the power button a few times after unplugging to drain any residual charge from the capacitors.
- Ground Yourself: Wear your anti-static wrist strap and connect it to an unpainted metal part of your PC case. If you don’t have a strap, frequently touch an unpainted metal part of your case to discharge any static buildup from your body. Avoid touching the gold contacts or circuit board components of your new graphics card or other internal parts directly.
- Organize Cables: Take photos of your current cable routing if you think you might forget how things are connected. This helps during reassembly.
By diligently completing these preparatory steps, you’re laying a solid foundation for a stress-free and successful graphics card upgrade.
Step-by-Step Physical Installation: Bringing Your New GPU to Life
With preparations complete, you’re ready for the hands-on part of the upgrade. Take your time, be gentle, and follow each step carefully.
Opening Your PC Case and Accessing Components
- Remove Side Panel: Most PC cases have thumb screws or standard screws holding the side panel in place. Unscrew them and gently slide the side panel off. Identify the side that exposes your motherboard and graphics card.
- Locate PCIe Slot: Inside, you’ll see your motherboard. The PCIe x16 slot for your graphics card is typically the longest slot, often reinforced with metal, and usually closest to your CPU. If you have an existing card, it will be in this slot.
- Identify Expansion Slot Covers: At the back of your case, aligned with the PCIe slots, are metal expansion slot covers. Your graphics card will occupy two or three of these.
Removing the Old Graphics Card (If Applicable)
If you’re upgrading an existing graphics card, you’ll need to remove it first. If you’re installing into a new system or adding a card where there wasn’t one, skip to the next section.
- Disconnect Power Cables: If your old card has PCIe power connectors (6-pin, 8-pin), carefully unclip and pull them out.
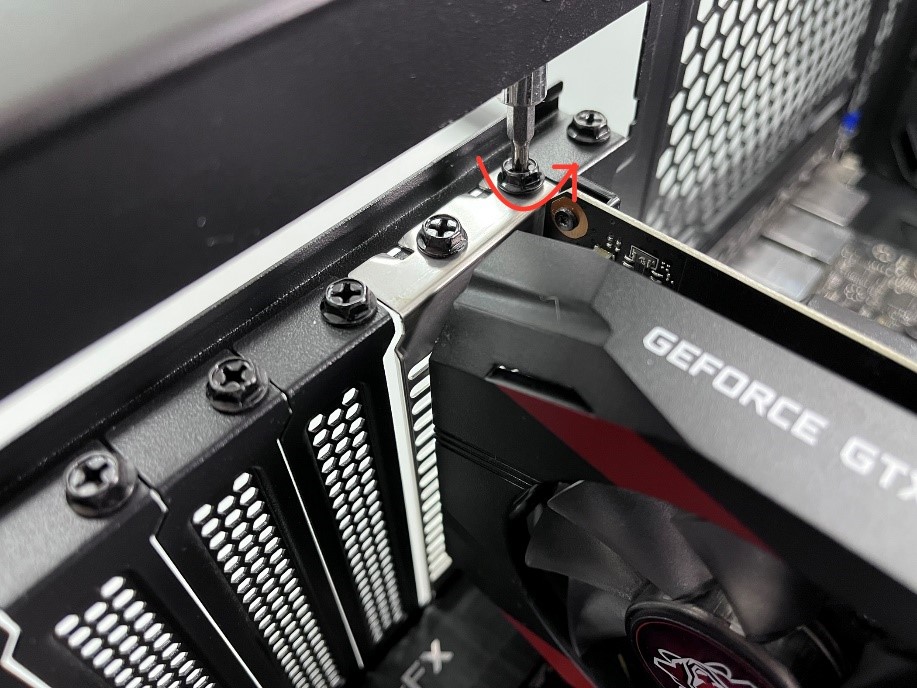
- Unscrew Retention Bracket: At the back of the case, unscrew the screw(s) holding the graphics card’s metal bracket to the case.
- Release PCIe Retention Clip: This is a crucial step. At the end of the PCIe x16 slot (opposite the monitor ports), there’s a small plastic or metal clip that secures the graphics card. Gently push or pull this clip away from the card to release it. Be careful not to force it, as these can be fragile.
- Gently Pull Out Card: With the clip released and screws removed, firmly but gently pull the old graphics card straight up and out of the PCIe slot. Place it in its anti-static bag or a safe place.
Seating Your New Graphics Card
Now for the main event: installing your new gadget.
- Prepare Expansion Slots: Remove the necessary expansion slot covers from the back of your PC case. Most modern GPUs take up two slots, but some high-end cards can be three or even four slots thick.
- Align and Insert: Carefully align your new graphics card with the PCIe x16 slot. Ensure the gold contacts on the card are directly above the slot.
- Firmly Press Down: With both hands, apply even pressure to both ends of the graphics card and push it straight down into the PCIe slot. You should feel it click into place as the retention clip at the end of the slot engages. Double-check that the clip has closed and the card is fully seated and level. A partially seated card can cause serious issues.
- Secure with Screws: Reinstall the screw(s) that hold the graphics card’s bracket to the case, securing it firmly in place.
Connecting Power and Securing the Card
This step ensures your powerful GPU gets the juice it needs.
- Connect PCIe Power Cables: Locate the PCIe power connectors from your PSU. These typically come in 6+2 pin configurations, allowing flexibility for 6-pin or 8-pin connections. Plug the required connectors firmly into the corresponding ports on your graphics card. Ensure they click into place. Do not force them; if they don’t go in easily, check the orientation. Use all required connectors (e.g., if the card has two 8-pin ports, connect both).
- Cable Management (Optional but Recommended): Route the power cables neatly, perhaps using zip ties or Velcro straps, to improve airflow and aesthetics. This is part of optimizing your Tech setup for longevity and performance.
Closing Up Your System
- Replace Side Panel: Once everything is connected and secured, carefully slide the side panel back onto your PC case and re-attach the screws.
- Reconnect Peripherals: Plug your monitor cable (HDMI, DisplayPort, DVI) into one of the output ports on your new graphics card. Reconnect your keyboard, mouse, power cable, and any other peripherals.
Post-Installation: Drivers, Testing, and Optimization
The physical installation is only half the battle. Software configuration is equally vital to harness the full power of your new GPU.
Connecting Your Monitor and Initial Boot-Up
- Connect Monitor: Ensure your monitor cable is plugged into the new graphics card, not the motherboard’s integrated graphics ports (unless you specifically intend to use integrated graphics as a primary output while the discrete card handles rendering).
- Power On: Turn on your monitor, then power on your PC. Your system should boot up as usual. If you get a display, congratulations! If not, don’t panic; we’ll cover troubleshooting briefly.
Installing and Updating Graphics Drivers
This is perhaps the most critical post-installation step. Without the correct drivers, your operating system will only recognize your GPU as a generic display adapter, severely limiting its capabilities and performance.
- Uninstall Old Drivers (Recommended): If you’re switching from an AMD card to an NVIDIA card (or vice-versa), or even upgrading within the same brand, it’s highly recommended to use a tool like Display Driver Uninstaller (DDU) in safe mode to thoroughly remove all traces of previous graphics drivers. This prevents conflicts and ensures a clean slate.
- Download New Drivers:
- NVIDIA: Go to NVIDIA’s official website, select your graphics card model, and download the latest GeForce Game Ready Driver. Alternatively, install “GeForce Experience” which can automatically detect your card and install/update drivers.
- AMD: Go to AMD’s official website, select your graphics card model, and download the latest Adrenalin Software.
- Intel (Arc GPUs): Go to Intel’s official website and download the latest drivers for your Intel Arc graphics card.
- Install Drivers: Run the downloaded driver installer. Follow the on-screen prompts. A custom or clean installation is often recommended to ensure all components are installed correctly and any old files are overwritten. Your screen may flicker or go black momentarily during the installation process; this is normal.
- Reboot: After the driver installation is complete, reboot your PC.
Verifying Performance and Troubleshooting Common Issues
Once booted, verify your new card is recognized and performing as expected.
- Device Manager: Right-click on the Start button, select “Device Manager,” expand “Display adapters.” Your new graphics card should be listed without any warning triangles.
- Graphics Control Panel: Open NVIDIA Control Panel (right-click on desktop) or AMD Adrenalin Software. You should see detailed information about your GPU.
- Run a Benchmark/Game: Launch a demanding game or a benchmarking tool (like 3DMark or Heaven Benchmark) to stress-test the card and observe its performance.
- Troubleshooting Common Issues:
- No Display/Black Screen: Double-check all power connections to the GPU and motherboard. Ensure the card is fully seated in the PCIe slot and the retention clip is engaged. Verify your monitor is plugged into the GPU, not the motherboard. Try booting with only one RAM stick or a different monitor cable.
- Artifacts/Flickering: This can indicate a faulty card, unstable drivers, or overheating. Reinstall drivers cleanly. Monitor temperatures using software like HWMonitor.
- Driver Crashes: Ensure you have the latest drivers. If conflicts persist, perform a DDU clean uninstall and reinstall. Check for Windows updates.
- Poor Performance: Verify drivers are installed. Check that the card is running at full PCIe bandwidth (can be seen in GPU-Z). Ensure power-saving features aren’t overly aggressive.
Maximizing Your New Graphics Card’s Potential
Installing the card and drivers is just the beginning. To truly leverage your investment, consider these ongoing optimization strategies, aligning with ongoing Technology Trends and best practices for system Productivity.
Driver Management and Regular Updates
Graphics card manufacturers frequently release driver updates that bring performance improvements, bug fixes, and support for new games or applications. Regularly check for these updates (via GeForce Experience, AMD Adrenalin, or manually from the manufacturer’s website). While bleeding-edge drivers aren’t always necessary immediately, staying reasonably current ensures you’re benefiting from the latest optimizations and compatibility patches. This proactive approach prevents future issues and keeps your system performing optimally.
Monitoring Temperatures and Airflow
High temperatures are the enemy of electronic components. Regularly monitor your GPU temperatures, especially under load (during gaming or rendering), using software like MSI Afterburner, HWMonitor, or the manufacturer’s own utilities. Aim to keep temperatures below 80-85°C under heavy load. Ensure good airflow within your PC case:
- Case Fans: Ensure your case fans are properly configured for intake and exhaust.
- Cable Management: Neat cable routing prevents air blockages.
- Dust Control: Periodically clean your PC’s internal components, especially the GPU heatsink and fans, with compressed air to prevent dust buildup, which impedes cooling.

Exploring Overclocking and Performance Tuning
For enthusiasts, overclocking can squeeze even more performance out of your graphics card. This involves increasing the GPU core clock and memory clock speeds beyond their factory settings. Tools like MSI Afterburner provide intuitive interfaces for adjusting these parameters. However, overclocking requires careful monitoring of temperatures and stability testing, as it can lead to instability if pushed too far. Start with small increments and test thoroughly. Many GPUs also have “OC modes” or “gaming profiles” accessible through their respective software suites (like GeForce Experience or AMD Adrenalin) that offer pre-tuned performance boosts without extensive manual tweaking, balancing performance with ease of use and stability.
By following this comprehensive guide, from initial research and preparation to physical installation and post-setup optimization, you’ll successfully install your new graphics card. This upgrade not only breathes new life into your PC but also equips you to conquer the latest games, accelerate demanding creative tasks, and stay ahead in the ever-evolving landscape of Tech advancements. Enjoy the stunning visuals and enhanced performance that your powerful new GPU brings to your digital world!
aViewFromTheCave is a participant in the Amazon Services LLC Associates Program, an affiliate advertising program designed to provide a means for sites to earn advertising fees by advertising and linking to Amazon.com. Amazon, the Amazon logo, AmazonSupply, and the AmazonSupply logo are trademarks of Amazon.com, Inc. or its affiliates. As an Amazon Associate we earn affiliate commissions from qualifying purchases.