In today’s fast-paced digital world, whether you’re a professional tackling complex projects, a student managing multiple research windows, a gamer seeking immersive experiences, or a creative individual demanding more screen real estate, a single monitor often falls short. The concept of “how to install two monitors” is more than just a technical query; it’s an investment in your efficiency, a boost to your professional image, and a strategic move to optimize your digital workspace. This guide will walk you through every step of setting up a dual monitor system, from initial considerations to advanced configurations, ensuring you unlock the full potential of your desktop environment.
The appeal of dual monitors is immediate and profound. Imagine having your primary work application open on one screen while reference materials, communication tools, or analytical dashboards are constantly visible on the second. This seamless integration drastically reduces the time spent toggling between windows, minimizes distractions, and enhances your ability to multitask effectively. For individuals and businesses alike, this translates directly into tangible benefits in terms of “Tech” efficiency, bolstering “Brand” professionalism, and ultimately optimizing “Money” through improved productivity and reduced operational friction.
I. Laying the Foundation: Pre-Installation Checks and Hardware Selection
Before you even think about plugging in cables, a thorough preparation phase is crucial. This initial assessment ensures compatibility, prevents frustration, and sets the stage for a smooth installation. Skipping these steps often leads to troubleshooting headaches down the line.
1. Assessing Your Current System and Connectivity Needs
The cornerstone of any dual monitor setup is your computer’s ability to support multiple displays. This primarily revolves around your graphics processing unit (GPU) and the available video output ports.
-
Graphics Card Capability: Most modern desktop computers and many laptops come with integrated or dedicated graphics cards capable of driving at least two displays. For dedicated graphics cards (common in gaming PCs and workstations), check the back of your computer for multiple video output ports. Integrated graphics on motherboards or within laptop CPUs are often limited by the CPU’s capabilities, but typically support two outputs. If you’re unsure, consult your computer’s or graphics card’s manual, or search online using your model number.
-
Available Video Ports: Inspect your computer’s rear panel (for desktops) or sides (for laptops) for video output ports. Common types include:
- HDMI (High-Definition Multimedia Interface): The most common standard, supporting both video and audio. Excellent for general use, widely compatible.
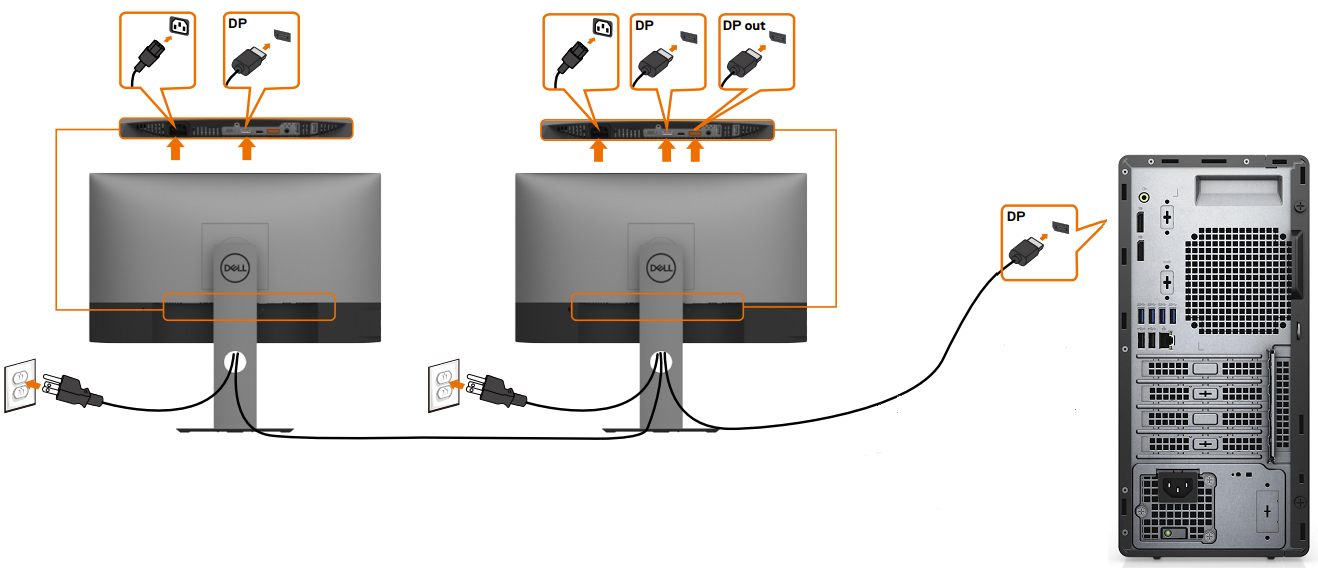
- DisplayPort (DP): Often found on newer graphics cards and professional monitors. Offers higher bandwidth than HDMI, supporting higher resolutions and refresh rates, and allows for “daisy-chaining” multiple monitors from a single port (if monitors support it).
- DVI (Digital Visual Interface): An older digital standard, primarily video-only. Still present on some older graphics cards and monitors.
- VGA (Video Graphics Array): An analog standard, largely obsolete for modern setups but still found on very old equipment. Avoid if possible due to lower quality.
- USB-C / Thunderbolt: Increasingly common on modern laptops and some desktops. A versatile port that can transmit video (DisplayPort Alt Mode), data, and power. Often used with docking stations for easy multi-monitor connectivity.
-
Matching Ports: The ideal scenario is to have matching ports on both your computer and your monitors (e.g., two HDMI ports on your PC, and two HDMI ports on your monitors). If not, you’ll need adapters (e.g., DisplayPort to HDMI, USB-C to HDMI) or specific cables that convert between standards. Always opt for passive adapters for simple conversions and active adapters for more complex or high-resolution conversions, particularly if you’re adapting from an older standard to a newer one or vice versa.
2. Selecting Your Monitors and Essential Accessories
The monitors you choose and the quality of your accessories can significantly impact your experience.
- Monitor Selection:
- Identical vs. Mixed: While not strictly necessary, using two identical monitors provides a seamless visual experience, especially regarding color calibration, resolution, and bezel thickness. However, mixing and matching is perfectly fine if one monitor will serve as a primary focus and the other as a secondary display.
- Size and Resolution: Consider your workspace and viewing distance. For a dual setup, two 24-inch to 27-inch monitors are popular. Resolutions like 1080p (Full HD) are standard, but 1440p (QHD) or 4K monitors offer significantly more screen real estate, though they require a more capable GPU.
- Ergonomics: Look for monitors with adjustable stands (height, tilt, swivel, pivot) or VESA mount compatibility if you plan to use a monitor arm. This is crucial for long-term comfort and preventing strain, an important consideration for “Tech” productivity and personal well-being.
- Cables: Purchase high-quality cables that match the ports on your computer and monitors. Don’t skimp on cables; cheap, poorly shielded cables can lead to signal loss, flickering, or display issues, undermining your “Tech” investment.
- Monitor Stand or Arm (Optional but Recommended): A dual monitor stand or two individual VESA-compatible monitor arms can significantly improve ergonomics and free up desk space. This elevates your monitors to eye level, reducing neck and eye strain, which contributes positively to “Brand” professionalism by demonstrating attention to detail and employee welfare (if in a business context) and preventing potential future health-related costs (“Money”).
- Cleaning Supplies: A microfiber cloth and screen cleaner are useful for preparing your monitors and keeping them smudge-free.
II. The Physical Setup: Connecting Your Displays
With your preparation complete, it’s time to physically connect your monitors to your computer. This process is generally straightforward but requires attention to detail.
1. Strategic Monitor Placement for Optimal Ergonomics
Before connecting anything, arrange your monitors on your desk. Ergonomics should be a primary concern to ensure comfort and prevent strain during extended use.
- Primary Display Centered: If you have one primary monitor you focus on most, position it directly in front of you. The second monitor can then be placed to its left or right.
- Two Equal Displays: If both monitors are equally important, position them so the seam between them is directly in front of you, with each monitor angled slightly inward.
- Distance and Height: Your monitors should be an arm’s length away from your face. The top of the monitor screen should be at or slightly below eye level. Use monitor stands or arms to achieve this height.
- Angle and Tilt: Angle monitors slightly inward to create a more immersive viewing experience and reduce glare. Tilt them slightly backward to avoid looking down.
- Orientation (Landscape vs. Portrait): While most users opt for two landscape monitors, consider setting one to portrait mode. This can be incredibly useful for long documents, coding, or social media feeds, maximizing vertical screen real estate.
2. Making the Connections: Cables and Power
This is where the magic starts to happen. Ensure your computer is turned off before making any cable connections to prevent potential damage.
- Connect Video Cables:
- Carefully plug one end of the first video cable (e.g., HDMI, DisplayPort) into an available output port on your computer.
- Plug the other end of that cable into the corresponding input port on your first monitor.
- Repeat this process for your second monitor, using a different video output port on your computer.
- Pro Tip: If using adapters, connect the adapter to the cable first, then to the computer/monitor. Ensure all connections are snug and secure. Loose cables are a common cause of display issues.
- Connect Power Cables:
- Plug the power cable into each monitor.
- Plug the other end of each power cable into a power outlet or surge protector.
- Power On: Once all cables are securely connected, turn on both monitors, then power on your computer. You should see your computer’s startup screen on at least one, if not both, monitors.
III. Software Configuration: Bringing Your Dual Monitors to Life
Physical connections are only half the battle. The next crucial step is configuring your operating system to recognize and utilize both displays effectively. This section focuses on the software side, ensuring your dual monitor setup functions seamlessly.
1. Configuring Displays in Your Operating System (Windows & macOS)
Both Windows and macOS offer intuitive settings for managing multiple displays. The goal is to tell your computer how you want the monitors to interact.
- For Windows Users:
- Access Display Settings: Right-click anywhere on your desktop and select “Display settings.” Alternatively, go to “Settings” > “System” > “Display.”
- Detect Displays: Your computer should automatically detect both monitors. If not, click the “Detect” button. The monitors will appear as numbered boxes (1 and 2). Click “Identify” to see which number corresponds to which physical screen.
- Arrange Displays: Drag and drop the numbered monitor boxes to match their physical arrangement on your desk. This ensures your mouse cursor moves naturally between screens.
- Multiple Display Options: Under the “Multiple displays” dropdown, select your desired mode:
- Extend these displays: This is the most common and recommended option for productivity. It treats your monitors as one continuous desktop, allowing you to drag windows freely between them.
- Duplicate these displays: Both monitors show the exact same content. Useful for presentations or sharing content with someone next to you.
- Show only 1 / Show only 2: This turns off one monitor and uses only the selected one.
- Set Primary Display: Click on the monitor you wish to be your primary display (where your taskbar, desktop icons, and new applications will usually open). Scroll down and check “Make this my main display.”
- Resolution and Orientation: For each monitor, verify the “Display resolution” matches its native resolution for the sharpest image. Adjust “Display orientation” to Landscape or Portrait as needed.
- Scaling: If text and icons appear too small or too large, adjust the “Scale and layout” percentage for each monitor. This is particularly important if you have monitors with different resolutions or sizes.
- Apply Changes: Click “Apply” to save your settings.
- For macOS Users:
- Access Display Settings: Go to “System Settings” (or “System Preferences” on older macOS versions) > “Displays.”
- Detect Displays: macOS typically detects external displays automatically. If not, you might need to hold down the Option key while in the Displays settings and click “Detect Displays.”
- Arrangement Tab: Click on the “Arrangement” tab. You’ll see blue boxes representing your monitors. Drag them to match their physical layout.
- Mirror Displays: To extend your desktop, ensure “Mirror Displays” is unchecked. If checked, both monitors will show the same content.
- Set Primary Display (Menu Bar): Drag the white menu bar from one monitor box to another to designate which display will be your primary monitor (where the menu bar and dock appear).
- Resolution and Rotation: Select each monitor and adjust its “Resolution” (choose “Default for display” or a scaled option) and “Rotation” (Standard, 90°, 180°, 270°) as needed.
- Refresh Rate: For some monitors, you might also have options to adjust the refresh rate.
- Close Settings: Your changes are usually applied instantly.
2. Advanced Configuration and Driver Updates
While OS settings cover the basics, your graphics card’s control panel and up-to-date drivers can offer more granular control and prevent issues.
- Graphics Card Drivers: Always ensure your graphics drivers are up to date. Outdated drivers are a common cause of display recognition problems, flickering, or performance issues.
- NVIDIA Users: Download GeForce Experience, which can automatically update drivers. You can also access the NVIDIA Control Panel for advanced settings like custom resolutions, color calibration, and multi-display configurations.
- AMD Users: Download AMD Radeon Software Adrenalin Edition for driver updates and access to Radeon Settings for similar advanced display controls.
- Intel Integrated Graphics: Use the Intel Graphics Command Center or visit the Intel download center for driver updates.
- Color Calibration: For tasks requiring color accuracy (graphic design, video editing), consider calibrating your monitors. Your GPU control panel might offer basic calibration tools, or you can invest in a hardware colorimeter for professional-grade accuracy. This is particularly important for creative professionals, as consistent color across displays enhances “Brand” consistency in visual output.
IV. Optimizing Your Dual Monitor Experience: Productivity and Troubleshooting
With your dual monitor setup operational, it’s time to refine your workflow and address any potential issues. Maximizing your new real estate requires smart habits and an understanding of common pitfalls.
1. Boosting Productivity with Dual Monitors
The true power of a dual monitor setup lies in its ability to enhance your workflow and “Tech” productivity. Here are some strategies:
- Strategic Window Management:
- Primary Application on Main Screen: Keep your most critical application (e.g., word processor, IDE, main communication tool) on your primary monitor.
- Supporting Tools on Secondary Screen: Use the secondary monitor for reference materials, email, chat applications, social media feeds, or auxiliary tools.
- Maximize Window Space: Utilize snapping features (Windows key + arrow keys on Windows, or third-party apps for macOS) to quickly arrange windows to fill half or a quarter of a screen.
- Virtual Desktops/Spaces: Leverage virtual desktops (Task View in Windows, Mission Control in macOS) to create even more organized workspaces. For example, have a specific virtual desktop for “Communication” with email and chat, another for “Research,” and another for “Core Work,” each spanning both monitors.
- Dedicated Peripherals: Consider a full-sized keyboard and a comfortable mouse. For advanced users, a programmable mouse can assign shortcuts for moving windows between screens or changing virtual desktops.
- Ergonomics Check-Up: Periodically review your posture, monitor height, and lighting. Take regular breaks to prevent eye strain and physical discomfort. Remember, a healthy worker is a productive worker, which aligns with long-term “Money” savings on healthcare and improved “Brand” image through consistent output.
2. Common Troubleshooting Steps
Even with careful setup, you might encounter issues. Here’s how to tackle them:
- “No Signal” or Black Screen:
- Check Cables: Ensure all video and power cables are firmly plugged in at both ends (computer and monitor). Try unplugging and re-plugging.
- Input Source: On your monitor, press the “Input” or “Source” button to ensure it’s set to the correct input (e.g., HDMI 1, DisplayPort).
- Reboot: Restart your computer. This often resolves minor detection glitches.
- Test Cables/Monitors: If possible, swap cables or test one monitor at a time to isolate whether the issue is with a specific cable, monitor, or computer port.
- Incorrect Resolution or Refresh Rate:
- Update Drivers: As mentioned, outdated graphics drivers are a primary culprit.
- OS Display Settings: Manually set the correct native resolution and refresh rate in your OS display settings.
- GPU Control Panel: Use your graphics card’s control panel for more advanced resolution and refresh rate options.
- Mouse Cursor Gets Stuck or Jumps:
- Arrangement: Double-check your monitor arrangement in your OS display settings to ensure it accurately reflects your physical setup. Misalignment can cause jerky mouse movements.
- Flickering Screen:
- Cable Quality: A low-quality or damaged cable can cause flickering. Try a different, high-quality cable.
- Refresh Rate Mismatch: Ensure the refresh rate is consistently set across both displays and supported by your graphics card.
- Driver Issues: Again, update or reinstall your graphics drivers.
- Only One Monitor Detected:
- Check all connections.
- Reboot computer.
- Force Detection (Windows): In Display Settings, click “Detect.”
- Graphics Card Limit: Verify your graphics card truly supports two monitors and that you’re using ports capable of simultaneous output. Some older cards might only support one active digital output and one active analog output at a time.
- Try Different Ports: If you have multiple HDMI or DisplayPort connections, try swapping which monitor is connected to which port.
3. Advanced Considerations and Investing in Your Workspace
Beyond the basic setup, several advanced elements can further refine your dual monitor environment. Investing in these areas can have a significant return on investment (“Money”) by enhancing your long-term “Tech” efficiency and portraying a top-tier “Brand” image.
- Docking Stations for Laptops: For laptop users, a docking station or a high-quality USB-C hub is invaluable. It allows you to connect multiple monitors, peripherals, power, and network with a single cable to your laptop, transforming it into a powerful desktop workstation. This streamlines your setup, reduces cable clutter, and protects your laptop’s ports from constant plugging and unplugging.
- Cable Management: A tidy workspace is a productive workspace. Invest in cable ties, sleeves, or cable management trays to route and conceal cables neatly. A clean desk improves aesthetics, reduces distractions, and contributes to a professional appearance, whether for personal focus or client video calls (“Brand”).
- Lighting: Proper lighting can reduce eye strain. Position your monitors to avoid direct glare from windows or overhead lights. Task lighting can help illuminate your keyboard without reflecting off your screen.
- Regular Updates and Maintenance: Keep your operating system and graphics drivers updated. Periodically clean your monitors with a microfiber cloth to remove dust and smudges.
Conclusion
Setting up two monitors is a transformative upgrade for any computer user. It’s not just about adding more screen space; it’s about fundamentally altering your interaction with your digital environment. By following this comprehensive guide, from the initial assessment of your hardware to the fine-tuning of software settings and ongoing optimization, you’ll create a powerful, ergonomic, and highly efficient workspace.
The benefits extend far beyond mere convenience. A well-configured dual monitor setup directly impacts your “Tech” productivity by facilitating seamless multitasking and reducing cognitive load. It enhances your “Brand” by projecting an image of professionalism and efficiency, both in your work output and in your visible workspace. Furthermore, the increased output and ergonomic benefits contribute to your “Money” goals, whether through faster project completion, reduced errors, or safeguarding your long-term health. Embrace the power of dual monitors and elevate your digital experience to new heights.
aViewFromTheCave is a participant in the Amazon Services LLC Associates Program, an affiliate advertising program designed to provide a means for sites to earn advertising fees by advertising and linking to Amazon.com. Amazon, the Amazon logo, AmazonSupply, and the AmazonSupply logo are trademarks of Amazon.com, Inc. or its affiliates. As an Amazon Associate we earn affiliate commissions from qualifying purchases.