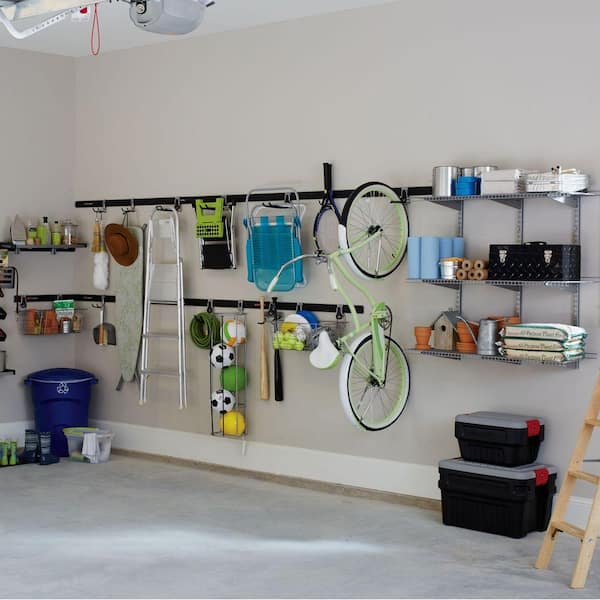
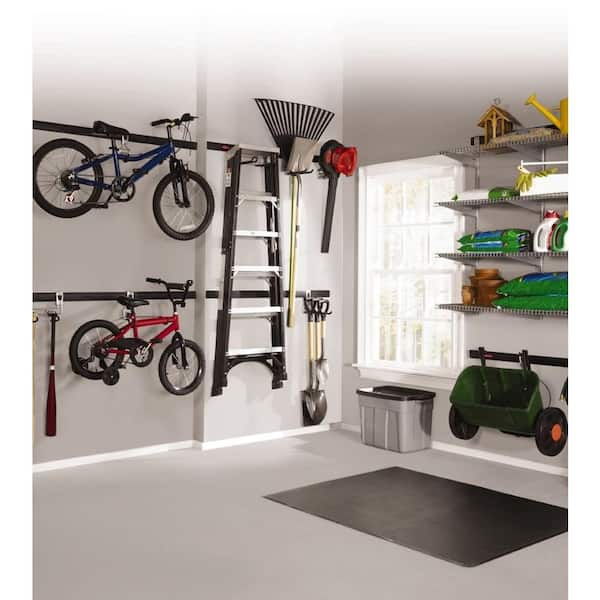
The Rubbermaid FastTrack system is a popular and versatile garage organization solution. It’s designed to help you reclaim valuable space and keep your tools, sporting equipment, and other essentials neatly stored and easily accessible. While installation on drywall or studs is relatively straightforward, mounting it onto a concrete block wall presents a unique set of challenges and requires specific techniques. This guide will walk you through the entire process, from understanding the system and the nature of concrete block walls to the step-by-step installation, ensuring a secure and long-lasting setup.
Understanding Your Needs and the FastTrack System
Before you even pick up a drill, it’s crucial to understand why you’re installing the FastTrack system and what you intend to store. This will dictate the number of rails you need, their placement, and the types of accessories you’ll be using.
1. Assessing Your Storage Requirements and Layout
The first step is to envision the desired outcome. What items are cluttering your garage? What kind of organization are you aiming for? Consider the following:
- Item Inventory: Make a list of everything you want to store. This includes tools, gardening supplies, bicycles, sports equipment, seasonal items, and anything else that currently occupies floor space.
- Space Utilization: Think about how you can best utilize the vertical space on your concrete block wall. The FastTrack system excels at this, allowing you to hang items at various heights.
- Accessibility: Consider how often you’ll need to access the stored items. Frequently used items should be placed at an easily reachable height, while less common items can be stored higher up.
- Weight Considerations: Different FastTrack accessories have varying weight capacities. Estimate the weight of the items you plan to hang on each section of the rail. This is particularly important when mounting on concrete blocks, as the anchors will bear the load.
- Layout Planning: Sketch out a plan for your garage. Mark the desired locations for your FastTrack rails, taking into account existing structures like windows, doors, electrical outlets, and plumbing. Measure the available wall space accurately.
2. Deconstructing the Rubbermaid FastTrack System
The FastTrack system is comprised of several key components:
- FastTrack Rails: These are the backbone of the system, typically 3-foot or 4-foot long lengths of sturdy metal or plastic. They are designed with a series of slots and hooks for attaching various accessories.
- FastTrack Mounting Brackets (Optional but Recommended for Concrete Block): While not strictly necessary for all installations, these specialized brackets provide an additional layer of support and can simplify the alignment process, especially on uneven surfaces like concrete block walls.
- FastTrack Accessories: This is where the system’s versatility shines. You’ll find a vast array of hooks, shelves, baskets, and specialized holders for everything from shovels and bicycles to sports balls and power tools.
- Fasteners: The type of fasteners you use is critical for a secure installation on concrete block. This is a point we will delve into in detail later.
Preparing Your Concrete Block Wall for Installation
Concrete block walls, also known as CMU (Concrete Masonry Unit) walls, are robust but require specific preparation and fastening methods to ensure the integrity of any mounted system. Unlike drywall, you can’t simply screw into them.
1. Gathering Essential Tools and Materials
Having the right tools at hand will make the installation process smoother and more efficient. For a concrete block wall installation, you’ll need:
- Rubbermaid FastTrack Starter Kit (or rails and desired accessories)
- Drill: A powerful corded drill or a good quality cordless hammer drill is essential for drilling into concrete.
- Masonry Drill Bits: These are specifically designed for drilling into concrete and masonry. You’ll need bits that match the diameter of your chosen anchors.
- Concrete Anchors: This is arguably the most critical component for concrete block installation. We will discuss suitable options below.
- Measuring Tape: For accurate placement of rails.
- Level: To ensure your rails are perfectly horizontal.
- Pencil or Marker: For marking drill hole locations.
- Safety Glasses: Always wear safety glasses when drilling into concrete.
- Dust Mask: Drilling concrete produces fine dust, so a mask is recommended.
- Hammer: For tapping in anchors or setting screws.
- Screwdriver or Wrench: Depending on the type of anchors and screws you use.
- Stud Finder (Optional but helpful): While you’re not screwing into studs, a stud finder can help identify the solid parts of the concrete block, though this is less critical than on a stud wall.
- Vacuum Cleaner or Dustpan and Brush: For cleaning up dust after drilling.
- Optional: Rotary Hammer Drill: For very hard concrete or if you have a large installation.
2. Choosing the Right Anchors for Concrete Block Walls
This is where the distinction between installing on drywall and concrete block becomes most apparent. Standard drywall anchors or wood screws are completely inadequate for the job. You need anchors designed for masonry. Here are the most common and effective options:
- Sleeve Anchors (Wedge Anchors): These are a very popular and robust choice for concrete block. They consist of a bolt and an expansion sleeve. As you tighten the bolt, the sleeve expands, creating a secure grip within the drilled hole. They are excellent for heavy-duty applications. Ensure the bolt size and sleeve length are appropriate for the thickness of your FastTrack rail and any mounting brackets.
- Tapcon Screws: These are specialized concrete screws with a self-tapping thread. You drill a pilot hole of a specific size (indicated on the Tapcon packaging), and then the Tapcon screw cuts its own threads into the concrete as you drive it in. They are easier to install than sleeve anchors but might not be as suitable for extremely heavy loads.
- Concrete Anchors (Plastic Expansion Anchors): While often used for lighter loads in concrete, standard plastic anchors might not be sufficient for the dynamic loads often placed on garage storage systems. If you opt for these, ensure they are rated for the weight you intend to hang and are specifically designed for concrete block. Larger and more robust plastic anchors are available.
Important Considerations for Anchors:
- Hole Depth and Diameter: Always follow the manufacturer’s instructions for the correct drill bit size and hole depth for your chosen anchors. Drilling too shallow or too wide will compromise the anchor’s holding power.
- Block Integrity: Concrete blocks can be hollow or have internal webs. Ideally, you want to drill into the solid parts of the block or into the mortar joints, which are generally softer and easier to drill. However, drilling into solid concrete within the block is the strongest option. Avoid drilling into the very thin outer shells of the block if possible.
- Weight Rating: Always check the weight rating of the anchors and ensure they are sufficient for the combined weight of the FastTrack rail, accessories, and the items you will be storing. It’s always better to err on the side of caution and choose anchors with a higher weight capacity.
3. Preparing the Wall Surface
Before you begin drilling, ensure the concrete block wall is clean and free of loose debris.
- Clean the Area: Sweep or vacuum the wall area where you plan to install the FastTrack. Any dust or loose mortar can interfere with the anchor’s grip.
- Inspect for Cracks: Check for any significant cracks in the concrete blocks. If you find major cracks, it might be advisable to reinforce the area or reconsider the placement of your FastTrack system.
Step-by-Step Installation of Rubbermaid FastTrack on Concrete Block
With your tools and materials ready, and your wall prepared, you can now proceed with the installation. Patience and precision are key to a successful outcome.
1. Marking the Rail Placement
Accurate marking is crucial for a level and properly positioned FastTrack system.
- Determine Height: Decide on the desired height for your FastTrack rail. Use your measuring tape and level to mark a starting point on the wall.
- Draw a Level Line: Extend your level line across the entire length where the FastTrack rail will be installed. This line will serve as your guide.
- Position the Rail (or Mounting Bracket): Hold the first FastTrack rail (or mounting bracket, if using) against the wall, aligning its top edge with your level line.
- Mark Drill Holes: Using your pencil or marker, mark the locations of the mounting holes on the wall through the holes in the FastTrack rail or bracket.
Tips for Marking:
- Install in Sections: If you are installing multiple rails, mark and install them one at a time to ensure proper spacing and alignment.
- Use a Level Frequently: Constantly check for levelness as you mark and install. Small errors at this stage can lead to a crooked system.
2. Drilling Pilot Holes
This is the most labor-intensive part of the process on a concrete block wall.
- Select the Correct Drill Bit: Choose a masonry drill bit that matches the diameter specified by the anchor manufacturer.
- Start Drilling: Place the tip of the drill bit on your marked spot. Begin drilling slowly and steadily.
- Apply Consistent Pressure: Apply firm, consistent pressure. Let the drill do the work. Avoid pushing too hard, which can overheat the drill bit or cause it to wander.
- Drill to the Correct Depth: Ensure you drill the pilot hole to the depth recommended by the anchor manufacturer. Too shallow and the anchor won’t engage fully; too deep and it may not have enough material to grip.
- Clear the Dust: Periodically pull the drill bit out of the hole to clear away concrete dust. This helps the drill bit cut more effectively and ensures the hole is clean for the anchor.
- Repeat for All Holes: Continue this process for all marked drill hole locations.
Important Notes on Drilling:
- Hammer Drill Function: For concrete block, engaging the hammer drill function on your drill is highly recommended. This percussive action helps break up the concrete, making drilling much faster and easier.
- Drilling into Mortar vs. Block: If you encounter areas of softer mortar, you can drill into these. However, for maximum strength, aim to drill into the solid concrete of the block itself.
- Hole Cleaning: After drilling all holes, it’s beneficial to use a vacuum cleaner or a can of compressed air to thoroughly clean out the dust from each hole. This ensures optimal anchor performance.
3. Installing the Anchors and Fasteners
Now, it’s time to secure your FastTrack system to the wall.
- Insert the Anchors:
- For Sleeve Anchors: Insert the expansion sleeve into the drilled hole. Then, insert the bolt through the FastTrack rail (or bracket) and into the sleeve.
- For Tapcon Screws: With the FastTrack rail (or bracket) in place, drive the Tapcon screw directly into the pilot hole.
- For Plastic Anchors: Insert the plastic anchor into the drilled hole. Then, drive the screw through the FastTrack rail (or bracket) and into the plastic anchor.
- Tighten the Fasteners:
- For Sleeve Anchors: Use a wrench to tighten the bolt. As you tighten, the sleeve will expand, creating a secure fit. Tighten until the rail is snug against the wall, but avoid over-tightening, which could damage the block or anchor.
- For Tapcon Screws: Use a screwdriver or drill with the appropriate bit to drive the screws until the rail is firmly against the wall.
- For Plastic Anchors: Use a screwdriver or drill to drive the screws until the rail is snug against the wall.
Crucial Steps for Secure Mounting:
- One Anchor at a Time (Recommended): For better alignment, especially if using mounting brackets, it can be helpful to partially secure one anchor on each rail first, then install the next, and so on. This allows for minor adjustments.
- Ensure Flush Fit: The FastTrack rail or mounting bracket should sit flush against the concrete block wall. If there are small gaps, double-check that your anchors are properly seated and that you haven’t over-tightened.
- Check for Stability: Once all fasteners are tightened, gently tug on the FastTrack rail to ensure it is securely attached to the wall and does not wobble.
4. Attaching the FastTrack Rail and Accessories
With the rail securely mounted, you can now add your accessories.
- Snap-On System: The FastTrack system is designed for easy attachment and detachment of accessories. Simply align the hook of the accessory with the slot on the FastTrack rail and push down or slide until it clicks into place.
- Distribute Weight Evenly: When loading accessories and items, try to distribute the weight evenly along the rail. Avoid concentrating heavy items in one small area, especially between anchor points.
- Follow Weight Limits: Always adhere to the weight limits specified for each FastTrack accessory. Overloading can lead to the accessory detaching or even damaging the rail or wall.
Maintaining and Maximizing Your FastTrack System
Once installed, a little maintenance and smart organization will ensure your Rubbermaid FastTrack system remains functional and visually appealing for years to come.
1. Regular Inspection and Maintenance
- Periodic Checks: Every few months, or whenever you notice items are significantly heavier or more frequently accessed, give your FastTrack rails a quick visual inspection.
- Tighten Fasteners: If you notice any loosening of the rails or accessories, re-tighten the mounting screws or bolts. This is especially important in areas with significant temperature fluctuations, which can cause materials to expand and contract.
- Clean the System: Wipe down the rails and accessories with a damp cloth to remove dust and cobwebs. This keeps your garage looking tidy and prevents grime buildup that could interfere with accessory operation.
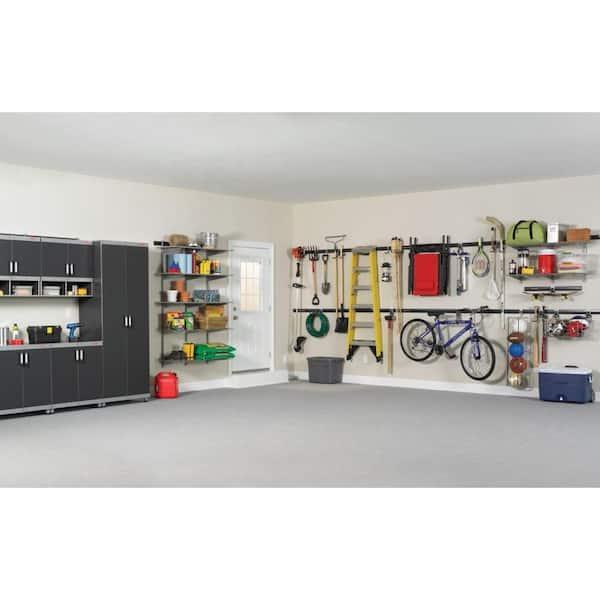
2. Smart Organization Strategies
- Zone Your Storage: Group similar items together. For example, create a gardening zone, a sports equipment zone, or a tool zone.
- Utilize Different Accessories: Mix and match different types of hooks, shelves, and baskets to create a customized storage solution that fits your specific needs.
- Consider Weight Distribution: As mentioned, be mindful of how you load the rails. Heavier items should ideally be placed closer to the mounting points or spread out over a larger section of the rail.
- Keep it Decluttered: The goal of FastTrack is to reduce clutter. Regularly review what you have stored and consider donating or discarding items you no longer need. This will make your system more effective and easier to manage.
Installing Rubbermaid FastTrack on a concrete block wall is a rewarding project that can significantly improve your garage’s organization. By understanding the system, preparing your wall correctly, choosing the right fasteners, and following these installation steps diligently, you’ll create a robust and reliable storage solution that maximizes your space and keeps your belongings neatly in place.
aViewFromTheCave is a participant in the Amazon Services LLC Associates Program, an affiliate advertising program designed to provide a means for sites to earn advertising fees by advertising and linking to Amazon.com. Amazon, the Amazon logo, AmazonSupply, and the AmazonSupply logo are trademarks of Amazon.com, Inc. or its affiliates. As an Amazon Associate we earn affiliate commissions from qualifying purchases.