In an increasingly connected world, smart home technology offers unparalleled convenience and peace of mind. Among the most popular smart home devices, the Ring Video Doorbell stands out as a guardian for your front door, blending cutting-edge security features with the simplicity of traditional doorbell functionality. For many homeowners, the idea of integrating such a device without completely overhauling their existing electrical setup is appealing. This comprehensive guide will walk you through the process of installing a Ring Doorbell with your existing doorbell wiring and chime, transforming your entryway into a smart, secure, and accessible portal.
Gone are the days when a doorbell was just a button and a bell. Today, a Ring Doorbell provides instant notifications, two-way talk capabilities, live video feeds, and motion detection, all accessible from your smartphone. The beauty of Ring is its ability to tap into your home’s existing low-voltage doorbell wiring, often making the installation process far simpler than many imagine. By leveraging your home’s pre-existing infrastructure, you can enjoy the advanced features of a smart doorbell without the hassle of constantly recharging batteries or running new wires. This integration ensures a continuous power supply to your Ring device, guaranteeing uninterrupted surveillance and communication, a critical component of modern digital security for your home.
The Smart Home Upgrade: Why Integrate a Ring Doorbell?
The allure of a smart home extends beyond mere novelty; it’s about enhancing daily living through seamless technology. Integrating a Ring Doorbell with your existing setup is a prime example of this philosophy. Instead of a standalone device that might complicate your home’s aesthetic or require separate power solutions, connecting it to your existing doorbell system means it becomes an intrinsic part of your home’s electrical network, powered continuously and working in tandem with your traditional chime (if desired).
The advantages are manifold. From a security standpoint, a Ring Doorbell acts as a vigilant sentinel, providing real-time alerts whenever motion is detected or someone presses the button. This immediate awareness allows you to monitor your property, deter potential intruders, and even answer your door remotely from anywhere in the world. For busy professionals or frequent travelers, this capability is invaluable, offering a crucial layer of digital security and peace of mind that was once unattainable. Furthermore, the integration with your existing chime ensures that household members accustomed to the traditional doorbell sound aren’t left out of the loop, creating a hybrid system that caters to both modern tech enthusiasts and those who appreciate familiar comforts. It’s a pragmatic step into smart home living, blending the new with the tried-and-true to create a more secure, convenient, and technologically advanced entryway.
Essential Preparations: What You Need Before You Start
Before you embark on your Ring Doorbell installation journey, a little preparation goes a long way. Ensuring you have the right tools, understanding your current doorbell system, and prioritizing safety are crucial steps that will make the installation process smooth and hassle-free.
Gathering Your Tools and Components
Having all your necessary tools and components laid out beforehand will prevent interruptions and streamline the installation. Most Ring Doorbell models that wire to existing systems come with a basic installation kit, but you’ll likely need a few additional items.
Here’s a checklist of what you’ll typically need:
- Your Ring Video Doorbell: Ensure you have the correct model (e.g., Ring Video Doorbell Wired, Ring Video Doorbell Pro, Ring Video Doorbell Pro 2) as installation steps and required accessories can vary slightly.
- The Ring Chime Connector (or Pro Power Kit V2): This small device is often essential for connecting your Ring Doorbell to an existing mechanical chime and ensuring it receives adequate power without buzzing or damage. Some models include it; others require a separate purchase or might not need it for digital chimes. Always check your specific Ring model’s requirements.
- Screwdriver: A Phillips head screwdriver is almost always necessary, and sometimes a flathead for terminal screws. Ring often includes a specialized screwdriver in its kit.
- Drill (with appropriate drill bits): For mounting the doorbell bracket to your wall, especially on brick, stucco, or masonry.
- Pencil: For marking drill holes.
- Level: To ensure your doorbell is mounted straight.
- Wire Strippers (optional, but useful): If your existing doorbell wires are damaged or too short.
- Pliers (optional): For manipulating wires.
- Utility Knife: To score old caulk if your old doorbell is sealed to the wall.
- Ladder or Step Stool: If your doorbell is mounted high.
- Electrical Tape: For insulating exposed wires if needed.
Understanding Your Existing Doorbell System: Voltage and Chime Compatibility
This is arguably the most critical preparatory step. Your Ring Doorbell needs a specific voltage range to operate correctly, typically 8-24 VAC (Volts Alternating Current). Installing it on an incompatible system can lead to malfunction, damage to the device, or simply non-operation.
- Locate Your Doorbell Transformer: The transformer is usually found near your main electrical panel, in a basement, crawl space, or sometimes inside a closet near the doorbell chime itself. It’s a small box, often metal, that steps down your home’s 120V power to the lower voltage required by your doorbell.
- Check the Voltage: The transformer will have its voltage output printed on it (e.g., “16V 10VA”). Confirm this falls within the 8-24 VAC range. If it’s outside this range, you may need to replace your transformer, which is a more advanced electrical task and might require professional assistance.
- Identify Your Chime Type:
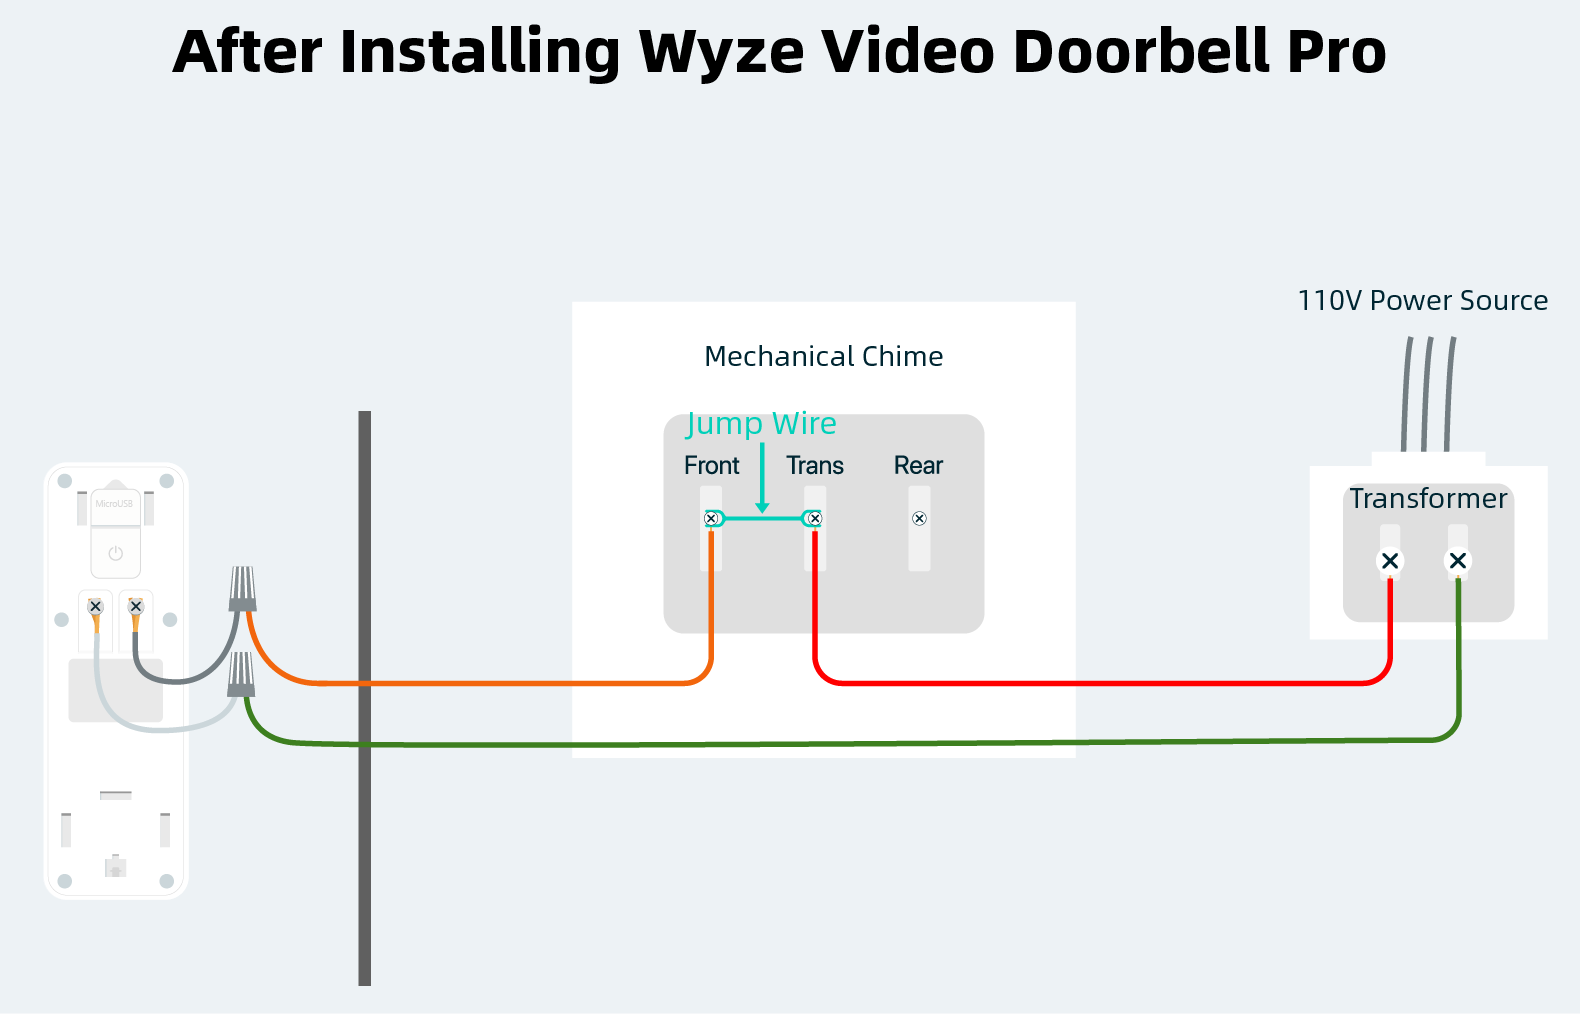
- Mechanical Chime: This is the most common type, featuring physical hammers striking metal bars to produce a “ding-dong” sound. If you have a mechanical chime, you will almost certainly need to install the Ring Chime Connector (or Pro Power Kit V2) at your chime box. This component ensures sufficient power delivery to the Ring device while preventing the chime from buzzing continuously.
- Digital Chime: These chimes play electronic melodies or pre-recorded sounds through a speaker. For digital chimes, the Chime Connector is often not used. Instead, you’ll configure your Ring Doorbell in the app to recognize a digital chime, and it will trigger it appropriately without the need for an additional component. Some digital chimes may not be compatible at all, in which case you would rely solely on Ring’s in-app notifications or a separate Ring Chime accessory.
- No Existing Chime: If you don’t have an existing chime, the installation is simpler as you won’t need to deal with the Chime Connector. You’ll rely entirely on your smartphone notifications and/or a separate Ring Chime accessory.
Taking the time to accurately assess your system’s voltage and chime type will save you considerable frustration during installation and ensure the longevity and optimal performance of your new smart doorbell.
Safety First: Power Down!
This step is non-negotiable. Working with household electricity can be dangerous if proper precautions are not taken. Before touching any wires, you must turn off the power to your doorbell circuit at your home’s circuit breaker.
- Locate Your Breaker Box: This is usually a metal box found in your garage, basement, utility room, or a closet.
- Identify the Correct Breaker: Look for a breaker labeled “doorbell,” “chime,” or the circuit that powers the area where your doorbell is located. If not labeled, you may need to flip breakers one by one until the existing doorbell stops working.
- Turn Off the Power: Flip the corresponding breaker to the “OFF” position.
- Verify Power is Off: Press your existing doorbell button. If it doesn’t chime, and the lights nearby are off (if on the same circuit), you’ve successfully cut the power. Use a non-contact voltage tester on the doorbell wires to be absolutely certain before proceeding.
Never skip this critical safety step. It protects both you and your home from electrical hazards.
Step-by-Step Installation: Connecting Your Ring Doorbell
With preparations complete and safety ensured, you’re ready to begin the physical installation of your Ring Doorbell. Follow these steps carefully for a successful setup.
Removing Your Old Doorbell Button
- Unscrew the Old Doorbell: Using your screwdriver, carefully remove the screws holding your existing doorbell button to the wall.
- Disconnect Wires: Gently pull the doorbell button away from the wall. You will typically see two low-voltage wires connected to the back of it. Note how they are connected (though for Ring, polarity often doesn’t matter for power). Disconnect these wires from the old doorbell and ensure they don’t fall back into the wall. If they are short, use electrical tape to secure them to the wall temporarily.
- Clean the Area: Wipe down any dirt, paint flakes, or old caulk from the wall surface where your new Ring Doorbell will be mounted.
Installing the Ring Chime Connector (If Applicable)
This step is crucial if you have a mechanical chime. If you have a digital chime (and your specific Ring model doesn’t require it) or no chime, skip to the next section.
- Locate Your Doorbell Chime: This is the box on your wall that makes the “ding-dong” sound.
- Open the Chime Cover: Gently remove the cover of your chime box.
- Identify Transformer and Front/Rear Terminals: Inside, you’ll typically see a small circuit board or terminals. Look for terminals labeled “FRONT,” “TRANS” (Transformer), and possibly “REAR” (if you have a second doorbell).
- Connect the Chime Connector: The Ring Chime Connector (or Pro Power Kit V2) usually has two wires. Connect one wire from the Chime Connector to the “FRONT” terminal and the other wire to the “TRANS” terminal. Consult the specific instructions provided with your Ring device for exact wiring diagrams, as these can vary slightly. This connector regulates the power and prevents your chime from constantly buzzing when the Ring Doorbell is installed. Secure the wires firmly under the terminal screws.
- Mount the Chime Connector: The connector is usually small enough to fit inside your chime box. Use the included adhesive or screws to secure it neatly inside, ensuring it doesn’t obstruct any moving parts of a mechanical chime.
- Replace Chime Cover: Once the Chime Connector is installed and secured, replace the cover of your existing chime box.
Mounting the Ring Doorbell Bracket
- Position the Mounting Bracket: Hold the Ring doorbell mounting bracket (or the doorbell itself, if it’s an all-in-one unit) against the wall where your old doorbell was. Ensure it’s level using a spirit level.
- Mark Drill Holes: Using a pencil, mark the positions for the drill holes through the holes on the bracket.
- Drill Pilot Holes: Use an appropriate drill bit (often specified in Ring’s instructions) to drill pilot holes at your marked positions. If drilling into masonry, brick, or stucco, you’ll likely need masonry bits and the included wall anchors. Insert the anchors flush with the wall surface.
- Secure the Bracket: Feed your existing doorbell wires through the center opening of the bracket. Then, screw the mounting bracket firmly to the wall using the provided screws. Do not overtighten.
Wiring Your Ring Doorbell to Existing System
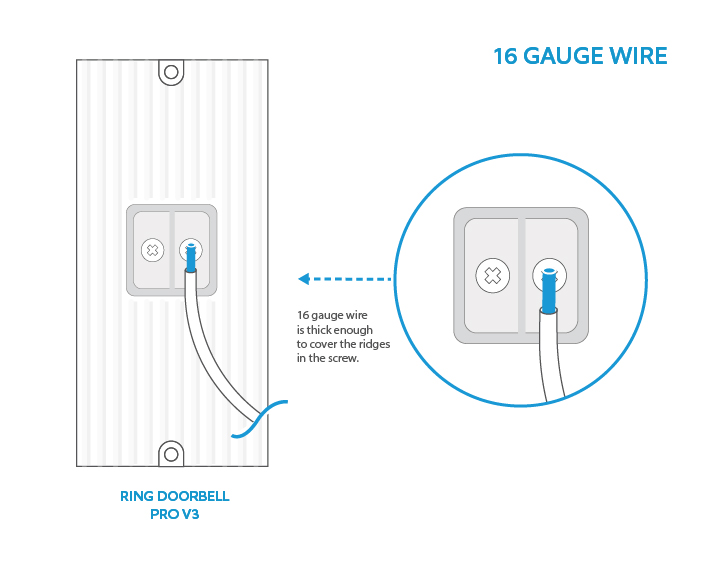
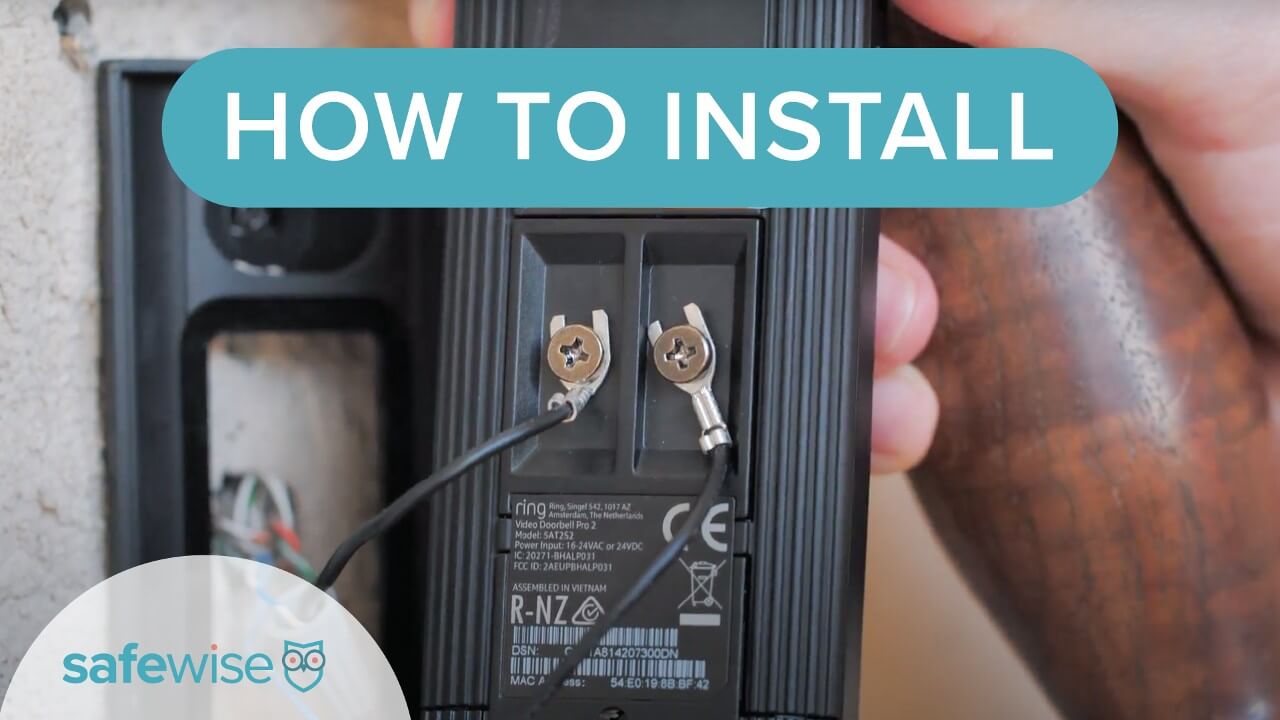
- Connect the Doorbell Wires: Take the two low-voltage wires coming from your wall and connect them to the terminal screws on the back of your Ring Doorbell. Ring doorbells are typically forgiving with polarity, so it usually doesn’t matter which wire goes to which screw. Loosen the terminal screws, insert one wire under each screw, and then tighten the screws firmly to secure the wires. Ensure there are no loose strands that could cause a short circuit.
- Tuck Wires: Gently push any excess wiring back into the wall opening to create a clean installation.
- Mount the Ring Doorbell: Carefully align the Ring Doorbell with the mounting bracket. Slide it down until it clicks securely into place.
- Secure with Security Screw: Most Ring models come with a small security screw at the bottom of the device. Use the included screwdriver to insert and tighten this screw. This prevents easy removal of the doorbell by unauthorized individuals, adding an extra layer of digital security to your device.
Restoring Power and Initial Setup
- Restore Power at Breaker Box: Go back to your circuit breaker and flip the breaker you turned off earlier back to the “ON” position.
- Wait for Ring Doorbell to Power Up: Your Ring Doorbell will now power on. You should see a light ring illuminate and possibly hear an audible chime. This usually takes a minute or two as the device boots up. The light pattern will indicate its status (e.g., spinning white for setup mode).
Configuring Your Ring Doorbell in the App
This is where your Ring Doorbell truly comes alive and integrates with your smart home ecosystem.
- Download the Ring App: If you haven’t already, download the Ring app from the App Store (iOS) or Google Play Store (Android).
- Create or Log In to Your Account: Follow the prompts to create a new Ring account or log in to an existing one.
- Set Up a Device: In the app, tap the “Set Up a Device” option.
- Scan QR Code: The app will likely ask you to scan the QR code found on your Ring Doorbell (often on the back or on the packaging). This automatically identifies your device model.
- Follow On-Screen Instructions: The app will guide you through connecting your Ring Doorbell to your home’s Wi-Fi network. You’ll need your Wi-Fi network name (SSID) and password.
- Name Your Device: Assign a name to your doorbell (e.g., “Front Door,” “Main Entry”).
- Configure Chime Settings: This is crucial for integrating with your existing doorbell chime. The app will ask if you have a mechanical or digital chime.
- For Mechanical Chime: If you installed the Chime Connector, select “Mechanical Chime.” The app will often then “learn” your chime type to ensure correct timing for ringing.
- For Digital Chime: Select “Digital Chime.” Note that some digital chimes may have compatibility issues, in which case you might need to disable the existing chime feature in the app and rely on Ring’s built-in digital chime notifications or a separate Ring Chime.
- Test Your Doorbell: Press your Ring Doorbell button. Verify that your existing chime rings (if configured), you receive a notification on your phone, and you can see a live view and engage in two-way talk through the app.
Troubleshooting Common Issues and Optimizing Performance
Even with careful installation, you might encounter minor hiccups. Here’s how to address them and further enhance your Ring experience.
Addressing Power and Connectivity Problems
- Doorbell Not Powering On/Insufficient Power:
- Check Breaker: Ensure the circuit breaker is ON.
- Verify Transformer Voltage: Double-check your transformer’s output. If it’s below 8V or above 24V, it’s incompatible.
- Inspect Wiring: Ensure all wires are securely connected to the Ring Doorbell terminals and, if applicable, the Chime Connector. No loose strands.
- Chime Connector Installation: If using a mechanical chime, confirm the Chime Connector is installed correctly at the chime box. An incorrectly installed or missing connector is a frequent cause of buzzing or power issues.
- Ring Health Check: Use the “Device Health” section in the Ring app to check the device’s power status. It can often diagnose low voltage.
- Poor Wi-Fi Connection:
- Router Proximity: Ensure your Wi-Fi router is not too far from your doorbell.
- Signal Interference: Walls, large appliances, and other wireless devices can interfere with Wi-Fi signals.
- Wi-Fi Extender: Consider a Wi-Fi extender or a Ring Chime Pro, which doubles as a Wi-Fi extender for Ring devices.
- Check Network: Ensure your home network is stable and correctly configured.
Fine-Tuning Your Ring App Settings
The Ring app offers a plethora of customization options to tailor your doorbell’s performance to your specific needs.
- Motion Zones: Define specific areas where you want the doorbell to detect motion. This reduces false alerts from passing cars or pedestrians on public sidewalks.
- Motion Sensitivity: Adjust how sensitive the motion detector is.
- People Only Mode: Some Ring models offer this feature to only alert you to human motion, ignoring animals or blowing leaves.
- Alert Frequency: Customize how often you receive alerts.
- Linked Devices: Integrate your Ring Doorbell with other Ring devices (like security cameras) or smart home platforms (like Alexa) for a more comprehensive security and automation system.
- Notification Settings: Fine-tune notifications for doorbell presses, motion alerts, and critical security events.
The Benefits Beyond the Button: Security & Convenience
Once your Ring Doorbell is fully operational, you unlock a world of enhanced home security and convenience.
- Enhanced Security: With motion detection, live view, and instant alerts, you’re always aware of activity at your front door, adding a vital layer to your home’s digital security posture.
- Package Protection: Monitor deliveries and deter package theft.
- Remote Access: Answer your door from anywhere, whether you’re at work, on vacation, or just in another room. This capability is invaluable for managing deliveries or screening visitors when you’re not home.
- Two-Way Talk: Speak directly to visitors through the doorbell’s speaker and microphone, even when you’re not physically present.
- Integration with Smart Home: Seamlessly integrate your Ring Doorbell with other smart devices, enhancing your overall smart home experience. Imagine your porch lights turning on automatically when motion is detected at the doorbell.
- Review Recorded Footage: With a Ring Protect subscription, you can review and download recorded events, providing valuable evidence if an incident occurs. This is a key aspect of leveraging modern tech for personal and home safety.
Conclusion: Elevating Your Home’s Entryway
Installing a Ring Doorbell with your existing doorbell system is a powerful upgrade that marries traditional home infrastructure with cutting-edge smart technology. By following these detailed steps, you can confidently transform your home’s entryway into a smart, secure, and highly connected hub. From the initial safety precautions and voltage checks to the final app configuration and feature customization, each step contributes to a robust and reliable system that offers unparalleled peace of mind.
This technological enhancement not only modernizes your home but also bolsters your digital security, providing constant vigilance and remote access to your front door. Embrace the future of home security and convenience; your Ring Doorbell is more than just a smart gadget—it’s an intelligent guardian for your home.
aViewFromTheCave is a participant in the Amazon Services LLC Associates Program, an affiliate advertising program designed to provide a means for sites to earn advertising fees by advertising and linking to Amazon.com. Amazon, the Amazon logo, AmazonSupply, and the AmazonSupply logo are trademarks of Amazon.com, Inc. or its affiliates. As an Amazon Associate we earn affiliate commissions from qualifying purchases.