
In an increasingly connected world, the desire for convenience and smart technology extends seamlessly into our vehicles. Few automotive upgrades offer as immediate and tangible a benefit as a remote start system. Imagine stepping into a car that’s already warm on a frosty winter morning, or refreshingly cool on a sweltering summer afternoon, all with the simple press of a button from the comfort of your home or office. Beyond mere comfort, a remote start system adds a layer of modern sophistication, security, and even resale value to your vehicle.

While the prospect of installing such a system might seem daunting, typically relegated to professional auto electricians or specialized shops, the truth is that with the right tools, detailed instructions, and a methodical approach, a DIY installation is entirely achievable for many car owners. This comprehensive guide will walk you through everything you need to know, from understanding the technology to the detailed steps of wiring and programming, empowering you to tackle this upgrade yourself. Not only will you save on professional installation costs – a significant “Money” benefit – but you’ll also gain invaluable “Tech” knowledge about your car’s electrical system, and the satisfaction of enhancing your vehicle with your own hands.
The Allure of Remote Start: Comfort, Convenience, and Value
The integration of smart technology into our daily lives has made systems like remote start less of a luxury and more of an expectation for modern drivers. Its appeal is multifaceted, touching upon personal comfort, vehicle security, and even the long-term value of your automotive “Brand.”
Why Remote Start is a Modern Necessity
The primary draw of a remote start system is undeniably comfort. In regions with extreme climates, the ability to pre-condition your car’s interior before you even step outside is a game-changer. In winter, you avoid the bone-chilling cold, stiff steering wheel, and fogged-up windows. The engine warms up gradually, circulating warm air, de-icing the windshield, and melting snow. Conversely, in summer, you can escape the suffocating heat of a sun-baked cabin, allowing the air conditioning to cool the interior to a pleasant temperature. This not only enhances your driving experience but also contributes to safety by ensuring clear visibility and a more comfortable environment for immediate focus on the road.
Beyond comfort, remote start offers a significant boost in convenience. No more fumbling with keys while juggling groceries or children; simply activate your car from a distance. For some systems, this convenience extends to vehicle tracking, door lock control, and even geo-fencing features, integrating your car more deeply into your digital ecosystem. From a “Tech” perspective, these systems often employ advanced encryption to ensure secure communication between your remote and the vehicle, preventing unauthorized access.
Furthermore, installing a remote start system can be a smart “Money” investment. It demonstrably increases the resale value of your vehicle, especially in markets where such features are highly sought after. It signals to potential buyers that the car has been well-maintained and upgraded with desirable modern amenities, potentially justifying a higher asking price.
Understanding Different Remote Start Technologies
Before diving into the installation, it’s crucial to understand the types of remote start systems available and their core components. This “Tech” insight will help you choose the right system for your needs and vehicle.
- 1-Way Systems: These are the most basic and typically most affordable. When you press the button on your remote, it sends a signal to your car. The car executes the command (e.g., starts the engine), but the remote doesn’t receive any feedback. You’ll need to be within visual range or listen for the engine to confirm it started.
- 2-Way Systems: These systems offer enhanced peace of mind. Your remote sends a signal, and the car sends a confirmation signal back to the remote, often illuminating an LED or displaying text on an LCD screen. This feedback confirms that the command was successfully executed (e.g., engine started, doors locked/unlocked). They generally have a longer range than 1-way systems.
- Smartphone Integration (Telematics Systems): Representing the cutting edge of remote start “Tech,” these systems allow you to control your car from virtually anywhere via a smartphone app. They typically require a subscription service and a cellular data connection. Beyond starting the engine, these apps often provide features like vehicle location tracking, alarm notifications, door lock/unlock, and even battery status or fuel level checks. This level of connectivity transforms your car into a truly “smart” vehicle.
Regardless of the type, a remote start system comprises several key components:
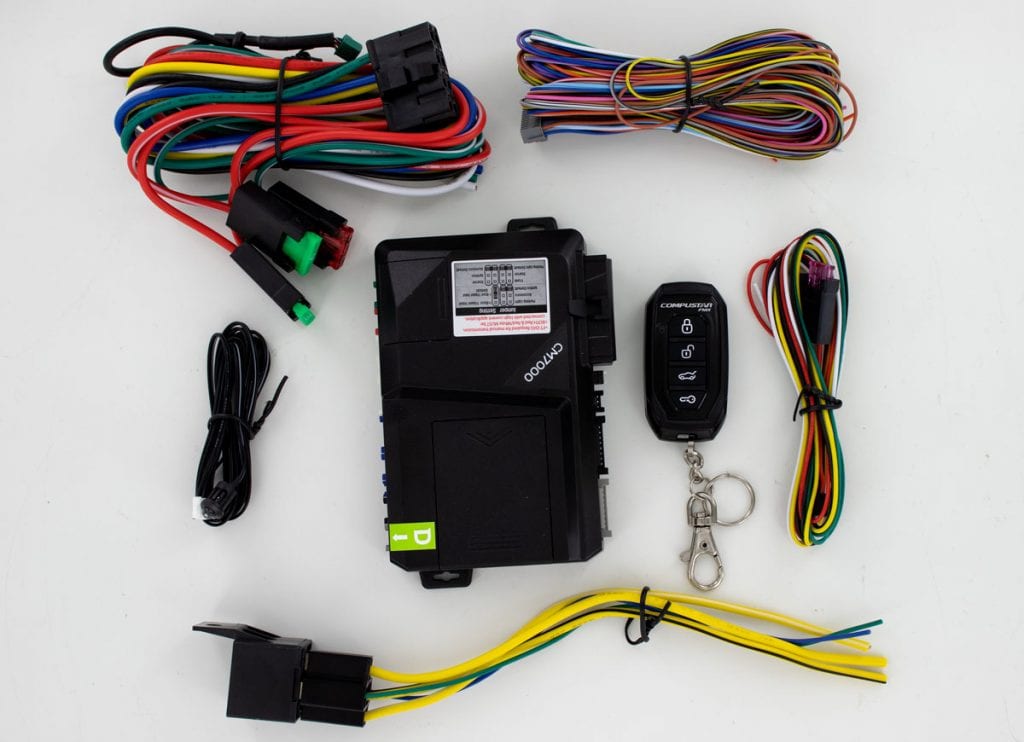
- Control Module: The brain of the system, this unit is typically mounted discreetly within the vehicle and processes signals from the remote, sending commands to the car’s electrical system.
- Remote Fob/Transmitter: The handheld device used to send commands to the control module.
- Wiring Harness: A complex bundle of wires that connects the control module to various points in your vehicle’s electrical system.
- Antenna: Receives signals from the remote fob and transmits them to the control module.
- Bypass Module (Immobilizer Interface): Crucial for modern vehicles equipped with factory immobilizer systems (anti-theft systems that prevent the car from starting without a correctly chipped key). This module temporarily “fools” the car into thinking the correct key is present, allowing the remote start system to function without compromising security. Some advanced bypass modules can integrate with your car’s data bus, simplifying installation.
When selecting a system, consider your vehicle’s specific make, model, and year, as compatibility is paramount. Reputable “Brand” names in the remote start industry include Viper, Compustar, Directed Electronics, and Fortin. Researching these brands and their product lines can help ensure you choose a reliable and compatible system that delivers on its promises.
Essential Preparations: Tools, Knowledge, and Safety First
Successful DIY installation hinges on meticulous preparation. This stage is arguably as critical as the installation itself, requiring the right “Tech” tools, comprehensive “Tech” knowledge about your vehicle’s electrical system, and an unwavering commitment to safety.
Gathering Your Arsenal: Must-Have Tools and Components
Before you even think about disconnecting wires, ensure you have all the necessary tools and components at hand. A well-organized toolkit will streamline the process and prevent frustration.
Essential Tools:
- Multimeter (Digital Volt-Ohm Meter – DVOM): Absolutely indispensable. Used to identify constant 12V, ignition, accessory, ground, and various signal wires. Do NOT rely solely on wiring diagrams; always verify with a multimeter.
- Wire Strippers/Crimpers: For cleanly stripping wire insulation and securely crimping connectors.
- Soldering Iron & Solder: For the most robust and reliable electrical connections. While not strictly mandatory for every connection, soldering is highly recommended for critical connections like ignition and power wires.
- Heat Shrink Tubing: For insulating soldered connections and protecting them from corrosion and short circuits. Alternatively, high-quality electrical tape can be used.
- Wire Connectors (T-taps, Butt Connectors): For non-soldered connections. Choose high-quality connectors to ensure durability.
- Trim Removal Tools (Plastic Pry Tools): Essential for safely removing interior trim panels without scratching or damaging plastic components.
- Screwdriver Set (Phillips, Flathead, Torx): For removing various screws and fasteners.
- Wrench/Socket Set: For disconnecting the car battery terminals.
- Zip Ties & Cable Management Sleeves: For neatly routing and securing wires, preventing rattles and wear.
- Flashlight or Headlamp: For illuminating tight, dark spaces under the dashboard.
- Test Light: Can be helpful, but a multimeter is superior for accurate voltage readings.
Essential Components (beyond the remote start kit):
- Extra Wire: Various gauges (e.g., 18-gauge, 16-gauge) for extending wires or making custom connections.
- Fuses & Fuse Holders: To protect your new wiring if you’re adding direct connections to the battery.
- Electrical Tape: High-quality vinyl electrical tape for insulation and bundling.
Deciphering Your Car’s Electrical System: The Importance of Wiring Diagrams
This is where the “Tech” deep dive truly begins. Every car is different, and understanding your specific vehicle’s electrical wiring is paramount. Attempting to install a remote start without accurate wiring diagrams is akin to navigating a maze blindfolded – you’re likely to get lost, or worse, damage something.
Where to Find Wiring Diagrams:
- Online Automotive Forums/Communities: Often a wealth of user-contributed information.
- Subscription Services (e.g., Alldata, Mitchell 1): Professional-grade databases that provide highly accurate and detailed wiring schematics.
- Vehicle-Specific Repair Manuals (e.g., Haynes, Chilton): Can be a good starting point, though sometimes less detailed for specific circuits.
- Remote Start System Manufacturer’s Database: Many reputable remote start “Brand” manufacturers offer vehicle-specific wiring guides or suggestions on their websites.
Key Wires You’ll Need to Identify (and verify with a multimeter):
- Constant 12V Power: A wire that has 12V even when the car is off and the key is removed. This powers the remote start module.
- Ignition Wires (Ignition 1, Ignition 2, Accessory 1, Accessory 2): Wires that power various systems when the key is turned to the ON or START position. Modern cars often have multiple ignition and accessory wires.
- Starter Wire: The wire that sends power to the starter motor when the key is turned to START.
- Ground Wire: A wire connected to the vehicle’s chassis, completing the electrical circuit.
- Parking Light Wires: To illuminate parking lights when the remote start is active (optional, but a good visual indicator).
- Door Lock/Unlock Wires: If your system includes keyless entry functionality.
- Brake Switch Wire: A safety interlock. The remote start system typically disengages if the brake pedal is pressed without the key in the ignition.
- Tachometer (RPM) Signal Wire: Helps the remote start module determine when the engine has successfully started and is running.
- Hood Pin Switch (Safety): Crucial safety feature that prevents the engine from starting if the hood is open.
Always double-check your findings with your multimeter. Don’t trust online diagrams implicitly without verification. Wire colors can vary even within the same make/model year.
Safety Protocols: Protecting Yourself and Your Vehicle
Electrical work in a car carries inherent risks. Prioritizing safety is paramount to prevent personal injury and damage to your vehicle’s sensitive “Tech” components.
- Disconnect the Battery: ALWAYS disconnect the negative terminal of your car battery before beginning any wiring work. This prevents accidental short circuits, electrical shocks, and damage to the car’s computer modules.
- Work in a Well-Lit Area: Ensure you have ample lighting to clearly see wires and connections.
- Use Insulated Tools: While less critical with the battery disconnected, it’s good practice.
- Avoid Airbag Wires: Be extremely careful when working around steering columns or dashboard areas. Wires related to airbags are often yellow or orange – do NOT tamper with them. Accidental deployment can cause serious injury.
- Test Before Taping: After making a connection, test it thoroughly with your multimeter before permanently taping or securing it.
- Proper Ventilation: If soldering, ensure good ventilation to disperse fumes.
- Read Instructions Carefully: Thoroughly read both your car’s service manual (for component locations) and your remote start kit’s installation manual. Different kits have different requirements and procedures.
Step-by-Step Installation: From Wiring to First Start
With preparations complete and safety protocols in mind, you’re ready to embark on the core “Tech” challenge: the installation itself. This section outlines the general steps, but remember to cross-reference with your specific remote start kit’s instructions and your vehicle’s wiring diagrams.
Locating Key Connections: The Heart of Your Remote Start System
Your journey begins by gaining access to the necessary wiring. This typically involves removing trim panels around the steering column, dashboard, and kick panels. Use your plastic trim removal tools to prevent scratches. Be patient and gentle, as plastic clips can be brittle.
Once panels are removed, you’ll need to physically locate the wires you identified in your diagrams. This involves probing wires with your multimeter while someone operates the ignition (e.g., turns the key to ACC, ON, START) or activates other functions (e.g., pressing the brake pedal, turning on parking lights).
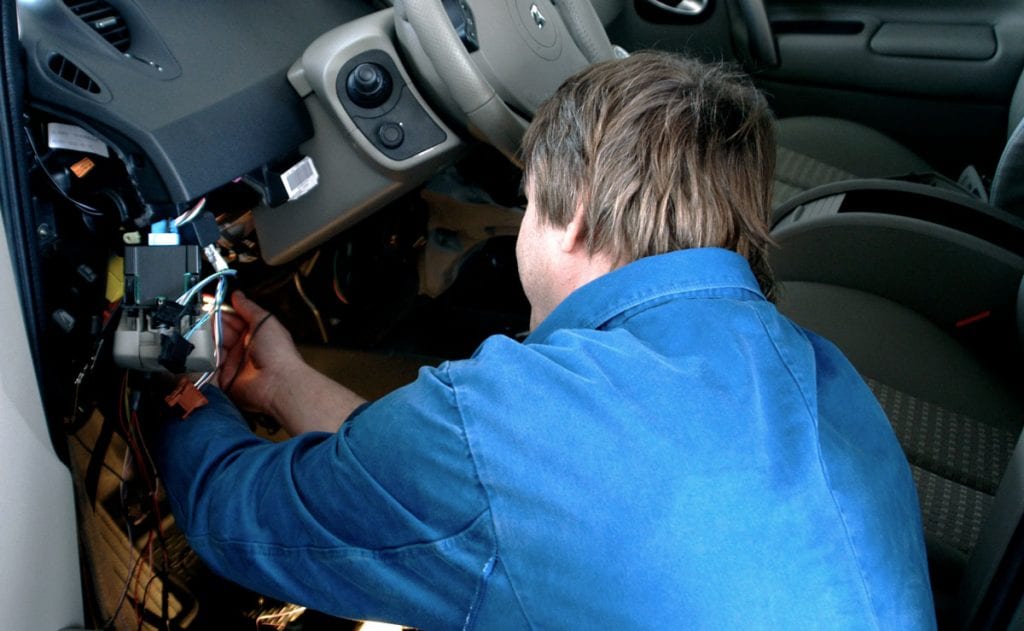
- Constant 12V and Ignition Wires: Usually found in the main ignition harness leading into the back of the ignition cylinder or a primary fuse box. Probe each wire while the ignition is off, then in accessory, then on, then start, noting the voltage changes.
- Starter Wire: Often found in the ignition harness, it will show 12V only when the key is in the START position.
- Ground: Connect your remote start module’s ground wire directly to a clean, bare metal part of the car’s chassis using a self-tapping screw, or a factory ground point.
- Parking Light, Brake, Door Lock Wires: These can be found at their respective switches, in the kick panels, or sometimes integrated into a main body control module.
Making the Connections: Splicing, Soldering, and Securing
Once a wire is positively identified, you’ll connect the corresponding wire from your remote start module. There are a few methods for this:
- Soldering (Recommended for Critical Connections): This provides the most reliable and low-resistance connection.
- Carefully strip a small section of insulation from both the vehicle wire and the remote start wire.
- Wrap the remote start wire around the vehicle wire.
- Heat the connection with your soldering iron and apply solder, allowing it to flow and encapsulate the wires.
- Allow to cool completely, then insulate thoroughly with heat shrink tubing or high-quality electrical tape.
- T-Taps/Quick Splices: These allow you to tap into an existing wire without cutting it. While quicker, they can sometimes lead to intermittent connections if not applied correctly. Ensure the tap is sized correctly for the wire gauge.
- Butt Connectors: Used to join two wires end-to-end after cutting one. Crimp securely.
Ensure all connections are robust, well-insulated, and free from strain. Poor connections are a common cause of remote start system failures and can even lead to electrical fires, highlighting the “Digital Security” aspect of meticulous wiring.
Integrating the Bypass Module and Final Assembly
Modern vehicles with immobilizers require a bypass module. This module needs to be wired into your remote start system and often programmed to “learn” your car’s key transponder code.
- Wiring: Connect the bypass module according to its specific instructions, which typically involve tapping into the vehicle’s data lines (CAN bus), ignition wires, and sometimes an antenna ring that goes around the ignition cylinder.
- Programming: Most bypass modules have a specific programming sequence that involves inserting your original car key into the ignition, turning it to various positions, or pressing buttons on the remote start system. Follow these instructions precisely. Incorrect programming will prevent the remote start from working.
Once all wiring connections are made and the bypass module is integrated, mount the remote start control module securely in a discreet location, away from heat sources and moving parts. Route all wires neatly using zip ties and cable management sleeves, ensuring they don’t interfere with pedals, steering, or airbags. Place the antenna module on the windshield or dashboard, ensuring it has an unobstructed line of sight for optimal range.
Initial Testing and Programming Your Remotes
With everything connected, it’s time for the moment of truth. Reconnect your car battery.
- Test Basic Functions: Before attempting to start the car remotely, test basic functions like door lock/unlock (if integrated) to confirm power and initial communication.
- First Remote Start Attempt: Stand a safe distance from your car and press the remote start button on your fob.
- Observe if the parking lights flash (if connected).
- Listen for the starter motor.
- Confirm the engine starts and runs.
- Test Safety Features:
- With the car running via remote start, approach the vehicle. Does it shut off when you open the door (if programmed)?
- Insert your key and turn it to the ON position without touching the brake. Does the remote start transfer control to the key without shutting off?
- Test the hood pin switch (if installed) by lifting the hood. The car should immediately shut off if running via remote start.
- Program Remotes: Most systems require you to program the remote fobs to the control module. This typically involves a sequence of turning the ignition on/off and pressing buttons on the remote. Refer to your kit’s manual for exact steps.
Post-Installation Checks and Troubleshooting Common Issues
Even with careful installation, minor issues can arise. A systematic approach to post-installation checks and troubleshooting will help ensure the long-term reliability of your new “Tech” upgrade.
Ensuring Reliability: Final Checks and Wire Management
Once the system is functioning correctly, take the time to perform a thorough final inspection.
- Double-Check All Connections: Visually inspect every splice, crimp, and solder joint. Tug gently on wires to ensure they are secure.
- Insulation: Verify that all exposed wires are properly insulated with electrical tape or heat shrink tubing. This prevents short circuits and corrosion.
- Wire Routing: Ensure all wires are neatly routed away from moving parts (pedals, steering column, fan motors), sharp edges, and heat sources. Use plenty of zip ties to secure bundles and prevent rattles or damage over time.
- Module Mounting: Confirm the control module and bypass module are securely mounted and not rattling or interfering with other components.
- Trim Panel Reinstallation: Carefully reattach all interior trim panels, ensuring all clips and screws are in place. Test for rattles or loose panels by gently tapping them.
- Battery Terminal Security: Ensure your battery terminals are tightly secured.
These steps, though seemingly minor, contribute significantly to the system’s longevity and reliability, reflecting a commitment to quality (a “Brand” attribute) in your DIY project.
Addressing Glitches: Common Problems and Solutions
Should your remote start system not function as expected, don’t despair. Most issues can be traced back to a few common culprits.
- System Not Starting (No Crank):
- Check Battery: Ensure your car battery is fully charged.
- Wiring Errors: Re-verify all constant 12V, ignition, and starter wire connections with your multimeter. Ensure they are getting power at the correct times.
- Bypass Module: Is it correctly wired and programmed? This is a very common cause of no-start issues in immobilizer-equipped vehicles.
- Safety Interlocks: Is the hood pin switch connected and functioning correctly? Is the brake pedal being inadvertently pressed? (Some systems have a diagnostic LED that flashes a code indicating the reason for no-start).
- Engine Cranks but Doesn’t Start:
- Bypass Module: Again, likely a bypass module issue. It’s allowing the starter to engage but not disabling the immobilizer.
- Fuel/Ignition Wires: Ensure all necessary ignition and accessory wires are correctly identified and connected, powering the car’s fuel pump and ignition system.
- Tachometer Wire: If the system isn’t detecting the engine running, it might attempt to crank too long or not at all. Verify the tach wire connection.
- Remote Range Issues:
- Antenna Placement: Is the antenna mounted in a clear, unobstructed location? Try repositioning it.
- Battery in Remote: Replace the battery in your remote fob.
- Interference: Nearby strong radio signals or large metal structures can interfere.
- Car Shuts Off When Door Opens/Brake Pressed:
- This is often a programmable feature. Refer to your manual for how to enable or disable “safety takeover” or “pit stop” mode. Ensure the system transitions smoothly to key control.
- Factory Alarm Triggers:
- Some vehicles require an additional module or programming to disable the factory alarm temporarily during remote start. Consult your kit’s instructions or the manufacturer’s tech support.
When troubleshooting, a logical, step-by-step approach is crucial. Begin by checking the most obvious and common issues, and work your way through the system. Utilize the diagnostic LEDs on your control module, if present, as they often provide valuable error codes.
When to Call in the Experts: Knowing Your Limits
While this guide empowers you to tackle remote start installation, it’s essential to recognize your limits. If you encounter persistent problems, feel uncomfortable with the wiring, or lack the necessary tools or “Tech” understanding, don’t hesitate to seek professional help. A qualified auto electrician or a reputable car audio/security shop has the specialized knowledge, diagnostic tools, and experience to correctly identify and resolve complex electrical issues. Investing in professional help for complex problems can ultimately save you “Money” in the long run by preventing costly damage to your vehicle’s intricate electrical system. Your car is a significant asset, and ensuring its reliable “Brand” performance is paramount.
Beyond the Install: Maximizing Your Remote Start Investment
Successfully installing a remote start system is a rewarding achievement, offering immediate benefits. But the value extends beyond the initial thrill.
The Financial Perks of DIY and Vehicle Enhancement
By undertaking this installation yourself, you’ve already made a significant “Money” saving. Professional installation for a remote start system can range from $200 to $600 or more, depending on the complexity of the vehicle and the system. Your investment was primarily in the kit itself and a few essential tools, many of which are reusable for future DIY car projects. This DIY approach not only saves cash but also adds a layer of satisfaction and a deeper understanding of your vehicle’s “Tech” intricacies.
Furthermore, as mentioned earlier, a well-installed remote start system genuinely enhances your vehicle’s value. It’s a highly desirable feature in the used car market, often making your car stand out among similar models. This translates into potentially quicker sales and a better return on your overall automotive “Money” investment.
Choosing Quality: Brands and Long-Term Performance
The “Tech” world of remote start systems is continually evolving. To maximize the long-term performance and reliability of your system, consider these points:
- Reputable Brands: Sticking with well-known “Brand” names like Viper, Compustar, or Fortin generally assures higher quality components, better warranty support, and more reliable “Tech” performance. These brands invest heavily in research and development to ensure their systems integrate seamlessly with a wide range of vehicles and meet stringent safety standards.
- Firmware Updates: Some advanced remote start and bypass modules can receive firmware updates. Keep an eye on the manufacturer’s website for these, as they can improve performance, add features, or enhance compatibility with newer vehicle software.
- Maintenance: While remote start systems are largely maintenance-free, occasionally checking your remote’s battery and ensuring all connections remain secure during other vehicle maintenance can help prevent issues.
- Security Features: Understand the security aspects of your system. Quality systems offer advanced encryption, rolling codes, and often integrate with your car’s factory alarm. Ensure you’re familiar with how to use these features to maintain your vehicle’s “Digital Security.”
In conclusion, installing a remote start system on your car is a rewarding DIY project that offers a blend of technological empowerment, personal convenience, and financial savvy. By following this comprehensive guide, approaching each step with care, and respecting the complexities of your vehicle’s electrical system, you can successfully upgrade your ride, enjoying the comfort and modernity it brings for years to come.
aViewFromTheCave is a participant in the Amazon Services LLC Associates Program, an affiliate advertising program designed to provide a means for sites to earn advertising fees by advertising and linking to Amazon.com. Amazon, the Amazon logo, AmazonSupply, and the AmazonSupply logo are trademarks of Amazon.com, Inc. or its affiliates. As an Amazon Associate we earn affiliate commissions from qualifying purchases.