In the ever-evolving landscape of survival horror gaming, few titles have captivated players with their unique blend of crafting, base-building, and relentless zombie combat quite like 7 Days to Die. Launched initially in early access, the game has grown significantly, fostering a dedicated community eager to push its boundaries. This desire for fresh experiences and deeper gameplay often leads players to the vibrant world of modding, where community-created content breathes new life into familiar digital realms. Among the plethora of modifications available, the “Rebirth” mod stands out as a colossal overhaul, transforming the core 7 Days to Die experience into something simultaneously familiar and refreshingly new.
This guide will walk you through the precise steps required to install the Rebirth mod, ensuring a smooth transition to an enriched survival adventure. Beyond the technical instructions, we’ll explore why undertaking such a modding endeavor is a valuable investment of your time, touching upon the technological prowess it demonstrates, the potential for personal brand enhancement within the gaming community, and the inherent value gained from mastering complex digital processes.
Understanding the Rebirth Mod and Its Appeal
Before diving into the mechanics of installation, it’s crucial to understand what makes the Rebirth mod such a compelling addition to 7 Days to Die. This isn’t just a minor tweak; it’s a significant reimagining that addresses many common desires within the player base.
What is Rebirth for 7 Days to Die?
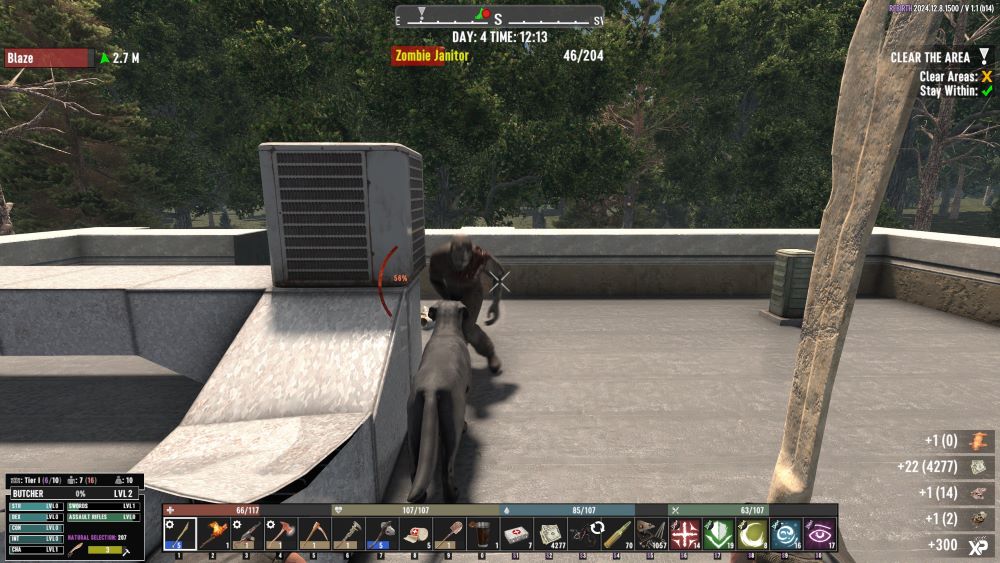
The Rebirth mod is an ambitious total conversion mod for 7 Days to Die. Unlike smaller mods that might introduce a new item or slightly alter a game mechanic, Rebirth completely overhauls numerous facets of the game. It introduces new enemies, weapons, tools, crafting recipes, biomes, questlines, and a revised progression system. The aim is to create a more challenging, immersive, and replayable experience, often with a stronger emphasis on realistic survival elements, enhanced exploration, and a deeper sense of lore. Players often seek out Rebirth when they’ve exhausted the vanilla game’s content or crave a fresh challenge that requires rethinking established strategies.
The mod’s creators often spend countless hours balancing new features, debugging, and integrating community feedback, fostering a robust and engaging product that rivals commercially developed content in scope and depth. This level of dedication is a testament to the power of community-driven development in the tech world.
Why Mod Your 7 Days to Die Experience?
The decision to mod a game like 7 Days to Die extends beyond mere curiosity; it’s often a strategic choice for several reasons:
- Enhanced Longevity and Replayability (Tech & Productivity): The vanilla game, while excellent, can eventually feel repetitive after hundreds of hours. Mods like Rebirth introduce vast amounts of new content, effectively resetting the learning curve and offering hundreds more hours of engaging gameplay. This isn’t just about entertainment; it’s about maximizing the value of your initial game purchase by extending its useful life and increasing your return on investment in leisure time. From a productivity standpoint, it ensures that your gaming sessions remain stimulating and rewarding.
- Tailored Gameplay (Tech & Personalization): Modding allows players to customize their experience to an extraordinary degree. If you prefer a harder challenge, more realistic resource management, or entirely new ways to interact with the world, there’s likely a mod (or a combination of mods) that caters to your specific preferences. This ability to personalize your digital environment reflects a broader trend in technology, where users expect and demand more control over their software experiences.
- Community Engagement and Innovation (Brand & Tech Trends): Modding is a cornerstone of PC gaming culture, representing a collaborative spirit where players and creators push boundaries. Engaging with mods means tapping into a dynamic community, participating in discussions, providing feedback, and even contributing your own ideas. It keeps the game relevant and fresh, showcasing how open ecosystems can drive innovation far beyond what a single development studio might achieve. For mod creators, it’s an opportunity to build a “brand” within the gaming community, earning recognition and reputation for their creative and technical skills.
- Skill Development (Tech & Personal Branding): The process of installing, configuring, and troubleshooting mods hones valuable technical skills. You learn about file systems, software compatibility, error logs, and problem-solving methodologies. Successfully navigating these challenges not only enhances your personal tech literacy but can also boost your “personal brand” within gaming circles – positioning you as a knowledgeable and resourceful individual capable of handling complex digital tasks.
Essential Preparations: Setting the Stage for a Smooth Installation
A successful mod installation hinges on meticulous preparation. Rushing through these initial steps can lead to frustrating errors and wasted time. Think of it as laying a solid foundation before constructing a building; without it, the whole structure is vulnerable.
System Requirements and Game Version Compatibility (Tech Considerations)
The Rebirth mod, being a significant overhaul, often introduces new assets and complex scripts that can be more demanding on your system than the vanilla game. Before proceeding, ensure your computer meets or ideally exceeds the recommended specifications for 7 Days to Die. Pay particular attention to:
- RAM: Mods typically consume more memory. While 8GB might suffice for vanilla, 16GB or even 32GB is highly recommended for Rebirth to prevent stuttering and crashes.
- Processor (CPU): A modern multi-core processor is beneficial for handling the increased AI and world generation complexity.
- Graphics Card (GPU): Enhanced visuals, new models, and lighting effects will put a greater strain on your GPU. Ensure your card is relatively recent and has ample VRAM (4GB+).
- Storage: SSD (Solid State Drive) is almost a necessity. Installing 7 Days to Die and especially large mods like Rebirth on an SSD dramatically reduces loading times and improves overall game responsiveness, offering a substantial productivity boost by minimizing downtime.
Crucially, mod compatibility with game versions is paramount. 7 Days to Die is still in active development, meaning it receives frequent updates (called “Alphas,” e.g., Alpha 20, Alpha 21). Most mods, Rebirth included, are developed for specific game versions. Attempting to install a mod designed for Alpha 20 onto an Alpha 21 game (or vice-versa) will almost certainly lead to crashes and instability.
Action:
- Check your 7 Days to Die version:
- Open Steam.
- Go to your Library.
- Right-click on 7 Days to Die -> Properties -> Betas.
- Note the currently selected beta branch (e.g., “none” for stable, or specific alpha versions).
- Verify Rebirth mod compatibility: When you download the mod, the creator will explicitly state which 7 Days to Die alpha version it supports. Ensure these match. If your game version doesn’t match the mod, you may need to revert your 7 Days to Die version via the Steam “Betas” tab to match the mod’s requirements.
Safeguarding Your Game: The Importance of Backups (Digital Security & Productivity)
This step cannot be overstated. Before installing any major mod, always, always create a backup of your vanilla game files and your save data. This is a fundamental principle of digital security and smart tech practice. Modding, by its nature, involves altering core game files. If something goes wrong—a corrupted file, an incompatible mod, or simply a desire to return to vanilla—a backup is your safety net, preventing hours of reinstallation and lost progress. It’s a proactive measure that saves significant time and frustration.
Action:
- Locate your 7 Days to Die installation folder:
- Open Steam.
- Go to your Library.
- Right-click on 7 Days to Die -> Manage -> Browse local files. This will open the game’s root directory.
- Copy the entire 7 Days to Die folder: Copy the entire folder (e.g.,
SteamLibrarysteamappscommon7 Days To Die) to a safe location on your hard drive (e.g.,C:7D2D_BackupVanilla_A21). Rename it descriptively. - Backup your save game data:
- Navigate to your 7 Days to Die application data folder, typically:
%APPDATA%7DaysToDie. You can typeshell:Appdatainto your Windows Run dialog (Win+R) to quickly access the AppData Roaming folder, then navigate back one level to AppData, then LocalLow, then The Fun Pimps. Or just paste%APPDATA%7DaysToDiein your explorer address bar. - Copy the entire
Savesfolder within%APPDATA%7DaysToDieto your backup location (e.g.,C:7D2D_BackupSaves_A21).
- Navigate to your 7 Days to Die application data folder, typically:
Sourcing the Mod: Where to Download Rebirth Safely (Tech, Brand Reputation, & Digital Security)
Downloading mods from reputable sources is critical to protect your system from malware, ensure you’re getting the official, uncorrupted version of the mod, and support the mod creators. Trusted sources build a strong “brand” within the modding community for reliability and safety.
Action:
- Identify Official Sources: The primary locations for 7 Days to Die mods are usually:
- The official 7 Days to Die forums (forums.7daystodie.com)
- Nexus Mods (nexusmods.com) – a widely respected modding hub.
- The mod creator’s official website or Discord server.
- Avoid shady third-party sites that promise “free” mods but might bundle unwanted software or outdated versions.
- Download the Rebirth mod: Locate the download link for the specific version of Rebirth compatible with your 7 Days to Die alpha version. Download the file, which will likely be a
.zipor.rararchive. - Basic Security Check: While downloading from reputable sites significantly reduces risk, it’s always good practice to quickly scan downloaded archives with your antivirus software before extracting them. This is a simple but effective digital security measure.
Step-by-Step Installation of Rebirth
With preparations complete, we can now proceed with the actual installation of the Rebirth mod. This process involves precise file management, a core technical skill applicable across many software environments.
Locating Your 7 Days to Die Installation Directory
As done during the backup phase, you need to know exactly where 7 Days to Die is installed.
Action:
- Open Steam, go to Library.
- Right-click 7 Days to Die -> Manage -> Browse local files.
- Keep this folder open. This is your target directory for the mod files. For clarity, let’s refer to this as the
[7D2D_Game_Folder].
Extracting the Rebirth Mod Files
The downloaded Rebirth mod will be in a compressed archive format. You’ll need an archive utility (like 7-Zip or WinRAR) to extract its contents.
Action:
- Create a temporary folder: Create a new, empty folder on your desktop or in your downloads directory, named something like
Rebirth_Extracted. - Extract the archive: Right-click on the downloaded Rebirth
.zipor.rarfile and select “Extract Here” or “Extract to Rebirth_Extracted/” (depending on your utility) into the temporary folder you just created. - Examine extracted contents: After extraction, you’ll typically find one or more folders. A common structure for 7 Days to Die mods is a
Modsfolder, and sometimes aDataorConfigfolder, or even a pre-configured 7 Days to Die folder structure intended to be merged directly. The mod’s instructions (often found in aREADME.txtfile within the archive) will clarify the exact structure. For most overhaul mods like Rebirth, you’re usually looking for a folder namedModscontaining the mod’s specific files (e.g.,Mods/Rebirth_Core).
Integrating Rebirth into Your Game Folder
This is the core step where the mod files are placed into your 7 Days to Die installation.
Action:
- Navigate to the
[7D2D_Game_Folder](from step 1): You should have this open from the previous step. - Locate or Create the
ModsFolder:- Look for a folder named
Modswithin your[7D2D_Game_Folder]. If it doesn’t exist (which is common for a fresh vanilla installation), create it yourself. Ensure the capitalization is exact:Mods.
- Look for a folder named
- Copy the Rebirth Mod Content:
- From your
Rebirth_Extractedtemporary folder, copy the contents that are meant to go into theModsfolder. This is usually theRebirth_Corefolder, and any other folders the mod specifically tells you to put intoMods. - Paste these into the
[7D2D_Game_Folder]Modsdirectory. - Self-contained overhauls: Some large overhaul mods are designed to replace entire game folders or be installed as a separate instance. In these cases, the extracted content might look like a full 7 Days to Die folder structure itself. Always refer to the mod’s specific installation instructions in its
READMEfile. If it’s a “copy-and-replace” scenario, you’d typically copy the mod’sData,Config,Alpha21_Data(or similar) folders directly into your[7D2D_Game_Folder], overwriting existing files. This is why the backup is so crucial. For Rebirth, it typically leverages theModsfolder structure, which is generally safer.
- From your
First Launch and Verification
Once the files are in place, it’s time to launch the game and verify the installation.
Action:
- Launch 7 Days to Die via Steam: Do not use any old shortcuts that might point to a vanilla configuration. Launch directly from Steam.
- Observe loading screens: You might notice new loading screens, splash art, or longer loading times, which are often indicators that the mod is active.
- Start a new game: It is highly recommended to start a completely new game/save file after installing a major mod like Rebirth. Using an old vanilla save file with a heavily modded game can lead to unpredictable bugs, crashes, and corrupted saves.
- Verify in-game: Once in your new game world, check for mod-specific elements: new UI, unique items in your inventory, new enemies, or altered crafting recipes. If you see these, congratulations, the installation was successful!
Troubleshooting Common Issues and Optimizing Your Modded Experience
Modding, while rewarding, isn’t always a flawless process. Encountering issues is part of the learning curve. Understanding how to troubleshoot effectively is a valuable technical skill that enhances your productivity and digital literacy.
Addressing Installation Problems (Tech & Productivity)
- Game Won’t Launch/Crashes on Startup:
- Check Game Version: The most common culprit. Ensure your 7 Days to Die version perfectly matches the mod’s required version.
- Verify Files (Steam): In Steam, right-click 7 Days to Die -> Properties -> Installed Files -> Verify integrity of game files. This can fix corrupted vanilla files that might conflict. (Note: this might remove mod files if they replaced vanilla ones, requiring re-installation of the mod.)
- Delete
7DaysToDiefolder in AppData: Sometimes old configuration files can cause conflicts. Delete the folder at%APPDATA%7DaysToDie(remember to backup yourSavesfirst if you hadn’t already). This will reset your game settings. - Review Mod’s
README: Thoroughly re-read the mod’s installation instructions for any missed steps or specific requirements.
- In-Game Glitches/Missing Textures:
- Corrupted Download: Re-download the mod file, ensuring a stable internet connection.
- Incorrect Placement: Double-check that all mod files were placed in the correct directories (e.g., in the
Modsfolder, not directly in the root). - Mod Conflicts: If you have other mods installed, they might be conflicting with Rebirth. For major overhauls like Rebirth, it’s generally recommended to run it standalone, without other content-modifying mods.
- “Easy Anti-Cheat” Issues:
- Many 7 Days to Die mods are incompatible with Easy Anti-Cheat (EAC). When launching a modded game, you usually need to launch it without EAC. The mod’s instructions will often specify this. If you encounter issues, launch the game via the
7DaysToDie.exedirectly, or ensure your Steam launch options are configured to disable EAC (e.g.,-noeac).
- Many 7 Days to Die mods are incompatible with Easy Anti-Cheat (EAC). When launching a modded game, you usually need to launch it without EAC. The mod’s instructions will often specify this. If you encounter issues, launch the game via the
Performance Considerations and Graphics Settings (Tech & Hardware)
A heavily modded game will inevitably demand more from your hardware. Optimizing your settings can make a significant difference in performance.
- Lower Graphics Settings: Don’t be afraid to reduce texture quality, shadow detail, reflection quality, and draw distance. The new content of Rebirth often outweighs a slight reduction in visual fidelity.
- Resolution Scaling: If your GPU struggles, consider reducing your rendering resolution scaling (e.g., to 90% or 80%) rather than dropping the overall display resolution.
- Dedicated GPU: Ensure 7 Days to Die is using your dedicated graphics card (if you have one) and not integrated graphics. Check your graphics card control panel (NVIDIA Control Panel or AMD Radeon Software).
- Drivers: Keep your GPU drivers updated to the latest stable version. This is crucial for performance and compatibility.
- Monitor Background Processes: Close unnecessary applications running in the background to free up RAM and CPU resources.
Leveraging the Modding Community for Support (Brand & Networking)
One of the greatest assets in modding is the community itself. When troubleshooting, don’t suffer in silence.
- Official Forums/Discord: Visit the official Rebirth mod thread on the 7 Days to Die forums or join its dedicated Discord server. Mod creators and experienced players often provide excellent support. This fosters a stronger “brand” for the mod and the community around it.
- Provide Detailed Information: When asking for help, always include:
- Your 7 Days to Die version.
- The Rebirth mod version.
- Your system specifications (CPU, GPU, RAM).
- A clear description of the problem.
- Relevant log files (often found in
C:Users[YourUsername]AppDataLocalLowThe Fun Pimps7 Days To Dieoutput_log.txtor the game’s root directory after a crash).
- Search Existing Solutions: Before posting, search the forums or Discord for similar issues. Chances are, someone else has encountered and solved the same problem. This demonstrates good “productivity” in problem-solving.
Beyond Installation: The Broader Impact of Modding
Successfully installing and enjoying a complex mod like Rebirth is more than just a gaming achievement; it’s a demonstration of digital literacy and an engagement with broader tech trends.
Enhancing Your Gaming “Brand” (Personal Branding & Content Creation)
Mastering mod installation and configuration positions you as a knowledgeable and capable individual within the gaming community. This can contribute to your “personal brand” in several ways:
- Community Expert: You become a go-to person for advice, helping others troubleshoot their installations. This fosters reputation and respect.
- Content Creator: Your expertise can be leveraged for online income. Consider creating YouTube tutorials, streaming modded gameplay on Twitch, or writing detailed blog posts about your experiences. These activities not only share knowledge but can also generate revenue through ad impressions, subscriptions, or donations—a direct link to “Money” and “Online Income.”
- Network Building: Engaging with mod creators and other modders can lead to valuable connections, opening doors to collaborative projects or even future development opportunities.
The “Value” of Modding: Time, Money, and Enjoyment (Personal Finance & Investing)
While modding may seem like a simple hobby, it carries intrinsic value that resonates with principles of personal finance and investment:
- Maximizing Investment: You’ve already invested money in 7 Days to Die. Modding expands its lifespan and enjoyment, ensuring you get the most out of your initial financial outlay. It’s an investment in your leisure and entertainment budget.
- Skill Acquisition as Capital: The technical skills you acquire—file management, troubleshooting, understanding software ecosystems, system optimization—are a form of intellectual capital. These skills are transferable to other tech-related challenges, making you a more efficient and adaptable digital citizen.
- Return on Time Investment: While installation takes time, the hundreds of hours of enhanced gameplay and new experiences offer a significant return on that initial time investment. It’s about optimizing your leisure for maximum satisfaction, which indirectly contributes to overall well-being and productivity.
Digital Literacy and Productivity Gained (Tech Skills & Digital Security Awareness)
The entire process of modding is a practical masterclass in digital literacy:
- Understanding File Structures: You gain a deeper appreciation for how software is organized on your computer.
- Problem-Solving Methodologies: You learn to systematically identify, diagnose, and resolve technical issues, a critical skill in today’s digital world.
- Cybersecurity Awareness: The emphasis on reputable download sources, backups, and virus scanning reinforces best practices for digital security, protecting your personal data and hardware.
- Resource Management: Optimizing game settings and monitoring system performance teaches you how to manage digital resources effectively, boosting your overall productivity in handling software.
In conclusion, installing the Rebirth mod for 7 Days to Die is more than just following a set of instructions. It’s an immersive experience in applied technology, a demonstration of personal initiative, and a gateway to deeper engagement with a vibrant community. By understanding the steps, preparing diligently, and troubleshooting proactively, you not only unlock an incredible new chapter in your 7 Days to Die journey but also cultivate valuable digital skills that extend far beyond the game itself. Embrace the challenge, enjoy the rebirth of your favorite survival game, and elevate your tech prowess in the process.
aViewFromTheCave is a participant in the Amazon Services LLC Associates Program, an affiliate advertising program designed to provide a means for sites to earn advertising fees by advertising and linking to Amazon.com. Amazon, the Amazon logo, AmazonSupply, and the AmazonSupply logo are trademarks of Amazon.com, Inc. or its affiliates. As an Amazon Associate we earn affiliate commissions from qualifying purchases.