Kitchen cabinets are the silent workhorses of our homes, housing everything from gourmet spices to cherished dinnerware. Yet, often overlooked are the small, functional details that can dramatically transform their appearance and your interaction with them: cabinet pulls. Installing new pulls is more than just a DIY task; it’s an opportunity to inject personality, enhance functionality, and even bolster the overall “brand” and value of your home. Whether you’re refreshing an outdated kitchen, completing a new build, or simply seeking a subtle design upgrade, mastering the art of installing cabinet pulls is a valuable skill that blends precision, aesthetics, and smart financial planning.
In an era where home aesthetics significantly contribute to personal brand and property value, the seemingly minor detail of cabinet hardware plays a surprisingly major role. This guide will walk you through the entire process, from selecting the right hardware to the final screw, while also exploring how this seemingly simple task intersects with the worlds of technology, branding, and personal finance. We’ll delve into smart tools that enhance precision, discuss how hardware choices define your home’s identity, and uncover the financial wisdom behind such an accessible home improvement. Get ready to turn your kitchen cabinets into a testament to thoughtful design and shrewd investment.
The Transformative Power of Cabinet Hardware: Blending Aesthetics with Function
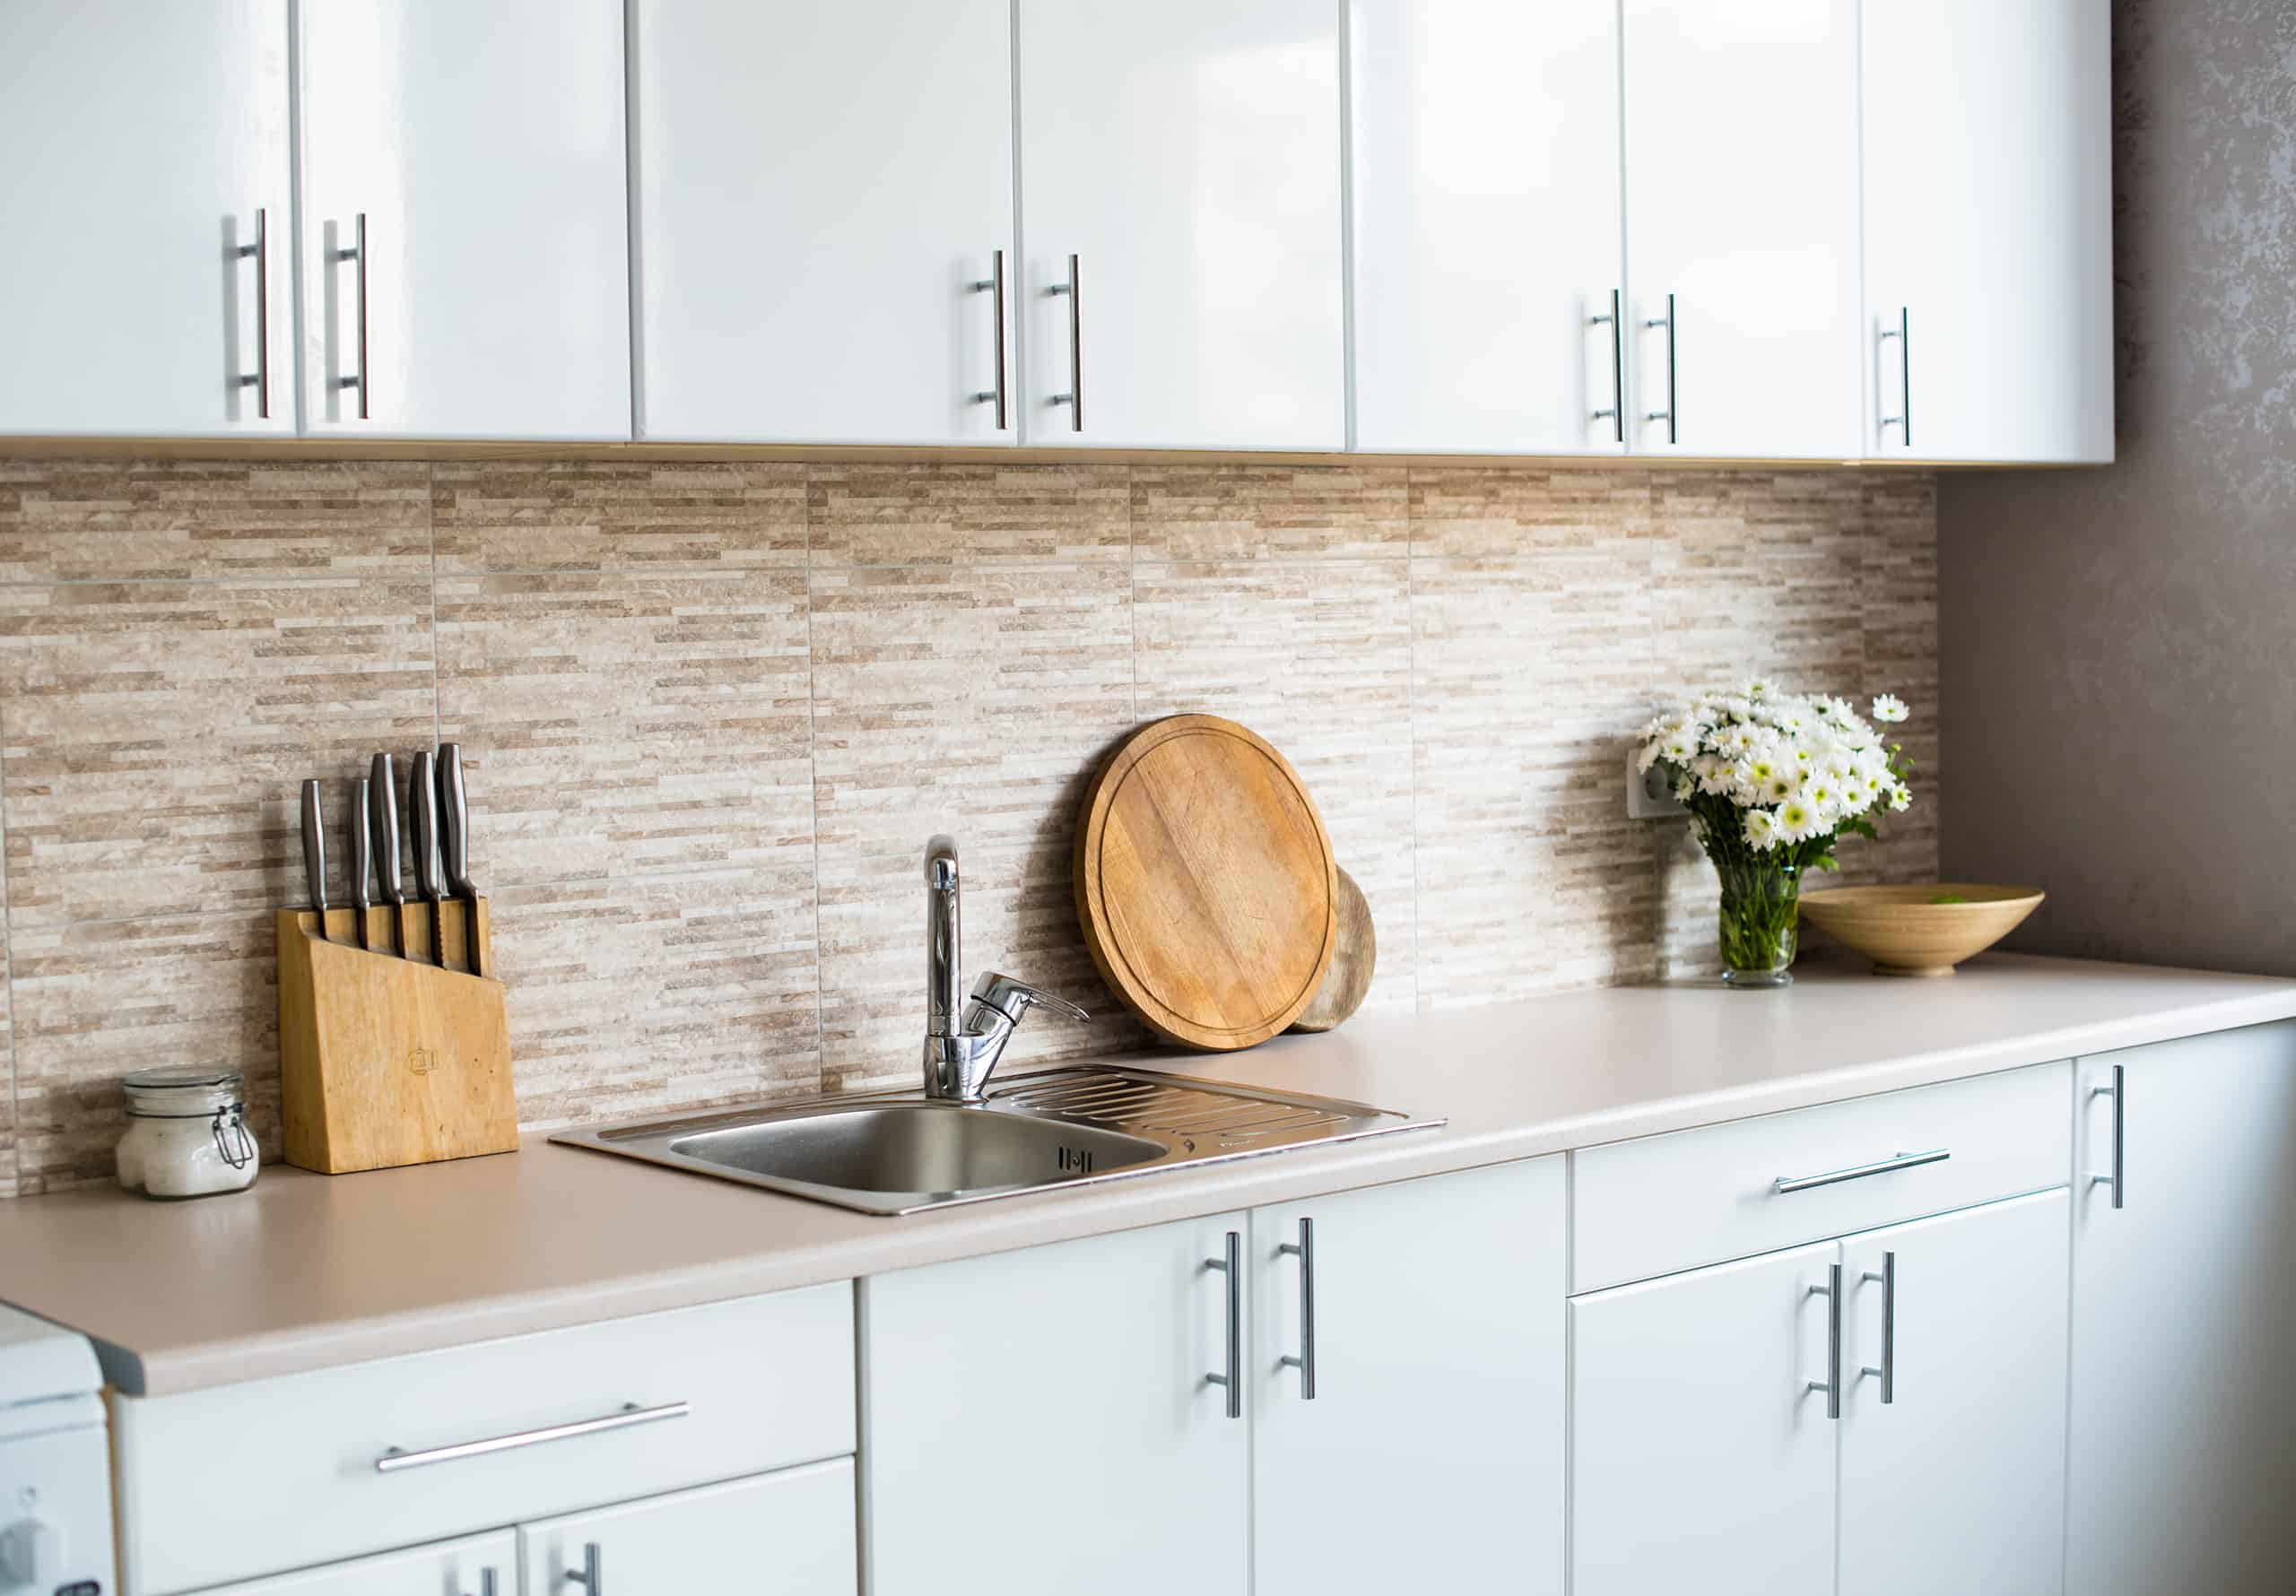
The impact of cabinet pulls extends far beyond their primary function of opening and closing doors and drawers. They are critical elements in shaping the visual narrative of your kitchen, acting as both practical tools and decorative accents. A well-chosen set of pulls can unify a design scheme, introduce a touch of elegance, or even serve as a bold statement piece, making your kitchen not just a cooking space, but a reflection of your unique style and a testament to meticulous attention to detail.
Elevating Your Home’s Brand: Design, Style, and First Impressions
Think of your home as a personal brand. Every choice you make, from paint colors to furniture, contributes to its overall identity and the impression it leaves on visitors and, crucially, potential buyers. Cabinet hardware is a powerful, yet often underestimated, component of this brand strategy. The style, material, and finish of your pulls can instantly communicate elegance, modernity, rustic charm, or industrial chic.
Consider the narrative you want your kitchen to tell. Do you envision a sleek, minimalist space? Then clean, linear bar pulls in a brushed nickel or matte black finish would align with that aesthetic, creating a sense of understated sophistication. For a more traditional or classic feel, perhaps ornate, antique brass cup pulls or polished chrome knobs would be more appropriate, lending an air of timeless elegance. The coherence of your hardware choices with the existing architecture and interior design elements of your home is paramount. Mismatched or poorly chosen hardware can disrupt the visual flow, making the space feel disjointed and less refined. Conversely, a cohesive selection reinforces your home’s aesthetic “brand,” demonstrating a deliberate and harmonious design philosophy. This attention to detail reflects positively on the entire property, signaling quality and care, which are invaluable assets when it comes to showcasing your personal style or even preparing your home for a competitive real estate market.
The Smart Investment: Boosting Value and Budgeting Your Upgrade
From a financial perspective, installing new cabinet pulls offers an exceptional return on investment (ROI), especially given its relatively low cost and minimal effort compared to other kitchen renovations. This small upgrade can dramatically refresh the look of your kitchen, making it appear more modern, well-maintained, and appealing without the significant expense of replacing cabinets or countertops. For homeowners planning to sell, a kitchen refresh with new hardware is a well-known staging trick that instantly elevates perceived value, often leading to quicker sales and better offers. Buyers often judge the overall condition of a home based on easily visible details, and new, stylish hardware suggests a home that has been cared for and updated.
Beyond resale value, there’s the personal finance aspect of saving money through DIY. While hiring a professional for cabinet hardware installation might seem convenient, it adds to labor costs. By undertaking this project yourself, you retain full control over the budget, allowing you to allocate funds primarily to the hardware itself. This also encourages smarter purchasing decisions; leveraging online reviews and comparison shopping (a tech-enabled money-saving strategy) can help you find high-quality pulls at competitive prices. Utilizing financial tools like budgeting apps to track your expenses for this project ensures you stay within your allocated funds, demonstrating a prudent approach to home improvement. This isn’t just about saving a few dollars; it’s about making a strategic investment in your largest asset while honing valuable practical skills.
Preparing for Installation: Tools, Techniques, and Tech Insights
Successful cabinet pull installation hinges on thorough preparation. This stage is where precision meets planning, and where the right tools — traditional and modern — make all the difference. Rushing through preparation often leads to misaligned pulls, damaged cabinets, and frustration. Instead, take your time to gather your materials, understand your measurements, and visualize the final outcome.
Essential Toolkit: Traditional Meets Digital for Precision
While you can technically install pulls with just a drill and a tape measure, a more comprehensive toolkit, sometimes leveraging smart tech, will ensure professional-grade results.
Basic Tools:
- Tape Measure: For initial measurements.
- Pencil: For marking drill points.
- Drill: A cordless drill is ideal for maneuverability.
- Drill Bits: Select bits specifically designed for wood, slightly larger than the screw shaft but smaller than the screw head (usually 3/16″ or 5mm). Always start with a smaller pilot hole if unsure.
- Screwdriver: Or a drill bit attachment for tightening the screws.
- Level: To ensure horizontal alignment.
- Awl or Center Punch: To make a small indentation before drilling, preventing the drill bit from wandering.
Advanced & Tech-Enhanced Tools for Superior Accuracy:
- Cabinet Hardware Template/Jig: This is perhaps the most crucial “tech” for perfect alignment. These reusable plastic or metal guides ensure consistent spacing between holes for pulls or knobs, eliminating measurement errors and saving immense time, especially for multiple cabinets. High-quality jigs often feature adjustable sliders and clear markings, making the process almost foolproof.
- Laser Level: While potentially overkill for pulls alone, a laser level can project perfectly straight lines, aiding in the visual alignment of pulls across multiple cabinets or drawers. This is especially useful for ensuring consistency in a large kitchen where cumulative small errors can become noticeable.
- Digital Caliper: For precise measurement of pull spacing (center-to-center distance), which is essential for ordering the correct template or drilling accurately.
- Smart Measuring Apps (on smartphones/tablets): While not for direct drilling, some apps can help visualize placement using augmented reality (AR) or measure distances with reasonable accuracy, assisting in the initial planning phase. They allow you to “try on” different pull sizes or positions virtually.
- Online Tutorials & Guides (like this one!): Leveraging online resources for video demonstrations, expert tips, and product reviews falls under the “Tech” umbrella, providing invaluable knowledge before and during your project. Checking reviews for specific hardware brands and tools can help you make informed purchasing decisions, optimizing your investment.
Investing in a good quality hardware jig, even a basic one, is highly recommended. It transforms a potentially frustrating task into a straightforward, precise operation, ensuring that your final product enhances your home’s brand rather than detracting from it with crooked hardware.
Strategic Placement: Crafting a Visually Harmonious Layout
Before you even think about drilling, precise planning of pull placement is paramount. This stage defines the aesthetic success of your installation. Consistent placement creates a polished, professional look, while haphazard positioning can make your kitchen feel unbalanced.
For Cabinet Doors:
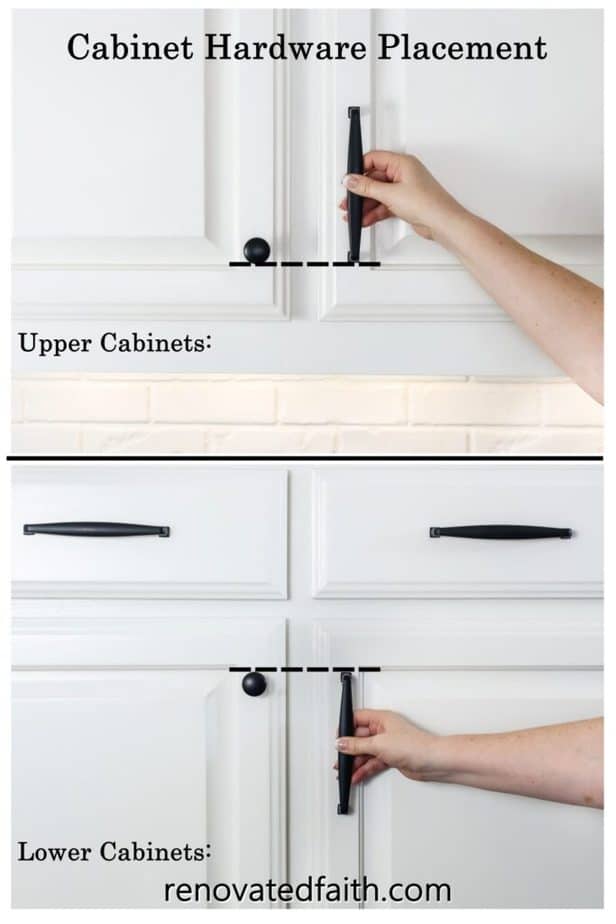
- Vertical Rails (Stiles): For upper cabinets, pulls are typically placed on the bottom vertical rail (stile) of the door, opposite the hinge. For lower cabinets, they are placed on the top vertical rail.
- Height: A common standard is to center the pull horizontally on the stile and position it vertically about 1-2 inches from the bottom edge (for upper cabinets) or top edge (for lower cabinets) of the door panel. This provides a comfortable grip and visually anchors the pull.
- Consider Door Size: For very tall pantry doors, you might opt for two pulls spaced vertically, or a longer pull for better proportion.
For Drawers:
- Centering: For most drawers, the pull is centered both horizontally and vertically on the drawer face. This provides optimal balance and ease of use.
- Multiple Pulls on Wide Drawers: For very wide drawers (e.g., over 24-30 inches), consider using two pulls for aesthetic balance and improved functionality. If using two, ensure they are equidistant from the center and from the edges of the drawer face.
- False Fronts (under sinks): Install pulls on false fronts to maintain visual continuity, even if they aren’t functional drawers.
The “Test It Out” Method: Before drilling, use painter’s tape or a removable adhesive to temporarily attach a pull to a cabinet door or drawer. Step back and observe it from different angles, and at different times of day. This allows you to fine-tune the placement until it feels just right. This iterative design approach, much like A/B testing in software development, ensures the best possible outcome for your home’s aesthetic. Consider the ergonomics – does the placement allow for a comfortable grip and natural opening motion? This attention to user experience is key to a truly successful installation, enhancing not just the looks but also the day-to-day usability of your kitchen.
Step-by-Step Installation: A Guide to Flawless Execution
With your tools ready and placement planned, it’s time to bring your vision to life. This section details the critical steps of marking, drilling, and securing, emphasizing accuracy at each stage to prevent costly mistakes and ensure a professional finish.
Marking and Drilling: The Foundation of a Perfect Fit
Precision here is non-negotiable. Mistakes in drilling can lead to visible holes, requiring costly repairs or cabinet replacement.
- Double-Check Measurements & Placement: Reconfirm your chosen pull placement on a test cabinet door or drawer. If using a jig, adjust it to the precise center-to-center measurement of your pulls.
- Affix the Template/Jig:
- For Doors: Position the jig on the cabinet door, aligning it perfectly with the edge and height marks you’ve determined. Clamp it securely in place or hold it firmly.
- For Drawers: Position the jig on the drawer face, ensuring it’s centered both horizontally and vertically, or adjusted for your chosen offset. Clamp or hold firmly.
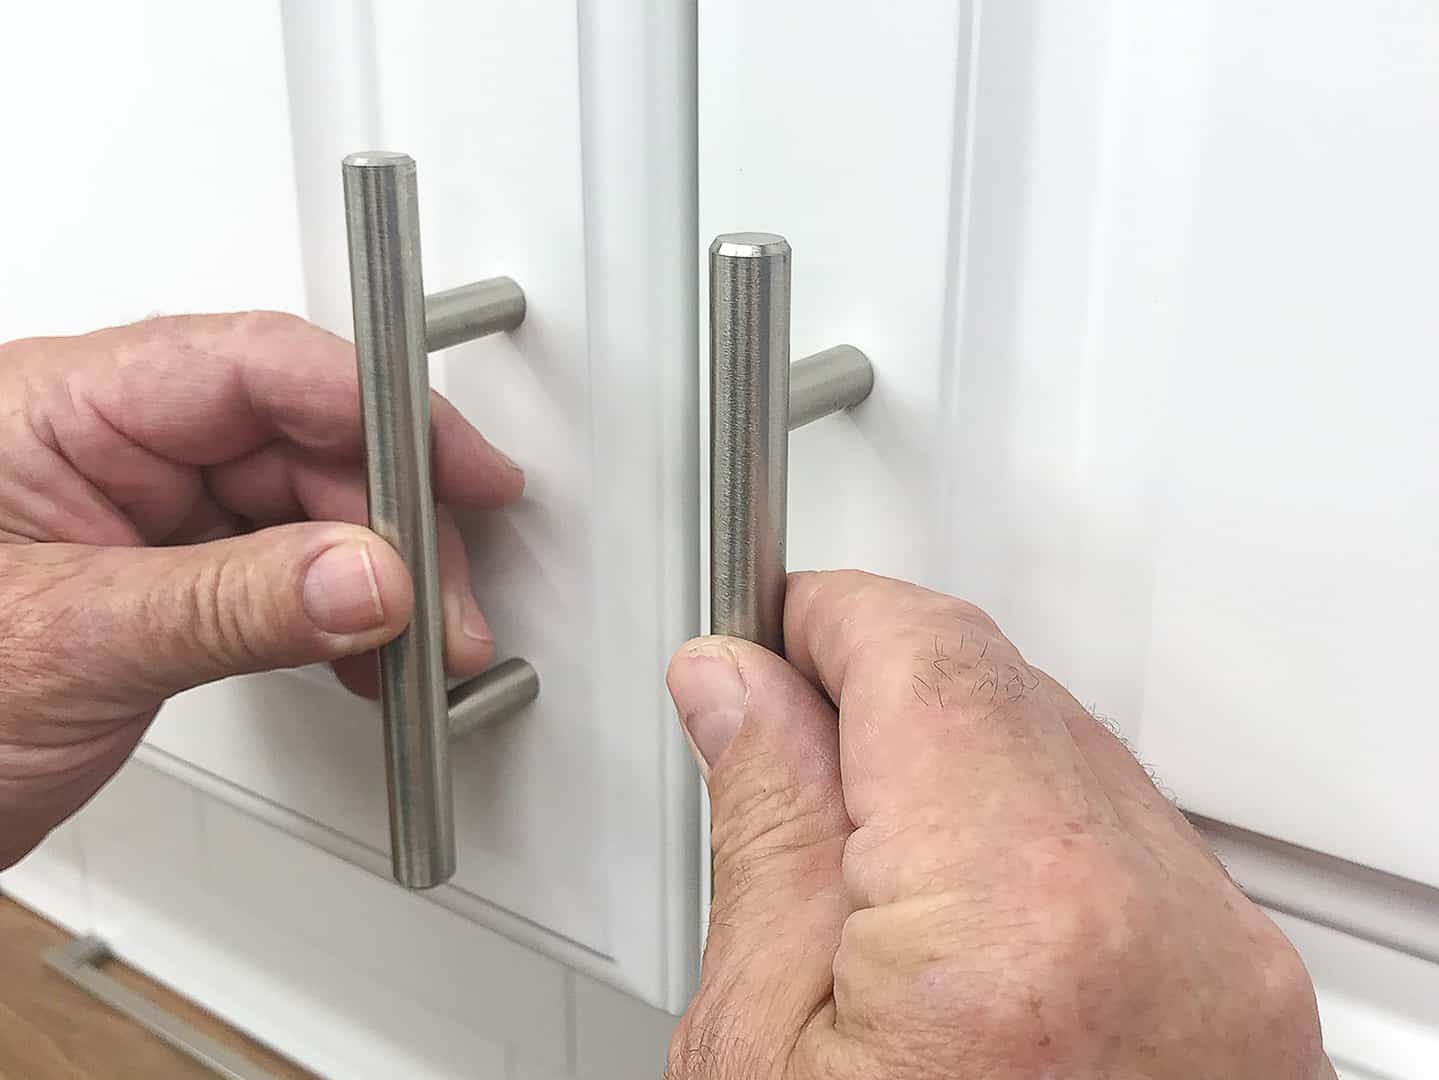
- Crucial Tip: Always start with an inconspicuous cabinet (like the inside of a pantry door or a lower cabinet) to practice and fine-tune your technique and jig settings. This minimizes risk on highly visible surfaces.
- Mark the Drill Points: Using the jig’s guide holes, mark the exact spots for drilling with a pencil. For even greater precision, use an awl or center punch to create a small indentation at each marked point. This prevents the drill bit from “walking” or slipping on the surface, ensuring the hole starts exactly where you intend it to.
- Select the Correct Drill Bit: Choose a drill bit that is slightly larger than the screw shaft but smaller than the screw head. If the holes are too small, forcing the screw might split the wood. If too large, the screws won’t hold securely.
- Drill the Holes:
- Slow and Steady: Use a moderate drill speed. Applying too much pressure or drilling too fast can cause splintering, especially on the back side of the cabinet.
- Prevent Tear-Out (Splintering): To prevent wood from splintering as the drill bit exits the other side, a common “tech” trick is to place a scrap piece of wood behind the cabinet face where the drill bit will emerge. Clamp it firmly in place. This provides backing support, ensuring a clean exit hole. Alternatively, drill until the tip of the bit just breaks through the surface on the back, then flip the door/drawer over and finish drilling from the back.
- Perpendicular Drilling: Ensure your drill is perfectly perpendicular to the cabinet surface. Angled holes will make it difficult to screw in the pull evenly and securely.
- Cleanliness: After drilling, remove any sawdust or wood shavings from the holes and surrounding area.
Securing Your Pulls: The Final Touch
Once the holes are drilled, the final step is to securely attach your new pulls.
- Align and Insert Screws: From the inside of the cabinet door or drawer, align the screws with the drilled holes. Push them through until they protrude from the front.
- Attach the Pull: Align the pull with the screw ends protruding from the front of the cabinet. Start threading the screws into the pull by hand to ensure they are properly aligned and not cross-threaded.
- Tighten Securely: Use a screwdriver (or a drill with a screwdriver bit set to a low torque setting) to tighten the screws.
- Avoid Overtightening: Overtightening can strip the screws, damage the pull, or crack the cabinet material. Tighten until the pull is snug and doesn’t wiggle, but avoid applying excessive force. The goal is firm, not strained.
- Check Alignment: As you tighten, ensure the pull remains perfectly straight. Make any minor adjustments before the screws are fully tightened.
- Repeat for All Cabinets: Methodically work through all your cabinets and drawers, using your jig for consistent results. Periodically step back and visually inspect your work to ensure uniformity.
This systematic approach, combining careful measurement with controlled drilling and precise fastening, will result in a professional installation that looks fantastic and functions flawlessly.
Troubleshooting and Maintenance: Ensuring Lasting Quality
Even with the best preparation, minor issues can arise during installation. Knowing how to address them quickly and effectively is part of being a savvy DIYer. Furthermore, understanding basic maintenance will ensure your newly installed pulls remain functional and beautiful for years, protecting your investment.
Common Challenges and Quick Fixes
- Screw Too Short/Long:
- Issue: The provided screws are either too short to reach the pull from inside the cabinet or too long, bottoming out before the pull is snug.
- Fix: Hardware stores and online retailers offer screws of various lengths. Take one of your existing screws and your pull to the store to find the correct length. For screws that are slightly too long, you can use a few small washers behind the pull to create enough space, or carefully cut down the screw using a bolt cutter (a specialized tool).
- Hole Slightly Misaligned:
- Issue: The screws don’t perfectly align with the pull’s holes, making it difficult to attach.
- Fix: If the misalignment is minor (less than 1/16th inch), you can sometimes gently ream out the hole slightly with the drill bit or a round file to create a bit more wiggle room. For larger errors, the best solution is to fill the original hole with wood filler, let it dry, sand it smooth, and then re-drill the hole accurately using your jig. This is why starting with a practice piece is so valuable.
- Stripped Screw Head:
- Issue: The screwdriver or drill bit slips, stripping the screw head and making it impossible to turn.
- Fix: If the screw is partially in, try a screw extractor kit. These tools grip the stripped head and allow you to remove it. Prevent this by using the correct size screwdriver bit and applying steady, firm pressure.
- Splintered Wood Around Hole:
- Issue: The wood on the cabinet face splintered during drilling.
- Fix: If the splintering is minor and covered by the pull, it might not be an issue. If visible, use wood filler to carefully patch the damaged area, sand it smooth once dry, and then touch up with paint or stain if necessary. Always use the scrap wood backing method to prevent this.
- Pulls Feel Loose After Installation:
- Issue: The pulls become wobbly over time, or were not tight enough from the start.
- Fix: Retighten the screws. If they consistently loosen, consider applying a tiny drop of thread locker (like Loctite for small fasteners) to the screw threads before re-tightening. This creates a stronger bond and prevents vibration from loosening the screws.
Extending the Life of Your Investment
Much like any valuable asset, your cabinet pulls benefit from regular care to maintain their aesthetic appeal and functionality, ensuring your initial investment continues to pay dividends in your home’s brand and daily usability.
- Regular Cleaning: Depending on the material, clean your pulls with appropriate methods.
- Metal Finishes (stainless steel, brushed nickel, chrome): A soft cloth dampened with mild soap and water is usually sufficient. Avoid abrasive cleaners or harsh chemicals, as these can strip finishes.
- Brass, Bronze, Copper: These metals may tarnish naturally. Use a specialized metal polish designed for the specific material if you wish to restore their shine. For an aged patina look, simply clean gently with soap and water.
- Matte Black/Powder Coated: A gentle wipe with a damp cloth is best.
- Avoid Over-Wiping with Harsh Chemicals: Especially true for cabinet faces and pulls. Constant exposure to cleaning sprays can degrade finishes over time.
- Check for Looseness: Periodically (e.g., every 6-12 months) check all pulls and knobs for any looseness. A quick retightening of screws will prevent them from falling off or damaging the cabinet face through prolonged wiggling. This simple maintenance prolongs the life of both the hardware and the cabinets.
- Protect from Scratches: Be mindful when moving heavy objects or cleaning around pulls to avoid accidental scratches or dents, especially for softer metals or plated finishes.
By addressing issues promptly and implementing a simple maintenance routine, you ensure your cabinet pulls remain a beautiful and functional part of your kitchen, reinforcing the quality and care that defines your home’s personal brand and protecting your thoughtful financial investment.
Beyond the Basics: Advanced Considerations and Future Trends
Installing cabinet pulls is a foundational DIY skill, but the broader context offers avenues for deeper engagement with technology, design strategy, and financial optimization. As homes become smarter and design choices more personalized, even small details like hardware can be approached with an innovative mindset.
Leveraging Technology for Design & Procurement
The initial decision of which pulls to choose can be significantly enhanced by modern technology. Gone are the days of relying solely on showroom samples or small images in a catalog.
- Augmented Reality (AR) Apps: Many hardware manufacturers and interior design platforms now offer AR features. You can use your smartphone or tablet camera to “virtually” place different pulls onto your actual kitchen cabinets, seeing how various styles, sizes, and finishes look in your specific space before making a purchase. This eliminates guesswork and ensures your choice perfectly aligns with your home’s brand vision.
- AI-Powered Design Tools: Emerging AI tools can analyze photos of your kitchen and suggest hardware styles that complement your existing decor, cabinet type, and desired aesthetic. These tools can offer personalized recommendations based on current design trends, your stated preferences, and even budget constraints, streamlining the decision-making process.
- Online Reviews and Comparison Shopping: Before purchasing, delve into online reviews (e.g., Amazon, specialty hardware sites, home improvement forums). Look for feedback on quality, durability, ease of installation, and how the finish holds up over time. This research is a form of digital security for your investment, safeguarding against poor quality products. Comparison shopping across various online retailers is also crucial for finding the best prices, ensuring you maximize your financial efficiency. Bulk purchasing options, often found online, can further reduce per-unit costs for larger projects.
- Digital Inventory Management: For large-scale renovations or projects involving multiple hardware types, simple spreadsheet applications or dedicated inventory apps can help you track quantities, sizes, and costs, keeping your project organized and within budget.
These technological aids transform the selection and procurement process from a tedious chore into an informed, engaging, and cost-effective experience, reinforcing the principles of tech-driven productivity and smart money management.
The Long-Term Brand and Financial Impact of Thoughtful Hardware Choices
The decision to install new cabinet pulls, while seemingly minor, has ripple effects that extend into your home’s long-term brand equity and financial performance.
- Enhanced Home Valuation: A cohesive and stylish kitchen, even with minor upgrades, signals a well-maintained and updated home. This directly contributes to a higher perceived value in the real estate market. Potential buyers are often swayed by the “feel” of a home, and well-chosen hardware contributes significantly to that positive impression. It’s a subtle form of marketing your property.
- Durability as an Investment: Opting for higher-quality pulls, perhaps from reputable brands known for their craftsmanship and durable finishes, is a wise long-term financial decision. While the initial cost might be slightly higher, these pulls resist wear, tarnish, and breakage far better than cheaper alternatives. This means less frequent replacement, saving you money and hassle in the long run. It aligns with the principle of investing in quality to avoid future repair costs – a core tenet of sound personal finance.
- Personal Enjoyment and Productivity: Beyond monetary value, there’s the intangible benefit of daily satisfaction. A beautiful, functional kitchen improves your quality of life. Smooth-operating pulls, a comfortable grip, and an aesthetically pleasing design contribute to a more enjoyable and efficient cooking and living environment. This enhancement of daily productivity and well-being is a return on investment that transcends mere dollars and cents.
- Sustainability and Responsible Sourcing: In an increasingly eco-conscious world, considering the materials and manufacturing processes of your hardware can also contribute to your home’s brand as a responsible, sustainable dwelling. Choosing products made from recycled materials or from companies with ethical sourcing practices aligns with modern values and can be a subtle selling point.
In conclusion, installing pulls on kitchen cabinets is far more than a simple DIY task. It’s an integrative project that touches upon the core tenets of modern living: leveraging technology for efficiency and informed decisions, building a strong personal and property brand through thoughtful design, and making shrewd financial investments that yield both monetary and intangible returns. By approaching this project with a strategic mindset, you’re not just upgrading your cabinets; you’re actively enhancing your home, your lifestyle, and your financial future.
aViewFromTheCave is a participant in the Amazon Services LLC Associates Program, an affiliate advertising program designed to provide a means for sites to earn advertising fees by advertising and linking to Amazon.com. Amazon, the Amazon logo, AmazonSupply, and the AmazonSupply logo are trademarks of Amazon.com, Inc. or its affiliates. As an Amazon Associate we earn affiliate commissions from qualifying purchases.