In an era where digital security is paramount, protecting your online activities has never been more critical. From safeguarding personal data to ensuring privacy across all your connected devices, a Virtual Private Network (VPN) offers a robust solution. While installing a VPN client on individual devices is common, configuring OpenVPN directly on your Netgear router takes your digital defenses to the next level, offering whole-home protection and convenience. This comprehensive guide, tailored for tech enthusiasts and security-conscious users, will walk you through the process, leveraging the power of Netgear’s capabilities to create a secure, encrypted network for every device in your home.
As a platform dedicated to exploring the latest in Technology Trends, Software, AI Tools, and Digital Security, we understand the importance of practical, actionable tutorials that empower our readers. Installing OpenVPN on your router isn’t just about technical configuration; it’s about investing in a more secure digital lifestyle, a crucial aspect of modern productivity and peace of mind. Let’s delve into how you can transform your Netgear router into a central hub for private and secure internet access.
Why Install OpenVPN on Your Netgear Router? The Undeniable Benefits
Before we dive into the technicalities, it’s essential to understand the “why.” What makes configuring OpenVPN on your Netgear router a superior choice compared to traditional per-device VPN installations? The advantages are compelling, touching upon security, convenience, and functionality that resonate with our core themes of Tech and Digital Security.
Comprehensive Network-Wide Protection
One of the most significant benefits is the blanket security it provides. Once OpenVPN is configured on your router, every device connected to that network—be it your smartphone, smart TV, gaming console, smart home gadgets, or guest devices—automatically routes its internet traffic through the VPN. This eliminates the need to install and manage VPN software on multiple individual devices, streamlining your security efforts. For households with numerous internet-enabled devices, this offers unparalleled ease of mind, knowing that everything is protected by default. It’s a foundational step towards a truly secure smart home ecosystem.
Bypassing Geo-Restrictions and Enhancing Privacy
A router-level VPN allows all connected devices to appear as if they are in the VPN server’s location. This capability is invaluable for accessing geo-restricted content, whether it’s international streaming libraries, online services, or regional news outlets. Furthermore, by encrypting all outbound and inbound traffic, your internet service provider (ISP) and other third parties are prevented from monitoring your online activities, significantly boosting your privacy. This becomes particularly relevant in an age where data collection is rampant, aligning perfectly with our focus on Digital Security and empowering users to reclaim their online anonymity.
Always-On Security and Device Compatibility
Unlike individual VPN clients that you might forget to activate, a router-level VPN is always on, ensuring continuous protection for your entire network. This is especially beneficial for devices that don’t natively support VPN clients, such as some smart TVs, gaming consoles, or IoT devices. With OpenVPN on your Netgear router, these previously unprotected gadgets can now benefit from the same level of encryption and privacy as your computer or smartphone, making your entire digital footprint more secure. This extends the utility of your tech gadgets, ensuring they contribute to, rather than detract from, your overall digital security posture.
Prerequisites: What You Need Before You Start
Embarking on this setup requires a few preliminary checks and items. Preparing these in advance will ensure a smooth and successful installation process, minimizing potential roadblocks. Think of this as your pre-flight checklist for enhanced digital security.
1. Compatible Netgear Router Model and Firmware
Not all Netgear routers support OpenVPN server functionality. Generally, higher-end models from the Nighthawk series or some of the more advanced routers are equipped with this feature. You’ll need to verify that your specific Netgear router model supports an OpenVPN server. This information can usually be found in your router’s specifications sheet on Netgear’s official website or within the router’s admin interface under the ‘Advanced’ or ‘VPN’ settings. Additionally, ensure your router’s firmware is up-to-date. Firmware updates often include security patches, performance improvements, and new features, including potential enhancements to VPN capabilities. This is a critical step for maintaining optimal performance and security of your gadgets.
2. A Reliable VPN Service Provider (Optional but Recommended)
While some Netgear routers can act as an OpenVPN server to allow external devices to connect into your home network, what most users desire is for their router to act as an OpenVPN client to connect out to a commercial VPN service. This allows your entire home network to browse through that VPN service. Most premium VPN providers like NordVPN, ExpressVPN, or Surfshark offer configurations specifically designed for router integration. If your Netgear router firmware has a built-in OpenVPN client feature (check for “VPN Client” settings), you’ll need the configuration files (typically .ovpn files) and login credentials from your chosen VPN provider. If your router only supports being an OpenVPN server and you want your entire network to connect out via VPN, you might need to explore custom firmware solutions like DD-WRT or OpenWRT, which is beyond the scope of this standard Netgear guide but important to note for advanced users. For this tutorial, we will primarily focus on using your Netgear router as an OpenVPN server to allow you to securely connect into your home network from outside. If you wish to connect out via a commercial VPN, ensure your Netgear router explicitly supports an OpenVPN client mode.
3. Access to Your Router’s Administration Panel
You’ll need the administrator username and password for your Netgear router. The default credentials are often printed on a sticker on the router itself, but it’s highly recommended that you’ve changed them for security reasons. If you haven’t, this is a good opportunity to update them to a strong, unique password.
4. Basic Networking Knowledge
While we’ll guide you through each step, a fundamental understanding of network concepts like IP addresses, ports, and subnets can be helpful for troubleshooting and deeper configuration. Don’t worry if you’re a beginner; the instructions are designed to be accessible.
Step-by-Step Guide: Configuring OpenVPN on Your Netgear Router
Now, let’s get down to the practical steps. This section will detail the process of enabling and configuring the OpenVPN server on your Netgear router, allowing you to securely access your home network resources from anywhere.
1. Access Your Netgear Router’s Admin Interface
The first step is to log into your router’s web-based administration panel. This is where all configuration changes will be made.
1.1 Find Your Router’s IP Address and Log In
Open a web browser on a computer connected to your Netgear network. In the address bar, type your router’s default IP address. Common Netgear router IP addresses are 192.168.1.1 or 192.168.0.1. If these don’t work, you can usually find the correct IP by checking your computer’s network settings (e.g., in Windows, use ipconfig in Command Prompt; on macOS, check Network Preferences).
Once you reach the login page, enter your router’s administrator username and password. If you haven’t changed them, try the defaults (often “admin” for username and “password” or “admin” for password, or check the sticker on your router).
1.2 Navigate to the VPN Section
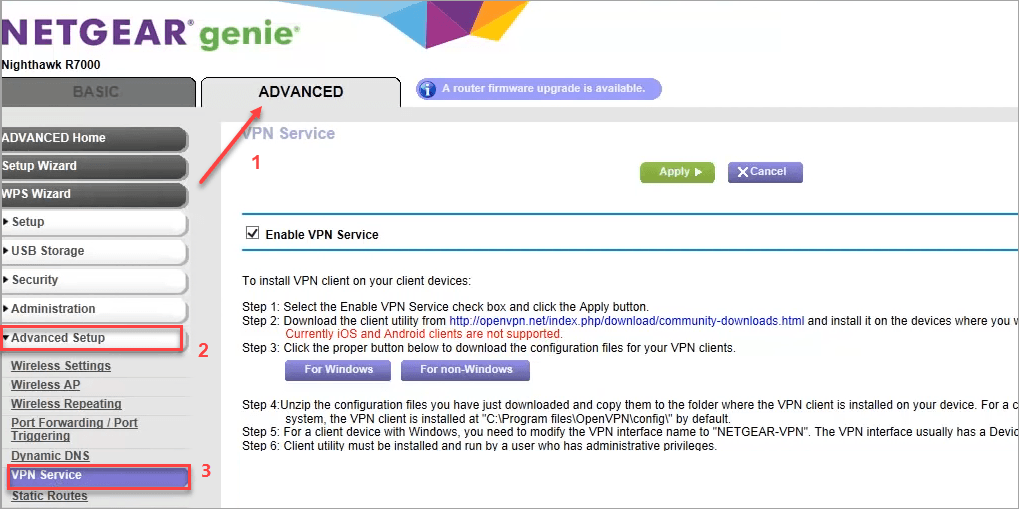
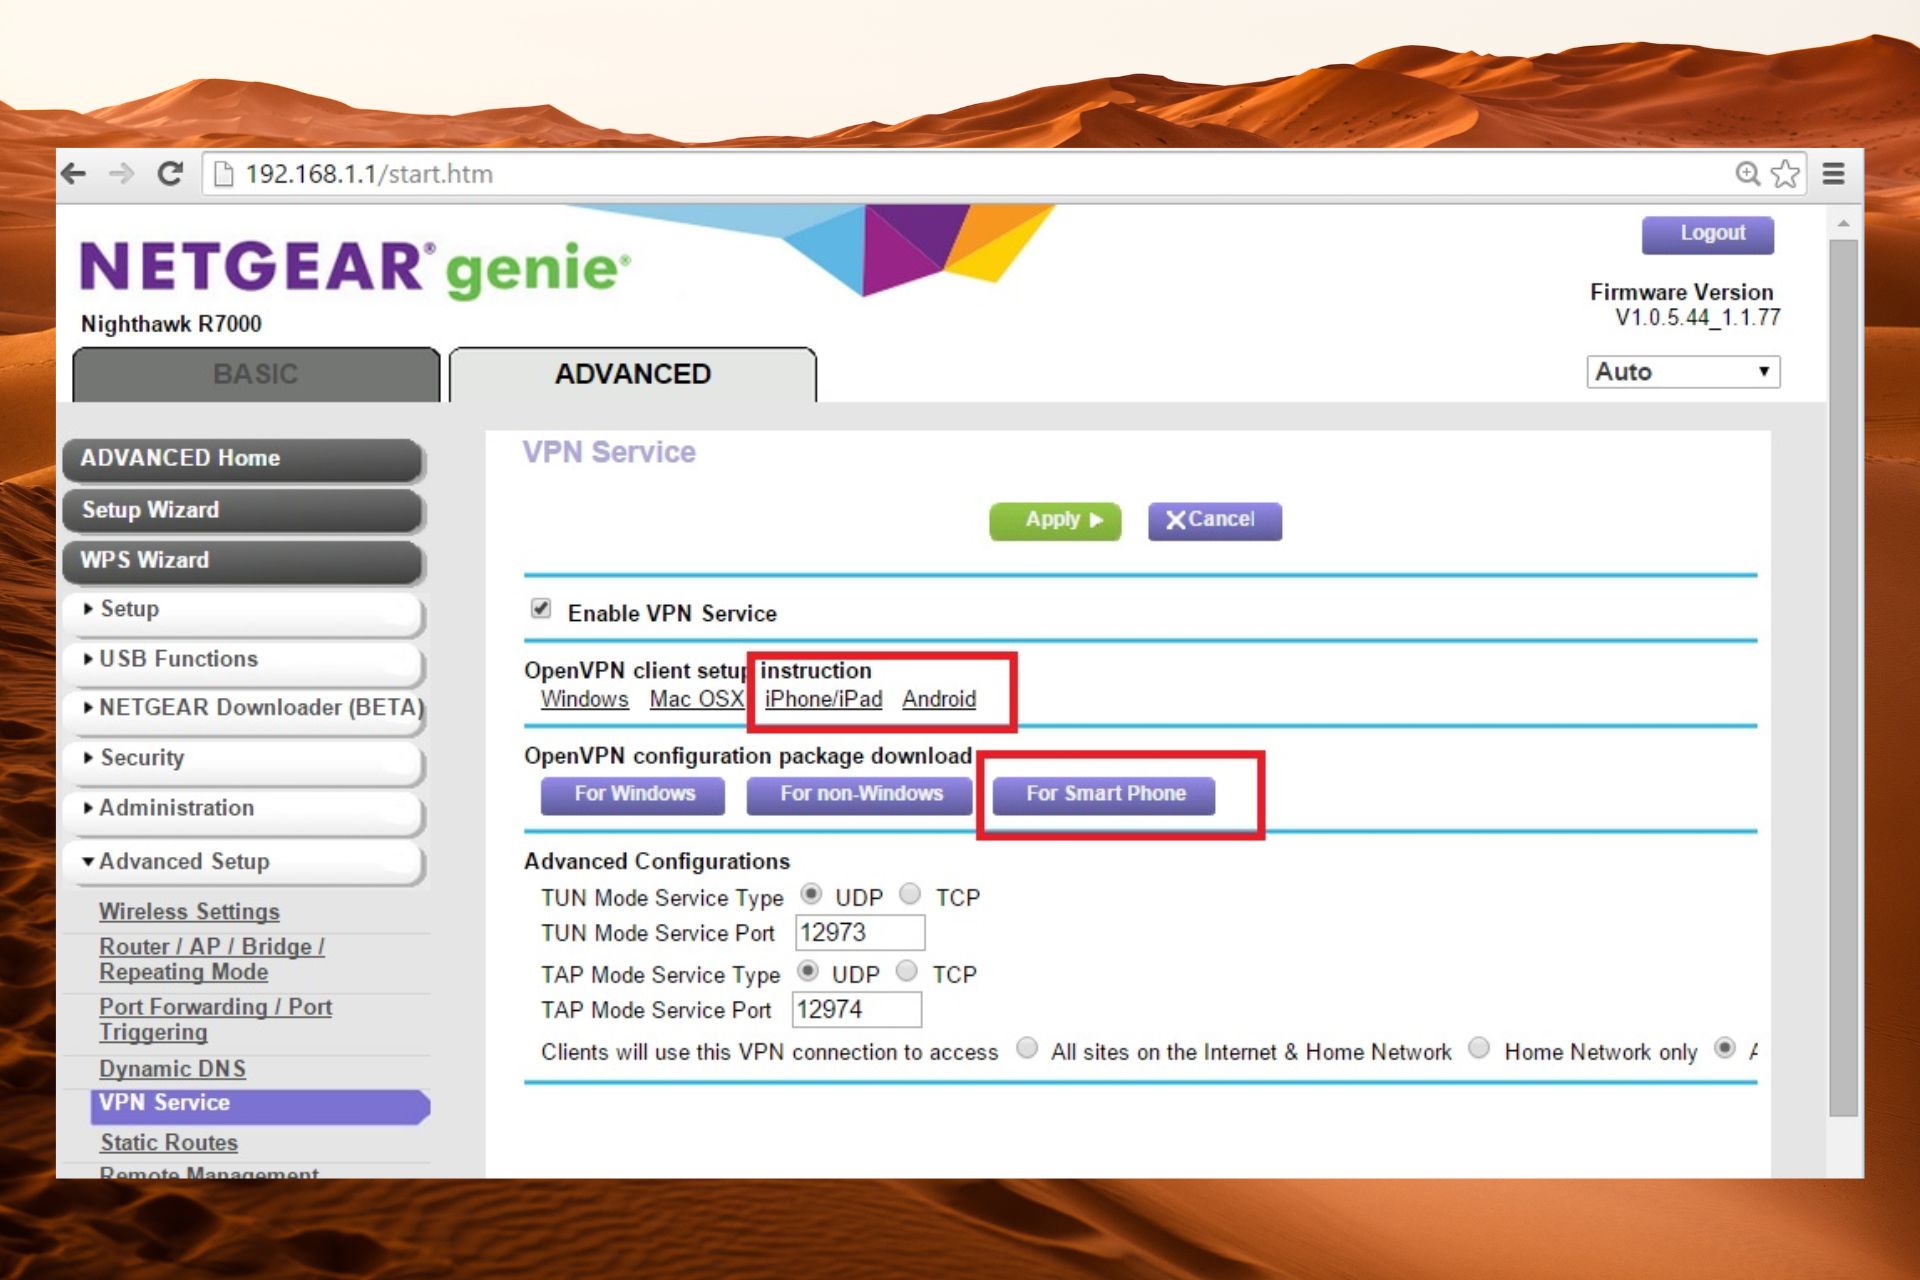
After successfully logging in, you’ll be on the router’s dashboard. Look for an “Advanced” tab or section. Under “Advanced,” you should find a “VPN Service” or “OpenVPN” submenu. Click on this to proceed. This is where you’ll enable and configure your OpenVPN server.
2. Enable and Configure the OpenVPN Server
Within the VPN Service section, you’ll find the options to enable and configure the OpenVPN server.
2.1 Enable OpenVPN Server and Select Configuration
Typically, there will be a checkbox or toggle labeled “Enable OpenVPN Server.” Check this box to activate the feature.
Your Netgear router will then present configuration options. You’ll usually have a choice between UDP and TCP protocols. UDP (User Datagram Protocol) is generally faster and recommended for most uses, especially for streaming and gaming, as it has less overhead. TCP (Transmission Control Protocol) is more reliable for data transmission but can be slower due to its error-checking mechanisms. For a home VPN server, UDP on port 1194 is often the default and a good choice. You might also be able to specify a port number; 1194 is the standard OpenVPN port.
Ensure that the “Clients use VPN connection to access:” option is set to “Home Network” or “All Internet Traffic.” This determines whether VPN clients can only access devices within your home network or also use your home internet connection for all their online activities. For full privacy and security, choose “All Internet Traffic.”
2.2 Generate and Download OpenVPN Configuration Files
After enabling and configuring the basic settings, your Netgear router will generate the necessary configuration files for your OpenVPN clients. There should be a button labeled something like “For Windows/Mac” or “Download Configuration File for Client.” Click this button to download a .zip file containing the .ovpn configuration file, along with any necessary certificates.
Important: This .ovpn file is unique to your router’s configuration and contains the server address, certificates, and keys needed for clients to connect securely. Keep it safe and do not share it with unauthorized individuals.
3. Setting Up Dynamic DNS (DDNS) for Remote Access
If your home internet connection has a dynamic IP address (which most residential connections do), your public IP address changes periodically. This can be problematic for a VPN server, as your clients won’t know where to connect. Dynamic DNS (DDNS) solves this by associating a hostname (e.g., myhomevpn.ddns.net) with your ever-changing IP address.
3.1 Configure DDNS on Your Netgear Router
Most Netgear routers integrate with popular DDNS services like Netgear’s own No-IP.com or DynDNS.
Go back to the “Advanced” section of your router’s interface, then look for “Dynamic DNS” or “DDNS.”
Choose your preferred DDNS service provider (you might need to create an account with them first).
Enter your DDNS hostname, username, and password. Your router will periodically update the DDNS service with your current public IP address, ensuring your VPN clients can always find your server.
If your router has a public static IP address, you can skip this step. If not, DDNS is crucial for reliable remote access.
4. Configuring OpenVPN Client Devices
With your Netgear router’s OpenVPN server configured and the .ovpn file downloaded, the next step is to set up your client devices (laptop, smartphone, tablet) to connect to your home VPN.
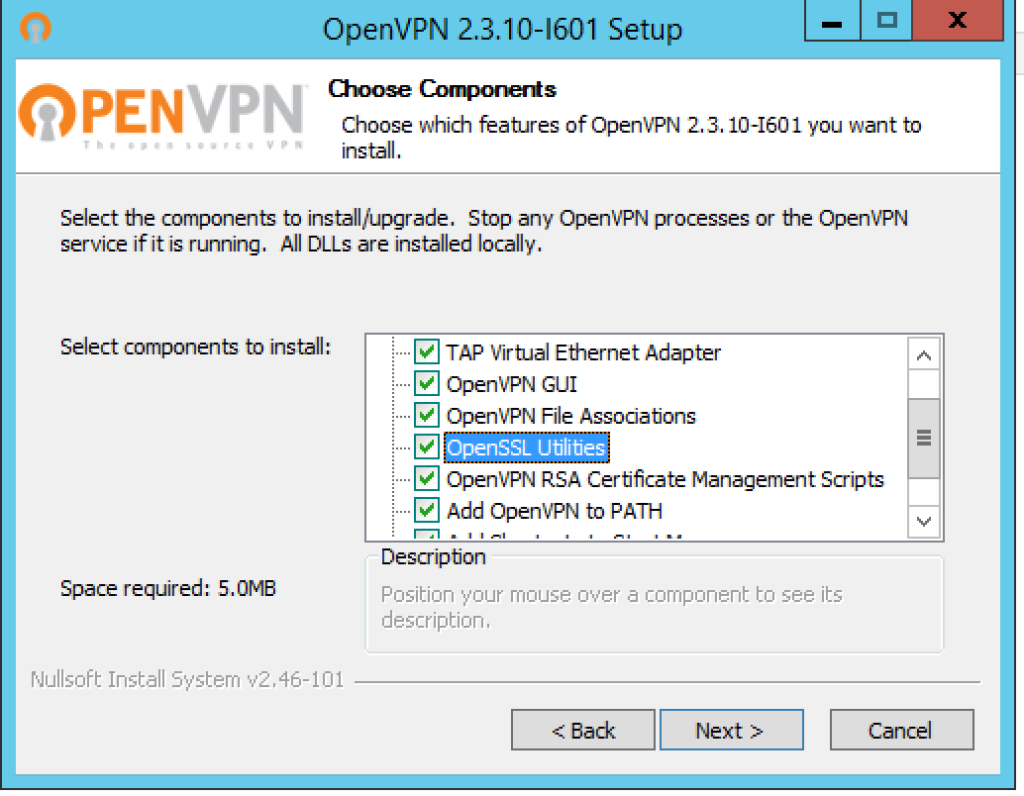
4.1 Install OpenVPN Client Software
Download and install the appropriate OpenVPN client software for your device’s operating system:
- Windows/macOS: Visit the official OpenVPN website (
openvpn.net) and download “OpenVPN Connect” or a compatible client like “Tunnelblick” (for macOS). - Android/iOS: Search for “OpenVPN Connect” in the Google Play Store or Apple App Store.
4.2 Import the OpenVPN Configuration File
Once the client software is installed, you’ll need to import the .ovpn file you downloaded from your Netgear router.
- For Desktop Clients: Open the OpenVPN client software. There’s usually an “Import Profile” or “File” -> “Import” option. Navigate to where you saved the
.ovpnfile and import it. - For Mobile Apps: Transfer the
.ovpnfile to your device (e.g., via email, cloud storage, or USB). In the OpenVPN Connect app, tap the+icon, choose “File,” and select the.ovpnfile.
4.3 Connect to Your Home VPN
After importing the profile, you’ll see your new VPN connection listed. Click or tap to connect. You may be prompted for a username and password if your router’s VPN configuration requires it (some Netgear models generate a default username/password for VPN access, or you can configure specific users).
Once connected, your device’s internet traffic will be routed through your home Netgear router, providing you with secure access to your home network and the internet as if you were physically there.
4.4 Verify Your Connection
To confirm your VPN is working, visit a website like whatismyip.com on your connected client device. The IP address shown should be your home’s public IP address, not the IP address of the network you’re currently connected to (e.g., public Wi-Fi). This confirms your traffic is successfully routing through your Netgear router.
Troubleshooting Common Issues and Optimizing Performance
Even with a detailed guide, you might encounter issues. Here’s a quick look at common problems and ways to optimize your OpenVPN connection.
1. Connection Failures
- Firewall Conflicts: Ensure no firewall on your router or client device is blocking the OpenVPN port (default 1194 UDP).
- Incorrect Credentials: Double-check the username and password if your router requires them for VPN clients.
- Dynamic IP Issues: If your home IP changed and DDNS isn’t correctly configured or updated, your client won’t find the server. Verify your DDNS hostname is resolving to your current home IP.
- Firmware Glitches: Occasionally, router firmware can be buggy. A simple router reboot can sometimes resolve connectivity issues.
- OVPN File Integrity: Ensure the
.ovpnfile was correctly downloaded and imported without corruption.
2. Slow Speeds
- Router CPU/RAM: Running an OpenVPN server can be resource-intensive for your router. Older or less powerful Netgear models might struggle, leading to slower speeds.
- Internet Upload Speed: Your VPN connection speed is limited by your home internet’s upload speed. If your upload speed is low, VPN performance will suffer.
- Encryption Overhead: VPN encryption adds a layer of processing, which naturally reduces speed slightly.
- Protocol Choice: UDP is generally faster than TCP for OpenVPN. If you configured TCP, try switching to UDP if your router allows.
3. Client Cannot Access Local Network Devices
If you can connect to the VPN but can’t access other devices on your home network (e.g., network drives, printers), ensure that your router’s OpenVPN server configuration allows client access to the “Home Network” or “LAN.” Check the routing settings within the VPN section of your Netgear router.
Maximizing Your Digital Security and Productivity
Successfully setting up OpenVPN on your Netgear router is a significant step in enhancing your digital security posture. It ensures that whether you’re working remotely, traveling, or simply using public Wi-Fi, your connection to your home network remains private and secure. This level of network control empowers you to secure your entire digital ecosystem, moving beyond individual device protection to a holistic approach.
At a broader level, this kind of hands-on technology configuration reflects a commitment to Digital Security and Productivity—core themes of our platform. By taking control of your network’s security, you’re not just following a tutorial; you’re actively building a more resilient and private digital environment. This minimizes risks associated with data breaches, identity theft, and online surveillance, allowing you to focus on what truly matters: your work, your leisure, and your peace of mind.
Regularly check for firmware updates for your Netgear router. Manufacturers frequently release updates that patch vulnerabilities and improve performance, which is crucial for maintaining the integrity of your VPN server. Also, remember to review your VPN configurations periodically, especially if you experience connectivity issues or upgrade your internet service.
In conclusion, installing OpenVPN on your Netgear router is a powerful way to centralize and strengthen your digital security. It provides network-wide encryption, offers flexibility for remote access, and ensures that all your connected devices benefit from enhanced privacy. Embrace this technological capability to build a safer and more private online experience for yourself and your family, aligning with the forefront of digital security practices. For more tech tutorials, reviews, and insights into navigating the digital landscape, stay tuned to our platform.
aViewFromTheCave is a participant in the Amazon Services LLC Associates Program, an affiliate advertising program designed to provide a means for sites to earn advertising fees by advertising and linking to Amazon.com. Amazon, the Amazon logo, AmazonSupply, and the AmazonSupply logo are trademarks of Amazon.com, Inc. or its affiliates. As an Amazon Associate we earn affiliate commissions from qualifying purchases.