The world of Night City, a neon-drenched metropolis teeming with cybernetic enhancements, corporate intrigue, and gritty street life, has always been a compelling playground for gamers. CD Projekt Red’s ambitious RPG, Cyberpunk 2077, offers a vast and immersive experience right out of the box. However, for many players, the true potential of Night City is unlocked through the vibrant and ever-evolving modding community. With the release of the transformative Update 2.0 and the Phantom Liberty expansion, Cyberpunk 2077 has seen a significant overhaul, impacting how mods function and are installed. This guide is designed to walk you through the essential steps to get your favorite mods up and running in the latest iteration of the game, ensuring you can tailor your Night City experience to your exact specifications.
Understanding the Shift: Why 2.0 Changed Everything
The arrival of Update 2.0 marked a fundamental shift in Cyberpunk 2077’s architecture. This wasn’t merely a patch; it was a significant redesign of core game systems. From revamped combat and police AI to entirely new perk trees and cyberware mechanics, the game fundamentally changed under the hood. For modders and players alike, this meant that many existing mods, particularly those that deeply interacted with game mechanics, would likely break or require substantial updates to remain compatible.
The Technical Backbone: Code and Compatibility
At its core, modding involves altering or adding to a game’s existing code and assets. Cyberpunk 2077, like many complex software applications, relies on a specific structure and set of dependencies. When CD Projekt Red released Update 2.0, they essentially updated this underlying structure. Think of it like renovating a house: if the foundation is significantly altered, anything built on the old foundation needs to be re-evaluated and potentially rebuilt.
- Engine Updates: Game engines are complex pieces of software. Updates to the engine or its core libraries can change how the game reads and processes data, including how it loads external files like mods.
- Scripting Changes: Many mods rely on scripting to alter gameplay elements. If the scripting language or its implementation changes, scripts written for the older version will no longer be recognized or executed correctly.
- Asset Overhauls: Visual mods that alter character models, textures, or environmental assets might also be affected if the underlying asset formats or loading mechanisms are changed.
The initial period after a major update like 2.0 is often a challenging one for the modding community. Modders must diligently work to understand the changes, identify incompatibilities, and release updated versions of their creations. This is why it’s crucial to always check for compatibility notes provided by mod authors.
Navigating the New Landscape: Essential Tools and Preparations
Before diving into installing mods, it’s essential to ensure you have the right tools and have prepared your game installation. The modding process for Cyberpunk 2077 typically involves several key components that facilitate the loading and management of custom content.
Essential Modding Tools: The Foundation of Your Modded Experience
The Cyberpunk 2077 modding scene, much like its predecessors in other games, relies on a few foundational tools to enable mod functionality. These tools act as intermediaries, allowing mods to interact with the game without directly overwriting core game files.
- Cyber Engine Tweaks (CET): This is arguably the most critical piece of infrastructure for Cyberpunk 2077 modding. CET provides a robust framework that allows mods to hook into the game’s execution and execute custom code. It’s essential for many gameplay-altering mods, UI enhancements, and performance tweaks. You’ll typically download the latest version from its official repository (often found on GitHub). Installation usually involves extracting files into your Cyberpunk 2077 game directory.
- RED4ext: This is another vital tool that expands the game’s scripting capabilities. It allows for more advanced modding functionalities by providing a more powerful scripting environment. Like CET, it’s usually downloaded as a set of files to be placed in your game’s root folder.
- ArchiveXL and redscript: For mods that add new items, clothing, or modify existing ones, ArchiveXL is often a requirement. It enables the loading of custom archive files. redscript is a compiler that translates custom script files into a format the game can understand. Many mods that involve script modifications will come with instructions referencing redscript.
- Codeware: This is a newer framework that is increasingly becoming a dependency for many advanced mods. It offers a more streamlined and efficient way for mods to interact with the game’s internal systems.
Important Note on Installation: The exact installation process for each of these tools can vary slightly, but generally, they involve downloading the latest compatible version and extracting its contents into your Cyberpunk 2077 game’s root directory (the folder where Cyberpunk2077.exe is located). Always refer to the specific installation instructions provided by the authors of these tools and individual mods.
Preparing Your Game Files: A Clean Slate
Before you begin installing mods, it’s always a good practice to ensure your game files are in a clean state. This can prevent conflicts and troubleshooting headaches down the line.
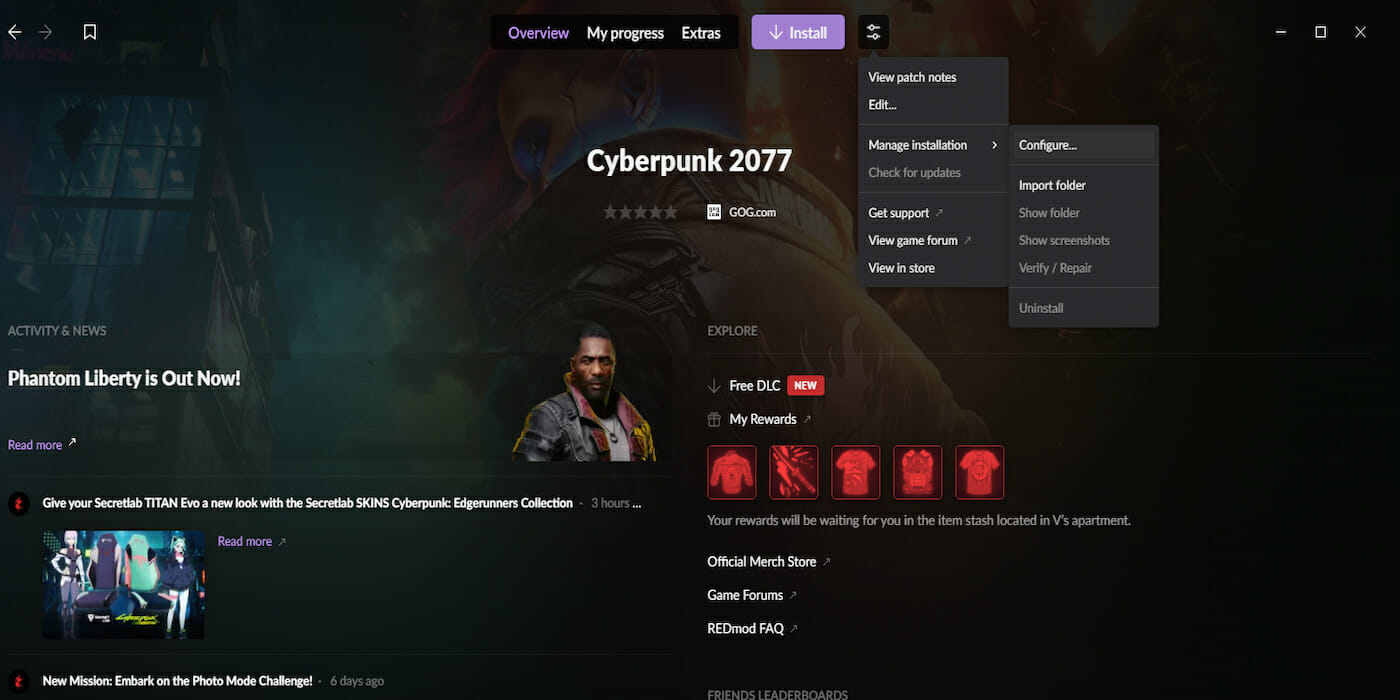
- Verify Game Files: If you’re using a platform like Steam or GOG Galaxy, you can use their built-in “Verify integrity of game files” (Steam) or “Repair installation” (GOG) features. This will check for any corrupted or missing game files and redownload them, effectively giving you a fresh copy of the base game. This is especially important after a major update like 2.0, as it ensures you’re starting with the correct game version.
- Backup Existing Mods (if applicable): If you were modding the game before Update 2.0, it’s wise to back up your existing mod folder structure. This allows you to revert to a previous setup if necessary or to check which of your old mods might have compatible updates.
The Modding Process: Step-by-Step Installation
With the essential tools in place and your game files prepared, you’re ready to start integrating mods into your Cyberpunk 2077 experience. The process typically involves downloading mods and placing them in the correct folders.
Downloading and Organizing Your Mods: The Digital Bazaar of Night City
The primary hub for Cyberpunk 2077 mods is Nexus Mods. This website hosts a vast library of community-created content, from simple visual tweaks to complex gameplay overhauls. When downloading mods, always prioritize reputable authors and pay close attention to the instructions and requirements.
Finding and Downloading Mods
- Navigate to Nexus Mods: Go to Nexus Mods and search for “Cyberpunk 2077.”
- Filter by Version and Requirements: Use the filtering options to look for mods that are explicitly marked as compatible with Update 2.0 or later. Pay attention to the “Requirements” section of each mod’s page. This will tell you which of the foundational tools (CET, RED4ext, ArchiveXL, etc.) the mod depends on.
- Read the Description Carefully: Mod authors provide detailed descriptions of their mods, including installation instructions, potential conflicts, and known issues. Read this thoroughly.
- Download the Mod: Most mods on Nexus Mods are available as .zip or .rar archives. Download the file to a convenient location on your computer.
Organizing Your Mod Folder
Once you’ve downloaded a mod, it’s crucial to place its files in the correct directory. The structure usually involves placing specific folders within your Cyberpunk 2077 game directory.
bin/x64Folder: Many core mod files, including executables, DLLs, and scripts, will go into theCyberpunk 2077/bin/x64folder. This is where Cyber Engine Tweaks and RED4ext often reside.archive/pc/modFolder: Mods that add new assets, such as clothing, weapons, or hairstyles, often require you to place their.archivefiles into theCyberpunk 2077/archive/pc/modfolder. If this folder doesn’t exist, you may need to create it.redscriptFolder: Mods that include custom.redscriptfiles will typically have aredscriptfolder that needs to be placed in your Cyberpunk 2077 root directory. This folder is then used by the redscript compiler.
Tip: Create a separate folder on your desktop or in your documents to store downloaded mod archives before you install them. This helps keep your downloads organized.
Installing a Mod: The Practical Application
Let’s walk through a typical mod installation process. This example assumes you have Cyber Engine Tweaks and RED4ext already installed.
-
Download a Mod: Find a mod on Nexus Mods that you want to install. For this example, let’s say it’s a new jacket for V.
-
Check Requirements: The mod’s page clearly states it requires Cyber Engine Tweaks and ArchiveXL. You’ve already installed CET, so you now need to ensure ArchiveXL is installed.
-
Install Dependencies: If you haven’t already, download and install ArchiveXL following its specific instructions, typically placing its files in the
bin/x64folder. -
Extract the Mod Archive: Open the downloaded mod’s .zip or .rar file. You will usually see a structure like this:
[Mod Name]/bin/x64/plugins/cyber_engine_tweaks/mods/[Mod Name]/(for scripts or DLLs)archive/pc/mod/[Mod Name]/(for .archive files)redscript/[Mod Name]/(for .redscript files)
-
Copy and Paste: Carefully copy the contents of the mod archive and paste them into your Cyberpunk 2077 game directory, overwriting any existing files if prompted and if the mod instructions indicate this is safe.
- If the mod archive contains a
bin/x64folder, merge its contents with your existingbin/x64folder. - If it contains an
archive/pc/modfolder, merge its contents. - Follow the specific instructions for any
redscriptfiles.
- If the mod archive contains a
-
Run the Game: Launch Cyberpunk 2077. If the mod is installed correctly, you should see its effects in the game. For script-heavy mods, you might notice a brief pause on startup as the game processes new scripts.
Troubleshooting Common Issues:
- Mod Not Appearing: Double-check that you’ve placed all files in the correct folders. Ensure the mod is compatible with your current game version.
- Game Crashing: This is often a sign of mod conflicts or an incorrect installation. Try removing recently installed mods one by one to identify the culprit. Ensure all dependencies are met and updated.
- Missing Textures or Models: This could indicate an issue with ArchiveXL or that the mod’s asset files were not placed in the correct
archive/pc/modfolder. - Script Errors: If you see error messages related to scripts, ensure RED4ext and redscript are installed correctly and that the mod’s
.redscriptfiles are in the proper location.
Beyond Installation: Maintaining Your Modded Night City
Modding isn’t a one-time setup; it’s an ongoing process of maintenance and curation. As CD Projekt Red releases patches and hotfixes for Cyberpunk 2077, or as mod authors update their creations, you’ll need to stay vigilant.
Staying Up-to-Date: The Evolving Landscape
Game updates are the most common cause of mod incompatibility. When a new patch is released, it’s almost inevitable that some of your mods will stop working.
- Check Mod Pages Regularly: Make it a habit to revisit the Nexus Mods pages for your installed mods. Mod authors will usually post an update notice if their mod is broken or has been fixed for a new game version.
- Read Patch Notes: Pay attention to the patch notes for Cyberpunk 2077. These can sometimes give clues about which game systems have been altered, helping you anticipate which mods might be affected.
- Mod Manager Considerations: While not as prevalent or as critical as in some other games, there are nascent mod managers for Cyberpunk 2077. These tools can help streamline the installation and removal of mods, making updates easier to manage. However, for now, manual installation and careful tracking remain the most common approach.
Managing Your Mods: The Art of Curation
As you install more mods, your Night City can become increasingly complex and potentially unstable. Effective mod management is key to a smooth experience.
- Keep a Spreadsheet: A simple spreadsheet can be invaluable. List each mod, its version, where you downloaded it from, its dependencies, and the date you last updated it.
- Install Mods Incrementally: Avoid installing dozens of mods at once. Install a few at a time, test your game, and then install more. This makes it much easier to pinpoint which mod is causing a problem if one arises.
- Prioritize Essential Mods: Some mods are more critical to your enjoyment than others. Focus on getting your essential mods working first after a major update.
- Understand Mod Conflicts: Some mods, especially those that alter the same game systems, may conflict with each other. Mod authors often list known conflicts on their pages. If you suspect a conflict, you may need to choose between mods or look for alternative solutions.

The Future of Modding in Night City
The modding community for Cyberpunk 2077 is incredibly active and resourceful. The success of Update 2.0 and the ongoing support from CD Projekt Red have revitalized interest and spurred innovation. As players continue to explore Night City, the demand for new and improved modding tools and content will undoubtedly grow. By understanding the technical underpinnings, utilizing the right tools, and practicing careful installation and maintenance, you can transform Cyberpunk 2077 into a truly unique and personalized adventure. So, dive back into Night City, embrace the mods, and forge your legend in the digital streets.
aViewFromTheCave is a participant in the Amazon Services LLC Associates Program, an affiliate advertising program designed to provide a means for sites to earn advertising fees by advertising and linking to Amazon.com. Amazon, the Amazon logo, AmazonSupply, and the AmazonSupply logo are trademarks of Amazon.com, Inc. or its affiliates. As an Amazon Associate we earn affiliate commissions from qualifying purchases.