
In an era dominated by proprietary operating systems, the allure of open-source alternatives like Linux Mint continues to grow. For tech enthusiasts, privacy advocates, or anyone simply looking for a fresh, fast, and secure computing experience, Linux Mint stands out as an exceptionally user-friendly distribution. Often lauded as the perfect gateway into the Linux ecosystem, it offers a familiar desktop environment, robust performance, and a thriving community. If you’re equipped with a brand-new hard drive, installing Linux Mint on it is not just a technical task; it’s an opportunity to revitalize your system, optimize performance, and gain full control over your digital environment. This comprehensive guide will walk you through every step, transforming your blank slate into a powerful, efficient, and secure Linux workstation.
The Appeal of Linux Mint: Why Make the Switch?
Before diving into the technicalities, it’s worth understanding why Linux Mint has garnered such widespread popularity and why it’s an excellent choice for a fresh installation. In the vast landscape of technology trends, open-source software champions innovation, transparency, and user empowerment – principles that Linux Mint embodies perfectly.
User-Friendly Experience: Bridging the Familiar with the New
One of the primary reasons many users, especially those migrating from Windows or macOS, find solace in Linux Mint is its intuitive design. The Cinnamon desktop environment, Mint’s flagship offering, provides a traditional desktop layout complete with a start menu, taskbar, and desktop icons. This familiarity significantly flattens the learning curve, making the transition feel less like a daunting leap and more like a comfortable stroll. Beneath this polished exterior lies the powerful and stable Linux kernel, ensuring a reliable computing experience without the bloat often associated with other operating systems. It’s a testament to good software design, demonstrating how technology can be both cutting-edge and accessible.
Robust Security and Enhanced Privacy: A Digital Shield
In an age where digital security and privacy are paramount concerns, Linux Mint shines as a beacon of trustworthiness. Built on the secure foundations of Ubuntu and Debian, Mint inherits a robust security model. Its open-source nature means its code is constantly scrutinized by a global community of developers, making vulnerabilities easier to spot and patch. Unlike some proprietary systems that collect vast amounts of user data, Linux Mint is designed with privacy in mind, offering users greater control over their information. This commitment to security and privacy aligns perfectly with current digital security trends, offering a computing environment where you can work and browse with greater peace of mind.
Optimized Performance for Any Hardware: Revitalizing Your Machine
Whether you’re breathing new life into an older PC or building a state-of-the-art workstation, Linux Mint excels at performance optimization. It’s renowned for its efficiency, requiring fewer system resources than many other operating systems. This means faster boot times, snappier application launches, and smoother multitasking, even on hardware that might struggle with more demanding software. For a new hard drive, this translates to maximizing its potential from day one. You’ll find that applications run smoothly, and the system remains responsive, making it an excellent choice for productivity, content creation, or simply everyday browsing.
Thriving Open-Source Ecosystem and Community Support
Beyond its core features, Linux Mint benefits from the vast open-source ecosystem. Access to thousands of free applications via its Software Manager, from office suites like LibreOffice to creative tools and development environments, ensures you have all the software you need without recurring costs. Furthermore, being part of the Linux community means you have access to an unparalleled level of support through forums, wikis, and online communities. This collaborative spirit is a hallmark of the open-source movement, fostering continuous improvement and shared knowledge – a true technological marvel.
Essential Pre-Installation Preparations: Setting the Stage
A successful Linux Mint installation hinges on proper preparation. Even with a brand-new hard drive, there are a few crucial steps to take before you begin the actual installation process. These preparations ensure a smooth, error-free setup and help you avoid common pitfalls.
Acquiring the Linux Mint ISO File
The first step is to download the Linux Mint installation image, known as an ISO file.
- Choose Your Desktop Environment: Linux Mint offers several desktop environments: Cinnamon (the flagship, modern, and feature-rich), MATE (traditional, stable, and less resource-intensive), and XFCE (lightweight and highly customizable). For most new users, Cinnamon is highly recommended due to its balance of aesthetics and functionality. Consider your hardware capabilities and personal preference when making this choice.
- Download from the Official Website: Always download the ISO file from the official Linux Mint website (linuxmint.com). Navigate to the “Download” section and select the version you prefer.
- Verify Integrity (Checksums): After downloading, it’s crucial to verify the integrity of the ISO file using its SHA256 checksum. The official website provides the correct checksums. Tools like 7-Zip (Windows) or the
sha256sumcommand (Linux/macOS) can generate the checksum for your downloaded file. Compare it to the official one to ensure the file hasn’t been corrupted during download or tampered with. This is a critical digital security step.
Creating a Bootable USB Drive
With the ISO file in hand, the next step is to transform a USB flash drive (at least 8GB recommended) into a bootable installation medium.
- Recommended Tools:
- Rufus (Windows): A popular and robust tool for creating bootable USB drives.
- BalenaEtcher (Cross-platform – Windows, macOS, Linux): An incredibly user-friendly and reliable tool known for its simple interface.
- The Process:
- Insert your USB drive into your computer.
- Open your chosen utility (Rufus or Etcher).
- Select the downloaded Linux Mint ISO file as the source image.
- Select your USB drive as the target device. Double-check that you’re selecting the correct drive, as this process will erase all data on it.
- Start the flashing process. This may take several minutes. Once complete, your bootable USB drive is ready.
Preparing Your System’s BIOS/UEFI Settings
Your computer’s firmware settings (BIOS or UEFI) dictate how it boots. You’ll need to adjust these to allow your system to boot from the newly created USB drive.
- Accessing Firmware Settings: Restart your computer and repeatedly press the key designated for entering BIOS/UEFI setup. Common keys include F2, F10, F12, DEL, or ESC. The specific key often appears on screen during startup.
- Disabling Secure Boot (if applicable): If your system uses UEFI and has Secure Boot enabled, you may need to disable it. Secure Boot is a security feature designed to prevent unauthorized operating systems from loading, and while beneficial, it can interfere with Linux installations. Look for “Secure Boot” options in the Boot, Security, or Authentication sections of your UEFI settings.
- Setting Boot Order Priority: Locate the “Boot Order,” “Boot Priority,” or “Boot Device” section. Change the order so that your USB drive is listed before your internal hard drive. This ensures the computer tries to boot from the USB first.
- UEFI vs. Legacy/CSM: Most modern systems use UEFI. It’s generally recommended to install Linux Mint in UEFI mode if your system supports it. If you have an older system or are dual-booting with an OS installed in Legacy mode, you might need to enable Compatibility Support Module (CSM) or Legacy boot. For a new hard drive, UEFI is usually the preferred and simpler option.
- Save and Exit: Once you’ve made the necessary changes, save your settings and exit the BIOS/UEFI setup. Your computer will then restart, attempting to boot from the USB drive.
Step-by-Step Linux Mint Installation Process: From Live to Installed
With your preparations complete, it’s time to embark on the actual installation of Linux Mint onto your new hard drive. This process is remarkably straightforward, thanks to Mint’s user-friendly installer.
Booting from the Live USB and Testing the Environment
After configuring your BIOS/UEFI and restarting, your computer should boot from the USB drive. You’ll typically see a grub menu with options like “Start Linux Mint.” Select this option.
- Welcome to the Live Environment: Linux Mint will boot into a “live” desktop environment. This means it’s running entirely from your USB drive, without touching your hard drive. This live session is incredibly useful:
- Testing Compatibility: You can test if your Wi-Fi, graphics, sound, and other hardware components work correctly before committing to an installation.
- Exploring the OS: Take this opportunity to explore the desktop environment, launch a web browser, and get a feel for Linux Mint.
- Troubleshooting: If something doesn’t work, you can usually find solutions online or try a different desktop environment version.
Launching the Installer and Initial Configurations
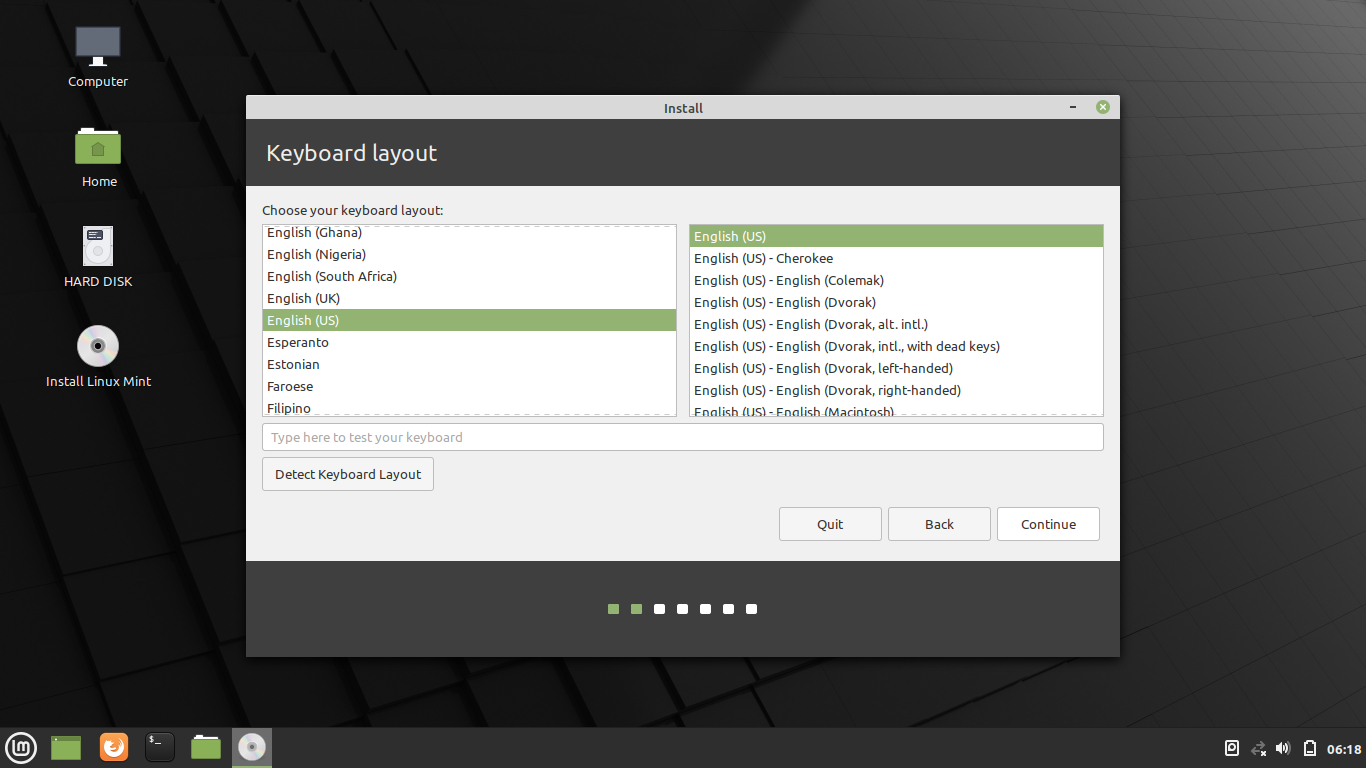
On the live desktop, you’ll find an icon labeled “Install Linux Mint.” Double-click it to start the installation wizard.
- Language Selection: The first step is to choose your preferred installation language.
- Keyboard Layout: Select your keyboard layout. You can also type in the provided text box to test it.
- Multimedia Codecs: The installer will offer to install multimedia codecs (for playing MP3s, watching videos, etc.). It’s highly recommended to check this box, as it saves you from installing them manually later. This is a convenience feature that enhances your tech experience right from the start.
Partitioning the New Hard Drive: Allocating Space
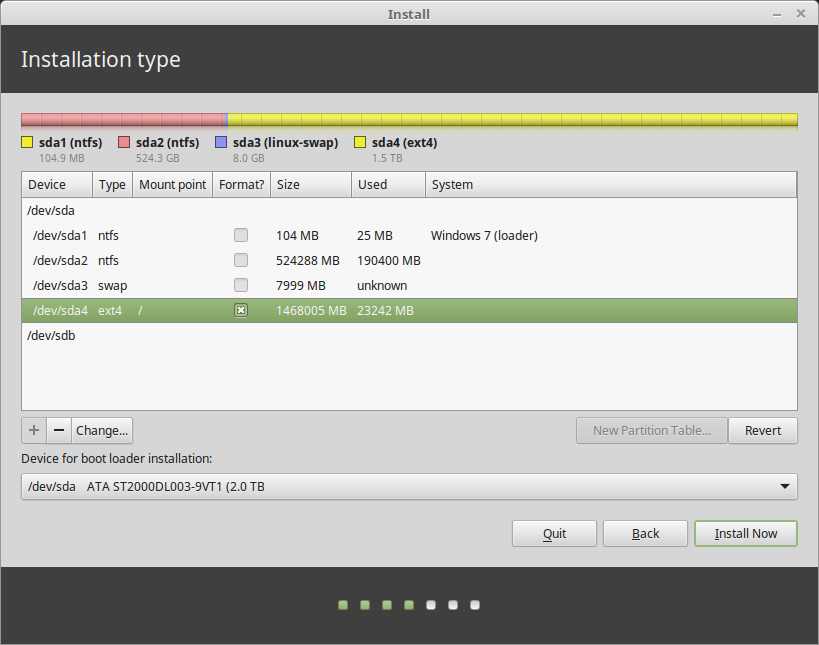
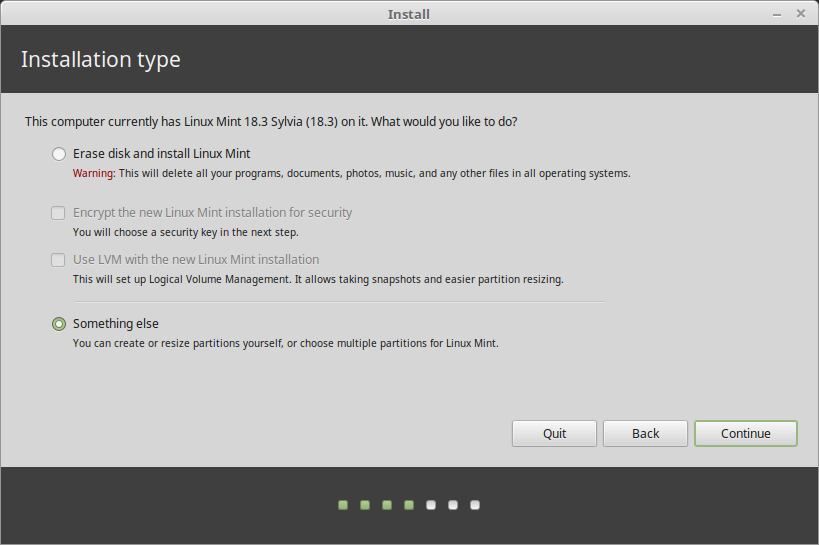
This is perhaps the most critical step, especially when dealing with a new, blank hard drive. Linux Mint’s installer makes it surprisingly simple.
- Installation Type:
- “Erase disk and install Linux Mint”: For a truly new and empty hard drive, this is the simplest and recommended option. The installer will automatically detect your new drive, format it, and create the necessary partitions (root, swap, EFI System Partition if using UEFI) for you. Ensure you select the correct new hard drive if you have multiple drives in your system!
- “Something else” (Manual Partitioning): This option is for advanced users who want fine-grained control over their partitions. For a new hard drive, you might choose this if you want to create a separate
/homepartition (for user files, making future re-installations easier) or have specific partitioning schemes.- If choosing “Something else”:
- Create a new partition table (if prompted).
- EFI System Partition (ESP): If installing in UEFI mode, create a small (e.g., 200-500 MB) FAT32 partition and set its mount point to
/boot/efi. This holds boot loaders. - Root Partition (
/): Create an Ext4 partition for the main operating system files. Allocate a generous amount (e.g., 20-50 GB or more) and set its mount point to/. - Swap Area: Create a swap partition, typically equal to or double your RAM size (or 4GB if you have ample RAM and don’t hibernate). Set its “Use as” to “swap area.”
- Home Partition (
/home): (Optional but recommended) Create another Ext4 partition using the remaining space and set its mount point to/home. This keeps your personal files separate from the system, making OS upgrades or re-installations much cleaner.
- If choosing “Something else”:
- Select Drive for Boot Loader: At the bottom, ensure the correct hard drive (the one you’re installing Mint on) is selected for the boot loader installation.
Selecting Your Location and Creating a User
After partitioning, the installer will ask for a few more details.
- Time Zone: Click on your location on the world map or select it from the dropdown menu.
- User Account Details:
- Your name: Your full name.
- Your computer’s name: A hostname for your machine on the network.
- Pick a username: Your login name.
- Choose a password: Crucial for security. Choose a strong, unique password.
- Confirm your password.
- Login Options: Decide if you want to “Require my password to log in” (recommended for security) or “Log in automatically.”
The Installation Phase
Once all the information is provided, click “Continue” to begin the installation. The installer will now copy files, install the system, and configure everything. This process can take anywhere from 15 minutes to an an hour, depending on your system’s speed. You’ll see a slideshow showcasing Linux Mint’s features during this time.
Completing the Installation and First Boot
When the installation is complete, you’ll be prompted to restart your computer.
- Remove the USB Drive: Before restarting, ensure you remove the USB installation medium from your computer when prompted, or right after the screen goes black and before the system tries to boot again. Failing to do so might cause your computer to boot back into the live environment.
- First Boot into Linux Mint: Your system should now boot directly into your newly installed Linux Mint operating system on your new hard drive. Enter your password at the login screen, and you’ll be greeted by your fresh, clean Linux Mint desktop.
Post-Installation Essentials: Optimizing Your Linux Mint Experience
Installing Linux Mint is just the beginning. To truly harness its power and ensure a smooth, secure, and productive experience, a few post-installation steps are highly recommended. These steps align with keeping your technology current and your digital environment robust.
Updating Your System: Keeping Current
The first thing you should do after installing any operating system is update it. This ensures you have the latest security patches, bug fixes, and software versions.
- Using the Update Manager: Linux Mint includes an intuitive “Update Manager.” You’ll likely see a shield icon in your system tray indicating available updates. Click on it, review the updates, and apply them.
- Terminal Commands (for the tech-savvy): Open a terminal (Ctrl+Alt+T) and run:
bash

sudo apt update

sudo apt upgrade
sudo apt updaterefreshes the list of available packages, andsudo apt upgradeinstalls the latest versions of your installed packages.
Installing Essential Software and Drivers: Expanding Functionality
While Linux Mint comes with a good set of default applications, you’ll likely want to install additional software and proprietary drivers to suit your specific needs.
- Graphics Drivers: If you have an NVIDIA or AMD graphics card, you might need to install proprietary drivers for optimal performance, especially for gaming or demanding graphics tasks. Open the “Driver Manager” from the Mint Menu to check for and install recommended drivers.
- Common Applications: The “Software Manager” (found in the Mint Menu) is your gateway to thousands of free applications. Search for web browsers (Chrome, Firefox), office suites (LibreOffice is pre-installed, but you might want others), media players (VLC), image editors (GIMP), and any other tools essential for your workflow.
- Productivity Tools: Explore apps for specific productivity needs, digital security tools, or even AI tools that integrate well with the Linux environment.
Customizing Your Desktop Environment: Making it Your Own
One of the great joys of Linux is the ability to customize almost every aspect of your desktop. Linux Mint offers robust customization options.
- System Settings: Explore the “System Settings” in the Mint Menu. Here you can change themes, fonts, desktop backgrounds, applet (taskbar) settings, desklets (desktop widgets), and much more.
- Personal Branding for Your Desktop: Think of your desktop as your digital workspace; personalizing it can enhance your productivity and reflect your style. Experiment with different layouts and appearances to find what works best for you.
Setting Up Backups and System Snapshots (Timeshift)
Finally, implement a robust backup strategy. Even with a new drive, data loss can occur. Linux Mint includes an excellent tool called “Timeshift.”
- Timeshift: This utility allows you to create system snapshots, which are essentially backups of your operating system files. If an update breaks your system or you make a configuration mistake, you can easily revert to a previous working state.
- Set up Timeshift to take regular snapshots (e.g., daily or weekly) and save them to a separate drive or partition if possible. This is a crucial aspect of digital security and data management.
- Personal Data Backups: For your personal files in your
/homedirectory, consider using a separate backup solution, such as an external hard drive, cloud storage, or dedicated backup software.
Installing Linux Mint on a new hard drive is a rewarding experience that opens up a world of possibilities. From its intuitive interface and robust security to its stellar performance and vast open-source ecosystem, Linux Mint offers a compelling alternative for anyone looking to embrace a more controlled and efficient computing environment. By following these steps, you’ve not only installed an operating system but also embarked on a journey into the exciting and ever-evolving world of open-source technology. Enjoy your new, powerful Linux Mint system!
aViewFromTheCave is a participant in the Amazon Services LLC Associates Program, an affiliate advertising program designed to provide a means for sites to earn advertising fees by advertising and linking to Amazon.com. Amazon, the Amazon logo, AmazonSupply, and the AmazonSupply logo are trademarks of Amazon.com, Inc. or its affiliates. As an Amazon Associate we earn affiliate commissions from qualifying purchases.