Kali Linux, a powerhouse in the cybersecurity and ethical hacking landscape, has become an indispensable tool for security professionals, penetration testers, and digital forensics experts. Its comprehensive suite of pre-installed tools, designed for a wide array of security auditing and penetration testing tasks, makes it the distribution of choice for many in the field. However, the journey to harnessing its power begins with a successful installation. This guide will walk you through the process of installing Kali Linux, ensuring you have a robust and secure operating system ready for your security endeavors.
The decision to install Kali Linux is often driven by its specialized nature. Unlike general-purpose operating systems, Kali is purpose-built for offensive security operations. This means it comes packed with tools for network scanning, vulnerability assessment, password cracking, wireless attacks, web application testing, and much more. While these tools are invaluable, they also necessitate a certain level of technical understanding. This article aims to demystify the installation process, making it accessible even to those with moderate technical experience.
Understanding the Installation Options
Before diving into the step-by-step process, it’s crucial to understand the various ways you can install and utilize Kali Linux. Each method offers distinct advantages and is suitable for different use cases.
Installing Kali Linux as a Dual Boot
One of the most common and recommended installation methods is dual-booting. This allows you to have Kali Linux installed alongside your existing operating system, such as Windows or macOS. When you boot your computer, you’ll be presented with a boot menu that allows you to choose which operating system to load. This approach provides full hardware access to Kali Linux, ensuring optimal performance for demanding security tasks.
Advantages of Dual Booting:
- Full Hardware Access: Kali Linux will have complete control over your system’s hardware, leading to better performance for resource-intensive tasks.
- Native Performance: You experience Kali Linux at its native speed without any virtualization overhead.
- Independent Environments: Your primary operating system remains unaffected by Kali Linux installations or configurations.
Considerations for Dual Booting:
- Partitioning: You will need to dedicate a portion of your hard drive to Kali Linux. This requires careful partitioning to avoid data loss.
- Bootloader Management: The bootloader (like GRUB) needs to be configured to allow you to switch between operating systems.
- Potential Conflicts: While rare, incorrect partitioning or bootloader configuration can lead to issues with either operating system.
Installing Kali Linux in a Virtual Machine (VM)
For users who prefer not to alter their primary operating system’s disk structure or for those who want to experiment with Kali Linux without committing to a full installation, a virtual machine is an excellent solution. Virtualization software like VirtualBox or VMware allows you to run Kali Linux within a window on your host operating system. This creates an isolated environment, making it safe to test and learn without risking your main system.
Advantages of Virtual Machines:
- Isolation and Safety: Your host operating system is completely isolated from Kali Linux, making it a safe environment for testing potentially risky tools.
- Ease of Setup and Removal: You can quickly set up a Kali Linux VM and easily remove it without impacting your host system.
- Snapshots and Rollbacks: Virtualization software allows you to take snapshots of your VM’s state, enabling you to revert to a previous configuration if something goes wrong.
- Flexibility: You can run multiple VMs simultaneously and easily test different configurations or scenarios.
Considerations for Virtual Machines:
- Performance Overhead: Running an OS within another OS introduces some performance overhead, which might be noticeable for highly demanding tasks.
- Hardware Access Limitations: Direct hardware access can be more limited compared to a bare-metal installation. However, for most Kali Linux tasks, this is not a significant issue.
Other Installation Methods
Beyond dual booting and VMs, Kali Linux offers other installation methods for specific needs:
- Live Boot: You can boot Kali Linux directly from a USB drive or DVD without installing it on your hard drive. This is ideal for quick tasks or for testing compatibility before committing to an installation. Your changes are not saved by default, though persistent storage can be configured.
- Netinstall: This method downloads the necessary packages from the internet during installation, resulting in a smaller initial download but requiring a stable internet connection throughout the process.
- Bare Metal Installation: This involves formatting your entire hard drive and installing Kali Linux as the sole operating system. This is for users who want Kali Linux to be their primary OS and are comfortable with wiping their existing data.
For the purpose of this guide, we will focus on the most common and practical methods: dual-booting and installing in a virtual machine.
Prerequisites for Installing Kali Linux
Before you begin the installation, ensure you have the following:
1. Download the Kali Linux ISO Image
Visit the official Kali Linux website (www.kali.org) and download the latest stable ISO image for your architecture (usually 64-bit). Choose between the “Installer” image for a full installation or the “Live” image if you plan to use it in live mode or install from a live environment.
2. Create Bootable Media
- For USB Installation: You’ll need a USB flash drive (at least 8GB recommended) and a tool like Rufus (for Windows) or Etcher (for Windows, macOS, and Linux) to write the ISO image to the USB drive.
- For Virtual Machine Installation: You will simply mount the downloaded ISO file within your virtualization software.
3. System Requirements
While Kali Linux is relatively lightweight, it’s good practice to ensure your system meets the minimum requirements:
- Processor: Any modern x86 or x86-64 processor.
- RAM: 2GB or more recommended for desktop experience.
- Hard Disk Space: At least 20GB of free space for installation.
- Graphics Card: Support for graphics acceleration is recommended.
4. Backup Your Data
Crucially important! If you are planning a dual-boot installation, back up all your important data from your existing operating system. Mistakes during partitioning can lead to data loss.
Installing Kali Linux in a Virtual Machine (Recommended for Beginners)
This method is highly recommended for users new to Linux or Kali Linux due to its inherent safety and flexibility.
Step 1: Install Virtualization Software
If you don’t already have it, download and install a virtualization software like Oracle VirtualBox (free and open-source) or VMware Workstation Player (free for personal use).
Step 2: Create a New Virtual Machine
- Open your virtualization software.
- Click on “New” or “Create a New Virtual Machine.”
- Name: Give your VM a descriptive name (e.g., “Kali Linux VM”).
- Type: Select “Linux.”
- Version: Choose “Debian (64-bit)” as Kali Linux is based on Debian.
- Memory (RAM): Allocate at least 2GB of RAM to the VM, more if your host system has ample RAM.
- Hard Disk:
- Select “Create a virtual hard disk now.”
- Choose “VDI” (VirtualBox Disk Image) or “VMDK” (VMware Virtual Machine Disk) depending on your software.
- Select “Dynamically allocated” for the storage type (this saves space on your host drive).
- Allocate at least 20GB of disk space to the virtual hard drive.
Step 3: Mount the Kali Linux ISO
- Once the VM is created, select it and click “Start” or “Power On.”
- The VM will prompt you to select a startup disk. Click the folder icon and navigate to the Kali Linux ISO file you downloaded.
- Click “Start” or “Continue.”
Step 4: Install Kali Linux
The Kali Linux installer will now boot from the ISO.
- Welcome Screen: You will see options like “Graphical install,” “Install,” “Live system,” etc. For a standard installation, choose “Graphical install” or “Install.”
- Language, Location, and Keyboard Layout: Select your preferred language, country, and keyboard layout.
- Network Configuration: The installer will attempt to configure networking. If you are behind a proxy, you can enter proxy details here.
- Hostname: Enter a hostname for your Kali system (e.g.,
kali-vm). - Domain Name: You can leave this blank unless you are in a specific network environment.
- Set up Users and Passwords:
- Root Password: You will be prompted to set a strong password for the
rootuser. This is crucial for security. - Create a New User: You will be asked to create a non-root user account. This is the user you will log in with for daily tasks. Choose a strong password for this user as well.
- Root Password: You will be prompted to set a strong password for the
- Partition Disks:
- For a VM, the easiest option is usually “Guided – Use entire disk.” This will dedicate the entire virtual hard drive to Kali Linux.
- If you need more control or are dual-booting on a physical machine, you would choose “Manual” partitioning.
- Write the Changes to Disks: Review the proposed partitioning scheme and confirm to proceed.
- Install the Base System: The installer will now copy files and install the base system. This may take some time.
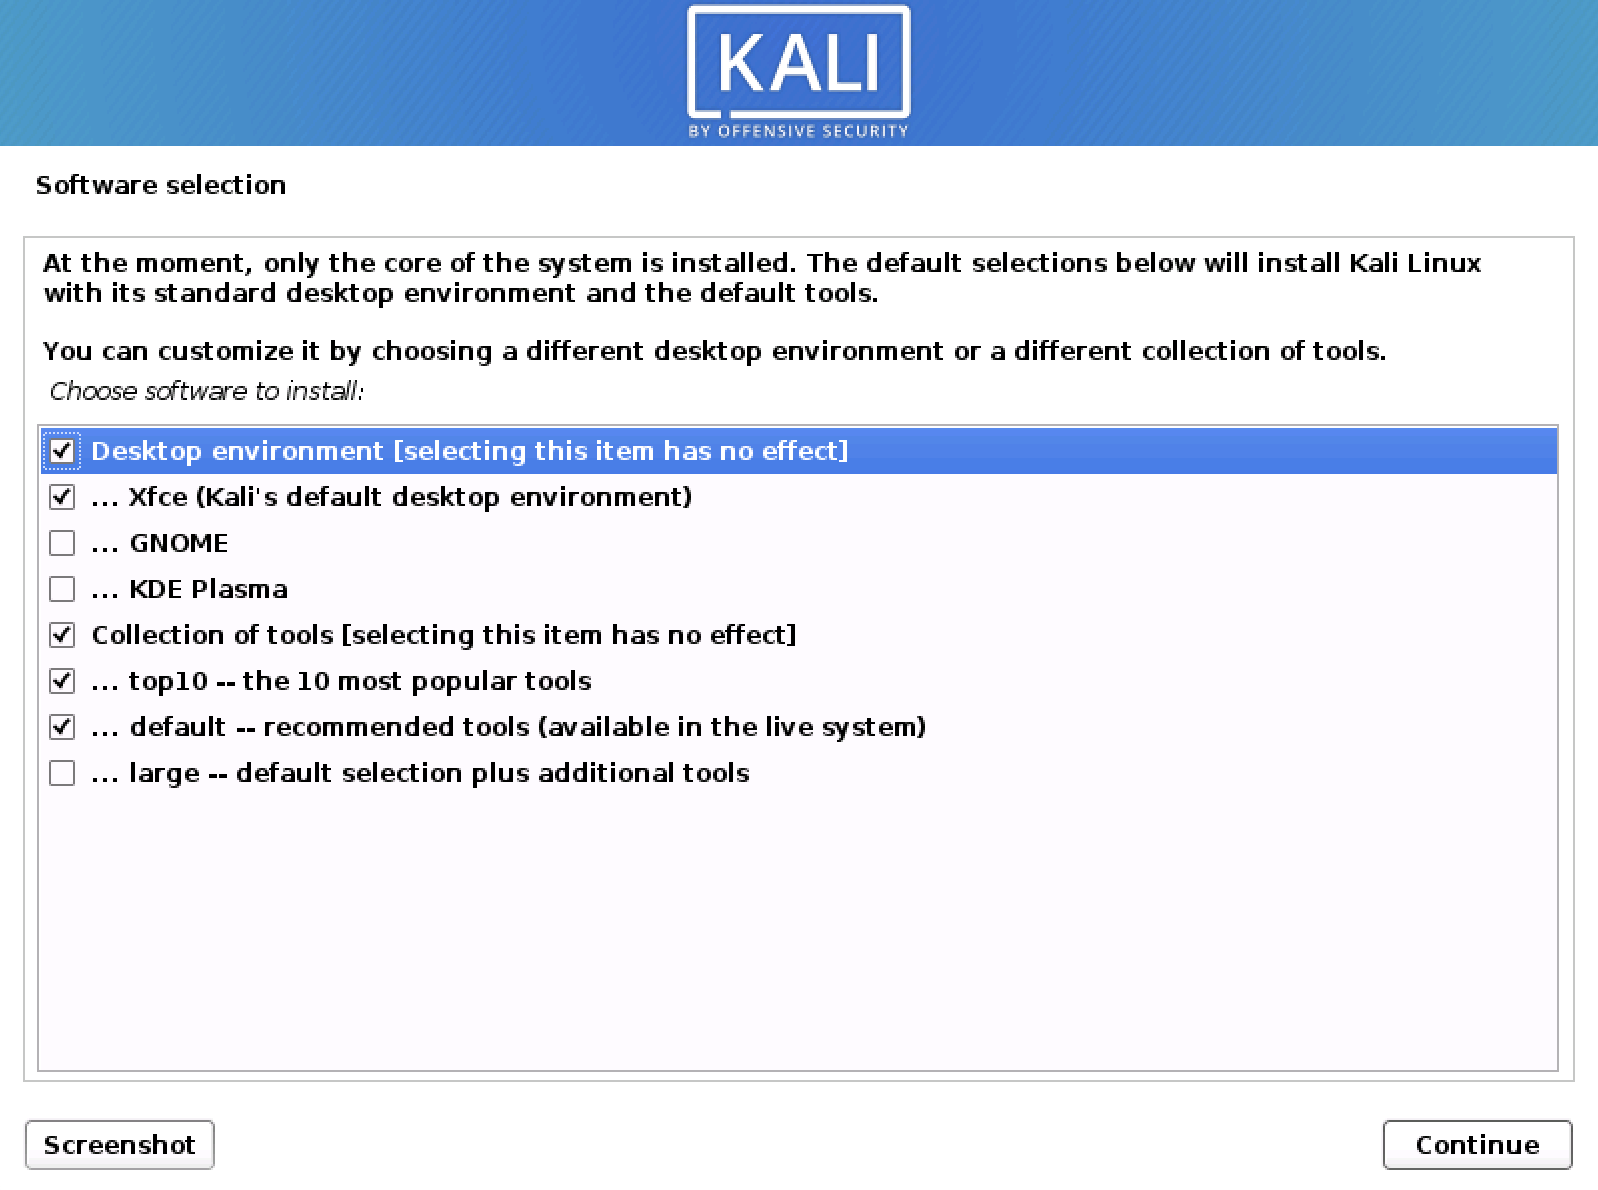
- Software Selection: You will be presented with options to select desktop environments (e.g., XFCE, GNOME, KDE) and a list of pre-installed tools. For a standard setup, XFCE is a good balance of features and performance. You can deselect or select specific tool categories based on your needs.
- Install the GRUB Bootloader:
- You will be asked if you want to install the GRUB bootloader to the master boot record. Select “Yes.”
- Choose the device where GRUB will be installed (usually the virtual hard disk you created for the VM, e.g.,
/dev/sda).
- Installation Complete: Once GRUB is installed, the installation is complete. Click “Continue” to reboot the VM.
Step 5: Boot into Kali Linux
Your virtual machine will restart. The GRUB bootloader will appear briefly, allowing you to select Kali Linux. Log in with the username and password you created. Congratulations, you have successfully installed Kali Linux in a virtual machine!
Installing Kali Linux as a Dual Boot
Dual booting requires more careful attention to disk partitioning. Ensure you have backed up your data before proceeding.
Step 1: Prepare Your Disk Space
- Shrink Existing Partition: Boot into your existing operating system (Windows or macOS). Use the disk management tools (e.g., Disk Management in Windows, Disk Utility in macOS) to shrink your main partition. Create unallocated space for Kali Linux. The amount of space needed depends on your intended usage, but at least 20-30GB is recommended.
- Bootable Kali USB: Ensure you have created a bootable Kali Linux USB drive as described in the prerequisites.
Step 2: Boot from the Kali Linux USB
- Insert the bootable Kali Linux USB drive into your computer.
- Restart your computer and enter your BIOS/UEFI settings (usually by pressing keys like F2, F10, F12, DEL, or ESC during boot).
- Change the boot order to prioritize booting from the USB drive.
- Save the changes and exit BIOS/UEFI. Your computer should now boot from the Kali Linux USB.
Step 3: Start the Kali Linux Installer
- You will see the Kali Linux boot menu. Select “Graphical install” or “Install” and press Enter.
- Follow the on-screen prompts for language, location, and keyboard layout, similar to the VM installation.
Step 4: Manual Partitioning (Crucial for Dual Boot)
This is the most critical step for dual-booting.
- When you reach the “Partition disks” step, select “Manual.”
- You will see a list of your hard drive partitions. Identify the unallocated space you created earlier.
- Create Partitions:
- Root Partition (
/): Select the unallocated space, choose “Create a new partition,” set the size (e.g., 20GB or more), choose “Primary” for the partition type, “Beginning of this space” for its location, and set the file system to “Ext4 journaling file system.” Mount point should be/. - Swap Partition: Create a new partition. Set its size (e.g., equal to your RAM, or 2-4GB for modern systems). Set the file system to “swap area.” This is used by the system when RAM is full.
- Home Partition (
/home– Optional but Recommended): Create another partition using the remaining unallocated space. Set the file system to “Ext4 journaling file system” and the mount point to/home. This separates your user data from the system files, making upgrades and reinstalls easier. - EFI System Partition (If using UEFI): If your system uses UEFI, you’ll need an EFI System Partition. If one already exists from your primary OS, you can usually just select it and set its mount point to
/boot/efi. If not, create a new one with FAT32 format and mount it as/boot/efi.
- Root Partition (
- Review and Confirm: Carefully review the partition scheme. Ensure you are not deleting or formatting your existing OS partitions. Once you are satisfied, select “Finish partitioning and write changes to disk.” Confirm the action.
Step 5: Install the Base System and Software
The installer will now proceed to install the base Kali Linux system.
- Configure the package manager: You may be asked to configure APT (Advanced Package Tool).
- Software Selection: Choose your desired desktop environment and tools.
- Install the GRUB Bootloader:
- When prompted to install GRUB, select “Yes.”
- Crucially, select the main hard drive where your primary OS is installed (e.g.,
/dev/sda), NOT a specific partition. This ensures GRUB can manage the boot process for both operating systems.
Step 6: Reboot and Select Your OS
Once the installation is complete, remove the USB drive and reboot your computer. You should now see the GRUB boot menu, allowing you to choose between Kali Linux and your other operating system.
Post-Installation Steps and Best Practices
Regardless of how you installed Kali Linux, a few post-installation steps are crucial for security and usability.
Update Your System
Immediately after installation, it’s vital to update your system to ensure you have the latest security patches and software versions. Open a terminal and run:
sudo apt update
sudo apt full-upgrade -y
Configure Network Interfaces
Ensure your network interfaces are correctly configured, especially if you plan to perform network-based security tests.
Install Additional Tools
While Kali comes with an extensive collection of tools, you might need to install others. You can search for packages using apt search <tool_name> and install them with sudo apt install <tool_name>.
Understand the Risks
Kali Linux is a powerful operating system designed for security professionals. Misusing its tools can have serious legal consequences. Always use Kali Linux responsibly and ethically, with proper authorization.
Practice Safe Computing
Even within Kali Linux, good security practices are paramount. Use strong, unique passwords, keep your system updated, and be cautious about the sources of any additional software you install.

Conclusion
Installing Kali Linux is the gateway to a world of advanced cybersecurity exploration. Whether you choose the safety of a virtual machine or the full power of a dual-boot setup, the process is designed to be comprehensive yet manageable. By following these steps, you can establish a secure and functional Kali Linux environment, ready to be deployed for your ethical hacking and security testing needs. Remember that continuous learning and responsible usage are key to becoming proficient with this potent operating system.
aViewFromTheCave is a participant in the Amazon Services LLC Associates Program, an affiliate advertising program designed to provide a means for sites to earn advertising fees by advertising and linking to Amazon.com. Amazon, the Amazon logo, AmazonSupply, and the AmazonSupply logo are trademarks of Amazon.com, Inc. or its affiliates. As an Amazon Associate we earn affiliate commissions from qualifying purchases.