JupyterLab, the next-generation user interface for Project Jupyter, has revolutionized how developers and data scientists interact with code, data, and computational environments. More than just an enhanced Jupyter Notebook, JupyterLab offers a flexible, extensible, and powerful platform for interactive computing. Whether you’re diving into machine learning, conducting data analysis, or developing complex applications, mastering JupyterLab installation is your first crucial step towards unlocking its full potential. This guide will walk you through the process, ensuring a smooth and successful setup, all within the broader context of technology trends that emphasize accessible and powerful development tools.
In today’s rapidly evolving tech landscape, where the democratization of advanced tools is paramount, JupyterLab stands out. It bridges the gap between raw code and insightful visualization, making complex tasks more manageable and the development lifecycle more efficient. This platform aligns perfectly with the “Tech” pillar of our website, offering a practical tutorial on a leading software tool that empowers productivity and innovation. We’ll also touch upon how mastering such tools can indirectly contribute to personal branding and even open avenues for online income, hinting at the “Brand” and “Money” aspects as well.
Prerequisites: Setting the Stage for a Smooth JupyterLab Installation
Before we embark on the installation journey, it’s essential to ensure your system is adequately prepared. A clean and well-configured environment is key to avoiding common installation hiccups and ensures JupyterLab runs optimally. This preparatory phase is analogous to laying the foundation for a robust digital presence or building a solid financial plan – meticulous attention to detail at the outset pays dividends later.
1. Understanding Your System and Package Management
The primary method for installing JupyterLab is through Python’s package installer, pip. This means you need to have Python installed on your system. If you don’t have Python, or if you’re unsure about your current installation, visiting the official Python website (python.org) is your first stop. It’s highly recommended to install a recent version of Python 3, as older versions may have compatibility issues.
When you install Python, ensure that the option to “Add Python to PATH” is selected. This makes it easier for your command line to find Python and its associated tools like pip.
Beyond individual Python installations, many developers opt for virtual environments. These are isolated Python installations that prevent package conflicts between different projects. For JupyterLab, using a virtual environment is a best practice. It keeps your JupyterLab installation and its dependencies separate from your system’s global Python environment, leading to a cleaner and more manageable setup.
Two popular tools for creating and managing virtual environments are:
- venv (built-in to Python 3.3+): This is the most straightforward option for most users.
- conda (part of the Anaconda distribution): Anaconda is a popular distribution for data science that includes Python, many scientific libraries, and conda as its package and environment manager. If you’re heavily involved in data science, Anaconda is an excellent choice.
Using venv for Virtual Environments
If you’re using a standard Python installation, creating a virtual environment with venv is simple:
-
Open your terminal or command prompt.
-
Navigate to the directory where you want to create your project (and virtual environment). For example:
bash

cd ~/projects/my_jupyter_project
-
Create the virtual environment:
python -m venv venvThis command creates a new directory named
venv(you can choose any name) containing the Python interpreter and thepippackage manager for this environment. -
Activate the virtual environment:
- On Windows:
bash

.venvScriptsactivate
- On macOS and Linux:
bash

source venv/bin/activate
Once activated, you’ll notice the name of your virtual environment (e.g.,(venv)) prepended to your command prompt, indicating that all subsequent commands will operate within this isolated environment.
- On Windows:
Using conda for Virtual Environments (with Anaconda)
If you have Anaconda installed, creating and activating a conda environment is also straightforward:
-
Open your Anaconda Prompt or terminal.
-
Create a new conda environment (e.g., named
jupyter_envwith Python 3):conda create --name jupyter_env python=3You’ll be prompted to proceed; type
yand press Enter. -
Activate the conda environment:
bash

conda activate jupyter_env
Similar tovenv, your prompt will change to indicate the active environment (e.g.,(jupyter_env)).
2. Ensuring Pip is Up-to-Date
pip is the package installer for Python. It’s crucial to have the latest version of pip to ensure compatibility and access to the newest features and bug fixes.
To upgrade pip within your activated virtual environment, run:
pip install --upgrade pip
This simple step can prevent a multitude of potential installation problems.
Installing JupyterLab: The Core Process
With your environment prepared and pip up-to-date, installing JupyterLab itself becomes a direct and rewarding process. This is where the practical application of your technical setup begins, much like launching a marketing campaign after solidifying your brand strategy.
Installing via Pip
The most common and recommended way to install JupyterLab is by using pip within your activated virtual environment.
-
Ensure your virtual environment is activated. (Refer back to the “Prerequisites” section if needed).
-
Run the following command in your terminal:
pip install jupyterlabThis command will download and install JupyterLab and all its necessary dependencies from the Python Package Index (PyPI). The installation process might take a few minutes, depending on your internet connection and system speed. You’ll see a stream of output indicating the progress and the packages being installed.
-
Verify the installation (Optional but Recommended):
After the installation completes, you can confirm that JupyterLab has been installed successfully. You can try to start it, or check its version:
bash

jupyter lab --version
If the command returns a version number, your installation was successful.
Installing JupyterLab with Conda
If you’ve opted for the Anaconda distribution and are managing your environments with conda, the installation process is equally straightforward.
-
Ensure your conda environment is activated. (Refer back to the “Prerequisites” section if needed).
-
Run the following command in your terminal:
conda install -c conda-forge jupyterlabUsing
-c conda-forgeis often recommended as it points to theconda-forgechannel, which is a community-led collection of recipes, build infrastructure, and packages for the conda ecosystem. It often has the latest versions of packages, including JupyterLab. -
Confirm the installation:
Similar to thepipinstallation, you can verify by checking the version:
bash

jupyter lab --version
Launching and Using JupyterLab: Your Interactive Playground
Once JupyterLab is installed, the exciting part begins: launching it and exploring its capabilities. This is where the “Tech” aspect truly comes alive, offering a hands-on experience that can foster creativity and efficiency, potentially leading to new business ventures or income streams.
Launching JupyterLab
To start JupyterLab, simply open your terminal or command prompt, ensure your virtual environment is activated, and run the following command:
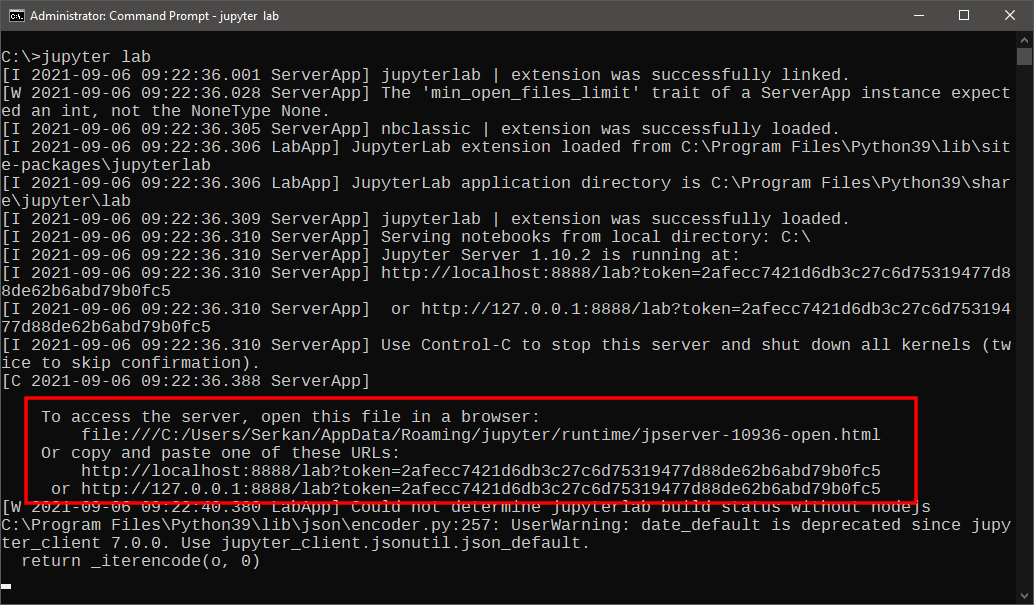
jupyter lab
This command will launch the JupyterLab interface in your default web browser. You’ll see a new tab open, displaying the JupyterLab dashboard. This dashboard is your central hub for managing files, creating new notebooks, consoles, terminals, and opening various document types.
Understanding the JupyterLab Interface
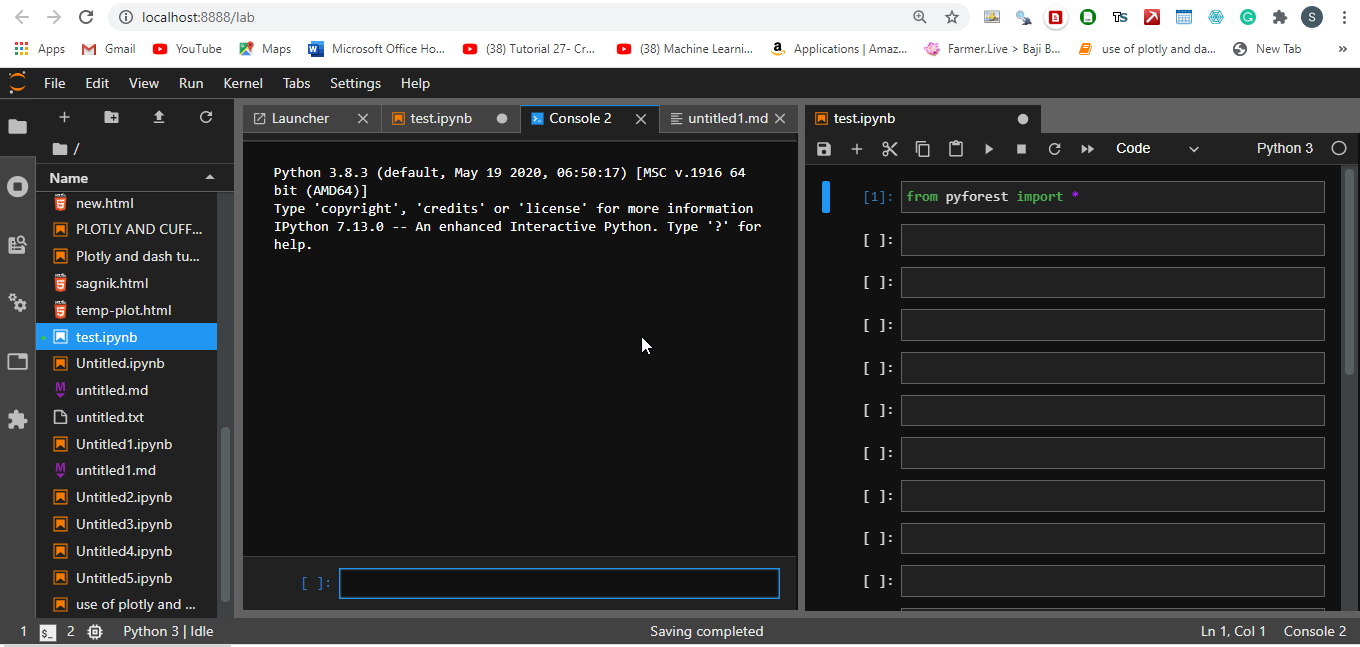
Upon launching, you’ll be greeted by a powerful, adaptable interface:
- Left Sidebar: This area contains several tabs for file browsing, running kernels, the command palette, and extensions. You can collapse or expand it as needed.
- Main Work Area: This is where your notebooks, code consoles, terminals, and other documents will open. You can arrange these elements in tabs, split them horizontally or vertically, and create a personalized workspace.
- File Browser: Located in the left sidebar, this allows you to navigate your file system, create new directories, upload files, and open existing ones.
- Notebooks: The heart of JupyterLab for many. Notebooks allow you to write and execute code in chunks (cells), interspersed with explanatory text, mathematical equations, and visualizations. This makes them ideal for exploratory data analysis, rapid prototyping, and sharing your work.
- Code Consoles: Provide an interactive Python (or other language) interpreter that you can use for quick code testing or exploration without the structure of a notebook.
- Terminals: You can open a system terminal directly within JupyterLab, allowing you to execute shell commands without leaving the application.
Working with Notebooks: A Glimpse
To create your first notebook, click the “Python 3” (or your preferred kernel) icon in the file browser or go to File > New > Notebook. You’ll see a new notebook open in the main work area, featuring code cells.
- Writing Code: Type your Python code into a code cell.
- Running Cells: Press
Shift + Enteror click the “Run” button in the toolbar to execute the code in the cell. The output will appear directly below the cell. - Markdown Cells: To add explanatory text, you can change a cell’s type to “Markdown” from the dropdown menu in the toolbar. Then, write your text using Markdown syntax and run the cell to render it.
JupyterLab’s flexibility extends to its ability to integrate with various programming languages through different kernels, not just Python. This cross-language compatibility is a significant advantage in diverse technical projects.
Advanced Installation and Customization (Optional)
While the basic installation covers most needs, JupyterLab’s extensibility means you can tailor it further to your workflow. This advanced aspect highlights the platform’s alignment with customizability and the potential for unique solutions, resonating with both tech innovation and personal branding.
Installing Extensions
JupyterLab’s ecosystem of extensions is vast and growing, offering features from version control integration to advanced charting tools. You can install extensions directly from within JupyterLab using the Extension Manager (usually accessible from the left sidebar).
Alternatively, you can install extensions via pip or conda from your terminal:
# Example: Installing a popular extension (e.g., JupyterLab Git)
pip install jupyterlab-git
# Or with conda
conda install -c conda-forge jupyterlab-git
After installing an extension, you might need to rebuild the JupyterLab application for the changes to take effect. This is typically done by running:
jupyter lab build
This command compiles the frontend assets and makes your newly installed extensions available.
Troubleshooting Common Issues
- “command not found: jupyter”: This usually means Python or the
jupyterexecutables are not in your system’s PATH, or your virtual environment is not activated. Double-check your Python installation and PATH settings, or ensure your environment is active. - Installation Errors: If
piporcondathrows errors, it’s often due to missing system dependencies or conflicts. Ensure yourpipis up-to-date, and try installing within a fresh virtual environment. Sometimes, searching for the specific error message online will yield solutions. - Browser Not Opening: If
jupyter labruns but your browser doesn’t open, you can manually navigate to the URL provided in the terminal output (usuallyhttp://localhost:8888/lab).

Conclusion: Embracing Interactive Computing
Installing JupyterLab is more than just a technical task; it’s an investment in a powerful tool that enhances productivity, fosters collaboration, and accelerates innovation in technology, data science, and software development. By following these steps, you’ve successfully set up a versatile environment for exploring code, visualizing data, and building your projects.
As you become more adept with JupyterLab, consider how it can shape your personal brand. A well-presented Jupyter Notebook or a custom-built JupyterLab extension can serve as a compelling portfolio piece, showcasing your skills to potential employers or clients. Furthermore, the ability to effectively leverage tools like JupyterLab can lead to opportunities for online income, whether through freelance data analysis, creating educational content, or developing specialized applications.
The world of tech is constantly evolving, and tools like JupyterLab are at the forefront, empowering individuals and organizations to tackle complex challenges. Embrace its interactive nature, explore its vast potential, and let it be a cornerstone in your journey of technological advancement and professional growth.
aViewFromTheCave is a participant in the Amazon Services LLC Associates Program, an affiliate advertising program designed to provide a means for sites to earn advertising fees by advertising and linking to Amazon.com. Amazon, the Amazon logo, AmazonSupply, and the AmazonSupply logo are trademarks of Amazon.com, Inc. or its affiliates. As an Amazon Associate we earn affiliate commissions from qualifying purchases.