Java, a cornerstone of the software development world, remains an indispensable technology for a vast array of applications, ranging from enterprise-level systems and mobile apps to scientific computing and web services. Its “write once, run anywhere” philosophy, robust ecosystem, and enduring popularity make it a critical skill for developers and a fundamental requirement for users who need to run Java-based software. For anyone operating a Windows machine, knowing how to properly install and configure Java is a foundational step into this powerful ecosystem, whether you’re embarking on a coding journey or simply need to ensure your favorite applications run smoothly.

This comprehensive guide will walk you through the entire process of installing Java on Windows, addressing key considerations like choosing the right version, understanding essential components like the JRE and JDK, and meticulously configuring your system’s environment variables. By the end of this tutorial, you’ll have a fully functional Java environment, ready for development or for executing Java applications with confidence.
Understanding Java: JRE vs. JDK and Why It Matters
Before diving into the installation process, it’s crucial to grasp the fundamental distinction between two core Java components: the Java Runtime Environment (JRE) and the Java Development Kit (JDK). Understanding their roles will help you decide which package best suits your needs and avoid common pitfalls during setup.
The Java Runtime Environment (JRE): For Running Java Applications
The Java Runtime Environment (JRE) is precisely what its name suggests: a runtime environment that enables you to execute Java applications. If your primary goal is simply to run software written in Java – such as certain desktop applications, games, or server-side tools – then the JRE is all you technically need. It comprises the Java Virtual Machine (JVM), which interprets and executes Java bytecode, and the core Java class libraries that provide essential functionalities.
Think of the JRE as the engine that allows your computer to “speak” and “understand” Java. Without it, your Windows system wouldn’t know how to launch or operate programs that are built using Java. For the vast majority of end-users who interact with Java-based software, but do not develop it, the JRE provides all the necessary components.
The Java Development Kit (JDK): Your Toolkit for Java Development
The Java Development Kit (JDK), on the other hand, is designed for Java developers. It is a superset of the JRE, meaning it includes everything found in the JRE, plus a suite of development tools essential for writing, compiling, debugging, and packaging Java applications. Key components within the JDK include:
javac(Java Compiler): Translates human-readable Java source code (.javafiles) into bytecode (.classfiles) that the JVM can execute.java(Java Launcher): Used to launch Java applications and applets.javadoc(Documentation Generator): Creates HTML documentation from source code comments.jar(Archiver): Packs related class files and resources into a single JAR (Java Archive) file.- Debugging Tools: Utilities for identifying and fixing errors in your code.
In essence, if you plan to write, compile, or debug Java programs, the JDK is an absolute necessity. It provides all the tools required to transform your code ideas into functional applications. When you install the JDK, you implicitly install the JRE components along with it, ensuring you can both develop and run Java software. For anyone venturing into Java programming, always opt for the JDK.
Choosing the Right Java Version and Distribution
With the distinction between JRE and JDK clear, the next critical step is to select the appropriate Java version and distribution. The Java landscape has evolved significantly over the years, offering various options that cater to different needs and licensing preferences.
Oracle JDK vs. OpenJDK: Navigating Licensing and Community
Historically, Oracle JDK was the de-facto standard. However, Oracle’s licensing changes, particularly for commercial use of JDK 11 and later, prompted a significant shift towards OpenJDK distributions.
- Oracle JDK: While still available, Oracle JDK now requires a commercial license for production use and certain updates for versions beyond Java 8. For individual developers and non-commercial use, the terms can be complex, and often a paid subscription is needed for long-term support.
- OpenJDK Distributions: OpenJDK is the open-source reference implementation of Java. Numerous vendors provide their own builds of OpenJDK, which are generally free to use, distribute, and modify, even for commercial purposes. These distributions are often preferred by developers and organizations due to their open-source nature, cost-effectiveness, and community support. Popular OpenJDK distributions include:
- Adoptium (formerly AdoptOpenJDK): A widely used, community-driven OpenJDK distribution offering builds for various platforms. It’s an excellent choice for most users.
- Amazon Corretto: Amazon’s no-cost, multiplatform, production-ready distribution of OpenJDK.
- Azul Zulu: Another popular OpenJDK build, known for its extensive support and performance optimizations.
- Microsoft Build of OpenJDK: Microsoft’s contribution to the OpenJDK ecosystem.
Recommendation: For most developers and users, an OpenJDK distribution is the recommended choice due to its open-source license and free commercial use. Adoptium is a particularly strong recommendation for its ease of use and broad community backing.
LTS Versions and Latest Releases: Stability vs. Cutting Edge
Java versions are released on a regular six-month cadence, but not all releases are created equal in terms of long-term support.
- Long-Term Support (LTS) Versions: These versions (e.g., Java 8, Java 11, Java 17, Java 21) receive extended support and updates for several years, making them ideal for production environments where stability and predictability are paramount. Most enterprise applications are built and run on LTS versions.
- Non-LTS Versions: These are feature releases that occur between LTS versions. They introduce new features and improvements but have a shorter support window (typically six months until the next release). They are suitable for experimentation, learning new features, or projects that can tolerate frequent upgrades.
Recommendation: For most scenarios, especially if you’re developing applications for the long term or running existing software, an LTS version of OpenJDK (such as Java 17 or Java 21) is highly recommended. It offers the best balance of modern features and long-term stability.
32-bit vs. 64-bit: Matching Your System Architecture
Nearly all modern Windows operating systems are 64-bit. It’s crucial to download the Java installer that matches your system’s architecture. Installing a 32-bit Java on a 64-bit system can lead to compatibility issues, especially when interacting with other 64-bit software or maximizing memory usage.
Recommendation: Always download the 64-bit (x64) version of Java unless you have a very specific reason or a legacy 32-bit system requirement. You can check your system type by going to Settings > System > About and looking under “System type.”
Step-by-Step Installation of Java on Windows
Now that we’ve covered the prerequisites, let’s proceed with the actual installation process. We’ll use Adoptium’s OpenJDK distribution (Temurin builds) as an example, as it’s a popular and reliable choice. The steps will be very similar for other OpenJDK distributions.
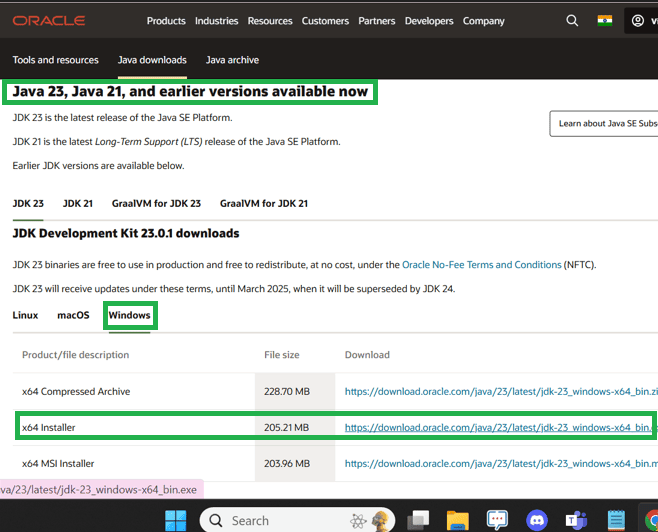
Downloading the JDK Installer (Adoptium Example)
- Navigate to the Adoptium Website: Open your web browser and go to the official Adoptium website (e.g.,
adoptium.net). - Select Your Configuration: On the homepage, you’ll typically find a prominent download section. You’ll need to specify:
- Operating System: Windows
- Architecture: x64 (for 64-bit systems, which is most common)
- Version: Choose an LTS version (e.g., JDK 17 or JDK 21). Select the “Latest LTS Release” unless a specific project requires an older version.
- JVM: Select “JDK” (Java Development Kit), as this includes the JRE and development tools.
- Download the
.msiInstaller: Look for the installer file type ending with.msi(Windows Installer). Click the download button to begin the download. Save the file to a location you can easily find, like yourDownloadsfolder.
Running the Installer
- Locate and Launch the Installer: Once the download is complete, navigate to where you saved the
.msifile and double-click it to launch the Java installer. - Follow the Installation Wizard:
- Welcome Screen: Click “Next.”
- License Agreement: Read the license terms (Eclipse Public License, which is open-source friendly) and accept them by checking the box. Click “Next.”
- Custom Setup: This screen allows you to choose which features to install and where. By default, all necessary components are usually selected. Crucially, ensure that “Set JAVA_HOME environment variable” and “Add to PATH” options are selected. These options might appear as dropdowns next to the respective components. If they are not selected by default or aren’t present, don’t worry, we’ll cover manual configuration in the next section.
- Installation Path: The default installation path (e.g.,
C:Program FilesJavajdk-17.0.x) is usually suitable. You can change it if you have a specific preference, but remember this path for future reference. Click “Next.” - Ready to Install: Click “Install” to begin the installation process.
- User Account Control: If prompted by User Account Control (UAC), click “Yes” to allow the installer to make changes to your system.
- Completion: Once the installation is finished, you’ll see a confirmation screen. Click “Finish” to exit the installer.
Congratulations, you’ve successfully installed Java on your Windows machine! However, the installation isn’t fully complete until your system knows where Java is located. This brings us to the crucial step of configuring environment variables.
Configuring Environment Variables: Making Java Accessible
Even after installing Java, your operating system might not immediately recognize the java or javac commands from any directory in the Command Prompt or PowerShell. This is because Windows needs to be explicitly told where to find the Java executables. This is achieved by setting environment variables, particularly JAVA_HOME and updating the Path variable.
Why Environment Variables are Important
Environment variables are dynamic named values that can affect the way running processes will behave on a computer. In the context of Java:
JAVA_HOME: This variable points to the root directory of your JDK installation (e.g.,C:Program FilesJavajdk-17.0.x). Many Java-based tools, integrated development environments (IDEs) like IntelliJ IDEA or Eclipse, and build tools like Maven or Gradle, rely onJAVA_HOMEto locate your Java installation.Path: This system variable contains a list of directories where the operating system looks for executable files when you type a command in the Command Prompt or PowerShell. By adding thebindirectory of your Java installation toPath, you enable yourself to runjava,javac, and other Java commands from any directory without needing to specify the full path to the executable.
While modern Java installers often attempt to set these variables automatically, it’s good practice to verify them or set them manually if needed.
Setting the JAVA_HOME Environment Variable
- Open System Properties:
- Right-click on the “This PC” icon on your desktop or in File Explorer.
- Select “Properties.”
- In the System window, click on “Advanced system settings” on the left-hand side. This will open the “System Properties” dialog.
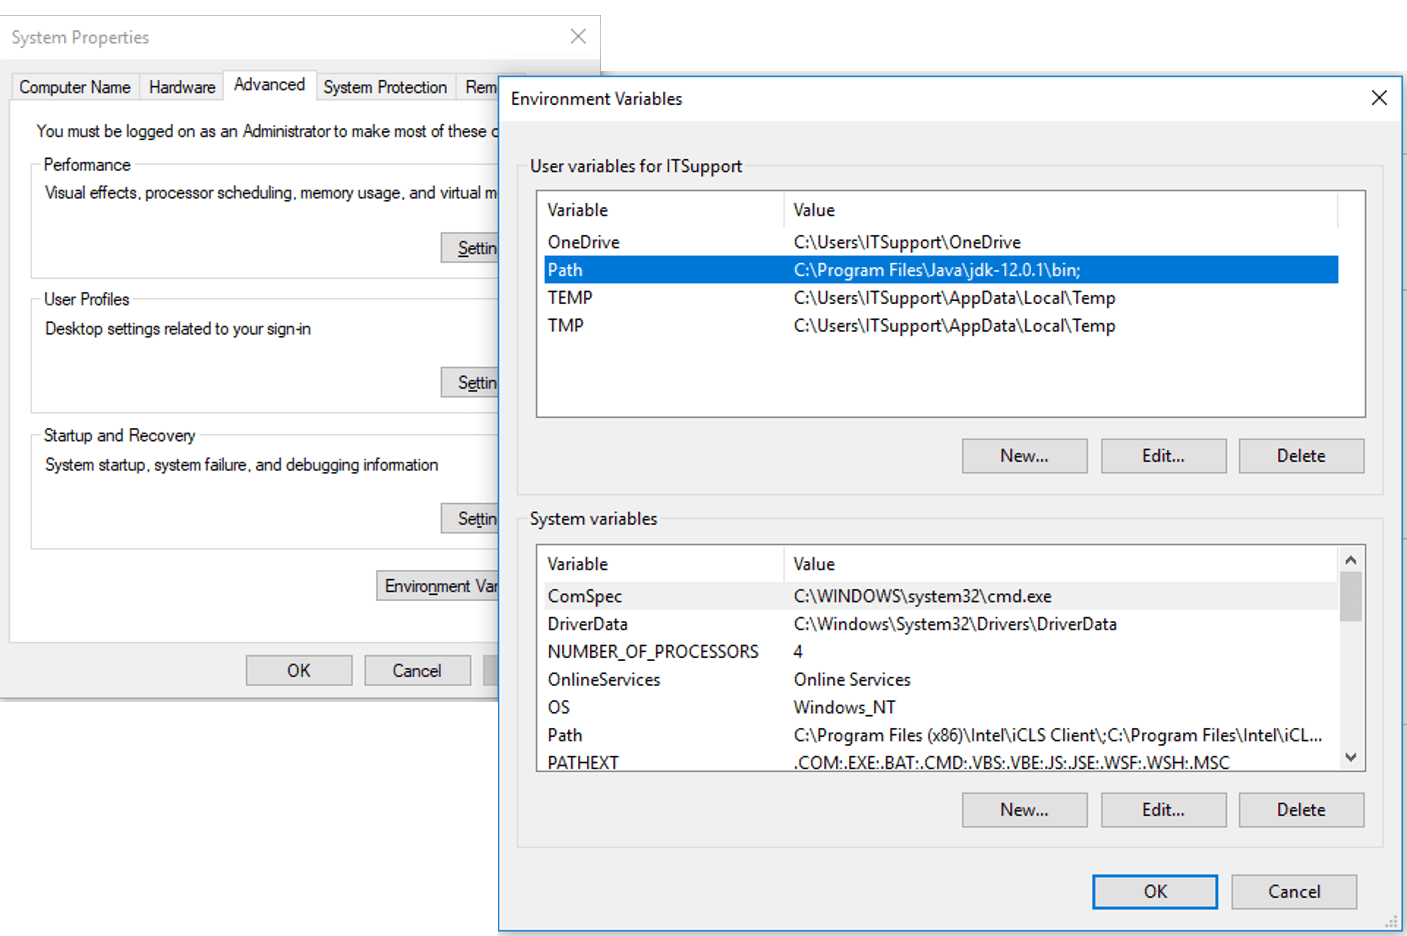
- Access Environment Variables:
- In the “System Properties” dialog, go to the “Advanced” tab.
- Click the “Environment Variables…” button at the bottom.
- Create/Edit JAVA_HOME:
- Under the “System variables” section (the bottom list), click the “New…” button.
- Variable name:
JAVA_HOME - Variable value: Enter the full path to your JDK installation directory. This is the directory that contains the
bin,lib,jre(if applicable), etc., folders. For example:C:Program FilesJavajdk-17.0.x(replacejdk-17.0.xwith your actual version number). - Click “OK.”
- If
JAVA_HOMEalready exists: Select it, click “Edit…”, and update its value to your new JDK path.
Adding Java to the Path Variable
- Open Environment Variables (if not already open): Follow steps 1 and 2 from setting
JAVA_HOME. - Edit the Path Variable:
- Under the “System variables” section, locate the
Pathvariable. - Select it and click the “Edit…” button.
- Under the “System variables” section, locate the
- Add Java’s Bin Directory to Path:
- In the “Edit environment variable” dialog, click “New.”
- Add
%JAVA_HOME%bin(this uses theJAVA_HOMEvariable you just set, making it more flexible if you update Java versions). - Alternatively, you could add the direct path:
C:Program FilesJavajdk-17.0.xbin(again, replace with your actual version). - Important: Ensure this new entry is moved to the top of the list using the “Move Up” button. This ensures that your system uses this specific Java installation over any older or conflicting versions that might be listed lower down in the Path.
- Click “OK” on the “Edit environment variable” dialog.
- Click “OK” on the “Environment Variables” dialog.
- Click “OK” on the “System Properties” dialog to close everything.
Note: After making changes to environment variables, it’s often necessary to restart your Command Prompt or PowerShell windows (or even your entire system in some rare cases) for the changes to take effect. If you have an IDE or other applications open that use Java, consider restarting them too.
Verifying Your Java Installation
The final and most satisfying step is to confirm that Java has been installed and configured correctly. This involves running a few simple commands in your command-line interface.
Checking Java Version
- Open Command Prompt or PowerShell:
- Press
Win + R, typecmdand press Enter, or search for “Command Prompt” or “PowerShell” in the Start Menu.
- Press
- Verify JRE Installation:
- Type the command:
java -version - Press Enter.
- You should see output similar to this (version numbers will vary):
openjdk version "17.0.8" 2023-07-18

OpenJDK Runtime Environment Temurin-17.0.8+7 (build 17.0.8+7)

OpenJDK 64-Bit Server VM Temurin-17.0.8+7 (build 17.0.8+7, mixed mode, sharing)
- This confirms that the Java Runtime Environment is correctly installed and accessible via your Path variable.
- Type the command:
- Verify JDK Installation (for developers):
- Type the command:
javac -version - Press Enter.
- You should see output similar to this:
javac 17.0.8
- This confirms that the Java Development Kit (specifically the compiler) is installed and accessible. If you only installed the JRE, this command will not work, which is expected.
- Type the command:
- Verify JAVA_HOME (optional):
- Type the command:
echo %JAVA_HOME% - Press Enter.
- This should display the path you set for your
JAVA_HOMEvariable, e.g.,C:Program FilesJavajdk-17.0.x. This confirms theJAVA_HOMEvariable is correctly set.
- Type the command:
Running a Simple Java Program (Optional but Recommended)
To ensure everything is working perfectly, let’s compile and run a basic “Hello, World!” program.
- Create a Java Source File:
- Open a plain text editor (like Notepad).
- Type the following code:
java

public class HelloWorld {

    public static void main(String[] args) {

        System.out.println("Hello, World! Java is installed!");

    }

}
- Save the file as
HelloWorld.javain an easily accessible directory, for example,C:UsersYourUsernameJavaProjects. Make sure the file type is “All Files” and not “.txt” if using Notepad.
- Compile the Program:
- Open your Command Prompt or PowerShell.
- Navigate to the directory where you saved
HelloWorld.javausing thecdcommand (e.g.,cd C:UsersYourUsernameJavaProjects). - Type the command:
javac HelloWorld.java - Press Enter.
- If successful, you will not see any output, but a new file named
HelloWorld.classwill be created in the same directory. If there are errors, they will be displayed here.
- Run the Program:
- In the same Command Prompt/PowerShell window, type the command:
java HelloWorld - Press Enter.
- You should see the output:
Hello, World! Java is installed!
- In the same Command Prompt/PowerShell window, type the command:
If you see this output, your Java installation is fully functional, and you’re ready to start developing or running Java applications!
Troubleshooting Common Java Installation Issues
Even with careful steps, you might encounter issues. Here are some common problems and their solutions:
'java' is not recognized as an internal or external command: This is the most frequent issue and indicates that thePathenvironment variable is not set correctly or hasn’t taken effect.- Solution: Double-check your
Pathvariable in “Environment Variables” to ensure%JAVA_HOME%bin(or the direct path to your JDK’sbinfolder) is present and correctly spelled. Also, ensure it’s high up in the list. Remember to restart your Command Prompt/PowerShell.
- Solution: Double-check your
'javac' is not recognized: Similar to the above, but specifically for developers. This means the JDK’sbindirectory isn’t on thePath, orJAVA_HOMEis incorrect if you used%JAVA_HOME%bin.- Solution: Verify both
JAVA_HOMEand thePathvariable, ensuring%JAVA_HOME%binis correctly added.
- Solution: Verify both
- Incorrect Java version shown after
java -version: You might have multiple Java installations, and your system is picking up an older one.- Solution: In the
Pathenvironment variable, ensure your desired Java installation’sbindirectory (%JAVA_HOME%bin) is listed before any other Java-related entries.
- Solution: In the
- Installer failed or installation corrupted:
- Solution: Download the installer again to rule out corruption during download. Temporarily disable antivirus software (if it’s overly aggressive) and try reinstalling.
- Environment variable changes not taking effect:
- Solution: Always restart your Command Prompt/PowerShell. If issues persist, a system reboot often resolves lingering environment variable caching problems.
Conclusion
Installing Java on Windows, while seemingly straightforward, involves a few critical steps that, when correctly followed, lay a robust foundation for all your Java-related endeavors. From understanding the core differences between the JRE and JDK to meticulously configuring environment variables and verifying your setup, you now possess a fully functional Java environment.
Whether you’re an aspiring developer eager to build your first application, a seasoned programmer needing to update your toolkit, or simply a user requiring Java for specific software, this guide empowers you with the knowledge and steps to get started. Java’s expansive ecosystem continues to drive innovation, and with your installation complete, you are now officially connected to one of the most enduring and powerful programming languages in the world. Continue to explore, learn, and build – the world of Java awaits!
aViewFromTheCave is a participant in the Amazon Services LLC Associates Program, an affiliate advertising program designed to provide a means for sites to earn advertising fees by advertising and linking to Amazon.com. Amazon, the Amazon logo, AmazonSupply, and the AmazonSupply logo are trademarks of Amazon.com, Inc. or its affiliates. As an Amazon Associate we earn affiliate commissions from qualifying purchases.