In an era defined by data, where high-resolution media, sprawling game libraries, and complex software applications demand ever-increasing storage, the need to upgrade or add a hard drive is a common scenario for many computer users. Whether you’re a content creator wrestling with large video files, a gamer needing more space for the latest AAA titles, or simply seeking to breathe new life into an aging machine, installing a new hard drive is a fundamental skill that can significantly enhance your computing experience. This comprehensive guide will walk you through the process, covering everything from initial preparations to post-installation software configuration, ensuring a smooth and successful upgrade for both desktop PCs and laptops.
Why Upgrade or Add a Hard Drive?
Before diving into the technicalities, it’s worth understanding the primary motivations behind installing a new hard drive. This isn’t just about adding more space; it’s about optimizing your system for performance, reliability, and future-proofing.
Expanding Storage Capacity
The most obvious reason to install a new drive is to overcome storage limitations. Modern operating systems, applications, and user files consume vast amounts of space. A new hard drive provides the necessary room for your growing digital life, allowing you to store more documents, photos, videos, games, and software without constantly managing precious gigabytes or terabytes. This is particularly crucial for creative professionals who work with large project files or anyone who prefers to keep their digital assets locally rather than solely relying on cloud storage.
Improving Performance
While a hard disk drive (HDD) provides economical mass storage, a solid-state drive (SSD) offers dramatically superior speed. If your computer still uses an HDD as its primary boot drive, upgrading to an SSD can revolutionize your system’s performance. Boot times will shrink from minutes to seconds, applications will load almost instantly, and overall system responsiveness will feel snappier. Even adding a secondary SSD for frequently accessed games or applications, while keeping an HDD for bulk storage, can significantly enhance your daily computing experience. M.2 NVMe SSDs, a newer form factor, push these speed boundaries even further, offering unparalleled data transfer rates.
Replacing a Failing Drive
Hard drives, like all electronic components, have a finite lifespan. A failing drive can manifest through slow performance, frequent crashes, strange noises, or corrupted files. Replacing a failing drive is not just an upgrade but a critical step in preserving your data and maintaining system stability. Proactive replacement can save you from the headache and potential data loss associated with a complete drive failure. It’s an essential maintenance task that ensures your system remains reliable and your valuable data secure.
Essential Preparations Before You Begin
A successful installation hinges on thorough preparation. Gathering the right tools, understanding compatibility, and prioritizing safety will make the process much smoother and prevent potential issues.
Gathering Your Tools
You won’t need an extensive toolkit, but a few basics are essential:
- Screwdrivers: A Phillips-head screwdriver is usually sufficient for most PC cases and laptop panels. Some components might require a Torx screwdriver, but it’s less common. Magnetic tips are a bonus for preventing dropped screws.
- Anti-static Wrist Strap: This is highly recommended to prevent electrostatic discharge (ESD) from damaging sensitive computer components. If you don’t have one, regularly touching a grounded metal object (like your PC case when it’s still plugged into the wall, but switched off) can help discharge static, though it’s not as effective.
- Zip Ties or Velcro Straps: Useful for cable management after installation, improving airflow and aesthetics inside the case.
- Headlamp or Flashlight: Computer cases and laptop interiors can be dark, and a light source will help you see connections and mounting points clearly.
- Small Container: For holding screws, ensuring they don’t get lost.
Understanding Drive Types and Compatibility
Before purchasing a new drive, it’s crucial to understand what your system supports:
- Form Factor:
- 2.5-inch Drives: Standard for SATA SSDs and smaller HDDs, commonly used in laptops and often adaptable to 3.5-inch desktop bays with an adapter.
- 3.5-inch Drives: Standard for desktop HDDs.
- M.2 Drives: A compact stick-like form factor for SSDs, plugged directly into a compatible motherboard slot. They come in various lengths (e.g., 2280 is common).
- Interface:
- SATA (Serial ATA): The most common interface for HDDs and 2.5-inch SSDs, connecting via a data cable and a power cable. SATA III offers speeds up to 6 Gbps.
- NVMe (Non-Volatile Memory Express): A protocol specifically designed for SSDs, leveraging the PCIe bus for significantly higher speeds than SATA. NVMe drives typically come in the M.2 form factor.
- Compatibility: Check your motherboard’s manual or your laptop’s specifications.
- Does your motherboard have spare SATA ports and power connectors?
- Does your motherboard have an M.2 slot? If so, does it support NVMe, SATA, or both? (Note: M.2 slots often support either NVMe or SATA M.2 SSDs, but not always both protocols in the same slot).
- Does your laptop have a spare 2.5-inch bay or an M.2 slot? Some ultrabooks only support M.2 drives.
Safety First: Static Electricity and Power
Working inside a computer carries risks if proper precautions aren’t taken.
- Power Down and Unplug: Always turn off your computer completely and disconnect it from the wall outlet. For laptops, remove the battery if possible (though often not user-removable in modern designs).
- Discharge Static Electricity: Wear an anti-static wrist strap connected to a grounded metal object. If you don’t have one, frequently touch an unpainted metal part of your computer’s chassis (while still plugged into the wall but switched off) before and during the installation process. This helps discharge static electricity that could otherwise damage sensitive components like RAM or the motherboard.
- Work in a Clean, Organized Area: A clutter-free workspace reduces the chance of losing screws or accidentally knocking over components. Avoid working on carpeted surfaces, which generate a lot of static.
Step-by-Step Installation Guides
The physical installation process differs slightly between desktops and laptops, and between different drive types. We’ll cover the most common scenarios.
Installing a Hard Drive in a Desktop PC
Desktop PCs generally offer more space and easier access, making installation relatively straightforward.
Opening the Desktop Case
- Disconnect Everything: Unplug all cables from the back of your PC (power, monitor, USB, Ethernet, etc.).
- Move to a Flat Surface: Place your PC on a stable, flat surface where you have plenty of room to work.
- Remove the Side Panel: Most cases have two thumb screws or regular screws at the back holding one or both side panels. Unscrew them, then slide the panel backward and lift it away. Identify which side panel gives you access to the drive bays and motherboard.
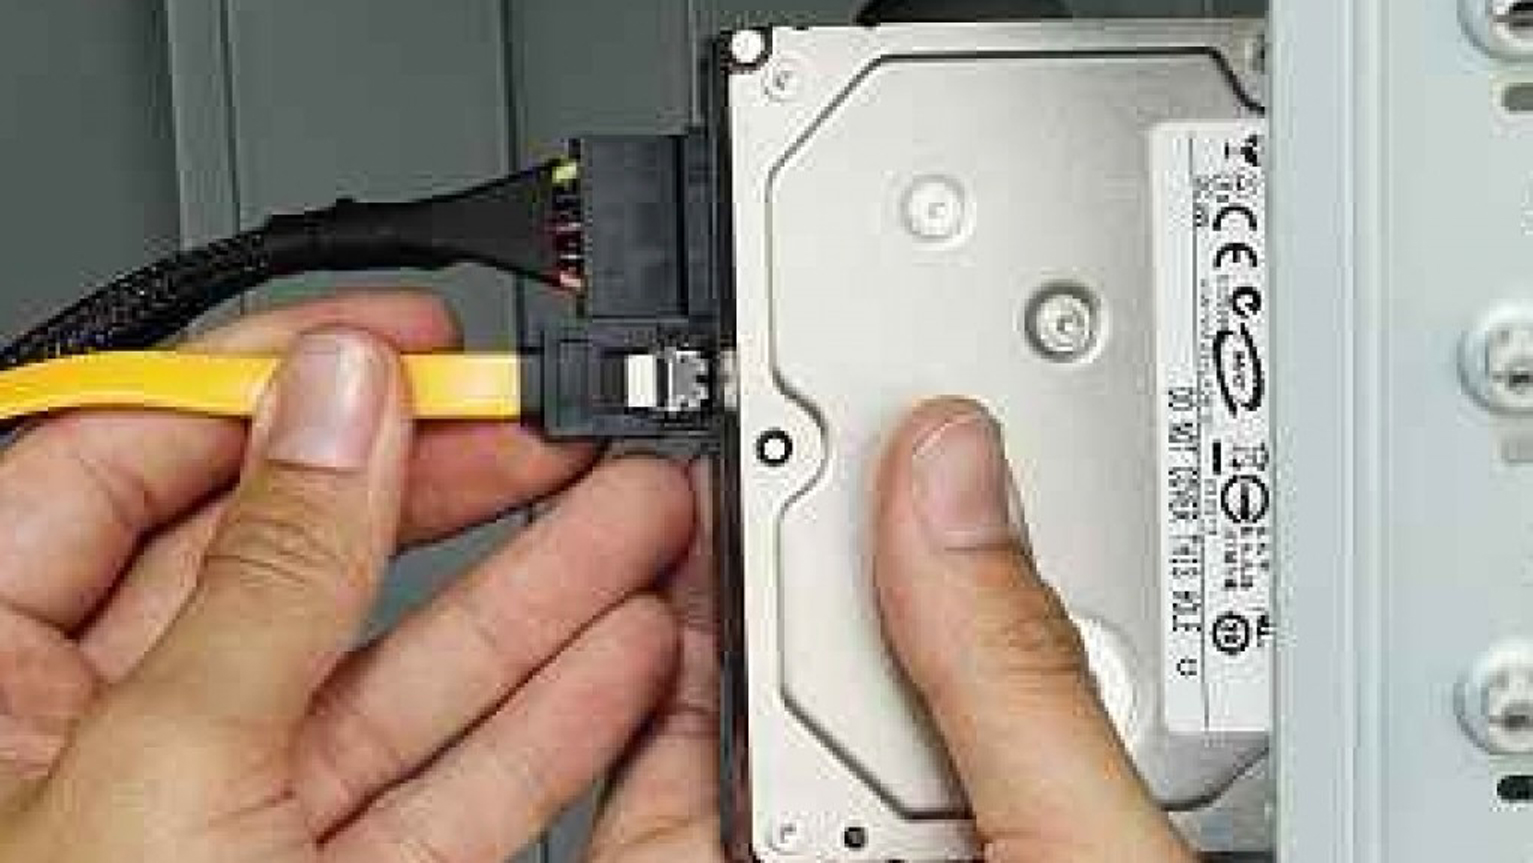
SATA SSD/HDD Installation
This applies to both 2.5-inch SSDs and 3.5-inch HDDs that use the SATA interface.
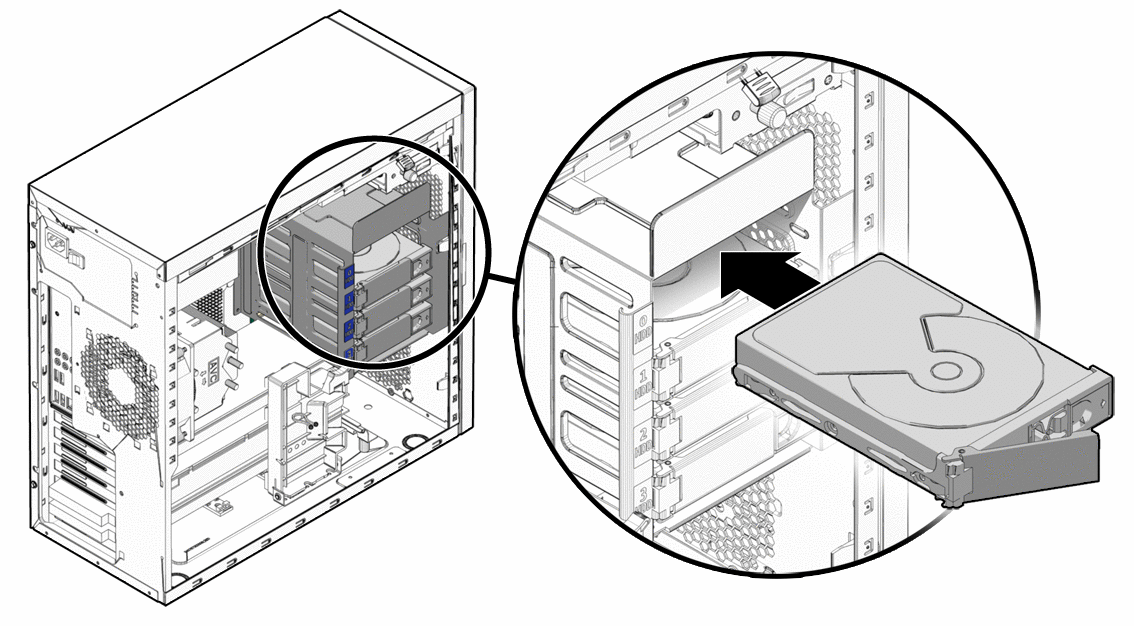
- Locate a Drive Bay: Desktop cases have dedicated drive bays. For 3.5-inch HDDs, use a 3.5-inch bay. For 2.5-inch SSDs, you might need a 2.5-inch adapter bracket to fit it into a 3.5-inch bay, or some cases have dedicated 2.5-inch mounts.
- Mount the Drive:
- Tool-less Bays: Many modern cases feature tool-less drive sleds or cages. Slide the drive into the sled and then slide the sled into the bay until it clicks into place.
- Screwed Bays: For older cases, slide the drive into the bay and secure it with screws through the side of the bay into the drive’s mounting holes.
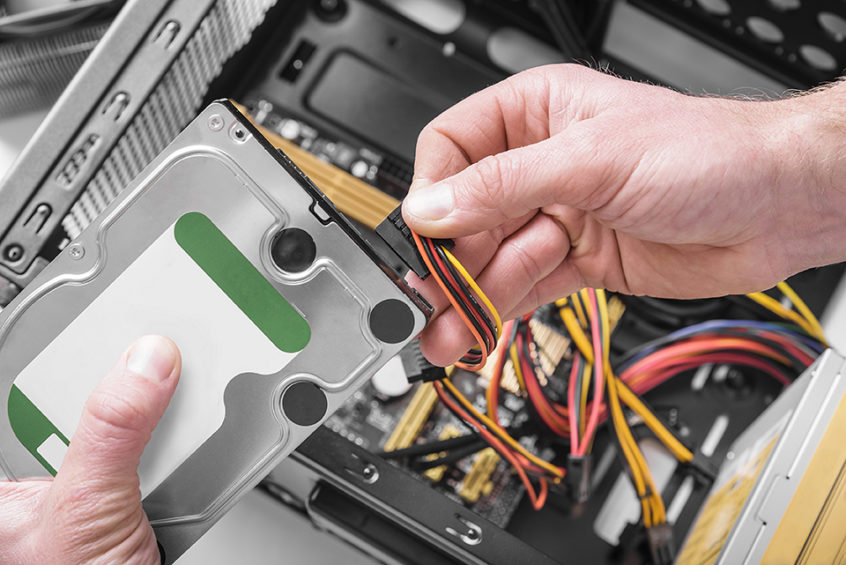
- Connect Data Cable: Plug one end of a SATA data cable (L-shaped connector) into the back of your new drive and the other end into an available SATA port on your motherboard. Motherboard SATA ports are usually grouped together and often labeled (e.g., SATA0, SATA1).
- Connect Power Cable: Plug an available SATA power connector (a wider, flatter L-shaped connector) from your power supply unit (PSU) into the back of the new drive. If you don’t have enough SATA power connectors, you might need a Molex-to-SATA power adapter, though it’s less common with modern PSUs.
M.2 NVMe SSD Installation
M.2 drives are directly mounted on the motherboard.
- Locate the M.2 Slot: Find the M.2 slot(s) on your motherboard. They are typically horizontal slots with a small screw stand-off at one end.
- Remove the Standoff Screw: Unscrew the small screw from the standoff at the end of the M.2 slot. This screw will secure the M.2 drive. (Some motherboards use a tool-less clip mechanism instead).
- Insert the M.2 Drive: Hold the M.2 SSD by its edges and carefully insert it into the M.2 slot at a slight angle (about 30 degrees). It should slide in smoothly.
- Secure the Drive: Gently push the M.2 drive down towards the motherboard. It should now be parallel with the board. Reinsert the small screw into the standoff to hold the drive firmly in place. If it’s a tool-less mechanism, simply click it into place.
- Heatsink (Optional but Recommended): If your motherboard or M.2 drive came with a heatsink, now is the time to install it. Peel off the protective film from the thermal pad (if present) and secure the heatsink over the M.2 drive according to its instructions. This helps prevent thermal throttling under heavy loads.
Reassembling the Desktop
- Cable Management: Neatly route your new SATA data and power cables to improve airflow and aesthetics. Use zip ties or Velcro straps if desired.
- Replace Side Panel: Carefully slide the side panel back into place and secure it with its screws.
- Reconnect Cables: Plug all external cables back into your PC.
Installing a Hard Drive in a Laptop
Laptop installations can be trickier due to tighter spaces and specific access panels, but the principles are similar.
Accessing the Laptop’s Drive Bay
- Power Down and Unplug: As with desktops, shut down, unplug the power adapter, and if possible, remove the main battery.
- Locate Access Panel: Most laptops have a dedicated access panel on the bottom for RAM, storage, or both. Consult your laptop’s manual for exact locations and removal instructions.
- Remove Screws and Panel: Unscrew the necessary screws (often Phillips-head) holding the access panel or the entire bottom chassis. Carefully pry open the panel using a plastic spudger or your fingernails, being mindful of any delicate clips. Some laptops require removing the entire bottom case.
2.5-inch SATA Drive Installation (for laptops)
This is common for older laptops or those with a dedicated 2.5-inch bay.
- Locate the Drive Bay: Find the existing 2.5-inch drive bay. It might already contain a drive you’re replacing, or it could be an empty secondary bay.
- Remove Old Drive (if applicable): If replacing, unscrew any mounting screws or brackets holding the old drive. Disconnect its SATA connector (it’s often a combined data and power connector). Remove the old drive.
- Transfer Caddy/Bracket: If your old drive was in a metal caddy or plastic bracket, carefully remove it and attach it to your new 2.5-inch drive. These brackets are crucial for securing the drive and often have rubber dampeners to reduce vibration.
- Insert New Drive: Slide your new drive (with its caddy/bracket) into the drive bay. Connect the SATA connector firmly.
- Secure the Drive: Screw the drive or its caddy back into place.
M.2 NVMe SSD Installation (for laptops)
Many modern thin and light laptops rely solely on M.2 SSDs.
- Locate the M.2 Slot: Find the M.2 slot on the motherboard, often near the battery or under other components. It will resemble the desktop M.2 slot, with a standoff and a screw.
- Remove the Standoff Screw: Unscrew the small screw from the standoff.
- Insert the M.2 Drive: Carefully insert the M.2 SSD into the slot at an angle.
- Secure the Drive: Gently push the M.2 drive down and secure it with the standoff screw.
Closing Up the Laptop
- Replace Access Panel/Bottom Case: Carefully align the access panel or bottom chassis and press it into place, ensuring all clips engage.
- Secure Screws: Replace all screws you removed.
- Reconnect Power: Reconnect the power adapter and reinsert the battery if it was removed.
Post-Installation Software Configuration
Physical installation is only half the battle. Once your new drive is in place, you need to prepare it for use within your operating system.
Initializing and Formatting Your New Drive
A brand-new hard drive needs to be initialized and formatted before your operating system can use it.
- Boot Up Your PC: Start your computer.
- Access Disk Management (Windows):
- Right-click the Start button and select “Disk Management.”
- A prompt for “Initialize Disk” should appear automatically for a new, uninitialized drive. If not, right-click the “Unknown,” “Not Initialized” disk.
- Choose your new drive (be very careful not to select your existing OS drive!).
- Select “MBR” (Master Boot Record) for drives up to 2TB, or “GPT” (GUID Partition Table) for drives larger than 2TB, or if you plan to use it as a boot drive in a UEFI system. GPT is generally recommended for modern systems.
- Click “OK.”
- Create a New Simple Volume (Windows):
- Once initialized, your drive will show as “Unallocated Space.”
- Right-click the unallocated space on your new drive and select “New Simple Volume.”
- Follow the New Simple Volume Wizard:
- Accept the default volume size (or specify if you want multiple partitions).
- Assign a drive letter.
- Choose a file system (NTFS for Windows is standard).
- Perform a “Quick Format” (a full format takes much longer).
- Give your drive a volume label (e.g., “Data Drive,” “Games”).
- Click “Finish.” Your new drive should now appear in “This PC” (or “My Computer”).
- Disk Utility (macOS):
- Connect the external drive (if it’s an external installation, otherwise proceed directly).
- Open “Applications” > “Utilities” > “Disk Utility.”
- Select your new drive from the sidebar.
- Click “Erase.”
- Choose a Name for the drive, Format (APFS for macOS High Sierra or later, Mac OS Extended (Journaled) for older versions), and Scheme (GUID Partition Map).
- Click “Erase” again.
Migrating Data or Installing an Operating System
If your new drive is intended to be your primary boot drive, you’ll need to either:
- Clone Your Existing OS: Use disk cloning software (e.g., Macrium Reflect Free, Clonezilla, or proprietary software from your SSD manufacturer) to copy your existing operating system and data from your old drive to the new one. This ensures you retain all your programs and settings. Remember to change the boot order in your BIOS/UEFI after cloning to boot from the new drive.
- Perform a Clean OS Installation: Install a fresh copy of Windows, macOS, or Linux onto the new drive. This is often recommended for optimal performance but requires reinstalling all your applications and transferring your personal files. You’ll need an OS installation media (USB drive or DVD) for this.
Troubleshooting Common Installation Issues
Even with careful preparation, issues can arise. Here are some common problems and their solutions.
Drive Not Detected
- Check Cables: Ensure all SATA data and power cables (or M.2 seating) are securely connected at both ends. A loose connection is the most frequent culprit.
- Check BIOS/UEFI: Enter your computer’s BIOS/UEFI settings (usually by pressing DEL, F2, F10, or F12 during startup). Look for a “Storage” or “SATA Configuration” section. Ensure the SATA port the drive is connected to is enabled. M.2 drives should also be detected here.
- Motherboard Drivers: Ensure your motherboard’s chipset drivers are up to date, especially for NVMe drives.
- Power Supply: Verify your PSU has enough wattage and available connectors.
- Faulty Drive/Port: Try connecting the drive to a different SATA port or testing it in another computer if possible. A faulty drive or motherboard port is rare but can happen.
Performance Problems
- SATA Mode: In your BIOS/UEFI, ensure the SATA mode is set to AHCI (Advanced Host Controller Interface) for SSDs. IDE mode will severely limit performance.
- TRIM Enabled (SSDs): For Windows, open Command Prompt as administrator and type
fsutil behavior query DisableDeleteNotify. If the result isDisableDeleteNotify = 0, TRIM is enabled. If it’s1, typefsutil behavior set DisableDeleteNotify 0to enable it. TRIM helps SSDs maintain performance over time. - NVMe Drivers: For NVMe drives, ensure you have the latest NVMe drivers installed from the drive manufacturer or your motherboard’s website.
- Heatsink (NVMe SSDs): If your NVMe SSD is getting hot, it might be throttling. Ensure a heatsink is properly installed, especially under sustained heavy loads.
Physical Installation Challenges
- Tight Spaces: Laptops and small form factor desktops can be cramped. Take your time, use adequate lighting, and consider using a plastic spudger for prying open panels gently.
- Lost Screws: Always use a small container to hold screws. If you lose one, don’t panic; often, an extra screw from an old component or a generic replacement can work, but it’s best to be careful.
- Static Shock: If you forgot your anti-static strap, touch a grounded metal object frequently. If you suspect an ESD event, observe for any immediate component failure, though often damage is latent.
Installing a hard drive is a rewarding DIY project that can significantly enhance your computing experience. By following these steps and taking the necessary precautions, you can confidently upgrade your system, boost performance, and expand your digital horizons. With your new drive humming along, you’re ready to tackle more projects, store more memories, and enjoy a smoother, faster computing journey.
aViewFromTheCave is a participant in the Amazon Services LLC Associates Program, an affiliate advertising program designed to provide a means for sites to earn advertising fees by advertising and linking to Amazon.com. Amazon, the Amazon logo, AmazonSupply, and the AmazonSupply logo are trademarks of Amazon.com, Inc. or its affiliates. As an Amazon Associate we earn affiliate commissions from qualifying purchases.